Samson 3274 Mounting And Operating Instructions
Electrohydraulic
Hide thumbs
Also See for 3274:
- Mounting and operating instructions (72 pages) ,
- Mounting and operating instructions (16 pages) ,
- Mounting and operating instructions (20 pages)

Subscribe to Our Youtube Channel
Related Manuals for Samson 3274


Summary of Contents for Samson 3274
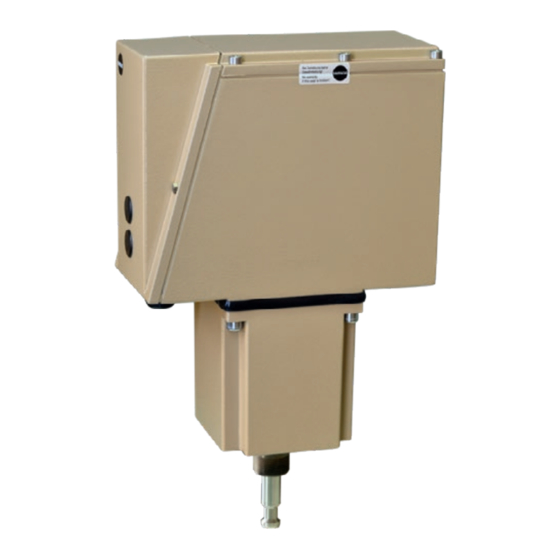
- Page 1 Type 3274 Electrohydraulic Actuator Mounting and Operating Instructions EB 8340 EN Edition October 2016...
- Page 2 Î For the safe and proper use of these instructions, read them carefully and keep them for later reference. Î If you have any questions about these instructions, contact SAMSON‘s After-sales Service Department (aftersalesservice@samson.de). The mounting and operating instructions for the devices are included in the scope of delivery.
-
Page 3: Table Of Contents
Contents General safety instructions ................4 Technical data ....................5 Design and principle of operation ..............7 Versions ......................7 Principle of operation ..................8 Accessories ....................8 3.3.1 Positioner ....................10 3.3.2 Position transmitter ..................10 3.3.3 Resistance transmitters ..................10 3.3.4 Mechanical limit contacts ................10 3.3.5 Priority circuit ....................10 3.3.6 Heating .......................10 Installation ....................11... -
Page 4: General Safety Instructions
General safety instructions 1 General safety instructions For your own safety, follow these instructions concerning the mounting, start-up, and opera- tion of the device: − The device is to be mounted, started up or operated only by trained and experienced personnel familiar with the product. -
Page 5: Technical Data
Technical data 2 Technical data Actuator Type 3274 Manual override Electric Mechanical Electric Fail-safe action Without Without With Direction of action: stem – – • retracts Direction of action: stem – – • • extends Rated travel 15 or 30 mm Transit time for rated travel 60 s with 15 mm travel ·... - Page 6 Actuator stem 1.4104 Hydraulic oil Special HLP, silicone-free Fine-wire fuses (see page 14) Î Contact SAMSON's After-sales Service department (aftersalesservice@samson.de) if you require them. Actuators with 120 s transit time at 30 mm travel Power supply Type of fine-wire fuse 230 V, 50/60 Hz T1L (1 A slow-acting)
-
Page 7: Design And Principle Of Operation
"actuator stem re- Testing according to DIN EN 14597 tracts" or "actuator stem extends" in the event of a power supply failure. The Type 3274-21 and Type 3274-23 Actu- ators are tested by the German technical 3.1 Versions surveillance association (TÜV) according to DIN EN 14597 in combination with various... -
Page 8: Principle Of Operation
Accessories equipped with one or two compression • • Positioner springs (5.7, 5.8). The motor in Types 3274- Position transmitter • • 11, -12, -15, -16 as well as -21 to -23 can • • • • • • • •... - Page 9 Design and principle of operation Actuator housing with oil reservoir Cylinder housing Terminal box Cylinder Piston Stem connector Actuator stem Compression spring Compression spring Motor Gear pump Check valve Pilot valve Fig. 1: Functional diagram EB 8340 EN...
-
Page 10: Positioner
Design and principle of operation 3.3.1 Positioner 3.3.5 Priority circuit The positioner compares the 0/4 to 20 mA The version with positioner is fitted with a or 0/2 to 10 V control signal issued by the priority circuit which is activated at terminals controller with the position of a potentiome- 82 and 83 (see section 7.1.1). -
Page 11: Installation
The actuator can be installed in any position. Restriction apply to actuators with mechanical override and/or integrated heating: see Fig. 2. Any mounting Restriction apply to actuators with position possible: mechanical override (Type 3274- 15/-16/-17/-18) and/or integrated heating: Fig. 2: Permissible/impermissible mounting positions of Type 3274 Actuator EB 8340 EN... -
Page 12: Assembling Valve And Actuator
5. Move the valve to the end position and Proceed as follows if the valve and actuator align the travel indicator scale (9.2) with have not been assembled by SAMSON, pro- the tip of the stem connector. ceed as follows (Fig. 3): Î... - Page 13 Installation Actuator Ring nut Actuator stem Stem connector Valve bonnet Travel indicator scale Stem connector nut Lock nut Plug stem Fig. 3: Mounting on the actuator EB 8340 EN...
-
Page 14: Electrical Connections
Electrical connections 5 Electrical connections How to proceed: Î Unscrew the side housing cover. Guide the cables through the cable glands on DANGER the housing to the terminals and connect Risk of electric shock. them (see Fig. 4 to Fig. 6 or circuit dia- −... - Page 15 Î A controller output which issues the eL and aL signals must only be supplied over terminal 81 (internal power supply of the Safety interlock circuit for actuator). Type 3274-2x (external wiring) Fig. 4: Electrical connection for three-step control EB 8340 EN...
- Page 16 (0)4...20 mA (0)4...20 mA White Jumper required with 0/2 to Green 10 V position feedback Brown (0)2...10V (0)2...10V Safety interlock circuit Input Output for Type 3274-2x control (position feedback) (external wiring) signal Fig. 5: Electrical connection for version with positioner EB 8340 EN...
- Page 17 0/2 to 10 V position feedback Controller (0)2...10V Safety interlock circuit Position feedback for Type 3274-2x (external wiring) Î A controller output which issues the eL and aL signals must only be supplied over terminal 81 (internal power supply of the actuator).
-
Page 18: Manual Operation Of Actuator
2. Firmly press down the release button un- til it engages (the red marking pin reap- Types 3274-11 to -14 and -22, -23 pears). The actuator stem can be retracted or ex- 3. Mount cover again and reconnect the tended by pressing one of the two pushbut- power supply. - Page 19 Manual operation of actuator Fuse Motor electronics Adjuster for version with positioner Gear segment Slide rod Release button Marking pin Isolating terminal Pushbutton (extend the actuator stem) 10 Pushbutton (retract the actuator stem) 11 Resistance transmitter 12 Limit contact(s) 13 Slider switch for version with positioner Isolating terminal Red marking pin...
-
Page 20: Version With Mechanical Override
Manual operation of actuator 6.2 Version with mechanical override 1. Press the black release button at the front of the housing. 2. Insert a hexagon wrench (width across flats 24) into the shaft end protruding from the housing to move the rack-and- pinion gear until the require actuator stem position has been reached. -
Page 21: Operation
Operation 7 Operation 7.1 Positioner The positioner ensures a predetermined assignment of the valve position to the input signal. The position feedback is provided as a current signal at terminals 31 and 32 and as a volt- age signal at terminals 32 and 33. Î... -
Page 22: Sw1: Priority Circuit
Operation The following functions can be adjusted with the slider switches SW1 to SW4: (see Table 2 for overview) Table 2: Meanings of the switch positions Priority operation for actuator stem retracts Priority operation for actuator stem extends Direction of action increasing/decreasing (<>) Direction of action increasing/increasing (>>) Position feedback signal 4 to 20 mA/2 to 10 V Position feedback signal 0 to 20 mA/0 to 10 V... -
Page 23: Calibrating The Positioner For Direction Of Action Increasing/ Increasing (>>) Or Increasing/Decreasing (<>)
Operation 7.1.4 Calibrating the positioner for direction of action increasing/ increasing (>>) or increasing/decreasing (<>) Settings for both directions of action: 1. Disconnect isolating terminal 81: Red marking pin Release button 2. Move the actuator stem to the lower end position. Actuators with electric override: press button (arrow symbol). - Page 24 Operation Calibration for direction of action increasing/increasing (>>): 6. Set slider switch SW2 to OFF. 7. Turn "Zero in" adjuster counterclockwise as far as it will go. Turn the "Span in" adjuster to the middle marking: Zero Span Span 8. Slowly turn the "Zero in" adjuster clockwise until the LED turns off. Turn it slightly further until the LED lights up again.
-
Page 25: Using The Positioner As A Position Transmitter
Operation Calibration for direction of action increasing/decreasing (<>): 14. Set slider switch SW2 to ON. 15. Turn "Zero in" adjuster clockwise as far as it will go: Zero Span Span 16. Set the input signal to 0 V or 0 mA. 17. Slowly turn the "Zero in" adjuster clockwise until the LED turns off. Turn it slightly further until the LED lights up again. -
Page 26: Calibrating The Position Transmitter
Operation 7.2 Calibrating the position transmitter 1. Mount the actuator onto the valve according to the mounting instructions. 2. Set the slider switches SW3 and SW4 depending on the required position feedback sig- nal: SW3 and SW4 to ON: 4 to 20 mA/2 to 10 V SW3 and SW4 to OFF: 0 to 20 mA/0 to 10 V 3. -
Page 27: Adjusting The Resistance Transmitters
Operation Note To reverse the characteristic, swap over the connecting wires (green and white) at the termi- nals eL and aL. 7.3 Adjusting the resistance transmitters The actuator can be equipped with two resistance transmitters at the maximum. Potentiometer P1 is required for internal position feedback in actuators with positioner or position transmit- ter. -
Page 28: Adjusting The Limit Contacts
Operation 7.4 Adjusting the limit contacts A limit contact consists of a changeover switch, which changes its switching position when a contact cam presses the switch downward. Turn the contact cam to continuously adjust the switching range over the travel range as required. Mechanical limit contact: 1. -
Page 29: Dimensions In Mm
Dimensions in mm 8 Dimensions in mm 8.1 Actuator with mechanical override ≥300 Ø11.5 M30 x 1.5 Ø16 EB 8340 EN... -
Page 30: Actuator With Electric Override
Dimensions in mm 8.2 Actuator with electric override ≥300 Ø11.5 M30 x 1.5 Ø16 EB 8340 EN... - Page 31 EB 8340 EN...
- Page 32 SAMSON AG · MESS- UND REGELTECHNIK Weismüllerstraße 3 · 60314 Frankfurt am Main, Germany Phone: +49 69 4009-0 · Fax: +49 69 4009-1507 EB 8340 EN samson@samson.de · www.samson.de...
Need help?
Do you have a question about the 3274 and is the answer not in the manual?
Questions and answers