Table of Contents
Advertisement
Quick Links
HVAC Meter
PCE-LD 1
380-00 JUN. 2007
PCE Americas Inc.
711 Commerce Way
Suite 8
Jupiter
FL-33458
USA
From outside US: +1
Tel: (561) 320-9162
Fax: (561) 320-9176
info@pce-americas.com
www.pce-instruments.com/english
www.pce-instruments.com
PCE Instruments UK Ltd.
Units 12/13
Southpoint Business Park
Ensign way
Hampshire / Southampton
United Kingdom, SO31 4RF
From outside UK: +44
Tel: (0) 2380 98703 0
Fax: (0) 2380 98703 9
info@pce-instruments.com
Advertisement
Table of Contents

Related Manuals for PCE Instruments PCE-LD 1


Summary of Contents for PCE Instruments PCE-LD 1
- Page 1 PCE Americas Inc. PCE Instruments UK Ltd. 711 Commerce Way Units 12/13 Suite 8 Southpoint Business Park Jupiter Ensign way FL-33458 Hampshire / Southampton United Kingdom, SO31 4RF From outside US: +1 From outside UK: +44 Tel: (561) 320-9162 Tel: (0) 2380 98703 0...
-
Page 2: Table Of Contents
CONTENT Page 1. GENERAL INFORMATION ------------------ 2. FEATURES ---------------------------------------- 3. SPECIFICATION --------------------------------- 4. OPERATION GUIDE --------------------------- 5. PART & CONTROL ------------------------------ 6. GETTING STARTED ---------------------------- 6-1 Installing Batteries---------------------------- 7 6-2 Automatic Circuit/Reset Feature--------- 8 6-3 Feature Sensitivity Adjustment---------- 9 7. OPERATING PROCEDURE ----------------- 8. -
Page 3: General Information
Refrigerant Leak Detector 1. GENERAL INFORMATION Thank you for purchasing Refrigerant Leak Detector. Read though the instruction manual before operation for correct and safe usage. Please store and retain this instruction manual for future reference. 2. FEATURES Refrigerant Leakage Detector is the perfect tool for maintaining the air-condition or a cooling system with compressor and Refrigerant. -
Page 4: Specification
Refrigerant Leak Detector 3. SPECIFICATION Detectable Gases: R-134a, R-404A, R-407C, R-410A, R-22 etc. Sensitivity: R-22.134a 6g/year 30g/year R-404A,407C,410A 8g/year 40g/year Alarm Method: Buzzer, Tricolor LED bar Indicator. Power Usage: 4 AA size (6V DC) Alkaline Batteries Snake Tube length: 390mm ( 15” ) Dimension / Weight: 173 x 66 x 56 mm ( approximately 400g ) Accessories:... -
Page 5: Operation Guide
Refrigerant Leak Detector Storage Temperature & Humidity: -10 ~60 °C, < 70% RH Altitude: < 2000M (6500’) 4. OPERATION GUIDE (1) The refrigerant leak detector unit is not equipped with anti-explosive designs and measures. Do not use this unit in the environment with the burnable gases. (2) There are some environmental condition that might cause the error reading: Pollutant places. -
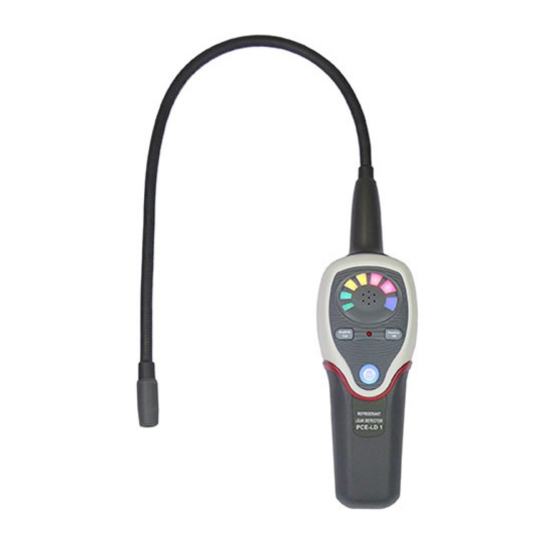
Page 6: Part & Control
Refrigerant Leak Detector 5. PART & CONTROL 5-1 Panel Description... - Page 7 Refrigerant Leak Detector Sensor Sensor Protector LED Leak Indicators Sensitivity Lo Button Sensitivity Hi Button Low Battery Indicator Power On/Off & Reset Button Battery Cover Battery Cover Screw 5-2 LED Leak Indicator Definition:...
-
Page 8: Getting Started
Refrigerant Leak Detector 6. GETTING STARTED 6-1 Installing Batteries Loose screw remove battery compartment door located on the bottom of the instrument As show below (Fig.1). Install 4 “AA” size alkaline batteries. Reinstall the battery cover by aligning it with the handle. -
Page 9: Automatic Circuit/Reset Feature
Refrigerant Leak Detector 6-2 Automatic Ambient Reset Feature The Refrigerant leak detectors feature an Automatic Ambient Reset function that sets the unit to ignore ambient concentrations of refrigerant. Automatic Ambient Setup - Upon initial power on, the unit automatically sets itself to ignore the level of refrigerant present at the tip. -
Page 10: Feature Sensitivity Adjustment
Refrigerant Leak Detector 6-3 Feature Sensitivity Adjustment The Instrument provides two levels of sensitivity. When the unit is switched on, it is set to the high sensitivity level. To change the sensitivity, press the key. When the key is pressed, the visual display will momentarily show the two left LED's (green) indicating Low Sensitivity level is selected. - Page 11 Refrigerant Leak Detector Press it once to turn on the Refrigerant leak detector, the display will illuminate with flash, for 1.5 minutes to heat up the sensor.. Press it again to reset the ambient base concentration. Press and hold this button for 5 second to turn OFF the power.
-
Page 12: Replacing New Sensor
Refrigerant Leak Detector then Orange LED then Red LED (highest concentration) as increasing of level indicate that the location is close to the source. When the Instrument signals a leakage, pull the probe away from the leak for a moment, then bring it back to pinpoint the location. -
Page 13: Cleaning
Refrigerant Leak Detector (1) Remove cone cap cover from the tip of snake tube. (2) Pull out old sensor and insert the new sensor into the plug ( see below fig.2). (3) Seal the cap cover over the plug. Sensor protector Sensor Fig.2 9.
Need help?
Do you have a question about the PCE-LD 1 and is the answer not in the manual?
Questions and answers