Table of Contents
Advertisement
Quick Links
ALI-NZ60 Series Camera System
Quick Installation Guide
This guide provides installation instructions for the following products:
Product SKU
Name
Base Station for ALI-NZ60 Series Mini IP Security
Cameras
ALI-NZ6012M
Add-on 2.1 Megapixel 1080p WDR Pinhole Tube
Mini IP Security Camera
ALI-NZ6022M
Add-on 2.1 Megapixel 1080p WDR Right Angle
Pinhole Mini IP Security Camera
ALI-NZ6032M
Add-on 2.1 Megapixel 1080p WDR Wide Angle
Tube Mini IP Security Camera
ALI-NZ6042HS
Add-on IP Height Strip Camera
The ALI-NZ60 series camera system features:
1/2.7" Progressive Scan CMOS
•
Up to 1920 x 1080 @ 30 fps for real-time output
•
IR cut filter with auto switch
•
Rotate mode, BLC, Defog and 120 dB WDR are supported
•
12 Vdc power supply or PoE supported
•
Built-in micro SD / SDHC / SDXC card slot, up to 128GB capacity (card not included)
•
Support for HLC, Defog
•
ALI-NZ60 Base Station
Status LEDs
Back panel
ALI-NZ60 Base Station module with Right Angle Pinhole Camera
Pinhole Tube Camera head (left, cable not shown) and Wide Angle Tube Camera (right)
For more information, refer to these documents available from your product vendor:
ALIBI™ Tools Utility Installation and User Manual
•
ALIBI™ IP Camera Firmware Version 5.3 (or later) User Manual
•
To install the ALI-NZ60 camera system:
Brackets and hardware is provided to mount the camera assembly flat on a surface, on a surface using the
tilt-mount bracket, or behind a surface (concealed) with camera visibility through a peep hole. The
ALI-NZ60 Base Station module can be secured to a surface, or supported by a hanger (hanger not
provided).
Make sure the device in the package is in good condition and all the assembly parts are included.
•
Check the products specification for the installation environment.
•
If the product does not function properly, please contact your provider. Do not disassemble the
•
camera for repair or maintenance by yourself.
Make sure that the mounting surface is strong enough to support at least three times the weight of
•
the camera or base station.
www.observint.com
1
Camera Type
--
1080P WDR 3.7 mm Right Angle Pinhole Camera
1080P WDR 2.8 mm Wide Angle Tube Camera
1080P WDR 3.7 mm Right Angle Pinhole Camera
Right Angle
Pinhole Camera Assembly
First install the install the ALI-NZ60 base station, install the add-on camera, and then configure the system.
Install the
ALI-NZ60 Base Station
(pg. 1)
Install the ALI-NZ60 Base Station
The ALI-NZ60 module can be anchored to a surface or set on a table or shelf. Ensure that it is positioned
where it can be reached by the cable attached to the camera head. The module should be installed in a
clean, low-dust location that is within the temperature and humidity specifications of the device. See the
Specifications section at the end of this document.
ALI-NZ60 Base Station includes the following:
ALI-NZ60 Base Station module
•
Base Station mounting bracket
•
Rail bracket
•
Mounting hardware
•
Base Station
Mounting
Bracket
ALI-NZ60 Base Station front panel: LAN / power / alarm connections
RESET button: To reset the device to the factory default settings, press and hold in the button while you
power on the base station for 10 seconds.
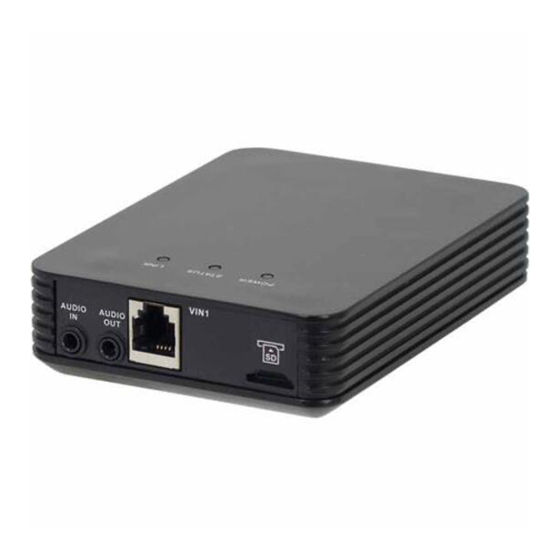
ALI-NZ60 Base Station back panel: camera / audio drop cable connectors , microSD card slot
To install the base station:
1.
Anchor the module on a surface:
Install your
Con gure the System
Add-on camera
(pg. 5)
pg. 1
pg. 2
pg. 3
pg. 3
pg. 4
pg. 5
pg. 5
Rail bracket
ALI-NZ60xx_CQ
Mounting
hardware
170720
Advertisement
Table of Contents

Related Manuals for ALIBI ALI-NZ60


Summary of Contents for ALIBI ALI-NZ60
-
Page 1: Table Of Contents
1080P WDR 3.7 mm Right Angle Pinhole Camera Install the ALI-NZ60 Base Station The ALI-NZ60 series camera system features: The ALI-NZ60 module can be anchored to a surface or set on a table or shelf. Ensure that it is positioned 1/2.7” Progressive Scan CMOS •... -
Page 2: Ali-Nz6012M
Attach the ALI-NZ60 module mounting bracket to the back of the module using the four If the device is NOT powered through the network cable (PoE), plug a 12 Vdc power source into the DC 12V connector on the front of the NZ60 module. Use a power source that is adequate for the screws provided. -
Page 3: Ali-Nz6022M Add-On Camera Installation
Push the cover onto the camera. The cover will snap into place. Tilt-mount Route the cable to the location where the ALI-NZ60 Base Station module will be located. bracket assembly Mounting the camera on a surface with the tilt-mount bracket... -
Page 4: Ali-Nz6042Hs Add-On Camera Installation
Plug the camera cable into the VIN1 connector of the ALI-NZ60 module. ALI-NZ6042HS Add-on Camera Installation Tilt-mount ALI-NZ6042HS add-on camera includes the following: bracket extension 1080P WDR 3.7 mm Right Angle Pinhole camera • Upper and lower end caps for height strip •... -
Page 5: Configure The System
Use the ALIBI™ IP Camera Firmware Version 5.3 User Manual to configure the device as needed. Route the camera drop cable to the ALI-NZ60 base station, and then plug it into the VIN1 connector. Specifications Adjust the pan angle of the camera as needed. It can point up to ± 15˚ from perpendicular to Camera the wall. - Page 6 12 Vdc ± 10% / PoE (802.3af) Power Consumption Max. 6.5 W ALI-NZ60 Base station: 3.07" × 4.13" × 1.26" (78 × 105 × 32 mm) Dimensions Height strip bracket: 2.39" × 1.5" × 34.80" (60.6 × 38.2 × 883.8 mm)
Need help?
Do you have a question about the ALI-NZ60 and is the answer not in the manual?
Questions and answers