Advertisement
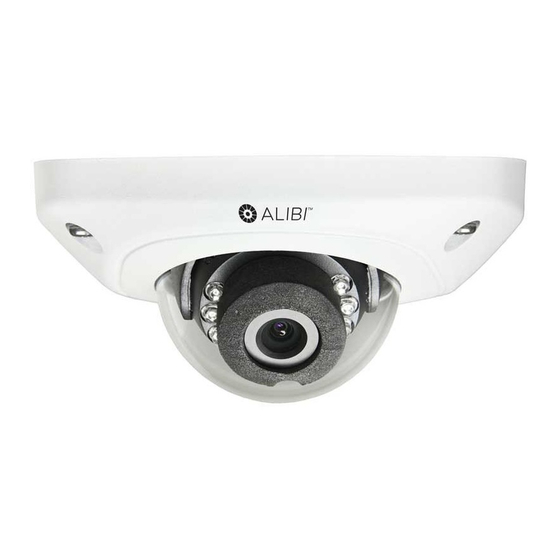
ALI-NS1024VR 4.0 Megapixel IR Mini Dome
IP Camera Quick Installation Guide
The ALIBI ALI-NS1024VR dome camera includes 4.0 megapixel video performance in a small form factor
network camera. The camera can be mounted directly to a ceiling, or onto a 3-gang box using the adapter
plate provided.
Features
4.0 Megapixel video
•
Up to 30 ft (10 m) IR
•
120dB WDR/3D DNR/BLC
•
Support on-board storage, up to 128GB
•
Built-in microphone
•
12 Vdc or Power over Ethernet (PoE)
•
Internal 3-axis adjustment
•
IP66 weather rated, IK08 impact resistant
•
Cover
screws (4)
For factory
use only
Lens
IR array
Pan adjust.
lock screw
Base assembly internal components
* To Reset the camera to its factory default state, hold down the button for 10 seconds while the camera is
powering on or rebooting.
www.observint.com
1
What's in the box
•
•
•
Cover
•
Microphone
•
port
•
•
•
Lens adjuster
MicroSD card slot
Camera
module
Tools you need
Microphone
To install the camera, you will need:
•
•
•
Hole for
mounting
screw
Step 1.
(1 of 2)
A MicroSD card installed in the provides local storage for video recordings, capture files, and log data. The
Reset button*
MicroSD card can hold as much as 128 GB of data. NOTE: If the camera is not managed by an NVR or other
video management system (VMS), and doesn't have a MicroSD card, video recordings, capture files, and
Base assembly
log data are not saved.
1. Remove the camera cover. Use the L-wrench to unscrew the four captive screws that secure the cover
Terminals identity label
Alarm in/out and audio out terminals
Camera drop cable connectors
Camera assembly
Drill template
Lens Adjuster (for camera module)
Torx™ L- wrench
Alibi Discover tool and documentation CD
Mounting hardware (screws and wall inserts (3 each))
Adapter plate
This manual
Torx
L-wrench
Alibi Discover tool and
Documentation CD
Adapter plate
12 Vdc power source. See Specifications for voltage and wattage requirements.
Tools and additional fasteners (may be required) for mounting the camera
Ethernet and power extension cables
Insert MicroSD card into the camera
to the base assembly, and then separate it from the base assembly. At this time, do not remove the
plastic film that protects the clear plastic dome.
Ethernet connector
Power Connector
Weatherproof fitting
for Ethernet cable
Mounting hardware
ALI-NS1024VR_CQ
10/9/15
Advertisement
Table of Contents

Related Manuals for ALIBI ALI-NS1024VR


Summary of Contents for ALIBI ALI-NS1024VR
- Page 1 Ethernet connector IP Camera Quick Installation Guide The ALIBI ALI-NS1024VR dome camera includes 4.0 megapixel video performance in a small form factor network camera. The camera can be mounted directly to a ceiling, or onto a 3-gang box using the adapter plate provided.
-
Page 2: Step 2. Install The Camera
During installation: Cover (captive) screw (4) Camera Lens: Handle the camera carefully to prevent scratching or soiling the lens. If the lens or IR • array shield becomes soiled, clean it only with approved products. See the section. Cleaning Camera drop cable: The camera drop cable splits into three separate cables. •... - Page 3 2. On the CD, find the folder that contains the Alibi Power Tools (Alibi Tools Utility). 3. Install Alibi Power Tools. Refer to the ALIBI™ Power Tools Installation and User Manual also provided on the CD. When the program opens, the following screen appears.
-
Page 4: Step 4. Login To The Camera
6. Close the Alibi Tools Utility by clicking the Close icon ( ) in the upper-right corner of the screen. 5. If this login is the first login to an Alibi camera from your computer and browser, continue with the Step 4. -
Page 5: Logout Button
Live View options Screen select tabs Live View image Logout button Capture, Record, Enable e-PTZ icons Observe the Live View screen to adjust the direction of the camera. Some computer security software may attempt to block you from running WebComponents.exe. If necessary, open the Internet Explorer downloads list, right click on the WebComponents.exe file name, 1. -
Page 6: Specifications
Configurable parameters include: Switch Day and Night: Select either Auto-Switch or Scheduled-Switch. • If using Auto-Switch, open the Day/Night Switch submenu to set the Sensitivity, Filtering — Time, and Smart IR features ON or OFF. If using Scheduled Switch, set the Start Time and End Time of the switch, and then open —... - Page 7 Bit Rate 32 kbps ~ 16 Mbps Bit Rate Mode CBR, VBR Audio Audio Streaming Two-way Audio Compression Format 64 Kbps (G.711) / 16 Kbps (G.726) / MP2L2 Microphone Built-in Features Motion Detection Support, Zone Configurable Backlight Compensation Support, Zone Configurable Event Notification Alarm Output, Email, FTP Privacy Mask...
Need help?
Do you have a question about the ALI-NS1024VR and is the answer not in the manual?
Questions and answers