Advertisement
Table of Contents
Advertisement
Table of Contents

Related Manuals for Gogen IR 167 BT B/W


Summary of Contents for Gogen IR 167 BT B/W
- Page 1 IR 167 BT B/W INTERNET RADIO WITH FM AND BLUETOOTH USER MANUAL...
-
Page 2: Before Started
IMPORTANT: Please read before using and retain for future reference. IMPORTANT NOTES INTRODUCTION • Thank you for buying our product. • Please read through these operating instructions, so you will know how to operate your equipment properly. After you finished reading the instructions manual, put it away in a safe place for future reference. -
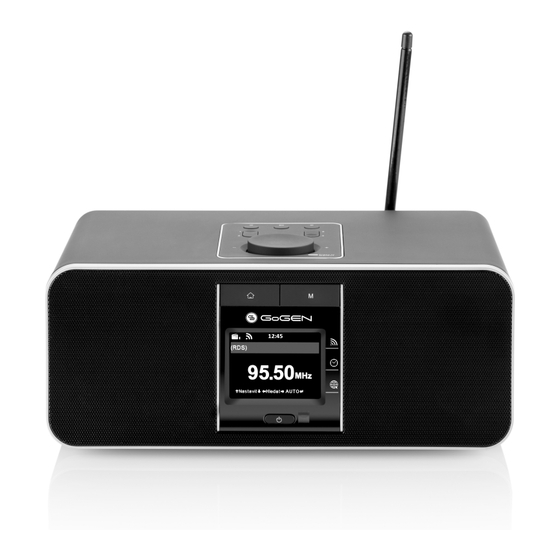
Page 3: Appearance And Key Description
2. APPEARANCE AND KEY DESCRIPTION Front View 1. Button Press to return to the main menu 2. M button Switch between audio sources 3. 2.4” TFT full color display Power on/Standby button 5. Remote Sensor Top View 6. < Left cursor / Previous button Play/Pause button 8. - Page 4 11. Volume/Navigate + OK dial Adjust volume; Cursor up/down; Confirm selection Back View 12. USB port for charging (5 V,1 A) 13. 3.5 mm Earphone Jack 14. AC Socket 15. Telescopic Antenna Remote Control Mute button Power on/Standby button 3. Button Press to return to the main menu.
-
Page 5: Getting Started
Remember to pull out the clear plastic tab from the battery compartment before using the remote. To remove the battery from the remote, use your thumb to pull out the battery tray. Replace it with a AA type battery. Caution: Risk of explosion of battery is replaced by an incorrect type. Dispose of used batteries according to the instructions. - Page 6 • Select Yes to establish connection to the network. • Select Yes(WPS)(only for WPS routers). Then press the WPS button on your router. • Select No if you would prefer to listen to a terrestrial station or to use the speaker with an external playback device.
- Page 7 The number of bars in the wireless symbol in front of the network name (SSID) shows the relative signal strength of the network. The key symbol indicated that the network is password-protected. If the device does not find any wireless networks, no wireless Networks Found appears on the display.
- Page 8 J K L j k l M N O m n o P Q R S p q r s T U V t u v W X Y Z w x y z Alternatively, you can enter the numbers and letter using only the cursor buttons: Go to previous entry space, entry can be overwritten Go to next entry space, the last entry is saved Select number / letter...
-
Page 9: Airmusic Control App
• If you have setup a network connection, and use IR167BT again within the network, it will automatically establish the connection. In case you desire to change the network, enter configuration to setup the corresponding connection. • Use the letter keys to input numbers/letters. Once you are on the letter you want, press to the next entry. -
Page 10: Internet Radio
To activate your own station list, follow the steps below: 1. Access http://www.mediayou.net. 2. Join my mediaU membership 3. Login to the website 4. Enter the wireless MAC address of IR167BT to the mediaU website.This information can be obtained in Information Center > System Information > Wireless Info 5. - Page 11 If the selected station has been saved, you can’t save it again. Under the preset station list, move to your station, press OK to listen. You may also press enter its submenu to Delete, Shift Up, Shift Down along the list, Rename or Play. 5.2.2 Radio Station/Music Stations are categorized into Global Top 20, Genre, Country/Location and Highlight.
-
Page 12: Media Center
5.3 MEDIA CENTER 5.3.1 UPnP If you have set up shared media, you should see the shared media from UpnP. If you have more than one computer sharing media, the alternatives are listed. Select the shared media you want to play. Press on the remote control to play previous/next music track. -
Page 13: Information Center
Press / to search for FM stations. The frequency display starts to run up as IR167BT scans the FM band. It stops when it has received a station. You may press on the remote control to tune station manually. Each step moves 0.05 MHz. Press and hold the PRESET on the remote control and device to save the station. - Page 14 5.5.2 Financial Information View the stock index from around the world. 5.5.3 System Information Check out the version of the system, and the details of connected network. 5.6 BLUETOOTH • Press M button on the IR167BT or /MODE button on the remote control until the display shows Bluetooth or select Bluetooth in the main menu, then you can hear the sound “pairing”...
- Page 15 5.7.1 Time Display You may choose the standby display with Analog or Digital. 5.7.2 Manage my mediaU When it is enabled, My mediaU will be shown on the main menu. If various mediaU accounts exist in the IR167BT, select the default login account in here. Refer to 5.3 for more information of mediaU account setup.
- Page 16 Enter WEP or WPA/WPA 2 code to connect the WiFi. If it is accidentally pressed to move a redundant entry, press to correct. 5.7.3.2 Wiress Network (WPS PBC) If you are using a router with WPS/QSS button, you may set up the network connection simple via WPS function.
- Page 17 5.7.4 Date & Time • Setup the date and time • Set time format display as 12 Hour or 24 Hour (default). • Set date format in the positions of YY (year), MM (month) and DD (day) – YY/MM/DD, DD/ MM/YY (default) or MM/DD/YY.
- Page 18 During alarm, press any key to enter snooze mode. It will alarm again in 5 minutes. Press the STANDBY key to stop the alarm. 5.7.6 Timer Press on the remote control to setup the timer, then press OK to confirm. 5.7.7 Language Select the OSD language: English, German, Spain, French, Portuguese, Dutch, Italian, Russian, Swedish, Norwegian, Danish and so on.
- Page 19 5.7.9 Display You may choose to set the display in Color or Monochrome. 5.7.10 Power Management Choose the power management timer (5/15/30mins) to set the duration of the radio to switch to the standby mode automatically when no network connection is available. Choose “Turn Off”...
- Page 20 5.7.13 Weather IR167BT is able to display current weather information under standby mode. Turn on Standby Display and set Temperature Unit (°C or °F) to get the weather displayed at the standby mode. When it is turned on, the display will switch between time and weather while being in standby mode.
- Page 21 Select the playback mode of media center – Off (no repeat or shuffle), Repeat all, Repeat one or Shuffle. 5.7.17 DLNA Setup The default device name for DLNA is AirMusic. You may rename it for DLNA setup on the PC or mobile.
-
Page 22: Local Radio
After IR167BT is reset, the system will move to Language setting menu. And it will automatically turn to Network setting menu once the OSD language is elected. 5.8 LOCAL RADIO There is a shortcut Local Radio under Internet Radio so that you can easily go to the station list of your location. - Page 23 You may also enjoy the streaming music from other music server, such as smart phone (Android platform): - Connect the mobile to the network - Search and install media sharing apps from Google Play. - Add the audio files from your mobile you want to share. •...
-
Page 24: Troubleshooting
Procedures for playing shared music on the app are as follow: Select IR167BT as the player. Some apps may allow to play the music to multi players at the same time. Select music server and choose the music. Some apps can create a playlist if you choose several music. - Page 25 Hiss in FM 1. Check/move the FM antenna. mode. 2. Move the radio. Alarm does not 1. Switch on the alarm. work. 2. Due to the volume setting, refer to the solutions of “No sound”. 3. The source of alarm was set to be station but there is no network connection. Change the source of alarm or reconfigure the connection.
- Page 26 ETA Inc. hereby declares that the product IR167BT is in compliance with requirements and other relevant provisions of the R&TTE directive 1999/5/EC. The complete Declaration of Conformity can be found at http://www.gogen.cz/declaration_of_conformity TO AVOID DANGER OF SUFFOCATION, KEEP THIS PLASTIC BAG AWAY FROM BABIES AND CHILDREN.
- Page 28 EN - 28...
Need help?
Do you have a question about the IR 167 BT B/W and is the answer not in the manual?
Questions and answers