Table of Contents
Advertisement
Available languages
Available languages
Quick Links
Advertisement
Chapters
Table of Contents

Related Manuals for Flow Fitness RUNNER DTM600


Summary of Contents for Flow Fitness RUNNER DTM600
- Page 1 Gebruiksaanwijzing / Manual www.flowfitness.nl...
- Page 2 Alle rechten voorbehouden. Niets uit deze gebruiksaanwijzing mag worden gebruikt of gereproduceerd in welke vorm of op welke wijze dan ook zondervoorgaande schriftelijke toestemming van Flow Fitness B.V. All rights reserved. Nothing in this instruction manual may be used or reproduced in any form or way without...
-
Page 3: Table Of Contents
Inhoud 1. Belangrijke informatie 1.1 Gezondheid 1.2 Veiligheid 2. Introductie 2.1 Inhoud verpakking 2.2 Belangrijke onderdelen 2.3 Specificaties 3. Fitness 3.1 Trainen op hartslag 3.2 Warming up & cooling down 4. Gebruik 4.1 Montage 4.2 Opbergen/ in gebruik nemen 4.3 Gebruik computer 4.4 Onderhoud 5. -
Page 4: Belangrijke Informatie
1. Belangrijke informatie 1.1 Gezondheid Belangrijk: lees eerst deze handleiding en volg de instructies nauwkeurig op voordat u het product gaat gebruiken. · Raadpleeg een deskundige om het trainingsniveau te bepalen dat voor u het beste geschikt is. · Indien u tijdens het trainen last krijgt van duizeligheid, misselijkheid of ander lichamelijk ongemak, stop dan direct met trainen en raadpleeg een arts. - Page 5 Laat uw conditie controleren door een arts voordat u begint met trainen. Dit is extra belangrijk voor personen ouder dan 35 jaar of personen met gezondheidsproblemen. Lees alle instructies voor gebruik. Flow Fitness is niet verantwoordelijkheid voor per- soonlijk letsel of schade aan bezittingen veroorzaakt door gebruik van dit product.
-
Page 6: Introductie
2. Introductie Dank u voor de aanschaf van de Flow Fitness Runner DTM600 loopband. Met de Runner DTM600 loopband heeft u een hoogwaardig trainingsapparaat in huis gehaald. Met de Runner DTM600 loopband heeft u de mogelijkheid om 9 verschillende training- sprogramma’s in te stellen om zo gevarieerde trainingen te kunnen volgen. - Page 7 2. Introductie 5: Inbusbout 6: Brogmoer 20: Inbus bout 19: Ring 10: Inbusbout M10 X 60L (2x) M10 X 10t (2x) M8 X 15L (4pcs) M8 (4pcs) M8 X 70L (4pcs) 15: Schroef 18: Schroef Inbussleutel 6mm Inbussleutel 5mm Multitool Schroevendraaier #8 X 5/8”L (2pcs) #8 X 3/4”L (2pcs)
-
Page 8: Belangrijke Onderdelen
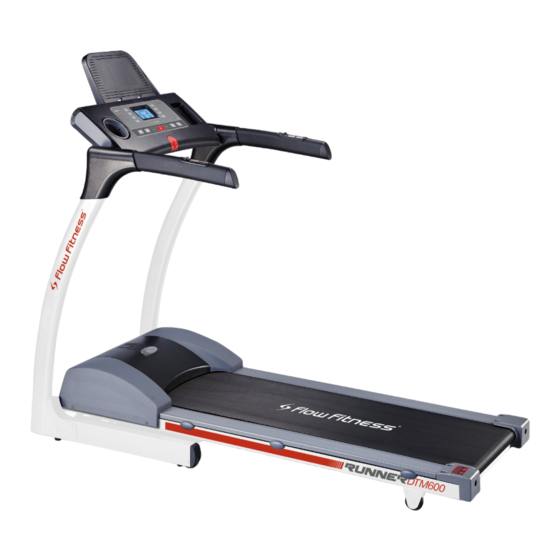
2. Introductie 2.2 Belangrijke onderdelen sneltoetsen snelheid sneltoetsen helling telefoon / MP3 speler houder computer aansluiting veiligheidskoord bidon houder Handvat snelheidregelaar handvat handvat hellingshoekregelaar hand hartslagmeter motorkap loopvlak... -
Page 9: Specificaties
2. Introductie 2.3 Specificaties Computer Techniek • 1 handmatig programma • Motor 1,7 PK continuous • 6 voorgeprogrammeerde programma’s • Hoekverstelling 0 - 12% (0-12 niveaus) • 1 hartslag gestuurde programma • Snelheid 1 - 16 km/u • 1 gebruikersprogramma’s •... -
Page 10: Fitness
3. Fitness Wat is fitness? In het algemeen is een fitnessoefening te omschrijven als een activiteit die er voor zorgt dat uw hart meer zuurstof via het bloed van uw longen naar uw spieren pompt. Hoe zwaarder de training, hoe meer brandstof (zuurstof) de spieren nodig hebben en hoe harder het hart moet werken om zuurstofrijk bloed naar de spieren te pompen. - Page 11 3. Fitness De beste manier om te beginnen met trainen is per persoon verschillend. Als u ongetraind bent of overgewicht heeft, moet u rustig aan beginnen en uw trainingsarbeid geleidelijk opvoeren. In het laatste hoofdstuk van deze gebruiksaanwijzing (zie: 5.Algemene informatie) staan verschillende trainingsschema’s weergeven.
-
Page 12: Warming Up & Cooling Down
3. Fitness 3.2 Warming up en cooling down Een goed trainingsprogramma begint met een warming up en eindigt met een cooling down. Hiermee kunnen spierpijn en blessures worden voorkomen. Hieronder vindt u een aantal geschikte oefeningen. Head Roll Kantel uw hoofd naar rechts. Hou dit één tel vast, zodat u de linkerkant van uw nek licht voelt trekken. -
Page 13: Gebruik
4. Gebruik 4.1 Montage Stap 1: Monteren van de displaybuizen. In dit hoofdstuk wordt beschreven hoe de loopband gemonteerd dient te worden. Haal alle onderdelen uit de doos en zorg dat er voldoende ruimte beschikbaar is om de loopband te monteren. - Page 14 4. Gebruik Stap 2: Bevestigen van de computer 1. Verbind de displaykabels (7A) en (7B) met elkaar in de rechter voorbuis (4). (Fig 3). 2. Plaats de computer (9) inclusief de handvaten op de 2 voorbuizen (3) en (4). 3. Bevestig de computer (9) met de 4 inbusbouten (10) en de 4 M8 ringen per buis. Let hierbij op dat er geen bedrading klem zit tussen de metalen onderdelen.
- Page 15 4. Gebruik Stap 4: Bevestigen handvatkappen 1. Plaats de handvatkap links boven (13) zoals aangegeven in Fig. 5. 2. Plaats de handvatkap links onder (14) tegen de handvatkap boven (13) aan, zodat: a) de vergrendelingspinnen (B in Fig. 6) op de juiste positie zitten. b) de kunstof pinnen (A in Fig.
- Page 16 4. Gebruik Stap 5: Plaatsen van iPadhouder 1. Plaats de twee iPadhouder steunen (22) aan de achterkant van de computer en schroef ze vast met de 4 bouten (23). (Fig. 7) 2. Schuif de iPadhouder (21) over de steunen (22) en monteer deze met behulp van de 4 bouten (24).
-
Page 17: Opbergen/ In Gebruik Nemen
4. Gebruik 4.2 Opbergen / in gebruik nemen Inklappen U kunt de loopband na gebruik inklappen. Til het loopvlak aan de achterzijde op, totdat deze vastklikt. Zorg er voor dat het loopvlak vergren- deld is, voordat u het weer loslaat. Door de loopband in ingeklapte positie naar u toe te trekken, kantelt het op de transportwielen. - Page 18 4. Gebruik Stroomvoorziening Voordat u kunt beginnen met trainen dient u de loopband van stroom te voorzien. Zorg dat de stekker van het netsnoer in het stopcontact zit en dat de aan/uit knop op “I” staat. De aan/uit knop bevindt zich aan de voorkant van het hoofdframe. Het is belangrijk voor uw veiligheid dat het netsnoer in een geaard stopcontact wordt gebruikt! Veiligheidskoord...
-
Page 19: Gebruik Computer
4. Gebruik 4.2 Gebruik computer 4.3 Gebruik computer Cardio Control DTM600 Designed by Flow Fitness Remove safety key when not in use and store out of reach of children. To avoid injury please follow instructions below before starting treadmill. 1. Attach clip of safety key to clothing 2. - Page 20 4. Gebruik Het eerste gebruik Zet de loopband aan door de aan/uit schakelaar achter op de motorkap op “I” te zetten.Plaats vervolgens de sleutel van het veiligheidskoord aan de voorkant van de computer in de daar- voor aangebrachte uitsparing. Bevestig het andere uiteinde aan uw kleren. U bent nu klaar om te trainen.
- Page 21 4. Gebruik Zelf in te stellen programma Het is ook mogelijk om een eigen trainingsprogramma samen te stellen. Doorloop daarvoor de volgende stappen. 1. Selecteer met behulp van de INCLINE of de SPEED toetsen programma U en druk op de MODE toets om de selectie te bevestigen. 2.
- Page 22 Hartslagband (niet bij geleverd) Voor het trainen op hartslag adviseert Flow Fitness om een hartslagband te gebruiken. Hiermee krijgt u een accurate meting van de hartslag en kunt u op efficiente wijze uw doel bereiken. De hartslagband wordt niet standaard geleverd bij de Runner DTM600...
-
Page 23: Onderhoud
4. Gebruik 4.4 Onderhoud Loopband spannen en centreren In de eerste weken dat u de loopband gebruikt, kan het voorkomen dat u het loopvlak opnieuw moet centreren. Dit kan als u bijvoorbeeld meer met uw linkervoet afzet dan uw rechter. Zorg dat de loopband met een snelheid tussen de 3 en 5 km/u draait. - Page 24 Zorg er echter wel voor dat alle on- derdelen goed droog zijn, voordat deze weer worden gebruikt. Flow Fitness adviseert om eens in de zes weken de bouten en moeren van de loopband te controleren en indien nodig aan te draaien. Gebruik hiervoor het bij het product geleverde gereedschap.
-
Page 26: Algemene Informatie
5. Algemene informatie 5.1 trainingsschema’s Introductie trainingsschema. Trainingsschema week 1 en 2 Train op 60% van uw maximale hartslag. Maximaal 3 keer per week. Warming up 5 - 10 minuten. Train 4 minuten. Rust 1 minuut. Train 2 minuten. 1 minuut rustig bewegen. Cooling down 5 minuten. - Page 27 5. Algemene informatie Trainingsschema week 5 en 6 Train op 60% van uw maximale hartslag (programma 7). Maximaal 5 keer per week. Warming up 5 - 10 minuten. Train 6 minuten. Rust 1 minuut. Train 4 minuten. 3 minuut rustig bewegen. Cooling down 5 minuten.
- Page 28 5. Algemene informatie Trainingsschema om conditie te verbeteren (vervolg op introductie trainingsschema) Trainingsschema week 7 en 8 Train op 85% van uw maximale hartslag. Maximaal 6 keer per week. Warming up 5 - 10 minuten. Train 7 minuten. Rust 1 minuut. Train 5 minuten.
- Page 29 5. Algemene informatie Trainingsschema om gewicht te verliezen (vervolg op introductie trainingsschema) Trainingsschema week 7 en 8 Train op 60% van uw maximale hartslag. Maximaal 6 keer per week. Warming up 5 - 10 minuten. Train 7 minuten. Rust 1 minuut. Train 5 minuten.
-
Page 30: Exploded View En Onderdelenlijst
5. Algemene informatie 5.2 Exploded view... - Page 31 5. Algemene informatie Belangrijkste onderdelen Frame voor Transportwieltje Frame achter Voorbuis Handvaten set Plastic kappen set Hellinkshoek motor 220V Gasveer Roller set Aandrijfmotor Aandrijfriem Speed sensor Motor controller board Computer display Sticker Veiligheids sleutel Display kabel set Loopplank Loopband Zij strip Motor kap Achterkap Stroomkabel 220V...
-
Page 32: Problemen Oplossen
5. Algemene informatie 5.3 Problemen oplossen Probleem: De computer gaat niet aan - controleer of stekker in een geaard stopcontact zit. Oplossing: - controleer of schakelaar op O of I staat. De schakelaar zit bij de uitgang van het netsnoer achterop de motorkap. - controleer de zekering bij de schakelaar. - Page 33 5. Algemene informatie Probleem: Computer geeft fout code E2 Geheugenchip van de computer is beschadigd. Neem contact op Oplossing: met uw dealer. Computer geeft fout code E4 of registreert geen hartslag. Probleem: Oplossing: - Indien u gebruik maakt van de handsensoren zorg voor schone handen en houd de sensoren stevig vast.
-
Page 34: Garantie
Indien nodig neemt de dealer contact op met Flow Fitness. Vervolgens zal Flow Fitness in samen- werking met de dealer het defect naar eigen inzicht verhelpen. Indien het defect binnen het garantietermijn valt, zal dit kosteloos gebeuren. - Page 35 Content 1. Important information 1.1 Health 1.2 Safety 2. Introduction 2.1 Contents of package 2.2 Important parts 2.3 Specifications 3. Fitness 3.1 Training by hart rate 3.2 Warming up & cooling down 4. Use 4.1 Assembly 4.2 Storage / usage 4.3 Use of the console 4.4 Maintenance 5.
-
Page 36: Important Information
1. Important information 1.1 Health Important: read this instruction manual first and follow the instructions carefully before using the product. · Consult an expert to determine the training level that is most suitable for you. · If you experience any dizziness, nausea or any other physical discomfort while training, cease the training immediately and consult a physician. - Page 37 This is particularly important for persons over 35 years old or persons who have any problems with their health. Read all instructions before using the equipment. Flow Fitness is not responsible for any personal injury or damage to property caused by the use of this equipment.
-
Page 38: Introduction
DTM600 treadmill you have purchased a high quality training machine. With the Runner DTM600 treadmill you can have varied work outs due to the 9 different training programs. The speed can be set from 0 to 16 km/h, the incline can vary between 0% and 12%. - Page 39 2. Introduction 5: Allen bolt 6: Self locking nut 20: Allen bolt 19: Washer 10: Allen bolt M10 X 60L (2x) M10 X 10t (2x) M8 X 15L (4pcs) M8 (4pcs) M8 X 70L (4pcs) 15: Screw 18 Screw Allen 6mm Allen 5mm Multitool Screwdriver...
-
Page 40: Important Parts
2. Introduction 2.2 Important parts quick keys speed quick keys incline holder for phone / MP3 player console connection safety cord bottle holder handrail speed keys handrail handrail incline keys hand heart rate sensor motor cover running deck... -
Page 41: Specifications
2. Introduction 2.3 Specifications Computer Technical • 1 manual program • Motor 1,7 HP continuous • 6 preset programs • Incline 0 - 12% (0-12 levels) • 1 heart rate controlled program • Speed 1 - 16 km/u • 1 user program •... -
Page 42: Fitness
3. Fitness What is fitness? Generally it can be described as an fitness exercise that causes your heart to pump more oxygen to your muscles via the blood from your lungs. The harder the workout, the more fuel (oxygen) the muscles require to achieve this rate of oxygen. The heart has to pump harder to get the oxygenated blood into the muscles. - Page 43 3. Fitness For each individual the best way to start training is different. If you have not exercised in some time or are overweight, you should start your training schedule slowly and gradually increase the level of activity. In the last chapter of this instruction manual you will find several different training sched- ules (chapter 5.
-
Page 44: Warming Up & Cooling Down
3. Fitness 3.2 Warming up and cooling down A good training schedule starts with a good warming up and ends with a cooling down of the muscles. This will prevent painful muscles and injury. Below you will find some suitable exercises. Head Roll Tilt your head to the right. -
Page 45: Use
4. Use 4.1 Assembly Step 1: Assembling the supports posts. This chapter describes how the treadmill needs to be assembled. Remove al parts from the box and make sure there is enough working space available to assemble the treadmill. Due to safety reasons and to prevent damaging the treadmill we advise you to assemble the treadmill with two persons. - Page 46 4. Use Step 2: Connect the console 1. Connect the power plug (7A) and power wire (7B) in the right support post (4). (Fig 3). 2. Place the console (9) with handrails on the 2 support posts (3) and (4). 3.
- Page 47 4. Use Step 4: Assemble the support post housing 1. Place the support post housing (upper left) (13) as described in Fig. 5. 2. Place support post housing (lower left) (14) against support post housing (13) Make sure that: a) the mounting pins (B) (Fig. 6) are in correct position. b) the plastic pins (A) (Fig.
- Page 48 4. Use Step 5: Placing the iPad holder 1. The two iPad holder brackets (22) on the back of the console and fasten them with 4 bolts (23). (Fig. 7). 2. Slide the iPad holder (21) over the brackets (22) and fasten the holder with 4 bolts (24).
-
Page 49: Storage / Usage
4. Use 4.2 Store / Usage Folding After a training, you can store the treadmill. Lift the running deck (at the back) until you feel it lock. Make sure the running deck is locked before releasing. By pulling the folded treadmill towards you to get the product on its transport wheels. - Page 50 4. Use Power connection Before you start exercising, you must provide the treadmill with power. Make sure the power cord is plugged in and that the on / off switch is switched to “I”. The on / off button is located on the front of the frame.
-
Page 51: Use Of The Console
4. Use 4.2 Gebruik computer 4.3 Use of the console Cardio Control DTM600 Designed by Flow Fitness Remove safety key when not in use and store out of reach of children. To avoid injury please follow instructions below before starting treadmill. - Page 52 4. Use First usage Set the treadmill’s on / off switch near the back of the motor cover to “I”. Then place the key with the safety rope on the front of the console in the provided slot. Clip the other end to your clothes.
- Page 53 4. Use User program It is also possible to create your own training program by following these steps: 1. Select with INCLINE or SPEED keys program U and press MODE to confirm the selection. 2. Then use INCLINE or SPEED keys to select the training duration and press MODE to confirm the selection.
- Page 54 Min. heart rate zone Chest belt (not included) For heart rate controlled training, Flow Fitness advises to use a chest belt. With a chest belt you will receive a accurate measuring of the heart rate which result in an more efficient way to reach your goal.
-
Page 55: Maintenance
4. Use 4.4 Maintenance Centering and tensioning the treadmill Within the first weeks of using the treadmill, it is possible that you need to center the belt. For example this can happen when applying more pressure to the left foot over your right. Make sure the treadmill is running with a speed between 3 and 5 km / hrs. - Page 56 However, make sure that all parts are completely dry before they are used again. Flow Fitness advises to check and if necessary tighten all nuts and bolts every six weeks. For tightening use the supplied tools. To prevent damage and wear to the treadmill, the product can only be used...
-
Page 58: General Information
5. General information 5.1 Training schedule Introduction training schedule Training schedule week 1 and 2 Train at 60% of your maximum heart rate. Max. 3 times a week. Warming up 5 - 10 minutes. Train 4 minutes. Rest 1 minute. Train 2 minutes. - Page 59 5. General information Training schedule week 5 and 6 Train at 60% of your maximum heart rate (program 7). Max. 5 times a week. Warming up 5 - 10 minutes. Train 6 minutes. Rest 1 minute. Train 4 minutes. Calmly train 3 minutes. Cooling down 5 minutes.
- Page 60 5. General information Training schedule to improve stamina. (follow-up to introduction training schedule) Training schedule week 7 and 8 Train at 85% of your maximum heart rate. Max. 6 times a week. Warming up 5 - 10 minutes. Train 7 minutes. Rest 1 minute.
- Page 61 5. General information Training schedule to lose weight (follow-up to introduction training schedule) Training schedule week 7 and 8 Train at 60% of your maximum heart rate. Max. 6 times a week. Warming up 5 - 10 minutes. Train 7 minutes. Rest 1 minute.
-
Page 62: Exploded View And Part List
5. General information 5.2 Exploded view... - Page 63 5. General information Important parts Main frame Transport wheel Frame base set Support post Handrail set Handlerail cover set Incline motor motor 220V Folding shock set Roller set Motor Deive belt Sensor set MCB group Console Console overlay Safety key set Cable set Running deck set Running belt...
-
Page 64: Troubleshooting
5. General information 5.3 Troubleshooting Problem: The console / display will not turn on. -Check if the treadmill is pugged into a grounded outlet. Solution: - Check if the 0 / I switch is on (I) . The switch is near the power cord on the back of the motor cover. - Page 65 5. General information Problem: The display shows error code E2. The memory chip of the computer / display is damaged. Please contact your Solution: dealer Problem: The display shows error code E4 or is not registering the heart rate. - In case your using the hand sensors in the handle bar make sure your hands Solution: are clean and firmly hold the handle bar.
-
Page 66: Warranty
· Repairs to the product carried out by others than by Flow Fitness or designated persons without its written permission. · When the product in the opinion of Flow Fitness is neglected or is used carelessly and / or incompetent. The product is wrongly processed and / or maintained. The product has normal wear and tear. - Page 67 www.flowfitness.nl...
Need help?
Do you have a question about the RUNNER DTM600 and is the answer not in the manual?
Questions and answers