Table of Contents
Advertisement
9292 Jeronimo Road
Irvine, CA 92618-1905
V2000 READER INTERFACE / ACCESS
PROPRIETARY INFORMATION. This document contains proprietary information which may not be duplicated,
published or disclosed to others, or used for any purpose without written permission from HID Corporation. 2004
© HID Corporation. All rights reserved.
Quick Installation Guide
CONTROLLER
Document Version 1.0
August 12, 2005
Document Number 6080-906B
Advertisement
Table of Contents

Related Manuals for HID VertXHID V2000


Summary of Contents for HID VertXHID V2000
- Page 1 V2000 READER INTERFACE / ACCESS CONTROLLER PROPRIETARY INFORMATION. This document contains proprietary information which may not be duplicated, published or disclosed to others, or used for any purpose without written permission from HID Corporation. 2004 © HID Corporation. All rights reserved. Document Version 1.0...
-
Page 2: Table Of Contents
Calibrate Input..........................22 Central Station Automation Provider Instructions..................... 23 Dice Corporation ............................23 GE MAS ..............................24 Bold Technologies ............................24 Contact Information............................... 24 Pre-Installation Checklist ............................26 August 2005 Page 2 of 23 2005 © HID Corporation. All rights reserved. -
Page 3: Introduction
Cat5, Cat5E, and Cat6 Power Supply ---- Refer to your Power Supply Installation Guide. +12 VDC IN * Minimum wire gauge depends on cable length and current requirements. August 2005 Page 3 of 23 2005 © HID Corporation. All rights reserved. -
Page 4: Overview
VertX V2000 (CS) Quick Installation Guide Overview The following outlines what is required to install the V2000. August 2005 Page 4 of 23 2005 © HID Corporation. All rights reserved. -
Page 5: Step 1 Preparations
3. The V2000 can be stacked with or without the cover. Do not remove the plastic base. Make sure you position the V2000 in such a way as to provide room for wiring, air flow and cable runs. August 2005 Page 5 of 23 2005 © HID Corporation. All rights reserved. -
Page 6: Wiring Vertx
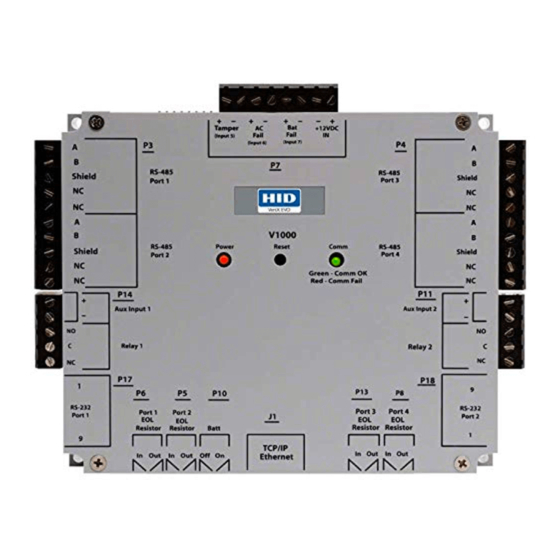
Pin # +12VDC Ground Bat Fail - Bat Fail + AC Fail - AC Fail + Tamper - Tamper + August 2005 Page 6 of 23 2005 © HID Corporation. All rights reserved. - Page 7 P6 Pins 3/2/1 P2 Pins 1/2/3 Aux Relay 2 Aux Relay 2 P2 Pins 4/5/6 P2 Pins 7/8/9 P4 Pins 9/8/7 P4 Pins 6/5/4 P4 Pins 3/2/1 August 2005 Page 7 of 23 2005 © HID Corporation. All rights reserved.
- Page 8 P7 Pins 8/7 P1 Pins 9/10 P7 Pins 4/3 Tamper Batt Fail Tamper Batt Fail P7 Pins 6/5 P7 Pins 6/5 P2 Pins 1/2 AC Fail AC Fail August 2005 Page 8 of 23 2005 © HID Corporation. All rights reserved.
-
Page 9: Step 3 Communications Configuration
/mnt/flash/etc/conf.d/hostname for instructions on changing the host name. /mnt/flash/TaskConfig/CommCfg) as well as the Pre-Installation Checklist. If you are not familiar with configuring a firewall for the network, contact the Network/IT administrator or manager. August 2005 Page 9 of 23 2005 © HID Corporation. All rights reserved. - Page 10 VertX V2000 (CS) Quick Installation Guide CAUTION: If the firewall is not configured properly the controller will not be able to communicate with the host. August 2005 Page 10 of 23 2005 © HID Corporation. All rights reserved.
-
Page 11: Computer To Vertx Controller Connection
Internet or E-mail. Depending on your operating system, follow one of the listed procedures. • Windows XP Computers • Windows 2000 Computers • August 2005 Page 11 of 23 2005 © HID Corporation. All rights reserved. - Page 12 4. Select the Use the following IP address radio button. This action will enable the fields IP address, Subnet mask and Default gateway. Use the space bar to tab between fields, the tab key will not work. August 2005 Page 12 of 23 2005 © HID Corporation. All rights reserved.
- Page 13 6. Enter the Subnet mask: 255.255.0.0. 7. Enter the Default gateway: 10.19.0.1. 8. Click OK. 9. Click the OK button again to complete the computer configuration. 10. Restart your computer. August 2005 Page 13 of 23 2005 © HID Corporation. All rights reserved.
-
Page 14: How To Edit Configuration Files
2. Enter the URL of the controller into the Address field. • Assigned VertX IP/InstallerTools.html Static TCP/IP Communication, • VertX_Controller.yourdomain.suffix/InstallerTools.html DHCP TCP/IP Communication, Note: The URL is case sensitive and must be entered precisely as shown. August 2005 Page 14 of 23 2005 © HID Corporation. All rights reserved. - Page 15 2. Enter the URL of the controller into the Address field. • Assigned VertX IP/InstallerTools.html Static TCP/IP Communication, • VertX_Controller.yourdomain.suffix/InstallerTools.html DHCP TCP/IP Communication, Note: The URL is case sensitive and must be entered precisely as shown. August 2005 Page 15 of 23 2005 © HID Corporation. All rights reserved.
-
Page 16: Dhcp Tcp/Ip Addressing
Select a file from the list the appropriate configuration file and click Edit File. If you need to clear the selection, click Clear Selection. While following these instructions edit the circled areas shown. August 2005 Page 16 of 23 2005 © HID Corporation. All rights reserved. - Page 17 Note: In addition to these configuration file edits, you may be interested in changing the “hostname”. See /mnt/flash/etc/conf.d/hostname for instructions on changing the host name. • /mnt/flash/TaskConfig/CommCfg • /mnt/flash/TaskConfig/CommHosts August 2005 Page 17 of 23 2005 © HID Corporation. All rights reserved.
- Page 18 # then disconnect. (timeout = 0 => no timeout, continuous connection) timeout 0 # Encrypt host communications (0=no, 1=yes) use_encryption 0 # If a response to a host request is not received within this time (~secs), August 2005 Page 18 of 23 2005 © HID Corporation. All rights reserved.
-
Page 19: Static Tcp/Ip Addressing
Modify the following lines to match the controller’s specified configuration. See the Pre-Installation Checklist – Ref #1, page 1. IP (Controller’s IP Address). 2. NETMASK (Subnet Mask). 3. Gateway (Network Gateway). August 2005 Page 19 of 23 2005 © HID Corporation. All rights reserved. - Page 20 ”, “ ” and “ ” values with the specified DNS IP addresses. See the Pre-Installation Checklist – Ref #3, page Example: search aaitg.com\000 nameserver 10.7.2.220 nameserver 10.7.2.221 August 2005 Page 20 of 23 2005 © HID Corporation. All rights reserved.
- Page 21 This is the last configuration file requiring edits for Ethernet setup. /mnt/flash/TaskConfig/CommHost 1. Select from the list. 2. Click Edit File. The Edit File window will display. August 2005 Page 21 of 23 2005 © HID Corporation. All rights reserved.
-
Page 22: Step 4 Reboot And Test With The Central Station
2. Enter the following URL depending on your communication configuration: • Assigned VertX IP/InstallerTools.html Static TCP/IP Communication, • DHCP TCP/IP Communication, VertX_Controller.yourdomain.suffix/InstallerTools.html 3. Select Calibrate Input 4. If more information is required, click Installer Tools Documentation. August 2005 Page 22 of 23 2005 © HID Corporation. All rights reserved. -
Page 23: Central Station Automation Provider Instructions
7. Click Save File, when complete and the change will become activated once the controller is rebooted. 8. Close the browser window(s) when completed. Continue to Step 4 Reboot and Test with the Central Station. August 2005 Page 23 of 23 2005 © HID Corporation. All rights reserved. -
Page 24: Ge Mas
V1000 controller. Contact Information HID Corporation 929274 Jeronimo Road, Irvine, CA 92618-1905 Web Site http://www.hidcorp.com Main Phone (949) 598-1600 (949) 598-1698 Sales (800) 210-4744 Technical Support (800) 237-7769 August 2005 Page 24 of 23 2005 © HID Corporation. All rights reserved. - Page 25 Connect the equipment into an outlet on a circuit different from that to which the receiver is connected. • Consult the dealer or an experienced radio/TV technician for help. August 2005 Page 25 of 23 2005 © HID Corporation. All rights reserved.
-
Page 26: Pre-Installation Checklist
/mnt/flash/etc/resolv.conf.def DNS IP Address (Primary) DNS IP Address (Secondary) Connect_on_start Maintain_host_connection Connection_port Listen_port /mnt/flash/TaskConfig/CommCfg Reconnect_interval Timeout Use_encryption Message_response_time Host Name (“john.abc.com”) /mnt/flash/TaskConfig/CommHost Host IP Address Connection Type(s) August 2005 Page 26 of 23 2005 © HID Corporation. All rights reserved.
Need help?
Do you have a question about the VertXHID V2000 and is the answer not in the manual?
Questions and answers