
Subscribe to Our Youtube Channel
Related Manuals for CDVI Galeo 2


Summary of Contents for CDVI Galeo 2
- Page 1 ENGLISH FRANCAIS GALEO Weatherproof Illuminated keypad with remote electronics Digicode extérieur avec électronique sécurisée ® The installer’s choice cdvigroup.com...
-
Page 2: Key Features
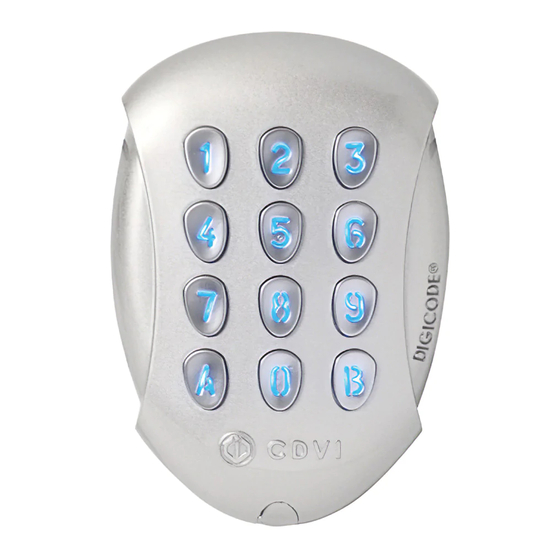
INSTALLATION MANUAL GALEO Weatherproof Illuminated Keypad with remote electronics Thank you for buying our products and for the confidence you placed in our company. 1] KEY FEATURES Polished heavy duty Zamak cast ® alloy, high resistance to vandalism 12 backlit keys Environmental tests: vibrations 2 independent relay outputs... -
Page 3: Mounting Kit
INSTALLATION MANUAL GALEO Weatherproof Illuminated Keypad with remote electronics 3] MOUNTING KIT Mounting (M4x10) ® (M4x30) Wiring Wiring plate for T20 Torx Plastic ® Varistor Caps mounting sealed sealed remote Torx Spanner anchors electronic screws screw GALEO Remote Controller 4] MOUNTING ®... - Page 4 INSTALLATION MANUAL GALEO Weatherproof Illuminated Keypad with remote electronics 5] WIRING DIAGRAM GALEO 2 RELAY OUTPUTS D - 693 : Remote electronics P3 jumper allows to the user to modify its own Pin code. To enable this feature put the jumper on.
- Page 5 INSTALLATION MANUAL GALEO Weatherproof Illuminated Keypad with remote electronics 6] WIRING DIAGRAM GALEO3R 3 RELAY OUTPUTS D - 693 : Remote electronics P3 jumper allows to the user to modify its own Pin code. To enable this feature put the jumper on. (see Programming section in the instruction manual) Relay...
-
Page 6: Programming Functions
INSTALLATION MANUAL GALEO Weatherproof Illuminated Keypad with remote electronics 7] PROGRAMMING FUNCTIONS DEFAULT VALUES AUDIBLE SIGNAL: program a code. The master code and - Without codes. The buzzer indicates different the Pin code can be of 4 or 5-digit code. - Illumination time: 10 seconds. -
Page 7: Adding, Changing Or Deleting A User Code
INSTALLATION MANUAL GALEO Weatherproof Illuminated Keypad with remote electronics 2. Press A5 to modify the master code. One beep is emitted. Enter the new 4 or 5 digit 1. Enter the master code twice (1 2 3 4 5 master code. One beep is emitted to confirm that default value master code). - Page 8 Programming instructions are the same H. SETTING A SUB MASTER CODE as for the GALEO keypad with 1 relay output. GALEO 2: 2 relay outputs N/O and N/C contacts The Sub Master code allows the user to change its 8A @ 250V~.
- Page 9 INSTALLATION MANUAL GALEO Weatherproof Illuminated Keypad with remote electronics To program Pin codes: User User User Code Name Code Name Code Name location location location GALEO Relay 1 (1 output) GALEO Relays 2 (2 output) GALEO Relays 3 (3 outputs) Relay 1 : From user location Relay 1 : From 00 to 59, Relay 1 : From 00 to 59,...
-
Page 10: Programming Chart
INSTALLATION MANUAL GALEO Weatherproof Illuminated Keypad with remote electronics 14] PROGRAMMING CHART Enter Master code twice 2 x beeps Illumination Time Relay 1 Time Relay 2 Time Relay 3 Code length Master code duration 1 x beep 1 x beep 1 x beep 1 x beep 1 x beep... - Page 11 INSTALLATION MANUAL GALEO Weatherproof Illuminated Keypad with remote electronics Sub master Sub master Sub master Buzzer (Audible Reset User codes code 1 code 2 code 3 feedback) 00-99 1 x beep 1 x beep 1 x beep 1 x beep 1 x beep 0= Buzzer disabled 4’...
-
Page 12: Présentation Du Produit
Certification CE 12V — > 24VAC / 12V — > 48VDC 2 ou 3 relais de commande -25°C à +70°C Programmation intuitive Standard CDVI jusqu’à 100 codes d’accès directement paramétrables par l’utilisateur Design ÉLECTRONIQUE SÉCURISÉE Faible encombrement & extra plat... -
Page 13: Éléments Fournis
MANUEL D’INSTALLATION GALEO Digicode extérieur avec électronique sécurisée ® 3] ÉLÉMENTS FOURNIS Vis Torx Clé mâle Plaque de ® cruciforme à tête coudée Cheville fixation de Varistance Cache vis à tête Passe fil Passe fil fraisée pour vis plastique l’électronique fraisée (M4x10) Torx... - Page 14 MANUEL D’INSTALLATION GALEO Digicode extérieur avec électronique sécurisée ® 6] SCHÉMA DE RACCORDEMENTS GALEO 2 RELAIS Électronique sécurisée Le cavalier sur P3 permet de changer le code d’entrée par l’utilisateur. Le cavalier doit être placé pour les modifications et enlevé...
- Page 15 MANUEL D’INSTALLATION GALEO Digicode extérieur avec électronique sécurisée ® 7] SCHÉMA DE RACCORDEMENTS GALEO 3 RELAIS Électronique sécurisée Le cavalier sur P3 permet de changer le code d’entrée par l’utilisateur. Le cavalier doit être placé pour les modifications et enlevé pour verrouiller cette option.
- Page 16 MANUEL D’INSTALLATION GALEO Digicode extérieur avec électronique sécurisée ® 8] PROGRAMMATION Tapez 2 fois le code Maître 2 bips sonores Temporisation Temporisation Temporisation Temporisation Nombre de Code maitre éclairage clavier relais 1 relais 2 relais 3 termes 1 bip 1 bip 1 bip 1 bip 1 bip...
- Page 17 MANUEL D’INSTALLATION GALEO Digicode extérieur avec électronique sécurisée ® Termes de Termes de Termes de Signal Programmation Reset modification modification modification sonore des codes relais 1 relais 2 relais 3 00-99 1 bip 1 bip 1 bip 1 bip 1 bip 0 = Supprimer 4’...
- Page 18 MANUEL D’INSTALLATION GALEO Digicode extérieur avec électronique sécurisée ® LES VALEURS DU GALEO Version 3 relais (Groupe 3) = Le code maître et les codes SONT PAR DÉFAUT: 4 et 6. d’ouverture de porte doivent - Sans codes. être composés de 4 ou 5 termes. SIGNAUX SONORES : - Temporisation éclairage : 10 s.
-
Page 19: Programmation Des Codes
00 pour obtenir un éclairage Groupe 1 : Du rang 00 au rang 99. permanent. Un bip sonore de validation est émis. GALEO 2 Relais 3. Relais 1 (Groupe 1) : Tapez A1. Groupe 1 : Du rang 00 au rang 59, Relais 2 (Groupe 2) : Tapez A2. - Page 20 MANUEL D’INSTALLATION GALEO Digicode extérieur avec électronique sécurisée ® Ex : De 01 pour 1 seconde à 99 pour 99 secondes. 1. Tapez 2 fois le code maître. La durée 00 correspond au fonctionnement bistable Pour la première utilisation, le code maître usine est : 1 2 3 4 5.
- Page 21 Code Prénom Prénom Prénom GALEO 1 Relais GALEO 2 Relais GALEO 3 Relais Groupe 1 : Du rang 00 au rang 99. Groupe 1 : Du rang 00 au rang 59, Groupe 1 : Du rang 00 au rang 59, RAPPEL Groupe 2 : Du rang 60 au rang 99.
- Page 22 MANUEL D’INSTALLATION GALEO Digicode extérieur avec électronique sécurisée ® 8] NOTES cdvigroup.com...
- Page 23 MANUEL D’INSTALLATION GALEO Digicode extérieur avec électronique sécurisée ® cdvigroup.com...
- Page 24 Reference : G0301FR0234V12 Extranet : EXE-CDVI_IM GALEO CMYK A5 EN-FR 12 *G0301FR0234V12* CDVI Group FRANCE (Siège social/Headquarter) Phone: +33 (0)1 48 91 01 02 CDVI SAS CDVI IBÉRICA FRANCE + EXPORT [SPAIN - PORTUGAL] 31, av. du Général Leclerc Phone: +34 (0)935 390 966 93500 PANTIN - France www.cdviberica.com...
Need help?
Do you have a question about the Galeo 2 and is the answer not in the manual?
Questions and answers