Moneris Mobile 8200 Operating Manual
Software version 6.10
Hide thumbs
Also See for Mobile 8200:
- Operating manual (249 pages) ,
- User manual (28 pages) ,
- Quick reference manual (9 pages)

Related Manuals for Moneris Mobile 8200


Summary of Contents for Moneris Mobile 8200
- Page 1 Moneris Mobile 8200 OPERATING MANUAL Software Version 6.10 Documentation Date: August 14, 2008...
- Page 2 All rights reserved. No part of this publication may be reproduced, stored in retrieval system, or transmitted, in any form or by any means, electronic, mechanical, photocopying, recording, or otherwise, without the prior written permission of Moneris Solutions. ® Registerd Trademark of Moneris Solutions Corporation.
-
Page 3: Table Of Contents
The Admin Functions Menu ................8 2.1.4.5 The Configuration Menu...................9 2.1.4.6 The General Parameters Menu................10 2.1.4.7 The Base Configuration Menu ................12 2.1.4.8 The Ethernet Setup Menu................12 2.1.4.9 The Printer Configuration Menu ..............13 2.1.5 Admin Codes .......................14 Moneris Mobile 8200 Operating Manual v2.0... - Page 4 Stand-by Mode ......................19 Optional Features......................19 2.2.1 Balanced Prompt......................20 2.2.2 Cashback........................20 2.2.3 Cheque Authorization....................21 2.2.4 Using a Chip Card on the Mobile 8200 ..............21 2.2.4.1 Identifying a Chip Card:..................21 2.2.4.2 Using a Chip Card...................22 2.2.5 Clerk Subtotalling .......................22 2.2.6 Clerk IDs ........................23 2.2.6.1...
- Page 5 2.3.27 Finding the Original Sequence Number..............38 2.3.28 Cardholder Entry ......................39 2.3.28.1 Selecting the Display Language for Chip Cards ........39 2.3.28.2 Selecting the Chip Card Application ............39 2.3.28.3 Entering Cashback Amount on Debit Purchase ..........40 Moneris Mobile 8200 Operating Manual v2.0...
- Page 6 To load a new paper roll into the terminal: .............54 The Display........................55 3.6.1 The READY Screen......................55 3.6.2 The TRAINING Screen ....................55 3.6.3 The Credit-Only READY Screen .................55 3.6.4 The Pre-Auth READY Screen..................56 The Terminal Keypad .......................56 Moneris Mobile 8200 Operating Manual v2.0...
- Page 7 Reset the trailer message to the original text ..............81 4.2.4 Trailer Message Options.....................82 4.2.4.1 English Trailer Messages ................82 4.2.4.2 French Trailer Messages .................83 Disabling the Backlight ....................83 Configuring Corporate (Purchasing) Cards ..............84 Configuring Private Label ....................85 Configuring General Parameters..................85 Moneris Mobile 8200 Operating Manual v2.0...
- Page 8 Credit Advice - with Voice Authorization Number............108 5.2.9 Credit Pre-Authorization Advice List................109 5.2.10 Manually Processing Credit Transactions..............111 5.2.11 Manually Processing Credit Transactions UNDER Floor Limit ......111 5.2.12 Manually Processing Credit Transactions OVER Floor Limit ......111 5.2.13 Corporate Card Purchase..................112 Moneris Mobile 8200 Operating Manual v2.0...
- Page 9 Debit Purchase with Chip Card ..............131 5.5.2 Debit Purchase Void with Chip Card ...............132 5.5.3 Debit Refund with Chip Card ................133 5.5.4 Debit Refund Void with Chip Card ..............134 Cheque Authorization .....................136 5.6.1 Cheque Authorization....................136 Moneris Mobile 8200 Operating Manual v2.0...
- Page 10 Selecting the Balance Due Payment Method.............150 6.6.5 Entering the Optional Information................150 6.6.6 Entering the Activation Amount ................151 6.6.7 Entering the Benefit Amount ..................151 6.6.8 Entering the Number of Points for a Redemption .............152 6.6.9 Entering the Redemption Amount................152 viii Moneris Mobile 8200 Operating Manual v2.0...
- Page 11 Rewards Program Parameters ...............171 7.3.3 Rewards Program Planning Worksheet ..............172 7.3.4 Reward Program Components - Calculator and Factor Values .......173 7.3.5 Reward Program Components - Bonus Offer Values..........175 7.3.6 Reward Program Components - Incentive Values ............177 Moneris Mobile 8200 Operating Manual v2.0...
- Page 12 Rewards - Reprint Last Receipt.................194 CHAPTER ADMIN TRANSACTIONS Log On..........................195 Log Off ...........................195 Private Label Instant Credit Card Application..............195 Training Mode ........................197 8.4.1 Training Mode......................197 8.4.2 Transactions Available in Training mode ..............197 8.4.3 Admin Functions ....................198 Moneris Mobile 8200 Operating Manual v2.0...
- Page 13 Multi-Terminal Report for One or More Terminals by Name.........215 10.2.3 Multi-Terminal Report for One or More Groups of Terminals.......216 CHAPTER TROUBLESHOOTING 11.1 Additional Documentation....................217 11.2 Telephone Assistance .....................217 11.3 Troubleshooting......................217 11.4 Error Messages on the 8200 Terminal ................218 11.5 Hardware Problems ......................233 Moneris Mobile 8200 Operating Manual v2.0...
- Page 14 11.6 Understanding DECLINED Messages ................236 11.7 Error Messages during Code Authentication ..............237 Moneris Mobile 8200 Operating Manual v2.0...
-
Page 15: Introduction
1.3 Learning About the Terminal The Moneris Mobile 8200 terminal is a short-range wireless debit and credit card payment system that connects to the point-of-sale (POS) services provided by Moneris Solutions. To introduce yourself to the terminal, read these sections: •... -
Page 16: Caring For Your Moneris Hardware
IMPORTANT: You must use the exact power adaptor and cable provided with the base by Moneris Solutions. Failure to do so may affect the operability of, or cause damage to the base and Moneris Solutions shall have no liability whatsoever for a failure to follow these instructions. -
Page 17: Features And Procedures
Tip amount by the cardholder on the terminal for both debit and credit transactions as well as many other features. 2.1 Standard Features These features are available and enabled on all Moneris Mobile 8200 terminals. • Backlight •... -
Page 18: On Receipts
2.1.3 Communications Status As the terminal communicates with the Moneris Host through the base, it displays PROCESSING to indicate that the transaction is proceeding correctly. Depending on the type of communication, additional status information is provided The terminal also provides information on the status of the wireless communication between the terminal and the communications base. -
Page 19: Ethernet Communications Status
If your communications base is using Dial Communications to communicate with the Moneris Host, the terminal will ask the base to dial the Moneris Host each time you begin a transaction (it, the base, does not make any noise when it dials). -
Page 20: The Main Menu
Note: This item appears only if Tip Reporting is enabled. PAYMENT processes a private label credit Payment transaction Note: This item appears only if the terminal is set up on the Moneris Host to process this transaction. CHEQUE AUTH connect to a cheque authorization service and obtain approval based... -
Page 21: The Reporting Functions Menu
2. Features and Procedures on a credit card or driver's licence Note: This item appears only if the terminal is set up on the Moneris Host to process this transaction. VOID-PURCHASE void a credit or debit Purchase transaction for the full amount of the original Purchase transaction. -
Page 22: The Admin Functions Menu
The functions are listed in the order they appear on the menu. ADMIN Allows you to: FUNCTIONS LOGON log on to the Moneris Host and allow the terminal to process transactions. LOGOFF log off of the Moneris Host and prevent the terminal from processing transactions... -
Page 23: The Configuration Menu
Centre. The Configuration menu (see CONFIG FUNCTIONS below) contains a list of parameters and programs that can be enabled and configured on the Mobile 8200 terminal. IMPORTANT: A number of these programs require agreements between the merchant and a service provider other than Moneris Solutions. Please ensure that the necessary agreements are in place before attempting to configure those programs on the terminal. -
Page 24: The General Parameters Menu
TIP REPORTING add the following financial and reporting menu features: Credit Pre-Authorization Advice List (found in the TRANSACTIONS Moneris Mobile 8200 Operating Manual v2.0... - Page 25 Pre-Authorization transactions using chip credit cards as well as magnetic stripe credit cards COMM WARNINGS Do NOT use this function unless directed to do so by the Moneris Merchant Service Centre. CASH BACK enable the ENTER CASH BACK prompt during debit Purchase...
-
Page 26: The Base Configuration Menu
SET TIME-OUT Do NOT use this function unless directed to do so by the Moneris Merchant Service Centre. SITE TEST Do NOT use this function unless directed to do so by the Moneris Merchant Service Centre. -
Page 27: The Printer Configuration Menu
DNS SETUP enter the Primary and Secondary DNS addresses PING Do NOT use this function unless directed to do so by the Moneris Merchant Service Centre. CONNECT T-OUT Do NOT use this function unless directed to do so by the Moneris Merchant Service Centre. -
Page 28: Admin Codes
Admin key and the Admin codes listed here. • Financial transactions, Ernex transactions and Air Miles transactions can be accessed using a 3-digit code. • Other transactions can each be accessed using a 2-digit code: • Reporting Transactions Moneris Mobile 8200 Operating Manual v2.0... - Page 29 Chip Credit Card Pre-Auth Pre-Auth Advice FIND ORIGINAL TRANSACTION? Pre-Auth Advice List ENTER AMOUNT Payment Private Label Card Payment Cheque Authorization Driver's Licence Credit Card Void-Purchase Stripe Credit Card Void Purchase Chip Credit Card Void Purchase Moneris Mobile 8200 Operating Manual v2.0...
- Page 30 Merchant Subtotals Inquiry Multi-Terminal Report Clerk Subtotals Inquiry Pre-Authorization List Print Configuration List Print EMV Parameters List Print Help List Administrative Transactions TRANSACTION CODE Log on Log off Reprint (a receipt or report) MasterCard Transaction Data Moneris Mobile 8200 Operating Manual v2.0...
- Page 31 Clerk Subtotalling Configuration Clerk ID Maintenance Default Clerk ID Purchasing (Corporate) Card Remote Download Restore Default Settings Ernex Transactions TRANSACTION CODE Ernex Initialization Ernex Communication Ernex Configuration List Enable Ernex Disable Ernex Ernex General Parameters Moneris Mobile 8200 Operating Manual v2.0...
- Page 32 Setup Air Miles Rewards Transactions TRANSACTION CODE Reward Purchase Reward Refund Reward Program Transaction List SAF Transaction Inquiry Reward Program Totals Upload SAF Reward Configuration List Reward Program Set-up Reward Reprint Reward Help List Moneris Mobile 8200 Operating Manual v2.0...
-
Page 33: Stored Transactions
These features may be available on your Mobile 8200 depending on the configuration of your Merchant ID on the Moneris Host. If the feature is available and you wish to use it, you must enable and configure the feature. If you do not wish to use an enabled feature, you can deactivate it. -
Page 34: Balanced Prompt
Stored Transactions report match the Moneris Host totals printed on the Current Batch Totals report (printed during the Close Batch). This prompt is used solely for your in-house record keeping and is not reported to the Moneris Host. -
Page 35: Cheque Authorization
The customer's driver’s licence or credit card can be used as identification for this transaction. 2.2.4 Using a Chip Card on the Mobile 8200 Cards with a chip in them, called "chip cards," must be inserted into the chip card reader and left in the reader for the entire transaction. -
Page 36: Using A Chip Card
The Clerk Inquiry function can be performed for one clerk, a group of clerks or all clerks on one or more terminals. Totals are calculated according to the Clerk ID entered during a transaction or the Default Clerk ID. Moneris Mobile 8200 Operating Manual v2.0... -
Page 37: Clerk Ids
If your business accepts only credit card payments (i.e. does not accept debit card payment), you may wish to have a credit-only terminal that processes only magnetic stripe credit cards and Chip credit cards. Contact the Moneris Merchant Service Centre to determine whether this option meets your business needs. -
Page 38: Multi-Terminal Reporting
READY screen configured to default to a Pre-Authorization transaction rather than a Purchase transaction. This feature must be set at the Moneris Host and is downloaded to your terminal during Initialization. To change it, please contact the Moneris Merchant Service Centre. -
Page 39: Air Miles Rewards Transactions
If this feature is enabled on your terminal, the terminal will prompt for a Customer Reference number and tax amounts when a corporate card is swiped or keyed in for a transaction. The Moneris Mobile 8200 Operating Manual v2.0... -
Page 40: Tip Entry By Cardholder
If you set a default Tip percentage, the cardholder will be given the opportunity to either key in a Tip amount of their choosing (in dollars or percent) or select your preset Tip amount to add to the total Purchase amount for debit and credit Purchases. Moneris Mobile 8200 Operating Manual v2.0... -
Page 41: Standard Procedures
2.3.2 Powering Down the Mobile 8200 The Moneris Mobile 8200 handheld terminal does not have an ON/OFF switch. To help reduce battery usage, power down the terminal when you are not using it. To power down (or turn off) the terminal from the READY screen: IMPORTANT: Ensure the terminal is off the base. -
Page 42: Attaching The Battery
The top of the battery lifts off the back of the handheld. 5. Holding onto the sides of the battery, lift the battery up to disengage the two plastic teeth at the bottom of the battery. Moneris Mobile 8200 Operating Manual v2.0... -
Page 43: Charging The Battery
IMPORTANT: Do not touch the contacts on the battery or the handheld. 2.3.5 Charging the Battery To recharge the battery, it must be placed on a Mobile 8200 base. The Mobile 8200 has two bases that can charge the battery: •... -
Page 44: Battery Management Tips
2.3.8 Battery Management Tips The Moneris Mobile 8200 handheld terminal uses one of these two battery types: nickel metal hydride (NiMH) or lithium ion (Li-ion). 2.3.8.1 Nickel Metal Hydride (NiMH) New NiMH batteries are shipped fully charged. -
Page 45: Bilingual Displays And Receipts
1. Press the Admin key. 2. Scroll down to ADMIN, and press OK. 3. Scroll down to LANGUAGE, and press OK. 4. Select the language you wish the terminal to display. 5. Press the Can/Ann key twice. Moneris Mobile 8200 Operating Manual v2.0... -
Page 46: Swipe Or Insert The Cardholder's Card
5. Press OK to continue the transaction. Go back to the transaction. 2.3.12 Cancelling a Transaction Note: Once the terminal has begun communicating with the Moneris Host, the transaction can no longer be cancelled. To cancel a transaction: 1. Press Can/Ann. -
Page 47: Cancelling A Report
If the most recently printed item was a terminal report, a copy of the report is re-printed with the text *DUPLICATE* at the top and bottom. There are two ways to access the Reprint function: Moneris Mobile 8200 Operating Manual v2.0... -
Page 48: Disputed Debit Transactions
During a transaction, if you feel that a customer, card or transaction is suspicious and needs investigating, call the Moneris Merchant Service Centre and state that the call is a Code 10. This will alert the Moneris operator without alarming your customer. The operator will ask you some ”Yes/No”... -
Page 49: Terminal Security
There are a number of factors that affect whether the terminal prompts for a POS Admin card including whether debit cards are processed, how the terminal is set up on the Moneris Host and whether the SWIPE ADMIN CARD prompt has been enabled on the terminal. -
Page 50: Entering Alphabetic Characters And Punctuation
2. Press the Admin key repeatedly until the character appears. For example, to key in THANK YOU. for a receipt message: To key in this text: Press these keys on the keypad: 8 Admin 4 Admin Admin 2 Admin 6 Admin Admin Moneris Mobile 8200 Operating Manual v2.0... -
Page 51: Entering The Clerk Id
Tip amount if any.) Go back to the Pre-Auth Advice transaction. 2.3.25 Deleting a Pre-Auth from the Pre-Authorization Advice List At the DELETE PRE-AUTH? screen: DELETE PRE-AUTH? 00000000000 0000 PA $999,999.99 Moneris Mobile 8200 Operating Manual v2.0... -
Page 52: Entering The Promo Code For Private Label Credit Card Transactions
Finding the Original Sequence Number The Original Sequence number needed for a Pre-Auth Advice is found on the Pre- Authorization receipt. If the Receipt number is: X00000000-123-456-789-0 Then the Original Sequence number is: 456789 Moneris Mobile 8200 Operating Manual v2.0... -
Page 53: Cardholder Entry
IMPORTANT: Do NOT allow the cardholder to select the application. You must select the application used to perform the original transaction (indicated on the original transaction receipt). i. Press F1 to use the displayed application: The <application name>-OK? prompt appears. Moneris Mobile 8200 Operating Manual v2.0... -
Page 54: Entering Cashback Amount On Debit Purchase
3. The cardholder presses OK. Continue the transaction. 2.3.28.4 Entering Tip Amount on Terminal Keypad for Credit Purchase When the CUSTOMER PRESS OK TO CONTINUE prompt appears: a. Pass the terminal to the customer. Do NOT press OK. Moneris Mobile 8200 Operating Manual v2.0... - Page 55 2. The cardholder returns the terminal to you. Accept the terminal from the cardholder. 3. Press OK to continue the transaction. Continue the transaction. If the cardholder is adding a different Tip amount as a percentage and has already pressed F3(OTHER): Moneris Mobile 8200 Operating Manual v2.0...
- Page 56 3. The cardholder presses OK. The RETURN TO CLERK prompt appears. 4. The cardholder returns the terminal to you. Accept the terminal from the cardholder. 5. Press OK to continue the transaction. Continue the transaction. Moneris Mobile 8200 Operating Manual v2.0...
-
Page 57: Entering Tip Amount On Terminal Keypad For Credit Purchase With Chip Card
If the cardholder is adding a different Tip as a dollar amount and has already pressed F3(OTHER): 1. At the ENTER TIP IN PERCENTAGE OR AMOUNT? prompt, the cardholder presses F3($). The ENTER TIP AMOUNT entry screen appears. Moneris Mobile 8200 Operating Manual v2.0... -
Page 58: Entering Tip Amount On Terminal Keypad For Debit Purchase
Tip at all. Note: The Tip percentage is applied only to the original Purchase amount and does not include the Cashback amount. If the cardholder is adding a preset Tip amount and has already pressed F1(##%): Moneris Mobile 8200 Operating Manual v2.0... - Page 59 F3($). The ENTER TIP AMOUNT entry screen appears. 2. The cardholder simply leaves the dollar value at $0.00 and presses The PURCHASE $#.##-OK? prompt appears. 3. The cardholder presses OK. Continue the transaction. Moneris Mobile 8200 Operating Manual v2.0...
-
Page 60: Entering Tip Amount On Terminal Keypad For Debit Purchase With Chip Card
If the cardholder is adding a different Tip as a dollar amount and has already pressed F3(OTHER): 1. At the ENTER TIP IN PERCENTAGE OR AMOUNT? prompt, the cardholder presses F3($). The ENTER TIP AMOUNT entry screen appears. Moneris Mobile 8200 Operating Manual v2.0... -
Page 61: Cardholder Entry On Terminal Keypad For Credit Purchase With Chip Card
"protect your PIN." The RETURN TO CLERK DO NOT REMOVE CARD prompt appears. c. The cardholder returns the terminal to you. d. Press OK to continue the transaction. Continue the transaction. Moneris Mobile 8200 Operating Manual v2.0... -
Page 62: Cardholder Entry On Terminal Keypad For Debit Purchase With Chip Card
Note: Please respect the cardholder's privacy while they enter their PIN, and encourage your customers to "protect your PIN." b. The cardholder returns the terminal to you. c. Press OK to continue the transaction. The terminal communicates with the Moneris Host. Continue the transaction. Moneris Mobile 8200 Operating Manual v2.0... -
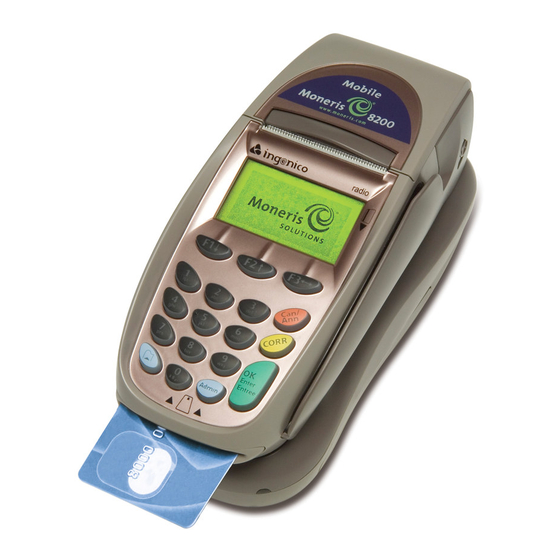
Page 63: The Moneris Mobile 8200 Hardware
3 The Moneris Mobile 8200 Hardware The Moneris Mobile 8200 Terminal and Base The Mobile 8200 is a hand-held wireless terminal that consists of an integrated PINpad, an integrated printer, a magnetic stripe card reader, and a removable, rechargeable battery. The terminal communicates over short distances with a communications base. -
Page 64: Selecting The Base Location
Centre-Obstruction Floor plan Indoor/Outdoor Floor plan L-Shaped Floor plan Multi-Level Floor plan 3. After you receive your Mobile 8200 POS system and configure it with the assistance of the Moneris installation team, the Moneris representative will check the range of the base from the spot you selected. -
Page 65: Do Not Place The Base Near
3.2.2.2 Indoor/Outdoor Floor plan If your location has an outdoor area where you wish to use the Mobile 8200 (e.g. a patio), try the base locations indicated below to see which provides the best coverage. Moneris Mobile 8200 Operating Manual v2.0... -
Page 66: L-Shaped Floor Plan
3. The Moneris Mobile 8200 Hardware 3.2.2.3 L-Shaped Floor plan If the area in which you plan to use the Mobile 8200 in your location is an L-shape, try the base locations indicated below to see which provides the best coverage. 3.2.2.4... -
Page 67: Registering The Handheld To A Base
3. The Moneris Mobile 8200 Hardware 3.3 Registering the Handheld to a Base A terminal must be registered to a communications base in order to process transactions. Registering introduces the terminal to the base so that the terminal knows which base to look for and the base knows which terminal(s) to accept transactions from. -
Page 68: The Handheld Terminal
• Removable, rechargeable NiMH or Li-ion battery 3.5 The Integrated Printer A thermal printer is integrated into the Moneris Mobile 8200 terminal. It prints black text on white, one-part thermal paper. Note: The maximum paper roll diameter is 2 inches. -
Page 69: The Display
3. The Moneris Mobile 8200 Hardware 3.6 The Display The display screen on the terminal displays the merchant and cardholder prompts as well as status and error messages. The Idle screen is displayed when the terminal is not performing any transactions or functions. -
Page 70: The Pre-Auth Ready Screen
3. The Moneris Mobile 8200 Hardware The READY screen displays "READY" over "PURCHASE". This screen appears when the terminal is operating normally. Debit cards cannot be used to process transactions. The Purchase READY screen READY PURCHASE ENTER AMOUNT $0.00 If the READY screen isn't displayed, press Can/Ann repeatedly to access it. -
Page 71: The Function Keys
3. The Moneris Mobile 8200 Hardware 3.7.2 The Function Keys NAME IMAGE ALLOWS YOU TO... select the option above the key (e.g. CREDIT) scroll down through options select an option select the option above the key (e.g. DEBIT) scroll up through options... -
Page 72: The Magnetic Stripe Reader
3. The Moneris Mobile 8200 Hardware 3.8 The Magnetic Stripe Reader The magnetic stripe reader (MSR) is located in a slot on the right-hand side of the terminal. When a payment card is swiped, the MSR reads the information encoded on the card's magnetic stripe. -
Page 73: The Battery
When the REMOVE CARD prompt appears, you or the cardholder must pull the card gently out of the chip card reader. 3.10 The Battery The Mobile 8200 is powered by a removable NiMH or Li-ion battery. See Identifying Battery Types. 3.10.1... -
Page 74: The Communications Base
The communications base connects to up to seven (7) terminals via wireless communication and to the Moneris Host via Ethernet and dial. If you have a number of 8200 handheld terminals, they can communicate with the Moneris Host through one communications base, but each terminal will need a charge-only base to charge the battery when the handheld is not in use. -
Page 75: The Charge-Only Base
(for Dial Communications) 3.12 The Charge-Only Base If you have a number of 8200 handheld terminals, they can communicate with the Moneris Host through one communications base, but each terminal will need a charge-only base to charge the battery when the handheld is not in use. -
Page 76: The Led On The Base
3. The Moneris Mobile 8200 Hardware Ports on the Charge-Only Base The charge-only base has 5 connection ports on the bottom: EXT LINE Do not use. Do not use. power connection COM2 Do not use. COM3 Do not use. 3.13 The LED on the Base The green LED on the communications base and the charge-only base indicates the power status of the base. -
Page 77: Led States On The Communications Base
3. The Moneris Mobile 8200 Hardware Green LED on the Base 3.13.1 LED States on the Communications Base LED STATE Ethernet Communications Dial Communications The communications base is The communications base is powered off. powered off. FLASHING The base is powered on but... -
Page 78: The Cables
IMPORTANT: You must use the exact power adaptor and cable provided with the terminal and base by Moneris Solutions. Failure to do so may affect the operability of, or cause damage to the terminal and/or base and Moneris Solutions shall have no liability whatsoever for a failure to follow these instructions. -
Page 79: Dial Communications Cable
3. The Moneris Mobile 8200 Hardware To power down the base, simply remove the power pack (2) from the power outlet. To reset the base, power down the base, then wait 30 seconds, and then power up the base. 3.14.3... -
Page 81: Configuring Your Terminal
4 Configuring Your Terminal Your Mobile 8200 terminal can be set up to accept and process a variety of cards including debit cards, credit cards with a magnetic stripe, credit cards with a chip, private label cards, corporate (a.k.a. purchasing) cards, Ernex Gift Cards and Ernex Loyalty programs. The terminal can also be set up to process cheque authorizations. -
Page 82: Configuring Dial Communications
IMPORTANT: Do NOT attempt to configure your terminal without assistance from the Moneris Merchant Service Centre If your terminal will communicate with the Moneris Host over a standard analog telephone line as back-up for Ethernet communications, you will need to set up these parameters. - Page 83 4. Configuring Your Terminal 5. To enter or change the PBX prefix for the seven-digit local telephone number and the ten- digit long distance telephone number to the Moneris Host: Note: This field is optional. PREFIX. Press OK to select The PREFIX entry screen appears.
-
Page 84: Dial Backup Communications For Ethernet
Moneris Merchant Service Centre. If your terminal will communicate with the Moneris Host over the Internet using Public IP with Dynamic addressing, you will need to set up these parameters. Each handheld terminal must have its own unique IP address assigned to it. -
Page 85: Configuring Dynamic Private Ip Communications
Press OK to return to the READY screen. Note: If the RE-INITIALIZATION REQUIRED message appears, you must perform a re- initialization to complete the configuration process. The terminal is ready to communicate with the Moneris Host over the Internet. 4.1.3.2 Configuring Dynamic Private IP Communications... - Page 86 4. Configuring Your Terminal If your terminal will communicate with the Moneris Host over the Moneris Private IP Network with Dynamic addressing, you will need to set up these parameters. Each handheld terminal must have its own unique IP address assigned to it.
-
Page 87: Configuring Customized Dns Addresses For Dynamic Public Ip Communications
Press OK to return to the READY screen. Note: If the RE-INITIALIZATION REQUIRED message appears, you must perform a re- initialization to complete the configuration process. The terminal is ready to communicate with the Moneris Host over the Internet. 4.1.3.3 Configuring Customized DNS Addresses for... - Page 88 4. Configuring Your Terminal If your terminal will communicate with the Moneris Host over the Internet using Public IP with Static addressing, you will need to set up these parameters. Each handheld terminal must have its own unique IP address assigned to it.
- Page 89 The TCP HOST CONNECTION OK PRESS OK prompt appears if the connection is up. b. Press OK to return to the READY screen. Note: If the RE-INITIALIZATION REQUIRED message appears, you must perform a re- initialization to complete the configuration process. Moneris Mobile 8200 Operating Manual v2.0...
-
Page 90: Configuring Static Private Ip Communications
Moneris Merchant Service Centre. If your terminal will communicate with the Moneris Host over the Moneris Private IP Network with Static addressing, you will need to set up these parameters. Each handheld terminal must have its own unique IP address assigned to it. - Page 91 Note: If the RE-INITIALIZATION REQUIRED message appears, you must perform a re- initialization to complete the configuration process. The terminal is ready to communicate with the Moneris Host over the Internet. As the terminal communicates with the Moneris Host through the base, it displays PROCESSING to indicate that the transaction is proceeding correctly.
-
Page 92: Configuring The Receipt Format
Note: If, during the transaction, the operator does not want to wait for the receipt copies to print automatically, they can press OK to force the next receipt to begin printing immediately. To print a tip line on Pre-Authorization receipts for the customer to indicate a Tip amount : Moneris Mobile 8200 Operating Manual v2.0... - Page 93 To suppress the printing of a Merchant copy of the credit Purchase receipt: DO NOT enable this feature: a. Scroll down to RCPT LIMIT-M, and press OK. The MERCHANT RECEIPT BELOW FLOOR LMT? prompt appears. b. Press F3 to select NO. The PRINTER CFG menu re-appears. Moneris Mobile 8200 Operating Manual v2.0...
-
Page 94: Select Number Of Receipts Printed For A Transaction
Cardholder and two Merchant copies 3 COPIES OPTN prints two copies (one Cardholder and one Merchant copy) To print the third copy (another Merchant copy), press OK. To cancel the third copy, press Can/Ann. Moneris Mobile 8200 Operating Manual v2.0... -
Page 95: Select And Edit The Trailer Message For Cardholder Receipts
For example: If you reset Option 1 to the original English text, make sure to reset the French Option 1 message as well. From the READY screen: Moneris Mobile 8200 Operating Manual v2.0... -
Page 96: Trailer Message Options
MOTHERS DAY IS COMING RESERVE YOUR SPACE CALL xxx xxx xxxx TO AVOID DISAPPOINTMENT 5 BACK TO SCH BACK TO SCHOOL SPECIAL PRESENT THIS RECEIPT TO CLAIM A FREE BACKPACK WITH YOUR NEXT PURCHASE Moneris Mobile 8200 Operating Manual v2.0... -
Page 97: French Trailer Messages
The Backlight can be disabled to reduce battery usage. From the READY screen or the TERMINAL SETUP REQUIRED prompt: 1. Press the Admin key. The MAIN MENU appears. 2. Scroll to ADMIN, and press OK. The ADMIN FUNCS menu appears. Moneris Mobile 8200 Operating Manual v2.0... -
Page 98: Configuring Corporate (Purchasing) Cards
Key in your Provincial Tax number, and press OK. The PURCHASING CRD menu appears. 10. Press Can/Ann three times to return to the READY screen. The terminal is now ready to process financial transactions using corporate (purchasing) Cards. Moneris Mobile 8200 Operating Manual v2.0... -
Page 99: Configuring Private Label
• contact the private label card issuer and arrange for service from them. • notify Moneris that you will be using this service to ensure that your terminal's initialization parameters are updated on the Moneris Host. • re-initialize your terminal 4.6 Configuring General Parameters... - Page 100 Note: The amount displayed is in dollars (cent values cannot be entered: e.g., 10 = $10.00). a. Scroll down to C BACK AMT 1, and press OK. The CASH BACK PRESET AMOUNT 1 entry screen appears. Moneris Mobile 8200 Operating Manual v2.0...
- Page 101 Amount 2 and greater than and not equal to Preset Amount 1. 3. Key in the amount, and press OK. The GENERAL PARAMETERS menu reappears. To set the maximum Cashback amount that can be entered during Debit Purchase transactions: Moneris Mobile 8200 Operating Manual v2.0...
- Page 102 Cheque Authorization transactions using a driver's licence, and press OK. (Refer to "Entering alphabetic characters and punctuation") Note: The province codes are provided by the cheque authorization service. The GENERAL PARAMETERS menu reappears. To be able to identify a credit transaction as E-COMMERCE during the transaction: Moneris Mobile 8200 Operating Manual v2.0...
- Page 103 The GENERAL PARAMETERS menu reappears. To enable the SWIPE ADMIN CARD prompt on all transactions on the REPORTS, ADMIN and CONFIGURATION menus: a. Scroll down to ADMIN PROTECT, and press OK. The PROTECT ALL ADMIN OPTIONS? prompt appears. Moneris Mobile 8200 Operating Manual v2.0...
-
Page 104: Configuring Clerk Subtotals
IMPORTANT: Clerk Subtotals must be cleared manually (by performing a Clerk Subtotals Report) on a regular basis (weekly is recommended). If not, the Moneris Host will automatically clear the totals when the number of transactions for a card type within a Clerk ID reaches 10,000. -
Page 105: Identify Clerk Id Entry Method
Use this function to add the Clerk IDs to be associated with your Merchant ID. The terminal must communicate with the Moneris Host in order to complete this function. The Clerk IDs you enter here can be entered at the ENTER CLERK ID entry screen during transactions and will be used in Clerk Subtotals Reporting. -
Page 106: Removing Clerk Ids
Host to add the Clerk IDs to the Host. When all the Clerk IDs have been added: 6. Scroll down to FINISHED, and press OK. The terminal communicates with the Moneris Host to add the Clerk IDs to the Host then returns to the READY screen. 4.7.4 Removing Clerk IDs Use this function to remove Clerk IDs associated with your Merchant ID. -
Page 107: Enabling The Clerk Id Prompt
2. Scroll down to CONFIGURATION, and press OK. The CONFIG FUNCS menu appears. 3. Scroll down to DEFAULT CLERK, and press OK. The ENTER CLERK ID entry screen appears. If the SWIPE ADMIN CARD prompt appears, swipe the POS Admin card. Moneris Mobile 8200 Operating Manual v2.0... -
Page 108: Identifying The Clerk Id Location
F1 to select YES. - use only the Close Batch transaction to close the batch on this terminal, press F3 to select The terminal communicates with the Moneris Host then returns to the READY screen. Moneris Mobile 8200 Operating Manual v2.0... -
Page 109: Disabling Multi-Terminal Reporting
F1 to select YES. - use only the Close Batch function to close the batch on this terminal, press F3 to select NO. The terminal communicates with the Moneris Host then returns to the READY screen. 4.8.4 Deleting the Terminal Name To delete a terminal name, simply disable the Multi-terminal Report function on the terminal. -
Page 110: Configuring Cheque Authorization
4. Press F3 to select NO. The terminal communicates with the Moneris Host then returns to the READY screen. The terminal name has now been removed from the Moneris Host and the terminal can no longer be closed using the Multi-terminal Report function. -
Page 111: Re-Initialization
4. Press F1 to select YES. IMPORTANT: Do NOT select NO unless instructed to do so by a Moneris Service Centre representative. 5. Please wait while the terminal communicates with the Moneris Host. This may take a few minutes. The CLEAR TERMINAL STORAGE? prompt appears. -
Page 112: Remote Code Download
4. Configuring Your Terminal This function returns the terminal’s parameters to the original factory settings. 4.12 Remote Code Download IMPORTANT: Do NOT use this function unless directed to do so by the Moneris Merchant Service Centre. Moneris Mobile 8200 Operating Manual v2.0... -
Page 113: Chapter 5 Financial Transactions
A debit Refund transaction moves funds from your business account to the debit cardholder's chequing or savings account. The Moneris Mobile 8200 point-of-sale terminal can process a variety of financial transactions on cards including debit cards, magnetic stripe credit cards, chip credit cards, private label credit cards and purchasing/corporate cards. -
Page 114: Credit Purchase
If the CUSTOMER PRESS OK TO CONTINUE prompt appears. Refer to the "Tip Entry by Credit Cardholder" procedure. The terminal communicates with the Moneris Host. 3. Please wait while the terminal processes the transaction. If the ENTER PROMO CODE entry screen appears, refer to the "Entering the Promo Code"... - Page 115 Batch. If you do not have the number, you may not be able to process this transaction. The terminal communicates with the Moneris Host. 8. Please wait while the terminal processes the transaction. If the ENTER PROMO CODE entry screen appears, refer to the "Entering the Promo Code"...
-
Page 116: Credit Refund
If the TAKE MANUAL IMPRINT OF CARD AND PRESS OK prompt appears, refer to the "Taking a Manual Imprint of a Credit Card" procedure. The ENTER ORIGINAL AUTHORIZATION # entry screen appears. 7. Key in the AUTH # found on the Purchase receipt, and press OK. Moneris Mobile 8200 Operating Manual v2.0... -
Page 117: Credit Refund Void
If the ENTER INVOICE NO entry screen appears instead, refer to the "Entering the Invoice Number" procedure. The terminal communicates with the Moneris Host. 8. Please wait while the terminal processes the transaction. The APPROVED message appears, and the Merchant copy of the receipt is printed. -
Page 118: Credit Pre-Authorization
If the ENTER INVOICE NO entry screen appears instead, refer to the "Entering the Invoice Number" procedure. Then the terminal communicates with the Moneris Host. 8. Please wait while the terminal processes the transaction. The APPROVED prompt appears and the Merchant copy of the receipt is printed. - Page 119 If the ENTER PROMO CODE entry screen appears, refer to the "Entering the Promo Code" procedure. If the ENTER INVOICE NO entry screen appears, refer to the "Entering the Invoice Number" procedure. The terminal communicates with the Moneris Host. Moneris Mobile 8200 Operating Manual v2.0...
-
Page 120: Credit Pre-Authorization As Default
If the ENTER INVOICE NO entry screen appears, refer to the "Entering the Invoice Number" procedure. The terminal communicates with the Moneris Host. 3. Please wait while the terminal processes the transaction. The APPROVED prompt appears and the Merchant copy of the receipt is printed. -
Page 121: Credit Advice - With Pre-Authorization Sequence Number
If the amount has changed, key in the final amount to be processed (this may be different if, for example, a Tip has been added) and press OK. If the ENTER CLERK ID entry screen appears, refer to the "Entering the Clerk ID" procedure. Moneris Mobile 8200 Operating Manual v2.0... -
Page 122: Credit Advice - With Voice Authorization Number
If the ENTER INVOICE NO entry screen appears, refer to the "Entering the Invoice Number" procedure. The terminal communicates with the Moneris Host. 8. Please wait while the terminal processes the transaction. The APPROVED prompt appears and the Merchant copy of the receipt is printed. -
Page 123: Credit Pre-Authorization Advice List
"Entering the Invoice Number" procedure. The terminal communicates with the Moneris Host. 9. Please wait while the terminal processes the transaction. The APPROVED prompt appears, and the Merchant copy of the receipt is printed. 10. Retain the Merchant copy of the receipt. - Page 124 If you pressed F3, the DELETE PRE-AUTH? screen appears, refer to the "Deleting a Pre- Auth from the Pre-Authorization Advice List" procedure. If the ENTER CLERK ID entry screen appears, refer to the "Entering the Clerk ID" procedure. Moneris Mobile 8200 Operating Manual v2.0...
-
Page 125: Manually Processing Credit Transactions
In order to process credit Purchase and Refund transactions manually you must have a Paper Sales Draft for the card type (e.g. a VISA sales draft for a Purchase on a VISA card) and an imprinter. Contact the Moneris Merchant Service Centre to obtain these supplies if you do not have them. -
Page 126: Corporate Card Purchase
Note: In order to process credit Purchases manually you must have a paper Sales Draft for the card type (e.g. a VISA sales draft for a Purchase on a VISA card) and an imprinter. Contact the Moneris Merchant Service Centre to obtain these supplies if you do not have them. -
Page 127: E-Commerce & Moto Transactions
4. Key in the Customer Reference number, and press OK, or simply press OK to leave this blank. The terminal communicates with the Moneris Host. 5. Please wait while the terminal communicates with the Moneris Host to process the transaction. The APPROVED prompt appears and the Merchant copy of the receipt is printed. -
Page 128: Purchase Transaction With Only E-Commerce Enabled
If the ENTER INVOICE NO entry screen appears, refer to the "Entering the Invoice Number" procedure. The terminal communicates with the Moneris Host. 5. Please wait while the terminal processes the transaction. The APPROVED prompt appears and the merchant receipt is printed. -
Page 129: Purchase Transaction With Only Moto Enabled
If the ENTER INVOICE NO entry screen appears, refer to the "Entering the Invoice Number" procedure. The terminal communicates with the Moneris Host. 5. Please wait while the terminal processes the transaction. The APPROVED prompt appears and the merchant receipt is printed. -
Page 130: Private Label Transactions
If the ENTER LAST 4 DIGITS entry screen appears, key in the last 4 digits of the private label credit Card number, and press OK. The terminal communicates with the Moneris Host. 6. Please wait while the terminal processes the transaction. -
Page 131: Private Label Payment Void
If the ENTER LAST 4 DIGITS entry screen appears, key in the last 4 digits of the private label credit Card number, and press OK. The terminal communicates with the Moneris Host. 7. Please wait while the terminal processes the transaction. -
Page 132: Credit Purchase Void With Chip Card
If the ENTER INVOICE NO entry screen appears, refer to the "Entering the Invoice Number" procedure. The PLEASE WAIT prompt appears; the terminal communicates with the Moneris Host. 3. Please wait while the terminal processes the transaction. The APPROVED ###### REMOVE CARD prompt appears, and the Cardholder copy of the receipt is printed. - Page 133 If the ENTER INVOICE NO entry screen appears instead, refer to the "Entering the Invoice Number" procedure. The PLEASE WAIT prompt appears; the terminal communicates with the Moneris Host. 8. Please wait while the terminal processes the transaction. The APPROVED ###### REMOVE CARD prompt appears, and the Merchant copy of the receipt is printed.
-
Page 134: Credit Refund With Chip Card
If the ENTER INVOICE NO entry screen appears instead, refer to the "Entering the Invoice Number" procedure. The PLEASE WAIT prompt appears; the terminal communicates with the Moneris Host. 8. Please wait while the terminal processes the transaction. The APPROVED ###### REMOVE CARD prompt appears, and the Merchant copy of the receipt is printed. -
Page 135: Credit Refund Void With Chip Card
7. Key in the AUTH # found on the Refund receipt, and press OK. IMPORTANT: You must enter an Original Authorization number that exists in the current Batch. If you do not have the number, you may not be able to process this transaction. Moneris Mobile 8200 Operating Manual v2.0... -
Page 136: Credit Pre-Authorization With Chip Card
If the ENTER INVOICE NO entry screen appears, refer to the "Entering the Invoice Number" procedure. The PLEASE WAIT prompt appears; the terminal communicates with the Moneris Host. 8. Please wait while the terminal processes the transaction. The APPROVED ###### REMOVE CARD prompt appears, and the Merchant copy of the receipt is printed. -
Page 137: Credit Pre-Authorization As Default With Chip Card
If the ENTER INVOICE NO entry screen appears, refer to the "Entering the Invoice Number" procedure. The PLEASE WAIT prompt appears; the terminal communicates with the Moneris Host. 3. Please wait while the terminal processes the transaction. The APPROVED ###### REMOVE CARD prompt appears, and the Merchant copy of the receipt is printed. -
Page 138: Corporate Card Purchase With Chip Card
4. Key in the Customer Reference Number, and press OK, or simply press OK to leave this field blank. The terminal communicates with the Moneris Host. 5. Please wait while the terminal processes the transaction. The APPROVED ###### REMOVE CARD prompt appears, and the Cardholder copy of the receipt is printed. -
Page 139: Debit Card Transactions
The SWIPE OR INSERT CARD prompt appears. 2. Swipe the debit card on the terminal's magnetic stripe reader. The CUSTOMER PRESS OK TO CONTINUE prompt appears. 3. Pass the terminal to the customer. Do NOT press OK. Moneris Mobile 8200 Operating Manual v2.0... - Page 140 Note: Please respect the cardholder's privacy while they enter their PIN and encourage your customers to "protect Your PIN." The terminal communicates with the Moneris Host. The APPROVED THANK YOU RETURN TO CLERK prompt appears. If there was NO Cashback: a.
-
Page 141: Debit Purchase Void
The SELECT ACCOUNT prompt appears. c. The cardholder selects their account type (F1 for Chequing or F3 for Savings). The ENTER PIN & OK prompt appears. d. The cardholder keys in their PIN and presses OK. Moneris Mobile 8200 Operating Manual v2.0... -
Page 142: Debit Refund
Note: Please respect the cardholder's privacy while they enter their PIN, and encourage your customers to "protect your PIN." The terminal communicates with the Moneris Host, and then the APPROVED THANK YOU RETURN TO CLERK prompt appears on the terminal. -
Page 143: Debit Refund Void
Note: Please respect the cardholder's privacy while they enter their PIN, and encourage your customers to "protect your PIN." The terminal communicates with the Moneris Host then the APPROVED THANK YOU RETURN TO CLERK prompt appears. e. The cardholder returns the terminal to you. - Page 144 Note: Please respect the cardholder's privacy while they enter their PIN and encourage your customers to "Protect Your PIN". The terminal communicates with the Moneris Host then the APPROVED THANK YOU RETURN TO CLERK prompt appears. e. The cardholder returns the terminal to you.
-
Page 145: Chip Debit Card Transactions
If the CUSTOMER PRESS OK TO CONTINUE prompt appears, refer to the "Cardholder Entry on the Terminal Keypad for Debit Purchase with Chip Card" procedure. The PLEASE WAIT prompt appears; the terminal communicates with the Moneris Host. 3. Please wait while the terminal processes the transaction. If there was NO Cashback: The APPROVED THANK YOU REMOVE CARD prompt appears. -
Page 146: Debit Purchase Void With Chip Card
Batch. If you do not have the number, you may not be able to process this transaction. The CUSTOMER PRESS OK TO CONTINUE prompt appears. 8. Pass the terminal to the customer. Do not Press OK. Moneris Mobile 8200 Operating Manual v2.0... -
Page 147: Debit Refund With Chip Card
"protect your PIN." 12. The cardholder keys in their PIN and presses OK. The PLEASE WAIT prompt appears; the terminal communicates with the Moneris Host. 13. The cardholder returns the terminal to you. The APPROVED ###### PRESS OK prompt appears. -
Page 148: Debit Refund Void With Chip Card
"protect your PIN." 11. The cardholder keys in their PIN and presses OK. The terminal communicates with the Moneris Host. The APPROVED THANK YOU REMOVE CARD message appears. 12. The cardholder removes the chip card, and returns the terminal to you. - Page 149 Note: Please respect the cardholder's privacy while they enter their PIN, and encourage your customers to "protect your PIN." 12. The cardholder keys in their PIN and presses OK. The terminal communicates with the Moneris Host. 13. The cardholder returns the terminal to you. The APPROVED ###### PRESS OK prompt appears.
-
Page 150: Cheque Authorization
If the ENTER LAST 4 DIGITS entry screen appears, key in the last 4 digits of the Card number, and press OK. The terminal communicates with the Moneris Host. 7. Record the APPROVED number on the back of the cheque. -
Page 151: Province Or State Code
The ENTER BIRTH DATE (YYMMDD) entry screen appears. 8. Key in the Birth date found on the driver's licence, and press OK. The terminal communicates with the Moneris Host. 9. Record the APPROVED number on the back of the cheque. -
Page 153: Chapter 6 The Ernex Programs
6 The Ernex Programs The ERNEX program allows you to offer your customers two electronic card-based programs that are activated and processed through the Mobile 8200 terminal: • Gift Cards: allows you to offer your customers stored-value gift cards for pre-defined dollar values as well as variable-value cards and rechargeable cards. -
Page 154: The Moneris Gift Card Program
For information on customized gift card programs for national chains, contact Moneris Solutions. To enable the Moneris Gift Card program on the terminal, follow the Ernex program setup process. The following transactions can be performed with the Moneris Gift Card program. They all begin at the ERNEX menu: •... -
Page 155: Deactivate A Gift Card
The PROCESSING prompt appears, and then the APPROVED PRESS OK message appears. 6. Press OK. If the TRANSFER BALANCE TO NEW CARD? prompt appears, refer to the "Transferring the Balance to a New Gift Card" procedure. Moneris Mobile 8200 Operating Manual v2.0... -
Page 156: Ernex Gift Card Purchase
If a Purchase using an Ernex Gift Card as payment was processed incorrectly, use this transaction to return the value of the Purchase back on to the Ernex Gift Card. Note: You must have the original Ernex Gift Card Purchase receipt available in order to perform this transaction. Moneris Mobile 8200 Operating Manual v2.0... -
Page 157: The Ernex Loyalty Program
Purchase (awards points) • Refund (removes points) • Redemption (uses points) • Activate Card • Deactivate Card • Card Inquiry on Loyalty Card • Void of Loyalty transaction • Reprint a Loyalty Card receipt Moneris Mobile 8200 Operating Manual v2.0... -
Page 158: Ernex Combo Card Transactions
If the ENTER CLERK ID entry screen appears, refer to the "Entering the Clerk ID" procedure. If the ENTER INVOICE NO entry screen appears, refer to the "Entering the Invoice Number" procedure. If the ENTER AMOUNT entry screen appears, refer to the "Entering the Activation Amount" procedure. Moneris Mobile 8200 Operating Manual v2.0... -
Page 159: Deactivate A Loyalty Card
4. Swipe the Loyalty Card on the terminal OR Key in the Loyalty Card number, and press OK. If the ENTER CLERK ID entry screen appears, refer to the "Entering the Clerk ID" procedure. Moneris Mobile 8200 Operating Manual v2.0... -
Page 160: Loyalty Card Purchase
If the ENTER BENEFIT AMOUNT entry screen appears, refer to the "Entering the Benefit Amount" procedure. The PROCESSING prompt appears, and then the APPROVED message appears while the first receipt prints. 6. Press OK to print the next receipt. Moneris Mobile 8200 Operating Manual v2.0... -
Page 161: Starting An Ernex Loyalty Card Transaction From A Pre-Authorization Transaction
Loyalty Card. Most Ernex Loyalty Card transactions are started automatically at the end of a debit or credit transaction, however they can also be started through the Ernex menus. Moneris Mobile 8200 Operating Manual v2.0... -
Page 162: Ernex Procedures
Reprinting Ernex Receipts Use this function to print a duplicate cardholder or Merchant copy of the most recently printed Ernex receipt. From the READY screen: 1. Press the Admin key. The MAIN MENU appears. Moneris Mobile 8200 Operating Manual v2.0... -
Page 163: Starting An Ernex Loyalty Card Transaction From A Financial Transaction
Credit Purchase Purchase (step 4) Debit Purchase Credit Refund Refund (step 4) Debit Refund Credit Purchase Void Ernex Void (step 4) Debit Purchase Void Credit Refund Void Ernex Void (step 4) Debit Refund Void Moneris Mobile 8200 Operating Manual v2.0... -
Page 164: Transferring The Balance To A New Gift Card
The default text of the optional information prompt is ENTER INFO; however, the Ernex Host may send a customized prompt, e.g. TRANSACTION ID. If this prompt has been customized, see the Customized Prompt Example below. Moneris Mobile 8200 Operating Manual v2.0... -
Page 165: Entering The Activation Amount
The ENTER DATA entry screen appears. b. Key in the dollar amount that will be used to calculate the number of points (i.e. the benefit), and press OK Simply press OK to use the value displayed. Moneris Mobile 8200 Operating Manual v2.0... -
Page 166: Entering The Number Of Points For A Redemption
Entering the Redemption Amount The default text of this optional prompt is ENTER AMOUNT; however, the Ernex Host may send a customized prompt. If this prompt has been customized, see the Customized Prompt Example below. Moneris Mobile 8200 Operating Manual v2.0... -
Page 167: The Menu Feature In Ernex
Starts an Ernex Gift Card Activation/Load or Loyalty Card Activation DEACTIVATE Starts an Ernex Gift Card Deactivation or Loyalty Card Deactivation CARD INQUIRY Starts an Ernex Card Balance Inquiry VOID Starts an Ernex Void REPRINT Starts the Ernex Reprint function Moneris Mobile 8200 Operating Manual v2.0... -
Page 168: The Ernex Setup Menu
Mobile 8200 terminal. IMPORTANT: The Ernex program requires an additional agreement between the merchant and Moneris Solutions. Please ensure that the necessary agreements are in place before attempting to configure those programs on the terminal. -
Page 169: The Ernex Voucher Header Menu
The SETUP menu appears. 6.7.3 The Ernex VOUCHER HEADER Menu The terminal can be configured to print Ernex vouchers on Ernex receipts. Use this menu to set up the Ernex voucher-related messages printed on the Ernex receipts. Moneris Mobile 8200 Operating Manual v2.0... - Page 170 3. Scroll up to SETUP and press OK. The SETUP menu appears. 4. Scroll down to PRINTER CONFIG and press OK. The PRINTER CFG menu appears. 5. Press OK to select VOUCHER HEADER. The VOUCHER HEADER menu appears. Moneris Mobile 8200 Operating Manual v2.0...
-
Page 171: The Ernex Report Functions Menu
Use this transaction to check the value remaining on the card as well as the status (active or deactivated) and the expiry date of an Ernex Gift Card or Loyalty Card. From the READY screen: Moneris Mobile 8200 Operating Manual v2.0... -
Page 172: Voiding An Ernex Transaction
TRANSACTIONS menu. Both Loyalty and Gift transactions can be cancelled using this transaction including: Loyalty Transactions (including Loyalty transactions on a Combo Card) Purchase Refund Redemption Activation Gift Transactions Purchase Refund Activation/Load Moneris Mobile 8200 Operating Manual v2.0... -
Page 173: Ernex Close Batch
ID feature has been enabled. The terminal communicates with the Ernex Host, then prints the CURRENT BATCH TOTALS report, and then returns to the ERNEX menu. 5. Press Can/Ann to return to the READY screen. Moneris Mobile 8200 Operating Manual v2.0... -
Page 174: Ernex Initialization
Note: Before attempting this transaction, ensure that: - the communications parameters have been configured. - the terminal has been registered to a communications base. - the terminal has been initialized to the Moneris Host 6.8.4.1 First Initialization From the READY screen: 1. -
Page 175: Ernex Reports
Clerk Subtotals Inquiry Ernex Clerk Subtotals Inquiry Configuration Parameters List Ernex Configuration Parameters List Help List Ernex Help List When the PRINT ERNEX REPORT? prompt appears: To print the same report for Ernex transactions: Moneris Mobile 8200 Operating Manual v2.0... -
Page 176: Printing A Stored Transactions Report For Ernex Transactions
If you wish to print information on each transaction individually as well as totals for the report, press F3 (NO). Note: If you are printing a Transactions List for the End-of-Day procedure, press F1 (YES). Moneris Mobile 8200 Operating Manual v2.0... -
Page 177: Printing An Ernex Open Batch Totals Report
• Amount • Type of transaction • Date of transaction The results can be printed or displayed on the terminal screen. From the READY screen: 1. Press the Admin key. The MAIN MENU appears. Moneris Mobile 8200 Operating Manual v2.0... - Page 178 (the 2-digit year is optional), and press OK. 10. The PRINT OR DISPLAY? prompt appears. To print the list of matching transactions, press F1 to select PRINT. The terminal searches its memory for matching transactions then displays PRINTING while the Moneris Mobile 8200 Operating Manual v2.0...
-
Page 179: Clerk Subtotalling On Ernex Transactions
Note: You can also perform a Clerk Subtotals Report for all clerks or one clerk. From the READY screen: 1. Press the Admin key. The MAIN MENU appears. 2. Scroll down to ERNEX, and press OK. The ERNEX menu appears. Moneris Mobile 8200 Operating Manual v2.0... -
Page 180: Ernex Clerk Subtotals Report For One Clerk
The ENTER CLERK ID entry screen appears. 6. Key in the Clerk ID, and press OK. (Refer to "Entering alphabetic characters and punctuation".) Note: You must enter the Clerk ID even if the Default Clerk ID feature has been enabled. Moneris Mobile 8200 Operating Manual v2.0... -
Page 181: Printing The Ernex Configuration Parameters List
3. Scroll down to REPORT FUNCS, and press OK. The REPORT FUNCS menu appears. 4. Scroll up to HELP LIST, and press OK. If the SWIPE ADMIN CARD prompt appears, swipe the POS Admin card. Moneris Mobile 8200 Operating Manual v2.0... - Page 182 6. The Ernex Programs The terminal displays PRINTING while it prints the report. When the reports are finished printing, the terminal returns to the ERNEX menu. 5. Press Can/Ann to return to the READY screen. Moneris Mobile 8200 Operating Manual v2.0...
-
Page 183: The Air Miles Rewards Program
Rewards Totals Reset time of day. v.Enable the Enter Reference Number prompt. Configure the Bonus Offers if you intend to offer them. Configure the Tax setup. Moneris Mobile 8200 Operating Manual v2.0... -
Page 184: The Air Miles Rewards Setup Menu
Centre. The Air Miles Rewards configuration menu (see REWARD PROGRAM below) contains a list of parameters that can be enabled and configured on the Mobile 8200 terminal. IMPORTANT: The Air Miles Rewards program requires an additional agreement between the merchant and Moneris Solutions. Please ensure that the necessary agreements are in place before attempting to configure those programs on the terminal. -
Page 185: Planning The Rewards Program Configuration
Before configuring an Air Miles Rewards program on your terminal, you will need to decide which parameters to use in creating your formula and what values those parameters will have. The parameters are: • Calculator and Factor values • Incentive parameters • Maximum Rewards value Moneris Mobile 8200 Operating Manual v2.0... -
Page 186: Rewards Program Planning Worksheet
Enable Enter Reference Number prompt (circle one): YES or NO Step 4. Configure the Bonus Offers: Number: ________ Description: _________________________ Reward Type (circle one): MULTIPLIER or POINTS If MULTIPLIER selected: Value: _____________ Multiplier Type (circle one): BASE POINTS or BONUS OFFERS Moneris Mobile 8200 Operating Manual v2.0... -
Page 187: Reward Program Components - Calculator And Factor Values
PURCHASE ÷ CALC 1 = REWARDS $10.00 ÷ $2.00 = 5 Description: Calculator 1 is applied to all sales of $2.00 or more, so the cardholder will receive 5 Rewards miles for their $10.00 Purchase. Example 2 Moneris Mobile 8200 Operating Manual v2.0... - Page 188 Values: CALC 1 = $2.00 FACTOR 1 = 52 CALC 2 = $1.00 FACTOR 2 = 98 PURCHASE = $300.00 REWARDS 1 = 150 MAX PURCHASE 1 = $104.00 MAX REWARDS 1 = 52 Moneris Mobile 8200 Operating Manual v2.0...
-
Page 189: Reward Program Components - Bonus Offer Values
2. As a multiplier applied to base miles (similar to an Incentive) - If a cardholder purchases a qualifying item, an incentive value is applied to their C/F rewards value. Only applicable if no other Incentive has been applied to the transaction. See Example Moneris Mobile 8200 Operating Manual v2.0... - Page 190 Example 2 Values: PURCHASE AMOUNT: $438.55 TOTAL C/F REWARDS: 115 BONUS OFFER configured as BASE POINTS MULTIPLIER VALUE: 1.5 Calculation: C/F REWARDS X BO MULTIPLIER VALUE = TOTAL REWARDS (115 x 1.5) = 172 Description: Moneris Mobile 8200 Operating Manual v2.0...
-
Page 191: Reward Program Components - Incentive Values
INCENTIVE VALUE: 1.5 Calculation: TOTAL STANDARD REWARDS x INCENTIVE VALUE = TOTAL INCENTIVE REWARDS (115 x 1.5) = 172 TOTAL INCENTIVE REWARDS - TOTAL STANDARD REWARDS = INCENTIVE REWARDS (172 - 115) = 67 Moneris Mobile 8200 Operating Manual v2.0... -
Page 192: Order Of Calculation
If Incentive Value >1.00 and no Bonus Offers are configured then award Total Incentive Rewards. If Incentive Value >1.00 and at least one Points Bonus Offer is configured then calculate the sum of Total Incentive Rewards + Total Points Bonus Offer Rewards. Moneris Mobile 8200 Operating Manual v2.0... -
Page 193: Rewards Calculation Table
Multiplier Bonus Offer #N Multiplier Value x (Points Bonus Offer #N Rewards Rewards) (MBO#N) Total Multiplier Bonus Offer MBO#1 + ... + MBO#N Rewards Total Bonus Offer Rewards (Total Points Bonus Offer Rewards) + (Total Moneris Mobile 8200 Operating Manual v2.0... -
Page 194: Enable The Rewards Program
REWARD PROGRAM menu. Note: If you select BOTH, the REWARD PURCHASE program selection prompt will appear during Reward Purchases and the REWARD REFUND program selection prompt will appear during Reward Refund transactions. Moneris Mobile 8200 Operating Manual v2.0... -
Page 195: Configure The Calculator And Factor Values
The configuration steps are the same for both the RETAIL and the WHOLESALE program types. The following instructions refer specifically to the Retail program. To configure the Wholesale program, follow these instructions substituting WHOLESALE wherever you see RETAIL. Moneris Mobile 8200 Operating Manual v2.0... -
Page 196: Configure The Maximum Rewards Allowed
Refer to your Rewards Program Planning worksheet for the values to key in for each parameter. The configuration steps are the same for both the RETAIL and the WHOLESALE program types. The following instructions refer specifically to the Retail program. To configure the Moneris Mobile 8200 Operating Manual v2.0... -
Page 197: Set The Rewards Totals Reset Time Of Day
The following instructions refer specifically to the Retail program. To configure the Wholesale program, follow these instructions substituting WHOLESALE wherever you see RETAIL. From the REWARD PROGRAM menu: a. Scroll down to RETAIL CONFIG, and press OK. The REWRD CFG-RETAIL menu appears. Moneris Mobile 8200 Operating Manual v2.0... -
Page 198: Configure The Bonus Offers
Scroll down to MULTIPLIER, and press OK. The BONUS OFFR REWRD MULTIPLIER entry screen appears. h. Key in the value of the multiplier (min. 1.00, max. 99.99), and press OK. The Bonus Offer Setup menu re-appears. Moneris Mobile 8200 Operating Manual v2.0... - Page 199 Key in the first date the bonus offers will be available (YYYYMMDD), and press OK. The Bonus Offer Setup menu reappears. o. Scroll down to BONUS END DATE, and press OK. The BONUS OFFR END DATE entry screen appears. Moneris Mobile 8200 Operating Manual v2.0...
-
Page 200: Configure The Tax Type
The SAF UPLOAD TIME PERIOD entry screen appears. 2. Key in the number of minutes the terminal must wait before attempting an automatic SAF Upload transaction, and press OK. (min. 1 minute, max. 15 minutes, default is 5 Moneris Mobile 8200 Operating Manual v2.0... -
Page 201: Air Miles Transactions
Add Bonus Offers during a Rewards Purchase If one or more Bonus Offers were enabled for the Rewards program used to calculate miles on this transaction, and the cardholder has purchased items that qualify as Bonus Offers, you Moneris Mobile 8200 Operating Manual v2.0... -
Page 202: Applying The Incentive To An Air Miles Rewards Purchase
The MAIN MENU appears. 2. Scroll down to REWARDS, and press OK. The REWARD MENU appears. 3. Scroll down to REFUND, and press OK. The SWIPE ADMIN CARD prompt appears. 4. Swipe your MONERIS POS Admin card. Moneris Mobile 8200 Operating Manual v2.0... -
Page 203: Add Bonus Offers During A Rewards Refund
14 characters of the bonus offer name (e.g. if bonus offer 001 is named "June and July Offer" then the receipt will display "001 JUNE AND JULY " and the Bonus Offer number to be entered here is 001). The POINTS REFUNDED entry screen appears. Moneris Mobile 8200 Operating Manual v2.0... -
Page 204: Air Miles Admin Transactions
7.5 Air Miles Admin Transactions 7.5.1 Completing Air Miles Reward Transactions Air Miles transactions are not complete until they have been uploaded to the Moneris Host for processing. The terminal automatically connects to the Moneris Host to upload and complete the transactions in the Reward SAF Log (refer to the "Printing the Air Miles Rewards SAF List"... -
Page 205: Saf Log Status Icons
Deleting a transaction from the Air Miles Rewards SAF List If an Air Miles Rewards transactions does not need to be sent to the Moneris Host for completion, e.g. if you wish to cancel the transaction before it is completed, you can delete the transaction from the Air Miles Rewards SAF Log in order to ensure that it is not completed accidentally. -
Page 206: Printing An Air Miles Rewards Totals Report
(i.e. you simply press OK as each criteria appears), all transactions in the terminal memory are listed. IMPORTANT: The POS Admin card is required if you wish to print unmasked Card numbers on this report. Criteria are: • Date of Transaction • Card Number Moneris Mobile 8200 Operating Manual v2.0... -
Page 207: Printing An Air Miles Rewards Configuration List
Factor values • Incentive values, descriptions and dates • Tax settings • Bonus Offer parameters From the READY screen or the TERMINAL SETUP REQUIRED prompt: 1. Press the Admin key. The MAIN MENU appears. Moneris Mobile 8200 Operating Manual v2.0... -
Page 208: Printing An Air Miles Rewards Help List
3. Scroll down to REPRINT, and press OK. A duplicate of the most recently printed Rewards receipt is printed. 4. The terminal returns to the REWARD MENU. 5. Press Can/Ann to return to the READY screen. Moneris Mobile 8200 Operating Manual v2.0... -
Page 209: Chapter 8 Admin Transactions
The ADMIN FUNCS menu appears. 3. Press OK to select LOGON. If the SWIPE ADMIN CARD prompt appears, swipe the POS Admin card. 4. The terminal communicates with the Moneris Host. 5. The READY screen appears. The terminal is now ready to process transactions. - Page 210 The LANGUAGE PREF menu appears. 11. Scroll down to select the applicant's Preferred Language, and press OK. PROCESSING is displayed on the terminal as it communicates with the Moneris Host. The Merchant copy of the Credit Card Application receipt is printed.
-
Page 211: Training Mode
8.4 Training Mode 8.4.1 Training Mode Training mode allows you and your employees to practise operating the Moneris Mobile 8200 terminal without affecting your terminal total amounts, your financial accounts and your customers’ accounts. Note: Once you enter Training mode you can not change the terminal language. If you wish to change the terminal language you must exit Training mode, change the terminal display language, then enter Training mode again. -
Page 212: Admin Functions
Swipe or Insert 8.4.4 Admin Functions Reporting Functions Admin Functions Configuration CLOSE BATCH REPRINT BASE CONFIG TRANS LIST BACKLIGHT TRANS INQUIRY TRAINING DEPOSIT TOTALS CREDIT APP MERCH SUBTOTAL POWER OFF TIP TOTALS CLERK INQUIRY PRE-AUTH LIST Moneris Mobile 8200 Operating Manual v2.0... -
Page 213: Loyalty Card Transactions
2. Scroll down to ADMIN, and press OK. The ADMIN FUNCS menu appears. 3. Scroll down to TRAINING, and press OK. The CLEAR TRAINING TOTALS? prompt appears. If the SWIPE ADMIN CARD prompt appears, swipe the POS Admin card. Moneris Mobile 8200 Operating Manual v2.0... -
Page 214: Exiting Training Mode
If the SWIPE ADMIN CARD prompt appears, swipe the POS Admin card. IMPORTANT: All transactions performed on the terminal will now be in normal mode. They WILL affect your terminal totals, your financial accounts and your customers’ accounts. Moneris Mobile 8200 Operating Manual v2.0... -
Page 215: Reports
The MULT CLERKS(00 PEND) prompt appears. 5. Scroll down to ALL CLERKS, and press OK. The terminal communicates with the Moneris Host then prints: a. The CLERK SUBTOTALS report for each Clerk ID b. The OVERALL TOTALS report for all Clerk IDs. -
Page 216: Clerk Subtotals Report For A Group Of Clerks
Note: You must enter the Clerk ID even if the Default Clerk ID feature has been enabled. The terminal communicates with the Moneris Host then prints the CLERK SUBTOTALS report and returns to the READY screen. If the PRINT ERNEX REPORT? appears, refer to the "Printing an Ernex Report after a Financial Report"... -
Page 217: Emv Parameters List
3. Scroll down to EMV PARMS LIST, and press OK. The EMV PARMS LIST screen appears. If the SWIPE ADMIN CARD prompt appears, swipe the POS Admin card. The terminal prints out the EMV parameters list and then returns to the READY screen. Moneris Mobile 8200 Operating Manual v2.0... -
Page 218: Current Batch Totals Report
The terminal finishes printing the report and returns to the READY screen. 9.5 Deposit Totals Inquiry The Deposit Totals Inquiry report provides transaction type totals by card type from the Moneris Host and grand totals by transaction type. From the READY screen: 1. Press the Admin key. -
Page 219: Tip Totals Report
If the ENTER CLERK ID entry screen appears, refer to the "Entering the Clerk ID" procedure. 4. The terminal communicates with the Moneris Host. 5. The report prints and the terminal returns to the READY screen. 9.6 Tip Totals report This function prints a summary of all Tip amounts entered for Purchase and Pre-Auth Advice transactions stored in the current batch. -
Page 220: Printing A Help List
If the PRINT ERNEX REPORT? appears, refer to the "Printing an Ernex Report after a Financial Report" procedure. 9.8 Merchant Subtotals Report This function prints the merchant totals for the current batch from the Moneris Host. From the READY screen: 1. Press the Admin key. - Page 221 The BATCH NUMBER entry screen appears. Simply press OK. • To print the report for a specific Batch number, press F3 (BATCH). The BATCH NUMBER entry screen appears. Key in the batch number and press OK. Moneris Mobile 8200 Operating Manual v2.0...
-
Page 222: Delete A Pre-Authorization Using Transaction Inquiry
D. Press F1 (NEXT). The DELETE PRE-AUTH? screen appears. DELETE PRE-AUTH? CCCCCCCCCCC MMDD TT $999,999.99 NEXT DELETE E. Confirm that this is the correct transaction then press F3 (DELETE) to remove it from the terminal memory. Moneris Mobile 8200 Operating Manual v2.0... -
Page 223: Private Label Transactions On Reports
If the ENTER CLERK ID entry screen appears, refer to the "Entering the Clerk ID" procedure. 5. Select the sorting method for the report: Press F1 to print the transactions that occur on a specific date. Press F3 to print the transactions that occur in a specific batch. Moneris Mobile 8200 Operating Manual v2.0... -
Page 224: Transaction Inquiry Report
3. Scroll down and select TRANS INQUIRY. The SWIPE ADMIN CARD prompt appears. 4. To print complete Card numbers on the report, swipe the POS Admin card OR To print masked Card numbers on the report, simply press OK. Moneris Mobile 8200 Operating Manual v2.0... -
Page 225: Printing A Transaction Inquiry Report
B. The terminal displays PRINTING while the report is printed. If the PRINT ERNEX REPORT? appears, refer to the "Printing an Ernex Report after a Financial Report" procedure. The terminal returns to the READY prompt. Moneris Mobile 8200 Operating Manual v2.0... -
Page 226: Transaction Inquiry - Reprinting The Merchant Receipt Copy
Trans Inquiry menu. To select another transaction to reprint, scroll through the list until the transaction is highlighted then press OK. To return to the READY screen, press Can/Ann repeatedly. Moneris Mobile 8200 Operating Manual v2.0... -
Page 227: Chapter 10 End-Of-Day Procedure
If the Air Miles Rewards program is enabled on your terminal, reward transactions are saved on the terminal then forwarded to the Moneris Host in small groups. You do not need to process an administrative transaction in order to close Air Miles transactions. It is recommended, however, that you check at the end of the day to ensure all Air Miles Rewards transactions have been forwarded to the Moneris Host. -
Page 228: Multi-Terminal Reports
TERMINAL BATCH TOTALS report (printed from the Print Stored Transactions report). b. If the totals do not match, contact the Moneris Merchant Service Centre the next business day for reconciliation assistance. 5. The terminal communicates with the Moneris Host again, finishes printing the report, and returns to the READY screen. -
Page 229: Multi-Terminal Report For One Or More Terminals By Name
The MULT TERM menu appears. 6. Scroll down to ALL TERMINALS, and press OK. The terminal communicates with the Moneris Host then, if the Deposit Totals report was requested in step 5, displays PRINTING while it prints the report and returns to the READY screen. -
Page 230: Multi-Terminal Report For One Or More Groups Of Terminals
This function does not compare totals stored in the terminal memory to totals stored on the Moneris Host. Therefore, ensure your receipts balance to the total of the Deposit Totals report (selected in step 5) or print a stored Transactions List report on each of the terminals selected. -
Page 231: Chapter 11 Troubleshooting
• refer to other Moneris Mobile 8200 documentation • call the Moneris Merchant Contact Centre 11.1 Additional Documentation To download a copy of the Moneris Mobile 8200 Quick Reference Guide: • go to: www.moneris.com/merchant/qrguides/ • and select "Mobile 8200" To download a printable PDF file of this Operating Manual: •... -
Page 232: Error Messages On The 8200 Terminal
ISP for assistance before contacting Moneris. Check the Error Message or Hardware Problem resolution to determine if this is the case. If this does not resolve the problem, contact the Moneris Merchant Service Centre for assistance. 11.4 Error Messages on the 8200 Terminal A message will appear on the display if an error occurs. - Page 233 - Ask the cardholder to return the terminal. - Press OK to display the merchant prompts. - The REFUND LIMIT EXCEEDED prompt appears. APP CA06 Contact the Moneris Merchant Service Centre for assistance. ASSERT Contact the Moneris Merchant Service Centre for assistance. AUTHENTICATE xxx = the application name or "OS"...
- Page 234 CARD REMOVED The chip card was removed from the chip card reader during the RETURN TO CLERK cardholder prompts, before the REMOVE CARD prompt was displayed. Moneris Mobile 8200 Operating Manual v2.0...
- Page 235 If dial backup is not available: - Press OK. The READY prompt appears. - Request an alternate form of payment. OR Contact the Moneris Merchant Service Centre for assistance. CF00 IDLE Contact the Moneris Merchant Service Centre for assistance. CFS XXX...
- Page 236 The Ernex Communication Test failed. PROBLEM WITH Press OK to return to the READY screen. ERNEX Contact the Moneris Merchant Service Centre for assistance. CUSTOMER - A chip card was swiped on the Magnetic Stripe Card Reader instead of INSERT CARD inserted into the chip card reader.
- Page 237 An unknown communication error has occurred. COMM ERROR Press OK to return to the READY screen and try the transaction again. If the message reappears, contact the Moneris Merchant Service Centre for assistance. ERROR 402 The Host has dropped the connection to the terminal during a HOST DISCONNECT transaction.
- Page 238 Press OK to return to the READY screen, and try the transaction again. If the message reappears, contact the Moneris Merchant Service Centre for assistance. ERROR 407 The application did not send the final message to the Moneris Host. The ACK NOT SENT transaction is considered cancelled. - Press OK.
- Page 239 FAILED, CONTACT Initialization. SERVICE CENTRE Press OK to return to the READY screen. Contact the Moneris Merchant Service Centre for assistance. INITIALIZATION The Merchant ID entered during the Initialization was not correct. FAILED, MERCHANT - Press OK to return to the READY screen ID ERROR - Check the Merchant ID.
- Page 240 - Press OK to return to the READY screen. Contact the Moneris Merchant Service Centre for assistance. INIT REQ'D The Moneris Host is requesting a re-initialization of the terminal. Contact the Moneris Merchant Service Centre for assistance. INVALID CARD NO.
- Page 241 Charge-only Base A must be located within range of Comms Base 1 to allow the terminal to communicate with Comms Base 1. MAC FAILURE The terminal was unable to initialize to the Moneris Host. PRESS OK Press OK. The terminal may automatically attempt another initialization or may simply return to the READY screen.
- Page 242 11. Troubleshooting prompt re-appears. If the prompt reappears, contact the Moneris Merchant Service Centre for assistance. NO ACTIVITY Clerk Subtotals are not available for that Clerk ID That Clerk ID does not exist. Check the Clerk ID and try the report again.
- Page 243 The terminal has been logged off to protect it from attempts to perform unauthorized transactions. Perform a Logon transaction. REFER CALL Contact the Moneris Merchant Service Centre to obtain a voice authorization. Once authorized, process an Advice Transaction. REFUND LIMIT The Refund Amount entered exceeds the limit set on the terminal during EXCEEDED Initialization.
- Page 244 Retry the transaction. If problem persists, contact the Moneris Merchant Service Centre for assistance. RETRY - SYSTEM The Moneris Host or the Third Party Host was unable to process the TIME OUT ### transaction. Retry the transaction. If the problem persists, contact the Moneris Merchant Service Centre for assistance.
- Page 245 See Code Authentication error messages. SECURITY MODE MLDT SYSTEM PROBLEM One or more of the messages sent between the terminal and the Moneris PLEASE RETRY Host are missing data or have incorrect data. Wait for a few minutes then try the transaction again.
- Page 246 Press OK to return to the READY screen. TERMINAL SETUP The terminal has not been configured. REQUIRED Contact the Moneris Merchant Service Centre for assistance with configuring the terminal. TIME-OUT The cardholder has taken too long to respond to their prompts.
-
Page 247: Hardware Problems
IMPORTANT: If you are using PUBLIC IP communication, you may need to contact your ISP for assistance before contacting Moneris. Check the Hardware Problem resolution to determine if this is the case. HARDWARE... - Page 248 - Try inserting a different card. If this card can be read, the problem is read cards with the first card. Request another form of payment. - If the card reader still won't read cards, contact the Moneris Merchant Service Centre for assistance. Display screen is blank The terminal may be in Stand-by Mode.
- Page 249 - Use a Head Cleaning Card to clean the card reader (a.k.a. the magnetic stripe reader or MSR). Contact the Moneris Merchant Service Centre if you need Head Cleaning Cards. - If the card reader still won't read cards, contact the Moneris Merchant Service Centre for assistance. No transactions are being - Determine whether Call Waiting or Call Answer is activated on the processed.
- Page 250 If the problem persists, advise the debit cardholder to contact CANCELLED their branch. Request another form of payment. DECLINED The terminal has not been set up on the Moneris Host to process CARD NOT SETUP that card type. Call the Moneris Merchant Contact Centre for assistance. DECLINED Call the Moneris Merchant Contact Centre for assistance.
- Page 251 The message will appear for 2 seconds. It may appear by itself or with one or more of these Code Authentication messages then the SSA menu appears. If any of these error messages appears, contact the Moneris Merchant Service Centre for assistance.
- Page 252 FAILED! SSA menu appears. Do NOT touch the keys on the terminal. Do NOT power down the terminal. Contact the Moneris Merchant Service Centre for assistance. CFS XXX xxx = CFS name CAN'T OPEN! This message will appear for 2 seconds. It may appear by itself or with one or more of these Code Authentication messages then the SSA menu appears.
- Page 253 11. Troubleshooting Contact the Moneris Merchant Service Centre for assistance. This special SSA menu appears when the terminal has finished SECURITY MODE authenticating the applications and one or more applications have MLDT failed. Do NOT touch the keys on the terminal.
Need help?
Do you have a question about the Mobile 8200 and is the answer not in the manual?
Questions and answers