Table of Contents
Advertisement
Quick Links
Advertisement
Table of Contents

Related Manuals for GeoVision GV-NAS SYSTEM


Summary of Contents for GeoVision GV-NAS SYSTEM
- Page 1 S yste e m y y t t e e m m The Vision of Security RoHS 2015/05 Thank you for purchasing GV-NAS System. This guide is designed to assist the new English user in getting immediate results from the GV-NAS System. NASV101-QG-A...
- Page 2 GeoVision. Every effort has been made to ensure that the information in this manual is accurate. GeoVision, Inc. makes no expressed or implied warranty of any kind and assumes no responsibility for errors or omissions. No liability is assumed for incidental or consequential damages arising from the use of the information or products contained herein.
-
Page 3: Table Of Contents
4. The Web Interface (Desktop)........19 5. Network Settings ............21 6. Recording GV-IP Cameras to GV-NAS System..23 7. Playing Back Recordings from GV-NAS System ...27 7.1 Playing Back on a Computer ...........27 7.2 Playing Back on a Mobile Device..........30 8. Firmware Upgrade .............35... -
Page 5: Introduction
1. Introduction Welcome to the GV-NAS System Quick Start Guide. In the following sections, you will learn about the basic installations and configurations. For more details, see GV-NAS System User’s Manual. -
Page 6: Packing List And Package
1.1 Packing List and Package You can choose to purchase a GV-NAS System package or a bundled package which also includes 4 GV-Target IP Camera of your choice and a GV-PoE switch. Package Options: Single Package Bundled Package GV-NAS System Single Package ... -
Page 7: System Requirements
Introduction 1.2 System Requirements Tested and Suggested Web Browsers and Versions Internet Explorer 8 or later Google Chrome 33.0.1750.154 Mozilla Firefox 28 Safari for Windows 5.1.7 Safari for MAC 6.0.5 Recommended Hard Disks For system efficiency, we recommend the following enterprise level hard disk drives. -
Page 8: Supported Ip Cameras
1.3 Supported IP Cameras GV-NAS System supports the following IP cameras. GV-EBL1100 / 2100 (GV-Target Series V1.02 or later) GV-EBX1100 / 2100 (GV-Target Series V1.02 or later) GV-EDR1100 / 2100 (GV-Target Series V1.02 or later) GV-EFD1100 / 2100 (GV-Target Series V1.02 or later) ... -
Page 9: Overview
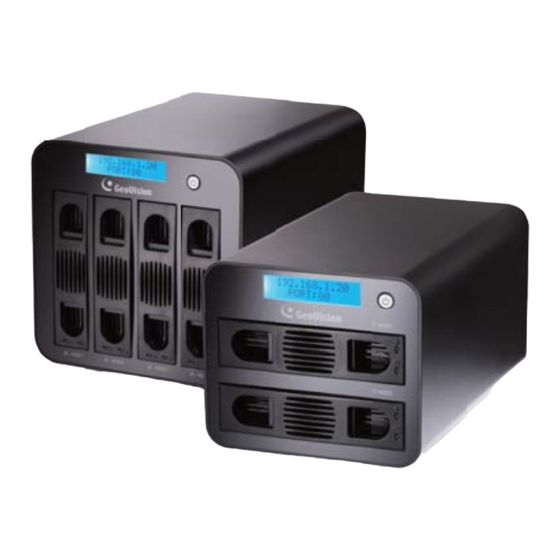
2. Overview 2.1 Front Panel GV-NAS2008/2016 GV-NAS4008/4016... - Page 10 Name Description LCD Panel Displays the device’s current IP address, port setting, MAC address, motherboard temperature and CPU temperature. Press the power button to switch the displayed information. Power Press the power button to turn the device on. Drive Bays Load hard disk drives.
-
Page 11: Rear Panel
Overview 2.2 Rear Panel GV-NAS2008 GV-NAS2016 POWER MODE USB DEFAULT GV-NAS4008 GV-NAS4016... - Page 12 Name Description Gigabit LAN Connects to 10/100/1000 Mbps Ethernet. Power Mode Sets the system status (on or off) when power resumes after a power failure. Press Switch 1 up to have the system turned on when power resumes; press Switch 1 down for the system to remain off when power resumes.
-
Page 13: Installing The Hard Disks
Overview 2.3 Installing the Hard Disks The GV-NAS System’s disk drives are hot-swappable. You can install or replace hard drives while the system is running. Follow the steps below to install a hard disk. Press and pull out the disk holder. For NAS4008/4016, the top of the disks should face the right. - Page 14 Put the hard drive into the disk holder. Your hard disk should fit perfectly with the connector pins facing the back. Connector pins Re-install the clips to secure the disk to the holder. Press the middle of the clip first and then the sides. Press the middle part first Follow step 1 to re-install the disk holder.
-
Page 15: Getting Started
3. Getting Started 3.1 Looking Up the IP Address By default, the IP address of GV-NAS System is assigned by the DHCP server when the system is connected under a LAN environment. To find the IP address: look up from the system’s LCD panel, or ... -
Page 16: Accessing The Gv-Nas System
Type the user name, password and the verification code to log in. The default user name and password are both admin. Note: If the GV-NAS System is installed behind a firewall or router, you may need to open these default ports: HTTP port 80, FTP port 21, Ajaxplorer port 8090, Web Server port 8060, Cloud Printing Service port 9100 and E-mail notification port 465 (for example: Google’s SMTP). -
Page 17: The Gv-Nas System Utility
You can also use the utility software included on the software CD to find the IP address. Execute GV-NAS System Utility.exe. This dialog box appears. Click Search to start searching the GV-NAS System under the same LAN. This dialog box appears, showing the device found and its network settings (IP address). - Page 18 If your device does not show up, click Search again to browse again. To configure the GV-NAS System’s network settings, device date and time, click Setup and type the password. Note: This setup will take you through the basic configurations of the device without an Internet browser.
-
Page 19: Creating Raid
Getting Started 3.4 Creating RAID GV-NAS System supports single disk formatting, linear (JBOD), RAID 0, RAID 1 and RAID 5 setup. Follow the steps below to format or create RAID to your disk drives. Note: RAID 5 is only supported by GV-NAS4016. - Page 20 Manual setup: Manually select the hard disk drives and then click Single Disk Volume, Linear Volume, RAID 0, RAID 1 or RAID 5. For details on requirement and effects of each format type, see 2.4 Creating RAID, GV-NAS System User’s Manual on the software CD.
- Page 21 To add another disk to a RAID group, click Add Disk(s) to RAID. IMPORTANT: Depending on the size of the hard disks, GV-NAS System may take varying amount of time to establish and rebuild RAID. Make sure the power supply is stable during the formatting. Power failure during formatting may cause permanent damage to the system, rendering the device unusable.
-
Page 22: Default Accounts
By default, GV-NAS2008/4008 contains 8 camera folders (“Cam01” to “Cam08”) and GV-NAS2016/4016 contains 16 camera folders (“Cam01” to “Cam16”). The webmaster account is only created after you enable the Web Server function. For details, see 4.7 Web Server, GV-NAS System User’s Manual. -
Page 23: The Web Interface (Desktop)
The desktop contains access (icons) to many applications and management tools. For details on these applications, see System Administration, Chapter 3, GV-NAS System User’s Manual on the software You can keep multiple windows open at the same time. To minimize all the... - Page 24 To power off, reboot or log out of the system, click the home icon the top-left corner of the desktop and select from the drop-down list. Click the home icon again to close the list.
-
Page 25: Network Settings
5. Network Settings By default, GV-NAS System is randomly assigned with an IP address by the DHCP server when it is connected to the network. However, if the server does not support DHCP, GV-NAS System will be assigned with the IP address http://192.168.0.200. - Page 26 Under Use the following DNS server address, configure the Primary DNS Server and Secondary DNS Server addresses. Click Apply to save the settings.
-
Page 27: Recording Gv-Ip Cameras To Gv-Nas System
From the GV-IP Camera’s Web interface, select Management and then Storage Settings. This page appears. Optionally configure the Recycle and Keep Days settings. The files recorded to the GV-NAS System will be stored based on these criteria. For details, see GV-IPCAM H.264 User’s Manual on the Software CD. - Page 28 Assign a storage location under the GV-NAS System. Select Enable. Type the URL/IP Address (the designated storage folder) in this format \\NAS Server Name\IP_Camera. As illustrated, this GV-IP Camera will be recorded to the shared folder “IP_Camera” in GV-NAS System.
- Page 29 Click the Search button to browse for the GV-NAS System. This page appears. Type the username and password, and click Select. This page appears. Select a folder and click OK. To record another GV-IP Camera to GV-NAS System, repeat steps 1 to 3 and select a different user account.
- Page 30 Click Apply. From GV-IP Camera’s Web interface, click Monitoring and select Start to start recording to the GV-NAS System. To change the user name or create more users or to create more shared folders, see 4.2.1 Users and 4.2.3 Shared Folder respectively in GV-NAS...
-
Page 31: Playing Back Recordings From Gv-Nas System
7. Playing Back Recordings from GV-NAS System You can play back recordings saved at your GV-NAS System on a computer or on your mobile device. 7.1 Playing Back on a Computer On GV-NAS System’s Web interface, click Ajaxplorer. The Ajaxplorer dialog box appears. - Page 32 Type the username and password which allows access to the recordings you wish to play back. The Ajaxplorer window appears. Note: By default, the administrator account and camera accounts all have access to the IP_Camera folder. For details, see 3.5 Default Accounts in the Quick Start Guide.
- Page 33 Playing Back From GV-NAS System Tip: You can search files using key words. From the left-corner of the Ajaxplorer window, type the key words and click . For example, use the date to help you narrow down the search:...
-
Page 34: Playing Back On A Mobile Device
7.2 Playing Back on a Mobile Device You can play back recordings saved at GV-NAS on your Android and iOS mobile devices using the GV-Eye application program. You can download the program from the App Store or Android Market. The following is an example using an iOS device. - Page 35 Playing Back From GV-NAS System Tap the GV-Eye icon . This page appears. Tap the Add icon . This page appears.
- Page 36 You can add cameras automatically or manually. A. To add cameras automatically, tap the WiFi Search button to browse cameras under the same LAN, tap to select cameras and click Save. This camera is added to the Camera List.
- Page 37 Playing Back From GV-NAS System B. To add cameras manually, type the Name, IP Address, port, username and password of the camera and then click Save. This camera is added to the Camera List.
- Page 38 Tap the live view to show a full-screen display and tap the Playback icon on the bottom right corner. A list of recordings appears. They are arranged from new to old. Tap an entry and the recording is immediately played back.
-
Page 39: Firmware Upgrade
8. Firmware Upgrade To upgrade the system firmware, follow the steps below. Download the latest firmware file from the GeoVision Website http://www.geovision.com.tw/english/5_3.asp Click the System Administration icon from the desktop and select Firmware Upgrade. This page appears. Click Choose File to browse the file and then click Upgrade. This will take about 8 minutes.
Need help?
Do you have a question about the GV-NAS SYSTEM and is the answer not in the manual?
Questions and answers