GeoVision GV Series How-To Manual
How to load default settings
Hide thumbs
Also See for GV Series:
- User manual (143 pages) ,
- Quick start manual (21 pages) ,
- Hardware installation manual (12 pages)
Table of Contents
Advertisement
Quick Links
[FAQ]
How to load default settings to GV-IP device & GV-System?
Article ID: GV13-01-31-k-1
Release Date: 01/31/2013
Applied to
GV-Video Server (GV-VS04H, GV-VS11, GV-VS12, and GV-VS14)
GV-Compact DVR V3 Series
GV-IPCAM H.264 Series
GV-DSP LPR V2 &V3
GV-System
Summary
Among different models of GV-IP devices, the time of loading default settings for each model
can vary and the way the LEDs flash can also be different.
1
Advertisement
Table of Contents

Related Manuals for GeoVision GV Series


Summary of Contents for GeoVision GV Series
- Page 1 [FAQ] How to load default settings to GV-IP device & GV-System? Article ID: GV13-01-31-k-1 Release Date: 01/31/2013 Applied to GV-Video Server (GV-VS04H, GV-VS11, GV-VS12, and GV-VS14) GV-Compact DVR V3 Series GV-IPCAM H.264 Series GV-DSP LPR V2 &V3 GV-System Summary Among different models of GV-IP devices, the time of loading default settings for each model can vary and the way the LEDs flash can also be different.
-
Page 2: Table Of Contents
Contents GV-Video Server (GV-VS04H and GV-VS14) ..................3 GV-Video Server (GV-VS11 and GV-VS12) .................... 4 GV-Compact DVR V3 ..........................5 GV-IPCAM H.264 Series ......................... 6 Box Camera ............................6 Ultra Box Camera ..........................7 Mini Fixed Dome ..........................7 Mini Fixed Rugged Dome ........................8 Bullet Camera ............................ -
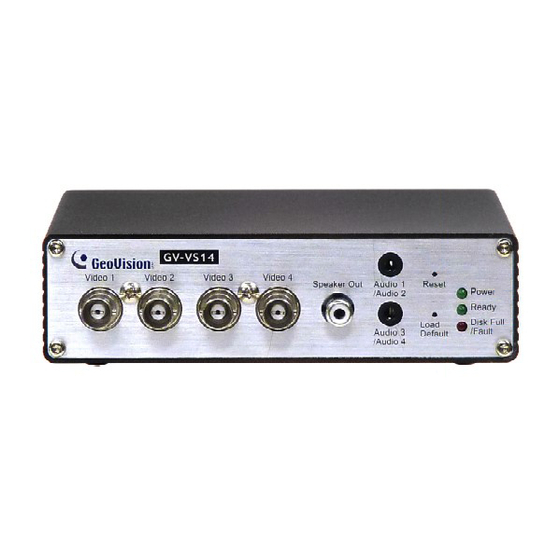
Page 3: Gv-Video Server (Gv-Vs04H And Gv-Vs14)
GV-Video Server (GV-VS04H and GV-VS14) Refer to the figure and instructions below to load default settings for GV-VS04H and GV-VS14. GV-VS04H GV-VS14 1. Press and then release the Reset button immediately. 2. Press and hold the Load Default button until all 3 LEDs (Power, Ready and Disk Full/Fault) are on. -
Page 4: Gv-Video Server (Gv-Vs11 And Gv-Vs12)
GV-Video Server (GV-VS11 and GV-VS12) GV-VS11 GV-VS12 1. Unplug and plug the power cable to start. 2. Press and hold the Default button until the Ready LED blinks. This may take up to 30 seconds. The Ready LED will blink twice. 3. -
Page 5: Gv-Compact Dvr V3
GV-Compact DVR V3 Refer to the figures and instructions below to load default settings for GV-Compact DVR V3. Standard Model Load Reset LEDs Default ACC Model 2 LEDs Reset Load Default 1. Press and then release the Reset button immediately. 2. -
Page 6: Gv-Ipcam H.264 Series
GV-IPCAM H.264 Series There are twelve models of GV-IPCAM H.264 Series: Box, Ultra Box, Mini Fixed Dome, Mini Fixed Rugged Dome, Bullet, Ultra Bullet, PTZ and PT, Vandal Proof IP Dome, Fixed IP Dome, Cube, and Advanced Cube. Box Camera Keep the power and network cables connected to the camera. -
Page 7: Ultra Box Camera
Ultra Box Camera Keep the power and network cables connected to the camera. Use a pin to press and hold the default button on the back panel of the camera. Release the default button when the status LED blinks. This shall take about 8 seconds. -
Page 8: Mini Fixed Rugged Dome
Mini Fixed Rugged Dome Keep the PoE cable connected to the camera. Press and hold the default button. Default button Status LED Release the default button when the status LED blinks. This shall take about 8 seconds. When the status LED fades, the process of loading default settings is completed and the camera reboots automatically. -
Page 9: Ultra Bullet Camera
Ultra Bullet Camera Keep the power and network cables (or PoE) connected to the camera. Press and hold the default button. Release the default button when the status LED blinks. This shall take about 8 seconds. When the status LED fades, the process of loading default settings is completed and the camera reboots automatically. -
Page 10: Ptz And Pt Camera
PTZ and PT Camera There are two types of default settings: camera default settings and system default settings. Camera default settings include all settings on Iris, White Balance, Image Reverse and Other in the VISCA OSD Configuration dialog box. System default settings refer to all the settings of the PTZ / PT camera except the camera settings. -
Page 11: Vandal Proof Ip Dome
Power on the camera using the power cable or the PoE cable. Hold the default button until the two network LEDs fade. This will take about 25 seconds. Network LEDs When default loading is completed, the camera will pan and tilt to its full range and return to the home point. -
Page 12: Fixed Ip Dome
Fixed IP Dome Keep the power and network cables (or PoE) connected to the camera. Use a pin to press and hold the default button on the panel. Default button Status LED Release the default button when the status LED blinks. This shall take about 8 seconds. -
Page 13: Advanced Cube Camera
Advanced Cube Camera Keep the power and network cables connected to the camera. Use a pin to press and hold the default button on the panel. Release the default button when the status LED blinks. This shall take about 8 seconds. -
Page 14: Gv-Dsp Lpr V2 & V3
GV-DSP LPR V2 & V3 Refer to the figure and instructions below to load default settings for GV-DSP LPR V2 & V3. Load Default 2 LEDs 1. Unplug and plug the power cable to start. 2. Press and hold the Load Default button until the Ready LED blinks. This may take up to 60 seconds. -
Page 15: Gv-System
GV-System Insert the Software DVD, click Install GeoVision Free Utility, select GV-Fast Backup & Restore Multicam System, and follow the on-screen instructions. After the installation is complete, run Fast Backup & Restore Multicam System from the Windows Start menu. This window appears.
Need help?
Do you have a question about the GV Series and is the answer not in the manual?
Questions and answers