ClearOne COLLABORATE Pro 300 Quick Start Manual
Hide thumbs
Also See for COLLABORATE Pro 300:
- User manual (84 pages) ,
- Quick start manual (9 pages) ,
- User manual (102 pages)
Table of Contents
Advertisement
Quick Links
Advertisement
Table of Contents

Subscribe to Our Youtube Channel
Related Manuals for ClearOne COLLABORATE Pro 300


Summary of Contents for ClearOne COLLABORATE Pro 300
- Page 1 COLLABORATE Pro 300 ® Quick-Start Guide...
-
Page 2: Components Included
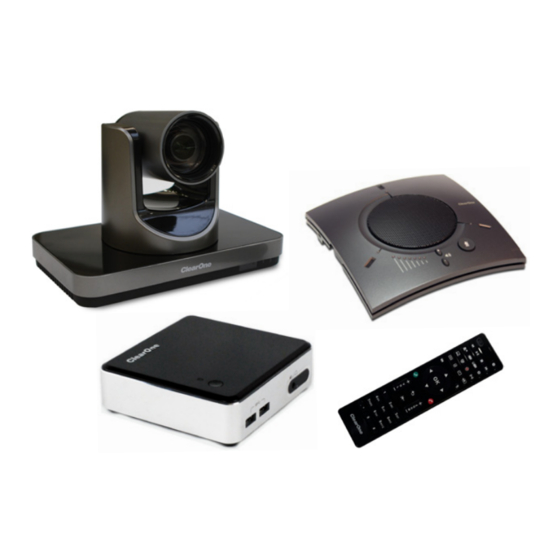
COLLABORATE PRO 300 COMPONENTS INCLUDED COLLABORATE Pro 300 COLLABORATE Pro 300 codec with power supply, VESA Mounting Plate, and COLLABORATE Remote Control with USB dongle 910-2100-003 UNITE 200 PTZ camera, power supply, USB cable Note: The remote control inside the camera box... -
Page 3: Connecting Peripherals
QUICK-START GUIDE CONNECTING PERIPHERALS Connect the CHAT 150C, Unite Camera, monitor(s), and network to the COLLABORATE Pro 300 codec as shown. DC In Mini Display Mini HDMI 1080P or USB Port for Port (for 2nd 720P Video/Audio Out UNITE Camera... - Page 4 COLLABORATE PRO 300 CONNECTING REMOTE CONTROL DONGLE Install batteries in the remote control and plug in the USB dongle into the codec. Note: To maximize range of the remote, verify that the dongle and the UNITE camera USB are plugged into opposite sides of the codec.
-
Page 5: Configuring Display Settings
QUICK-START GUIDE CONFIGURING DISPLAY SETTINGS After all peripherals are connected to the unit, turn the unit on. Once COLLABORATE Pro is loaded, the Setup Wizard appears. The Setup Wizard lets you configure the system name, time, and network, proxy, and Spontania settings. After the Setup Wizard is complete, using the remote control, navigate to the display settings: Settings >... -
Page 6: Configuring Audio Settings
COLLABORATE PRO 300 CONFIGURING AUDIO SETTINGS The COLLABORATE Pro 300 audio input and output are set to the CHAT 150C. Verify this in COLLABORATE Settings > System > Audio... -
Page 7: Configuring Network Settings
CONFIGURING NETWORK SETTINGS Using your remote control, navigate into the network settings: Settings > System > LAN The COLLABORATE Pro 300 obtains its IP automatically by default from a DHCP server. Uncheck the Obtain Address from DHCP checkbox to manually... -
Page 8: Clearone Contacts
Latin America Middle East Tel: +801.974.3621 Tel: +852.3590.4526 e-mail: global@clearone.com e-mail: global@clearone.com © 2017 ClearOne, Inc. All rights reserved - http://www.clearone.com/. Information in this document is subject to change without notice. QSG-0020-001 Revision 1.3, February, 2017...
Need help?
Do you have a question about the COLLABORATE Pro 300 and is the answer not in the manual?
Questions and answers