Table of Contents
Advertisement
Available languages
Available languages
R E F E R E N Z 3 7 7 7
P I L O T ' S W A T C H
C H R O N O G R A P H
B E D I E N U N G S A N L E I T U N G
O P E R A T I N G I N S T R U C T I O N S
M O D E D ' E M P L O I
I S T R U Z I O N I D ' U S O
I N S T R U C C I O N E S D E M A N E J O
M A N U A L D E I N S T R U Ç Õ E S
Advertisement
Table of Contents

Subscribe to Our Youtube Channel
Related Manuals for iwc IW3777


Summary of Contents for iwc IW3777
- Page 1 R E F E R E N Z 3 7 7 7 P I L O T ’ S W A T C H C H R O N O G R A P H B E D I E N U N G S A N L E I T U N G O P E R A T I N G I N S T R U C T I O N S M O D E D ’...
- Page 3 — 3 — — 5 — B E D I E N U N G S A N L E I T U N G Deutsch — 2 3 — O P E R A T I N G I N S T R U C T I O N S English —...
- Page 5 Erfindungen technischer, materieller oder formaler Natur, selbst wenn sie im kleinsten Detail stecken, das vielleicht nicht einmal sichtbar ist. Ein schönes neues Beispiel dieser IWC- Tradition ist hiermit in Ihrem Besitz: Wir möchten Ihnen hierzu von Herzen gratulieren, verbunden mit den besten Wünschen für eine Zeit mit Ihrer Uhr, die man vielleicht gar nicht genauer beschreiben kann –...
- Page 6 P I L O T ' S W A T C H C H R O N O G R A P H Ihre IWC-Uhr zeigt Ihnen die Zeit in Stunden, Minuten und Sekun- den sowie das Datum und den Wochentag. Mit dem integrierten Chronographen messen Sie jede Zeitspanne bis 12 Stunden in Sekunden, Minuten und Stunden.
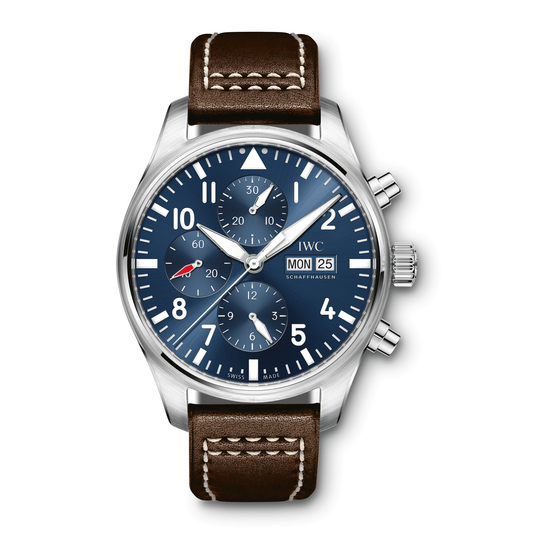
- Page 7 — 7 — Stundenzeiger Minutenzähler Minutenzeiger Stundenzähler kleiner Sekundenzeiger verschraubte Krone Datumsanzeige Start-Stopp-Drücker Wochentagsanzeige Rückstelldrücker Sekundenstoppzeiger P I L O T ' S W A T C H C H R O N O G R A P H...
- Page 8 — 8 — D I E F U N K T I O N E N D E R K R O N E Normalstellung (verschraubt) X — Aufzugsstellung 0 — Datums- und Wochentagseinstellung 1 — Zeiteinstellung 2 — D I E N O R M A L S T E L L U N G Diese Uhr besitzt eine verschraubte Krone.
- Page 9 — 9 — D I E A U F Z U G S S T E L L U N G In der Aufzugsstellung (Position 0) können Sie das automatische Uhrwerk auch von Hand aufziehen. Zum Ingangsetzen des Wer- kes genügen wenige Umdrehungen der Krone. Wir empfehlen je- doch, die Uhr durch ca.
- Page 10 — 1 0 — D I E Z E I T E I N S T E L L U N G Ziehen Sie die Krone in Position 2. Dadurch stoppen Sie das Uhr- werk. Für ein sekundengenaues Einstellen ist es vorteilhaft, wenn das Uhrwerk beim Durchgang des Sekundenzeigers über der 60 angehalten wird.
- Page 11 — 1 1 — D A S R I C H T I G E E I N S T E L L E N I H R E R U H R Zum richtigen Einstellen Ihrer Uhr gehen Sie wie folgt vor: –...
- Page 12 — 1 2 — dass sich beim Starten des Uhrwerkes der Minutenzeiger ohne Verzögerung fortbewegt. – Zum Starten des Uhrwerkes drücken Sie die Krone wieder in Position 0. – Drücken Sie nun die Krone in Position X und sichern Sie diese durch gleichzeitiges Rechtsdrehen.
- Page 13 — 1 3 — D A S A B L E S E N D E S C H R O N O G R A P H E N Sekundenstoppzeiger: Am Rand des Zifferblattes befindet sich die Einteilung für den zentralen Sekundenstoppzeiger. Minutenzähler: Auf dem Hilfszifferblatt bei 12 Uhr befindet sich die 30-Minuten-Einteilung mit einem langsam springenden Zeiger.
- Page 14 Ihnen erlaubt, die Bandlänge je nach Bedarf ganz einfach um bis zu 6 Millimeter zu erweitern oder zu verringern. Zum Verlängern des Bandes drücken Sie die Taste mit dem IWC- Logo herunter und ziehen Sie das Band etwas auseinander. Zum Verkürzen schieben Sie es im Bereich der Schliesse zusammen,...
- Page 15 — 1 5 — D A S T R E N N E N D E S B A N D E S Öffnen Sie die Faltschliesse durch Drücken der seitlichen Tasten. Legen Sie das Band mit der Aussenseite nach unten auf eine feste Unterlage.
- Page 16 — 1 6 — Beachten Sie bitte folgende Empfehlung: In der Regel nimmt der Umfang Ihres Handgelenkes im Laufe des Tages, abhängig von Temperatur und körperlicher Anstrengung, zu. Bevor Sie einzelne Bandglieder entfernen, sollten Sie je nach Tageszeit die Feineinstellung an der Schliesse geschlossen (morgens) oder ge- öffnet (abends) halten.
- Page 17 — 1 7 — D A S H E R A U S N E H M E N E I N Z E L N E R B A N D G L I E D E R U N D D A S Z U S A M M E N F Ü G E N D E S B A N D E S Wiederholen Sie die Schritte 1 bis 3 im soeben ermittelten Ab- stand von der ersten Trennstelle.
- Page 18 Magneten zu bringen. Im Falle einer plötzlichen Veränderung der Ganggenauigkeit wen- den Sie sich bitte an einen autorisierten IWC-Fachhändler (Official Agent), um Ihre Uhr auf Magnetismus prüfen zu lassen. P I L O T ' S W A T C H C H R O N O G R A P H...
- Page 19 Eine solche Prüfung muss auch nach ausser- gewöhnlichen Belastungen durchgeführt werden. Werden diese Prüfungen nicht ordnungsgemäss durchgeführt oder wird die Uhr von nicht autorisierten Personen geöffnet, so lehnt IWC jegliche Garantie- oder Haftungsansprüche ab. Empfehlung: Nach jedem Öffnen und Service Ihrer IWC-Uhr muss Ihr autorisierter IWC-Fachhändler (Official Agent) wieder...
- Page 20 Ihrer Uhr ca. alle fünf Jahre einen Unterhaltsservice durch- führen zu lassen. Wenden Sie sich dazu an einen autorisierten IWC-Fachhändler (Official Agent) oder direkt an den IWC-Kunden- dienst in Schaffhausen. P I L O T ' S W A T C H C H R O N O G R A P H...
- Page 21 — 2 1 — D I E G E H Ä U S E M A T E R I A L I E N G E H Ä U S E W E R K S T O F F K R AT Z F E S T I G K E I T B R U C H F E S T I G K E I T G E W I C H T...
- Page 23 You are now the owner of a beautiful new example of this IWC tradition. We would like to congratulate you on your choice and send you...
- Page 24 P I L O T ' S W A T C H C H R O N O G R A P H Your IWC watch shows you the time in hours, minutes and sec- onds, together with the date and the day. You can use the inte- grated chronograph to measure any period of time up to 12 hours in seconds, minutes and hours.
- Page 25 — 2 5 — Hour hand Minute counter Minute hand Hour counter Small seconds hand Screw-in crown Date display Start/stop push-button Day display Reset push-button Chronograph seconds hand P I L O T ' S W A T C H C H R O N O G R A P H...
- Page 26 — 2 6 — F U N C T I O N S O F T H E C R O W N Normal position (screwed in) X — Winding position 0 — Date and day setting 1 — Time setting 2 —...
- Page 27 — 2 7 — W I N D I N G P O S I T I O N With the crown in the winding position (0), you can also wind the automatic movement by hand. A few revolutions of the crown are enough to start the movement.
- Page 28 — 2 8 — T I M E S E T T I N G Pull out the crown to position 2. This will stop the movement. To set the time accurately to the second, it is best to stop the movement as the seconds hand passes 60.
- Page 29 — 2 9 — S E T T I N G Y O U R W A T C H C O R R E C T L Y To set your watch correctly, proceed as follows: – Release the crown by turning it to the left. –...
- Page 30 — 3 0 — – Push the crown back to position 0 to start the movement. – Now push the crown to position X and secure it by simultan- eously turning it to the right. Important: Although the watch is water-resistant in positions 0, 1 and 2, the crown should always be screwed in again for normal use (position X).
- Page 31 — 3 1 — R E A D I N G T H E C H R O N O G R A P H Chronograph seconds hand: The scale for the central chrono- graph seconds hand runs around the edge of the dial. Minute counter: The 30-minute scale with a slow jumping hand is situated on the subdial at 12 o’clock.
- Page 32 6 millimetres, de- pending on your needs. To increase the length of bracelet, press the button with the IWC logo and pull the bracelet slightly apart. To shorten it, push it together in the area of the clasp; here the button does not need to be pressed.
- Page 33 — 3 3 — T A K I N G T H E B R A C E L E T A P A R T Open the folding clasp by pressing the buttons on the side. Lay the bracelet face down on a firm base. To avoid scratching the bracelet and base, place a cloth underneath the bracelet.
- Page 34 — 3 4 — Please observe the following recommendation: Generally the size of your wrist will increase during the course of the day, depending on temperature and physical exertion. Before you re- move individual bracelet links, depending on the time of day you should have the fine-adjustment system on the clasp closed (in the morning) or open (in the evening).
- Page 35 — 3 5 — R E M O V I N G I N D I V I D U A L L I N K S A N D A T T A C H I N G T H E B R A C E L E T Repeat steps 1 to 3 at the distance from the first point of separ- ation you have just determined.
- Page 36 Should there be a sudden change in the precision of your time- piece, please contact an authorized IWC Official Agent to have your watch checked for magnetism. P I L O T ' S W A T C H C H R O N O G R A P H...
- Page 37 Agent will also be pleased to provide you with information. To ensure that your watch continues to function perfectly, you should have it checked by an IWC service centre at least once a year. Your watch should also be tested after exposure to unusual- ly harsh conditions.
- Page 38 Please contact an authorized IWC Official Agent or send your watch directly to the IWC Cus- tomer Service Department in Schaffhausen. P I L O T ' S W A T C H C H R O N O G R A P H...
- Page 39 — 3 9 — C A S E M A T E R I A L S C A S E M AT E R I A L S C R AT C H - R E S I S TA N C E B R E A K I N G S T R E N G T H W E I G H T S TA I N L E S S S T E E L...
- Page 41 Vous possédez aujourd’hui un bel exemple de cette tradition IWC. Nous tenons à vous en féliciter cordialement, tout en formant nos meilleurs vœux pour ces nombreuses heures en compagnie de votre montre qu’il...
- Page 42 M O N T R E D ' A V I A T E U R C H R O N O G R A P H E Votre montre IWC vous indique le temps en heures, minutes et secondes ainsi que la date et le jour de la semaine. À l’aide du chronographe intégré, vous pouvez chronométrer des temps al-...
- Page 43 — 4 3 — Aiguille des heures Compteur des minutes Aiguille des minutes Compteur des heures Petite aiguille des Couronne vissée secondes Poussoir start-stop Affichage de la date Poussoir de remise Affichage du jour à zéro de la semaine Trotteuse du chronographe M O N T R E D ' A V I A T E U R C H R O N O G R A P H E...
- Page 44 — 4 4 — L E S F O N C T I O N S D E L A C O U R O N N E Position normale (couronne vissée) X — Position de remontage 0 — Réglage de la date et du jour de la semaine 1 —...
- Page 45 — 4 5 — L A P O S I T I O N D E R E M O N T A G E Dans la position de remontage (0), vous pouvez aussi remonter manuellement le mouvement automatique. Quelques tours de la couronne suffisent à...
- Page 46 — 4 6 — L E R É G L A G E D E L ' H E U R E Tirez la couronne en position 2. Cette opération arrête le mouve- ment. Pour un réglage à la seconde près, il est préférable d’arrê- ter le mouvement lorsque l’aiguille des secondes se trouve sur 60.
- Page 47 — 4 7 — L E B O N R É G L A G E D E V O T R E M O N T R E Pour régler correctement votre montre, veuillez procéder comme suit : – Déverrouillez la couronne en la tournant à gauche. –...
- Page 48 — 4 8 — mouvement en arrière exactement sur le trait des minutes dé- siré. Ce mode de réglage garantit que l’aiguille des minutes se déplacera immédiatement lors du redémarrage du mouvement. – Pour faire démarrer le mouvement, il faut remettre la couronne en position 0.
- Page 49 — 4 9 — L A L E C T U R E D U C H R O N O G R A P H E Trotteuse du chronographe : la graduation de la trotteuse cen- trale du chronographe se trouve sur le bord du cadran. Compteur des minutes : la graduation à...
- Page 50 6 millimètres au maximum, selon les besoins. Pour augmenter la longueur du bracelet, veuillez appuyer sur le poussoir avec le logo IWC vers le bas et tirer un peu sur le bracelet. Pour diminuer la longueur du bracelet, vous pouvez le comprimer dans la zone du fermoir sans devoir appuyer sur le poussoir.
- Page 51 — 5 1 — S É P A R E R L E B R A C E L E T Ouvrez la boucle déployante en appuyant sur les poussoirs laté- raux. Posez le bracelet à l’envers sur une surface rigide. Pour éviter de rayer le bracelet et la surface sur laquelle il est posé, il est recommandé...
- Page 52 — 5 2 — Veuillez à cet effet tenir compte de la recommandation suivante : en général, la largeur de votre poignet augmente au cours de la journée en fonction de la température et des efforts physiques. Avant d’enlever des maillons, vous devriez maintenir le réglage de précision du fermoir fermé...
- Page 53 — 5 3 — R E T I R E R D E S M A I L L O N S E T A S S E M B L E R L E B R A C E L E T Veuillez répéter les étapes 1 à...
- Page 54 — 5 4 — R E M A R Q U E C O N C E R N A N T L E S C H A M P S M A G N É T I Q U E S En raison de l’utilisation de plus en plus répandue d’aimants en alliages de terres rares très puissants (comme l’alliage néodyme- fer-bore) depuis quelques années –...
- Page 55 L ' É T A N C H É I T É Pour les montres IWC, l’indication de l’étanchéité est faite en bar et non en mètres. Fréquemment utilisées dans l’industrie horlogère pour indiquer l’étanchéité, les indications métriques ne coïn-...
- Page 56 Pour garantir un fonctionnement parfait de votre montre, celle- ci doit être contrôlée au minimum une fois par an par un point service IWC. Un tel contrôle doit aussi être réalisé après toute sollicitation exceptionnelle. Si ces contrôles ne sont pas réalisés correctement ou si la montre est ouverte par des personnes non autorisées, IWC rejette alors toute revendication au titre de la...
- Page 57 Pour ce faire, veuillez vous adresser à un concessionnaire IWC agréé (Official Agent) ou directement au service après-vente IWC à Schaffhausen. M O N T R E D ' A V I A T E U R C H R O N O G R A P H E...
- Page 58 — 5 8 — L E S M A T É R I A U X D E S B O Î T I E R S R É S I S TA N C E A U X R É S I S TA N C E À L A M AT É...
- Page 61 Un esempio nuovo e affascinante di questa tradizione IWC è ora in suo possesso. Le porgiamo le nostre più vive congratulazioni, unitamente all’augurio di trascorrere col suo orologio tempi se-...
- Page 62 P I L O T ' S W A T C H C H R O N O G R A P H Il suo orologio IWC le indica l’ora in ore, minuti e secondi nonché la data e il giorno della settimana. Il cronografo integrato le consente di misurare ogni intervallo di tempo fino a 12 ore in secondi, minuti e ore nonché...
- Page 63 — 6 3 — Lancetta delle ore Lancetta dei minuti Lancetta dei minuti cronografici Piccola lancetta dei Contatore delle ore secondi Corona a vite Datario Pulsante start-stop Indicazione del giorno Pulsante di azzeramento della settimana Lancetta dei secondi cronografici P I L O T ' S W A T C H C H R O N O G R A P H...
- Page 64 — 6 4 — L E F U N Z I O N I D E L L A C O R O N A Posizione normale (avvitata) X — Posizione di carica 0 — Regolazione della data e del giorno della settimana 1 —...
- Page 65 — 6 5 — L A P O S I Z I O N E D I C A R I C A Nella posizione di carica (0) può caricare il movimento automatico anche manualmente. Per avviare il movimento sono sufficienti po- che rotazioni della corona.
- Page 66 — 6 6 — L A R E G O L A Z I O N E D E L L ' O R A Estragga la corona portandola in posizione 2. In questo modo bloccherà il movimento. Per una regolazione precisa al secondo è consigliabile bloccare il movimento quando la lancetta dei secon- di si trova su 60.
- Page 67 — 6 7 — L A C O R R E T T A R E G O L A Z I O N E D E L S U O O R O L O G I O Per una corretta regolazione del suo orologio proceda come segue: –...
- Page 68 — 6 8 — trattino che indica i minuti. Questo procedimento assicura l’im- mediato avvio della lancetta dei minuti al momento dell’azio- namento del movimento. – Per avviare il movimento, prema la corona riportandola in posi- zione 0. – Ora prema la corona riportandola in posizione X e la blocchi ruotandola contemporaneamente verso destra.
- Page 69 — 6 9 — L A L E T T U R A D E L C R O N O G R A F O Lancetta dei secondi cronografici: sul bordo del quadrante è riportata la scala di riferimento per la lancetta centrale dei secondi cronografici.
- Page 70 6 millimetri secondo necessità e in modo molto semplice. Per allungare il bracciale prema il tasto con il logo IWC ed estragga leggermente il bracciale. Per accorciarlo, spinga una verso l’altra le due metà del bracciale ai lati della fibbia senza azionare il tasto.
- Page 71 — 7 1 — L A S E P A R A Z I O N E D E L B R A C C I A L E Apra la fibbia déployante facendo pressione sui tasti laterali. Di- stenda il bracciale con il lato superiore appoggiato su un supporto rigido.
- Page 72 — 7 2 — Le consigliamo quanto segue: di norma la circonferenza del polso aumenta nel corso della giornata a dipendenza della tem- peratura e dello sforzo fisico. Prima di estrarre le singole maglie, le consigliamo di provare ad adeguare la regolazione di precisione sulla fibbia tenendola chiusa (al mattino) o aperta (alla sera).
- Page 73 — 7 3 — L ' E S T R A Z I O N E D I S I N G O L E M A G L I E E L A R I C O N G I U N Z I O N E D E L B R A C C I A L E Ripeta le operazioni da 1 a 3 alla distanza precedentemente sta- bilita dal primo punto di giunzione.
- Page 74 Nel caso in cui la precisione di marcia dovesse improvvisamente subire delle variazioni la preghiamo di rivolgersi a un rivenditore IWC autorizzato (Official Agent), il quale provvederà a verificare il magnetismo del suo orologio. P I L O T ' S W A T C H C H R O N O G R A P H...
- Page 75 — 7 5 — L ' I M P E R M E A B I L I T À I dati sull’impermeabilità degli orologi IWC sono indicati in bar e non in metri. Sebbene sia spesso utilizzata nell’industria orologie- ra, l’indicazione in metri può...
- Page 76 Le consigliamo pertanto di far eseguire un servizio di manutenzione al suo orologio circa ogni cinque anni. A tale scopo potrà rivolgersi a un rivenditore IWC autorizzato (Official Agent) o direttamente al servizio clienti di IWC a Schaffhausen.
- Page 77 — 7 7 — I M A T E R I A L I D E L L A C A S S A M AT E R I A L E R E S I S T E N Z A A I R E S I S T E N Z A A L L A P E S O D E L L A C A S S A...
- Page 79 Un hermoso ejemplo de esta tradición de IWC es ahora suyo. Reciba nuestra más cordial enhorabuena y nuestros mejo- res deseos de que pase con su reloj un tiempo que quizás no se...
- Page 80 R E L O J D E A V I A D O R C R O N Ó G R A F O Su reloj IWC le señalará el tiempo en horas, minutos y segundos, así como la fecha y el día de la semana. Con el cronógrafo inte- grado, usted podrá...
- Page 81 — 8 1 — Aguja de las horas Totalizador de los Minutero minutos Pequeño segundero Totalizador de las horas Indicación de la fecha Corona atornillada Indicación del día Pulsador de marcha- de la semana -parada Aguja de parada del Pulsador de puesta a segundero cero R E L O J D E A V I A D O R C R O N Ó...
- Page 82 — 8 2 — L A S F U N C I O N E S D E L A C O R O N A Posición normal (atornillada) X — Posición para dar cuerda 0 — Ajuste de la fecha y del día de la semana 1 —...
- Page 83 — 8 3 — L A P O S I C I Ó N P A R A D A R C U E R D A En la posición para dar cuerda (0) puede darse cuerda al mo- vimiento automático también a mano. Para poner en marcha el movimiento bastan unas pocas vueltas de corona.
- Page 84 — 8 4 — E L A J U S T E D E L A H O R A Tire de la corona hasta la posición 2. Así se detiene el movimien- to. Para una puesta en hora al segundo exacto, es conveniente que el movimiento se detenga cuando el segundero pasa por el 60.
- Page 85 — 8 5 — E L A J U S T E C O R R E C T O D E S U R E L O J Para el ajuste correcto de su reloj, proceda de la siguiente manera: –...
- Page 86 — 8 6 — marca del minuto correspondiente. Procediendo de esta for- ma, se asegurará que, al ponerse en marcha el movimiento, el minutero avance sin retraso alguno. – Para poner en marcha el movimiento, vuelva a introducir la co- rona en la posición 0.
- Page 87 — 8 7 — L A L E C T U R A D E L C R O N Ó G R A F O Aguja de parada del segundero: en el borde de la esfera se encuentra la graduación para la aguja central de parada del se- gundero.
- Page 88 6 milímetros. Para alargar el brazalete, presione hacia abajo el pulsador con el logo- tipo IWC y separe levemente el brazalete. Para acortar el braza- lete, comprímalo en la zona del cierre, sin presionar el pulsador.
- Page 89 — 8 9 — L A D I V I S I Ó N D E L B R A Z A L E T E Abra el cierre desplegable apretando los pulsadores laterales. Coloque el brazalete sobre una base firme con su parte exte- rior hacia abajo.
- Page 90 — 9 0 — Tenga en cuenta la siguiente recomendación: por lo general, el tamaño de su muñeca aumenta durante el día, dependiendo de la temperatura y del esfuerzo físico. Antes de extraer los eslabones individuales del brazalete, debería, dependiendo de la hora del día, mantener el ajuste de precisión del cierre cerrado (mañana) o abierto (tarde).
- Page 91 — 9 1 — L A E X T R A C C I Ó N D E E S L A B O N E S Y E L E N G A N C H E D E L B R A Z A L E T E Repita los pasos 1 a 3 con la distancia recién determinada desde el primer punto de separación.
- Page 92 En caso de un cambio súbito de la precisión de la marcha, diríjase a un concesionario autorizado por IWC (Official Agent) para averi- guar si su reloj presenta magnetismo. R E L O J D E A V I A D O R C R O N Ó G R A F O...
- Page 93 L A H E R M E T I C I D A D A L A G U A Los datos de la hermeticidad al agua en los relojes IWC se ex- presan en bar y no en metros. Los datos en metros, que fre-...
- Page 94 — 9 4 — Recomendación: tras cada apertura y servicio de su reloj IWC, su concesionario autorizado por IWC (Official Agent) deberá siem- pre llevar a cabo nuevamente una comprobación de la hermeti- cidad al agua. A D V E R T E N C I A Si su reloj está...
- Page 95 Diríjase para ello a un concesionario autoriza- do por IWC (Official Agent) o directamente al Servicio Posventa de IWC en Schaffhausen. R E L O J D E A V I A D O R C R O N Ó G R A F O...
- Page 96 — 9 6 — L O S M A T E R I A L E S D E C A J A M AT E R I A L R E S I S T E N C I A A L R E S I S T E N C I A A L A P E S O D E L A C A J A...
- Page 99 Um belo e novo exemplo desta tradição da IWC está agora na sua posse: por isso, gostaríamos de o felicitar cordialmente, expri- mindo os nossos melhores desejos para um bom tempo em com- panhia do seu relógio que talvez não possa ser descrito com...
- Page 100 R E L Ó G I O A V I A D O R C R O N Ó G R A F O O seu relógio IWC indica-lhe o tempo em horas, minutos, segun- dos e, também, a data e o dia da semana. Com o cronógrafo integrado, pode medir qualquer espaço de tempo até...
- Page 101 — 1 0 1 — Ponteiro das horas Contador dos minutos Ponteiro dos minutos Contador das horas Pequeno ponteiro dos Coroa de rosca segundos Botão de arranque/ Indicação da data paragem Indicação do dia Botão de reposição da semana Ponteiro de paragem dos segundos R E L Ó...
- Page 102 — 1 0 2 — A S F U N Ç Õ E S D A C O R O A Posição normal (enroscada) X — Posição para dar corda 0 — Acerto da data e do dia da semana 1 —...
- Page 103 — 1 0 3 — A P O S I Ç Ã O P A R A D A R C O R D A Na posição para dar corda (0), também pode dar corda ma- nualmente ao movimento automático. Para pôr a funcionar o movimento, basta rodar a coroa algumas voltas.
- Page 104 — 1 0 4 — O A C E R T O D O T E M P O Puxe a coroa para a posição 2. Desta maneira, faz parar o mo- vimento. Para proceder a um acerto com uma precisão de se- gundos, é...
- Page 105 — 1 0 5 — O A C E R T O C O R R E T O D O R E L Ó G I O Para acertar corretamente o seu relógio, proceda da maneira se- guinte: – Destrave a coroa, rodando-a para a esquerda. –...
- Page 106 — 1 0 6 — de forma a ficar exatamente no traço dos minutos a acertar. Este procedimento garante que, no momento em que iniciar o movimento, o ponteiro dos minutos continua a mover-se sem causar um atraso. – Para fazer arrancar o movimento de relógio, empurre a coroa novamente para a posição 0.
- Page 107 — 1 0 7 — A L E I T U R A D O C R O N Ó G R A F O Ponteiro de paragem dos segundos: À volta do mostrador encontra-se a divisão para o ponteiro central de paragem dos segundos.
- Page 108 6 milí- metros. Para um aumento do comprimento, basta premir a tecla com o logótipo da IWC e puxar um pouco a bracelete. Para uma redução, deve encolher-se um pouco a bracelete empurrando contra o fecho sem carregar na tecla.
- Page 109 — 1 0 9 — A S E P A R A Ç Ã O D A B R A C E L E T E Abra o fecho de engate premindo as teclas laterais. Coloque a bracelete em cima de uma base firme, com o lado exterior virado para baixo.
- Page 110 — 1 1 0 — Preste atenção à seguinte recomendação: Em regra, o tama- nho do seu pulso aumenta durante o dia consoante a temperatura e o esforço físico. Antes de remover elos individuais e conforme a hora do dia, deverá manter o ajuste fino do fecho fechado (de manhã) ou aberto (à...
- Page 111 — 1 1 1 — A R E M O Ç Ã O D E E L O S I N D I V I D U A I S E A L I G A Ç Ã O D A B R A C E L E T E Repita os passos 1 a 3 respeitando a distância acima determina- da a partir do primeiro ponto de separação.
- Page 112 ímanes fortes. Em caso de alteração súbita da precisão da marcha, contacte um concessionário IWC oficial e autorizado (Official Agent) para verificar se o seu relógio foi magnetizado. R E L Ó G I O A V I A D O R C R O N Ó G R A F O...
- Page 113 Para garantir um funcionamento perfeito do seu relógio, este de- verá ser examinado, pelo menos, uma vez por ano num posto de assistência técnica da IWC. Um tal exame terá de ser reali- zado igualmente após situações em que o relógio foi exposto a esforços extraordinários.
- Page 114 — 1 1 4 — Recomendação: Depois de cada abertura e assistência do seu relógio IWC, o seu concessionário IWC oficial e autorizado (Offi- cial Agent) terá de efetuar novamente um teste de resistência à água. N O T A Se o seu relógio estiver equipado com uma bracelete de pele,...
- Page 115 Para isso, dirija-se a um concessionário IWC oficial e autorizado (Official Agent) ou diretamente aos Servi- ços de Atendimento a Clientes da IWC em Schaffhausen. R E L Ó G I O A V I A D O R C R O N Ó G R A F O...
- Page 116 — 1 1 6 — O S M A T E R I A I S D A C A I X A R E S I S T Ê N C I A A R E S I S T Ê N C I A À M AT E R I A L D A C A I X A P E S O R I S C O S...
- Page 118 Fax +41 (0)52 635 65 01 info@iwc.com www.iwc.com © Copyright 2016 IWC Schaffhausen, Branch of Richemont International SA Printed in Switzerland P I L O T ' S W A T C H C H R O N O G R A P H...
Need help?
Do you have a question about the IW3777 and is the answer not in the manual?
Questions and answers