Advertisement
Art.5418
ECLIPSEHANDSFREEVIDEOPHONE VIDEOCITOFONOVIVA- V OCEECLIPSE
1
2
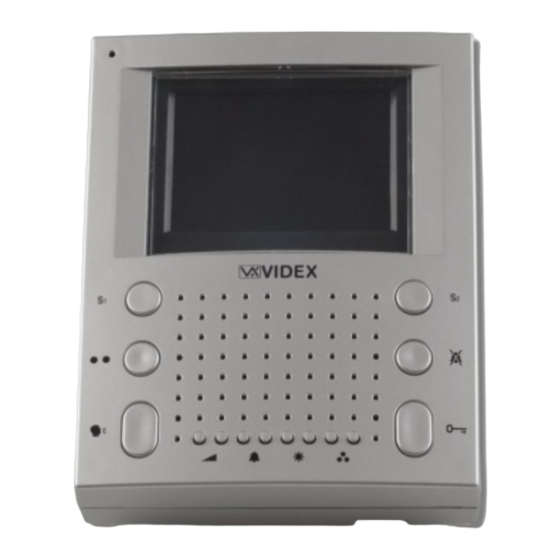
Fig.1
PULSANTI
Pulsante di Servizio
Fino a quando resta premuto chiude il morsetto "S1" verso il
morsetto "GND" (massa).
Pulsante Relè
Ad ogni pressione commuta in maniera stabile il morsetto
"COM2" verso il morsetto "NO2" o "NC2". Quando "COM2" è su
"NO2", il LED relativo al pulsante è acceso.
Pulsante risposta/autoaccensione/spegnimento/tx-rx 1 via
B
Alla ricezione della chiamata, abilita l'inizio conversazione. Il
relativo LED si accende.
B
Ad impianto spento, premere il pulsante per l'auto-accesione. Il
LED si accende.
B
Ad impianto acceso, consente lo spegnimento manuale (rapida
pressione del tasto). In ogni caso lo spegnimento è automatico
(il LED si spegne).
B
Premendo il pulsante per più di 3 secondi, il videocitofono
passa nel modo
trasmissione ad una via
l'esterno occorre tenere premuto il pulsante (il LED lampeggia
rapidamente), mentre per ascoltare il visitatore occorre lasciare
il pulsante (il LED lampeggia lentamente). Il videocitofono torna
al funzionamento normale alla successiva accensione.
Pulsante di Servizio
Fino a quando resta premuto chiude il morsetto "S2" verso il
morsetto "GND" (massa).
Pulsante "Privacy"
Attiva/Disattiva il servizio "privacy". Con il servizio attivo il
relativo LED è accesso e le chiamate entranti vengono ignorate.
Pulsante "Apri-Porta"
A sistema acceso, apre la porta. L'apertura è indicata
dall'accensione del relativo LED e da un segnale acustico (se la
fonia è attiva) per la durata del tempo d'apertura porta.
Installation Instructions
Istruzioni di Istallazione
3
4
A
: per parlare con
PUSH BUTTONS
Service push button
When pressed, shorts terminal "S1" to terminal "GND" (ground).
Latch relay button
Each time this button is operated it will latch "COM2" to "NO2 or
"NC2" alternately (Toggle action) and switch the relevant LED
ON.
Answer/Camera Recall/Switch off/1 way tx-rx button
B
On an incoming call, operation of this button allows the user to
answer and converse with the visitor. The relevant LED will
switch ON.
B
If operated when system is in standby (no Call) camera recall
will be activated and the relevant LED will switch on.
B
With the system switched on (monitor on), momentary opera-
tion of the button will switch the system into standby. The
system will automatically switch to standby after a time delay if
the button is not operated. The relevant LED will switch off.
B
By operating and holding the button for more than 3 seconds,
the videophone will enter the SIMPLEX speech mode. Press
and holding the button will allow speech to the outside door
panel (the relevant LED will flash rapidly), to listen to the visitor
at the outside door panel release the button (the relevant LED
will flash slowly). The videophone will revert to normal operation
when another call is made from the outside door panel.
Service push button
When pressed, shorts terminal "S2" to Terminal "GND" (ground)
Privacy on/off button
Enables / Disables the privacy service. When privacy is enabled
the relevant LED is switched on and no incoming calls will be
received.
Door open push button
When the system is switched on, operation of this button will
activate the "door open" relay (NO1, NC1, COM1). This will
switch on the relevant LED and be confirmed by an acoustic
signal for the duration of the "door opening time"
B
Advertisement
Table of Contents

Related Manuals for Videx 5418


Summary of Contents for Videx 5418
- Page 1 Installation Instructions Art.5418 Istruzioni di Istallazione ECLIPSEHANDSFREEVIDEOPHONE VIDEOCITOFONOVIVA- V OCEECLIPSE Fig.1 PULSANTI PUSH BUTTONS Pulsante di Servizio Service push button Fino a quando resta premuto chiude il morsetto “S1” verso il When pressed, shorts terminal “S1” to terminal “GND” (ground).
- Page 2 REGOLAZIONI CONTROLS Ciascuna delle 4 regolazioni possibili viene effettuata tramite i Each of the 4 possible adjustments is carried out by operation of the relativi 2 pulsanti: premere il pulsante di destra per aumentare o two buttons associated with that group. Operation of the right button quello di sinistra per diminuire la regolazione.
- Page 3 Installation Instructions Art.5980 Istruzioni di Istallazione MountingPlate&ConnectionBoard Pi a stradifi s saggi o eSchedadiconnessi o ne 104,00 +20V COM2 COM1 V2/V 80,00 Fig.2 SEGNALI SCHEDA DI CONNESSIONE PCB CONNECTION BOARD SEGNALI SCHEDA DI CONNESSIONE ART.5980 PCB CONNECTION BOARD ART.5980 SIGNALS Morsetto Descrizione Description...
- Page 4 Fig.1 Fig.2 Fig.3 Fig.4 VIDEOCITOFONO - ISTRUZIONI DI VIDEOPHONE - WALL MOUNTING MONTAGGIO A PARETE INSTRUCTIONS Dovendo passare attraverso la fessura “ ” (fig.2A) della Cables must be fed through the opening “e” (Fig. 2A) of the placca di fissaggio a parete, consigliamo di canalizzare i mounting plate “c”, which should be fitted approximately conduttori in maniera tale da lasciare 135cm circa tra la 135cm from finished floor level as shown in Fig 1;...
Need help?
Do you have a question about the 5418 and is the answer not in the manual?
Questions and answers