Table of Contents
Advertisement
Quick Links
Download this manual
See also:
User Manual
Advertisement
Table of Contents

Related Manuals for Plus CR-5


Summary of Contents for Plus CR-5
- Page 1 COPY BOARD CR-5 SERVICE MANUAL...
-
Page 2: Table Of Contents
2. SPECIFICATIONS ............2 6-1. Calibrtion ..............23 2-1. Product specifications ..........2 6-2. Updating the internal program of CR-5 main set ..24 2-2. Names of the Parts ............ 3 6-3. Test mode ..............25 2-3. Control Panel ............. 5 6-4. -
Page 3: Compliance Of Safe Repair
1. COMPLIANCE OF SAFE REPAIR Be sure to read this Service Manual before providing services. In the PLUS Copyboard, full consideration is taken to ensure the safety for a fire, electric shock, injury, harmful radiation, and substance. Therefore, observe the notice described in this Service Manual so that the safety is kept when providing services. Moreover, be sure to observe the notice described in the User’s Manual. -
Page 4: Specifications
• Please note that the appearance of the main unit, the supplied printer, specifications, and other items are subject to change without notice for the purpose of quality improvement. • This machine contains eParts of the eSOL, Co., Ltd. • This unit is a PLUS Copyboard product. -
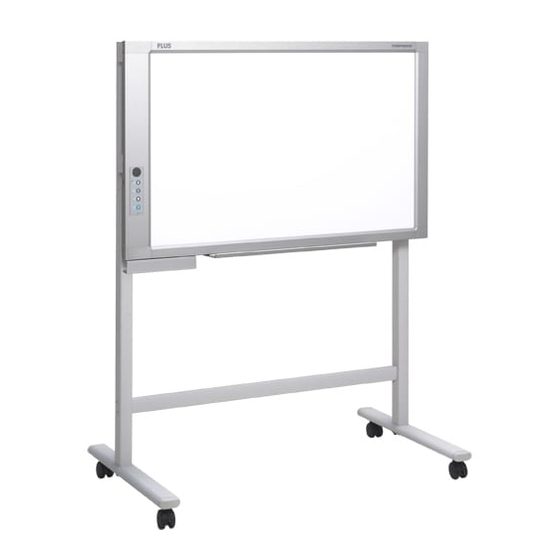
Page 5: Names Of The Parts
SPECIFICATION 2-2. Names of the Parts Front Sheet Use the dedicated markers to draw or write on the sheet. Frame cover Control panel USB port (Type A) (On the side of the copyboard.) Insert the USB memory device here. If you purchase a separately sold printer, connect to the printer's USB pore. - Page 6 SPECIFICATION Rear Rail groove When mounting the copyboard on a wall, insert the edge of the wall mount fitting here and fasten the copyboard. Rail groove When mounting the copyboard on a wall, insert the edge of the fixing bracket here and fasten the copyboard.
-
Page 7: Control Panel
SPECIFICATION 2-3. Control Panel When pressing a button, please press the center area (i.e., the round and protruding portion). The button may not work if it is pressed on a corner. Display window The status of the connection between the copyboard and com- puter, the operating status and error information are indicated by the 7-segment LEDs. -
Page 8: Error Display
Copyboard has been connected. and switch off the power. When a record is required, switch on the power and save to USB memory. If the problem persists, please contact your nearby PLUS Vision sales office, dealer, or store. -
Page 9: Software Plus Toolbox
3-1. What is Copyboard Soft PLUS TOOLBOX? The “PLUS TOOLBOX” software is an application for connecting the copyboard directly to a computer by USB port to allow transfer of the scanned data to the computer using a TWAIN driver so that the data can be stored on the computer as image files. -
Page 10: Connection To The Computer
To the PC dedicated USB port (Type B) USB cable supplied with the unit Description of the included CD-ROM’s menu screen (CR-5 setup launcher) The menu screen is displayed automatically when the included CD-ROM is inserted into the computer’s CD- ROM drive. -
Page 11: Installation Of The Software
SOFTWARE PLUS TOOLBOX 3-3. Installation of the Software When “Install Software” on the included CD-ROM’s menu is clicked, the “PLUS TOOLBOX”, TWAIN driver and USB driver are installed. Check Prior to Installation 1. Check whether your personal computer satisfies the operating environment. - Page 12 Installing the USB Driver The USB driver is installed on the computer with the installer, but this does not complete association with the USB port. In order to use PLUS TOOLBOX, install using the procedure described below with the copyboard connected.
- Page 13 Double click “Add or Remove Programs or Applications” (this will differ depending on the OS) to display the “Add or Remove Programs Properties” screen. Select PLUS TOOLBOX from among the list displayed and click [Change / Remove] to display the Add or Remove wizard screen.
-
Page 14: Menu Screen Names And Functions
SOFTWARE PLUS TOOLBOX 3-4. Menu Screen Names and Functions When a computer on which the “PLUS TOOLBOX” dedi- Ver.1.0 cated software is installed is connected to the copyboard, the “PLUS TOOLBOX” main menu appears. 1 Start Scan button Click this to scan the words or diagrams drawn on the copyboard onto the computer. -
Page 15: Operating The Copyboard From The Computer
JPG Files Note: When other TWAIN compatible applications are used to capture the picture data, while PLUS TOOLBOX software is running, following procedure should be taken. CR5tw When PLUS TOOLBOX is running or its icon appears on the Windows task... -
Page 16: Hardware Setup
Horizontal Position Turn on the copyboard’s power, start up the com- Ver.1.0 puter, then make the USB connections. The “PLUS TOOLBOX” main menu appears on the computer. Click the [Setup] button. Ver.1.0 The [Hardware Setup] screen appears. Click the desired item to select it. - Page 17 01 /01 /2008 Setting the time 20 : 15 : 06 By factory default, the time is set to Japan Standard Time. PLUS TOOLBOX uses a 24-hour time display. Click to [ ] return, Read current Date and Time to [ ] advance.
- Page 18 SOFTWARE PLUS TOOLBOX Aspect Ratio setting Select the vertical/horizontal aspect ratio for printing. When “Original Image” is selected, the image is printed with the same aspect ratio as on the copyboard’s sheet surface. When “Match Paper Size” is selected, the image is com-...
-
Page 19: Update The Copyboard's Internal Progrom
3-7. Update the Copyboard’s Internal Program Preparations: 1. Download the “Copyboard Firmware Update” program for the CR-5 (“XXXXX.zip”) 2. Unzip the “CR5_XX_X.zip” file and save the program file (“CR5_XX_X.mot”). 3. If the copyboard’s power cord is plugged into an outlet, unplug it. -
Page 20: Trouble Shooting
4. TROUBLE SHOOTING By checking operations, it is possible to carry out judgments on malfunction to a certain extent. Carry out the following checks before disassembling the equipment. 1. Press the Standby(On) button and turn on the power. Is the power turned on? •... -
Page 21: Disassembly And Assembly
5. DISASSEMBLY AND ASSEMBLY 5-1. Tools Required • Phillips screwdriver (+) No. 2 • Phillips screwdriver (–) 5-2.Cautions • See “1. Compliance of Safety Repair and Safety Inspection” before disassembling and assembling. • Put on gloves so that you do not cut your hand at the sharp edge of a frame during disassembly and assem- bly. -
Page 22: Disassembly And Assembly
DISASSEMBLY AND ASSEMBLY 5-4. Disassembly and Assembly This section describes one example of disassembly and assembly procedures. For the actual operation, disas- semble and assemble the required parts with reference to “5-3. Disassembly and Assembly Procedures”. * Remove the main set from the stand and proceed with operation with the sheet surface facing downward. (Perform the operation on a mat.) * Remove the pen tray before performing the procedure below. - Page 23 DISASSEMBLY AND ASSEMBLY 4) Remove the CIS Unit. (See Fig. 4.) 1. Remove the motor harness from the cable clamp 2. Remove the”S-1" screws shown in the figure. (Both sides.) 3. Hold the aluminum portion of the CIS Unit shown in the figure and remove it.
- Page 24 DISASSEMBLY AND ASSEMBLY 7) Remove the Main Board Assy. (See Fig. 7.) Gasket 1. Remove the”S-3" screws shown in the figure. 2. Remove the”S-4" screw shown in the figure and then remove the Main Board Assy. USB port Note: • Install so that a USB port is put below the gasket USB when installing the Main Board Assy.
-
Page 25: Adjustment
6. ADJUSTMENT 6-1. Calibration Calibration is required in the following cases. • When a main board is replaced • When a CIS unit is replaced • When an endless sheet is replaced For the replacement of a CIS Unit in the market, usually, use a unit that has been adjusted at a factory. * When any failure occurs in an image, be sure to perform calibration after replacing the CIS Unit. -
Page 26: Updating The Internal Program Of Cr-5 Main Set
1. Store a program (CR5_01_00) in the route of USB memory. 2. Press the “Power” button of the CR-5 main set and insert the USB memory into a USB memory port in the ON state. 3. The USB memory is recognized, a file is automatically detected, and the currently written major version blinks on the display window during display. -
Page 27: Test Mode
“ ” blinks. Clear the sheet length of the CR-5 main set and the existing data of a CIS white level according to the procedure described above. 6-4. Direct Command of CR-5 Main Set (for Maintenance Service and Installation Traders) The setting can be partially changed using the button on the operation panel of the main set. -
Page 28: Timing Belt Adjustment
ADJUSTMENT Installation This is the setting on whether to put the recorded image in the horizontal or vertical direction. The selection of installation and the direction in which an image was opened and printed using a personal computer are as shown in the table below. -
Page 29: Cable And Cable Connection
7. CABLE AND CABLE CONNECTION CIS LED2 Cable List Connector ・CIS Harness A : 8pin - 8pin ・CIS Harness B : 8pin - 8pin ・CIS LED Harness : 4pin + 4pin - 9pin (4pin Short : CIS LED1) (4pin Long : CIS LED2) ・EEPROM Harness : 4pin - 4pin ・Motor Harness... -
Page 30: Parts List
8. PARTS LIST 1. Overall configuration... - Page 31 PARTS LIST 1. Overall configuration PARTS NAME PARTS No. Q’ ty REMARK Back Panel Unit CR-5 300501 Back Panel Clip 722135100 RAIL CAP R 722120600 RAIL CAP L 722120700 Switch sheet (OS) CR-5 722150100 Switch Panel CR-5 722120300 Gasket USB...
-
Page 32: Frame Section
PARTS LIST 2. Frame Section Japan only... - Page 33 Q’ ty REMARK Frame side R Unit 300509 Frame upper 300510 Frame lower 300511 – – Frame Cover Unit CR-5 300502 Sheet Frame Unit CR-5 300504 Endless Sheet CR-5 300503 Sheet Motor Unit CR-5 722502000 Motor relay Harness 722591800 CIS Unit CR-5...
-
Page 34: Accessories Section
PARTS LIST 3. Accessories Section... - Page 35 Quick guide Hang 715354600 Wall Mount Plate positioning 722461500 CD-ROM CR-5 722461100 Molly anchor Set 722171000 with wrench Hook for Wall Mount CR-5 722130600 Wall Mount Plate Lower 722130700 Pen Tray Unit B 722130000 Adapter holder 722122000 Power Code (CEE) 4m...
-
Page 36: Cartion & Section
PARTS LIST 4. Carton & Section... - Page 37 PARTS LIST 4. Carton & Section PARTS NAME PARTS No. Q’ ty REMARK Carton Unit For CR-5 (O/S) 300507 Upper carton OS — No Parts Supply Lower carton — No Parts Supply Corner Packing (R) — No Parts Supply Corner Packing (L) —...
-
Page 38: Screws & Washers
PARTS LIST 5. Screws & Washers PARTS NAME PARTS No. Q’ ty REMARK M4-6 Cross Recessed Binding Head 961240610 M3-4 P-Tight Cross Recessed Binding Head 963230410 M3-6 P-Tight Cross Recessed Binding Head 963230610 M4-5 P-Tight Cross Recessed Binding Head 963240530 M3-8 P-Tight Countersunk Head 963330830 M4-6 S-Tight Cross Recessed Binding Head... -
Page 39: Cr-5-T
PARTS LIST 6. CR-5-T S-11 S-10 S-11 S-10 S-11 S-10 S-11 S-10... - Page 40 Stand’s hanger lower V 722330600 Long setting Plate nut 722330700 Cable Clamp for Stsnd 722370100 Assemble manual for stand 722360200 Screw Unit For CR-5-T 722910000 Carton Unit For CR-5-T — No Parts Supply Screws & Washers PARTS NAME PARTS No. Q’ ty...
-
Page 41: Cr-5-Tn
PARTS LIST 7. CR-5-TN S-11 S-11 S-10 S-11 S-10 S-11 S-10... - Page 42 Long setting Stand’s hanger lower V CR 722331700 Long setting Plate nut 722330700 Cable Clamp for Stsnd 722370100 Assemble manual for stand CR-5-TN 722363100 No Parts Supply Screw Unit For CR-5-TN 722090010 Carton Unit For CR-5-TN – No Parts Supply...
-
Page 43: Printer Table
8. PRINTER table PARTS NAME PARTS No. Q’ ty REMARK printer table 722730100 printer table clamp A 722730200 printer table clamp B 722730300 fastener layer Set 50 722090012 2TAP plug socket 722780100 Japan Only Screw Unit For PRINTER table CR-5 722090013... -
Page 44: Revision History
9. REVISION HISTORY Revision History Revision page Date...
Need help?
Do you have a question about the CR-5 and is the answer not in the manual?
Questions and answers