Table of Contents
Advertisement
Quick Links
Download this manual
See also:
Service Manual
Advertisement
Table of Contents

Subscribe to Our Youtube Channel
Related Manuals for Plus CR-5


Summary of Contents for Plus CR-5
- Page 1 Copyboard CR - 5 Thank you for your purchase of the PLUS Copyboard. Please read this User’s Manual carefully before use to take full advantage of the functions of this product. After you have finished reading the manual, please keep it...
- Page 2 The separately sold printer is designed to be used as a peripheral device for a PLUS copyboard. The printer is not guar- anteed to operate when connected directly to a computer.
-
Page 3: Table Of Contents
Table of Contents Important Safety Information ......................E-4 Package Contents ........................... E-7 Names of the Parts .......................... E-8 Front ............................E-8 Rear .............................. E-9 Control Panel ..........................E-10 Assembling and Installing the Copyboard .................. E-11 1.Mounting the pen tray and adapter holder ................E-11 2.Mounting the copyboard on the wal .................. -
Page 4: Important Safety Information
• Do not use any AC power adapter/cord set other than the Operation is subject to the following two specified (included) one with the PLUS copyboard. conditions: Doing so could result in fire or other accidents. (1) This device may not cause harmful inter- •... - Page 5 Important Safety Information Handling the AC power adapter’s cord and plug Preventing Tipping (for stand type units) • Damaging the power cord could lead to fire or electric To prevent tipping, heed the instructions below. Tipping shock. could lead to personal injury or damage the unit. •...
- Page 6 • PLUS Vision will not be responsible for the loss of content stored in the internal memory of this unit (i.e., images that have been read), or in USB memory.
-
Page 7: Package Contents
Use this to erase the drawing. • CD-ROM [1] Includes the handling instructions in PDF format and special software for using the copyboard (PLUS TOOL BOX). • Wall mount positioning sheet [1] Indicates the positions for mounting the wall mount •... -
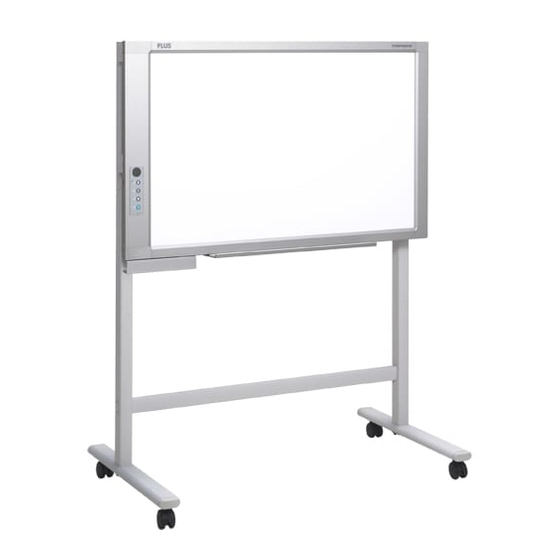
Page 8: Names Of The Parts
Names of the Parts Front Sheet Use the dedicated markers to draw or write on the sheet. Frame cover Control panel (See Page E-12) USB port (Type A) (On the side of the copyboard.) Insert the USB memory device here. (See page E-18.) If you purchase a separately sold Adapter holder... - Page 9 Names of the Parts Rear Rail groove When mounting the copyboard on a wall, insert the edge of the wall mount fitting here and fasten the copyboard. (See page E-15.) Rail groove When mounting the copyboard on a wall, insert the edge of the fixing bracket here and fasten the copyboard.
- Page 10 Names of the Parts Control Panel When pressing a button, please press the center area (i.e., the round and protruding portion). The button may not work if it is pressed on a corner. Display window The status of the connection between the copyboard and com- puter, the operating status and error information are indicated by the 7-segment LEDs.
-
Page 11: Assembling And Installing The Copyboard
Assembling and Installing the Copyboard After purchase, mount the included pen tray and adapter holder to the copyboard before installing the copyboard on the wall surface. CAUTION Special procedures are required to mount the copyboard to a wall surface. Before mounting, check that wall surface is strong enough to bear the total weight of the copyboard and wall mount fit- ting over a long period of time (even in earthquakes). -
Page 12: Mounting The Copyboard On The Wal
Assembling and Installing the Copyboard (2) Mount the adapter holder. The adapter holder is for stowing the AC power Rail groove in adapter. (See page E-16.) pen tray Temporarily fasten the adapter holder in place (at 3 points) using the included M4 x 6 screws. - Page 13 Assembling and Installing the Copyboard Reference Wall mount fitting dimensions diagram Copyboard top - Wall mount fitting hole center 1143 Maximum copyboard sliding distance Maximum copyboard sliding distance Wall mount fitting external dimensions and wall mount fitting screw hole positions Copyboard exterior Wall mount fitting screw hole center Fixing bracket screw hole center (approximate) Fixing bracket screw hole position...
- Page 14 Assembling and Installing the Copyboard Installation Method for Various Wall Materials Please perform an installation that suits the wall material. Please install the Copyboard to posts or studs when the wall surface is of insufficient strength. Installation Wall Material Installation Method Plaster board wall Molly anchor (included) * The included Molly anchors are suited for boards 6 to 10 mm thick.
- Page 15 Assembling and Installing the Copyboard (3) Insert the copyboard into the top of the wall mount fitting. Insert the rail groove on the rear of the copyboard into the wall mount fit- ting, then making sure it is properly inserted, gently lower the copyboard into place.
-
Page 16: Connections Between Copyboard And Ac Power Adapter
Connections Between Copyboard and AC Power Adapter To use the Copyboard, connect the supplied AC power adapter. Adapter holder * The DC input terminal is located on the bottom of DC input connector the copyboard. * Be sure to insert all the plugs securely. DC plug Wall outlet AC power adapter... -
Page 17: Operation Steps
Operation Steps When the Save button is pressed, the image data is stored in the memory. When a printer is connected and the Print button is pressed, the image on the sheet is printed out on the printer. Printing Saving to USB Memory * When printing is planned, please connect a printer. -
Page 18: Using Usb Memory
Personal computer : The connector is a USB port (type A), and the interface is compatible with USB 1.1 and USB 2.0. Note Notice • For the specification of the USB memory devices compatible with this Copyboard, please go to our website at: http://www. plus-vision.com USB Memory Storage Procedure Preparation: Connect the AC power adapter to the Copyboard. See Page E-16. - Page 19 Using USB Memory Press the Feed/Stop button and display the sheet surface you want to store. Pressing the Feed/Stop button scrolls the sheet one screen portion to the left and it stops automatically. To interrupt scrolling, press the Feed/Stop button again. Note •...
- Page 20 Using USB Memory Note • Depending on the USB memory, it may take time for recognition or it may take time for saving. • When the Feed/Stop button is pressed during the reading operation, the reading operation will be discontin- ued and the partially read image data will be stored in the USB memory.
-
Page 21: Saving Image Files To A Personal Computer, And Deleting Image Files
Using USB Memory Saving Image Files to a Personal Computer, and Deleting Image Files This is an operation example of storing the image file that has been stored in USB memory on the hard disk of the personal computer, or deleting the folder when the USB memory capacity has become full. (There are vari- ous methods that can be used for saving and deleting including the use of Explorer.) See the instruction manual of your personal computer or the software that you are using for information about using a personal computer. - Page 22 Using USB Memory Deleting USB memory image files with the computer Before deleting important image files, be sure to save them on the computer (as a data backup). . Open “My Computer” and then open the drive icon which shows USB memory. The folder named “CB_image”...
-
Page 23: Accompanying Software
* This driver may not work on some applications. * This driver conforms to TWAIN standard (ver. 1.9). • "PLUS TOOLBOX" dedicated software This is a utility for loading images from a computer, setting the copyboard's operating environment, making security settings, etc. -
Page 24: Operating Environment
• Windows 95, 98SE/Me, NT, 2000 Server, Server 2003, and Vista (64 bit version) are not supported. Dedicated software's setting items and factory defaults The "Settings" menu of the "PLUS TOOLBOX" dedicated software on the included CD-ROM can be used to change the copyboard's settings. -
Page 25: Meaning Of Error Messages
Copyboard has been connected. switch off the power. When a record is is connected required, switch on the power and save to USB memory. If the problem persists, please contact your nearby PLUS Vision sales office, dealer, or store. E-25... -
Page 26: Troubleshooting
• Is the Copyboard connected to the PC via a USB hub? (Connect the Copyboard directly to the USB port of the PC.) • If the problem persists, please contact your nearby PLUS Vision sales office, dealer, or store. * For setting instructions, see the separate "Software Operating Instructions". -
Page 27: Specifications
• Please note that the appearance of the main unit, the supplied printer, specifications, and other items are subject to change without notice for the purpose of quality improvement. • This machine contains eParts of the eSOL, Co., Ltd. • This unit is a PLUS Copyboard product. E-27... -
Page 28: Printing
Printing (When a printer has been purchased as an optional item) Use a separately sold printer to print the contents drawn on the sheet surface. Operations and part names differ from printer to printer. For details, see your printer's operating instructions. IMPORTANT When using a printer for the first time, remove the transport protection sheet and mount the printer cartridge. -
Page 29: Preparing The Printer
Printing Test print The following is the basic procedure for test printing. It may differ slightly on your printer. (1) Open the printer's top cover and paper feed tray, and remove the transport protection sheet, etc. (2) Turn on the printer's power. (See below.) (3) Mount the printer cartridge on the printer. -
Page 30: Basic Printing Operation
Printing Basic Printing Operation Preparation: Connect the AC power adapter to the Copyboard. See Page E-16. Press the ON/Standby button and switch on the power. Prepare the printer. Note • Press the ON/Standby button more than 3 seconds when con- necting the AC power adapter to the Copyboard unit or or after turning off the Copyboard power. - Page 31 Printing Note • If the ON/Standby button is pressed while the sheet surface is being read, printing is interrupted and only part of the image will be printed. To move the sheet surface, wait until scrolling stops, then press the Feed/Stop button.
-
Page 32: When There Is A Problem With Printing
Printing When there is a Problem with Printing When the Copyboard and an optional printer have been connected and you think there might be a breakdown, please check the following matters before requesting repair. Condition Please Check A press of the Print button does not result •...
Need help?
Do you have a question about the CR-5 and is the answer not in the manual?
Questions and answers