HME DX100 Operating Instructions Manual
Hide thumbs
Also See for DX100:
- Operating instructions manual (35 pages) ,
- Operating instructions manual (31 pages) ,
- Instructions (4 pages)
Table of Contents
Advertisement
Advertisement
Table of Contents

Related Manuals for HME DX100


Summary of Contents for HME DX100
-
Page 1: Wireless Intercom
DX100 Wireless Intercom Operating Instructions HME# 400G748 Rev A 5/4/17... -
Page 3: Table Of Contents
SECTION 1. INTRODUCTION ........................1 EQUIPMENT IDENTIFICATION ........................2 MAIN EQUIPMENT FEATURES ........................3 Base Station Features ............................3 Beltpac Features (Uses BAT41 battery) ......................3 WH220 Headset Controls (Uses BAT50 battery) ....................4 SECTION 2. EQUIPMENT SETUP ......................... 5 AC40 BATTERY CHARGER SETUP ......................... - Page 4 Environment, for work-related use. Transmit only when person(s) are at least the minimum distance from the properly installed, externally mounted antenna. Hereby, HM Electronics, Inc. declares that the DX100 is in compliance with the essential requirements and other relevant provisions of Radio Equipment Directive (RED).
- Page 5 The WEEE Directive covers most HME products being sold into the EU as of August 13, 2005. Manufacturers, distributors and retailers are obliged to finance the costs of recovery from municipal collection points, reuse, and recycling of specified percentages per the WEEE requirements.
-
Page 6: Section 1. Introduction
The MB100 Base Station can be operated using standard AC electricity, an external DC power source or six AA batteries. A power supply, cable and a battery sled are included with the base station. This is an example of a typical theatrical application. A variety of other uses for the DX100 are possible. -
Page 7: Equipment Identification
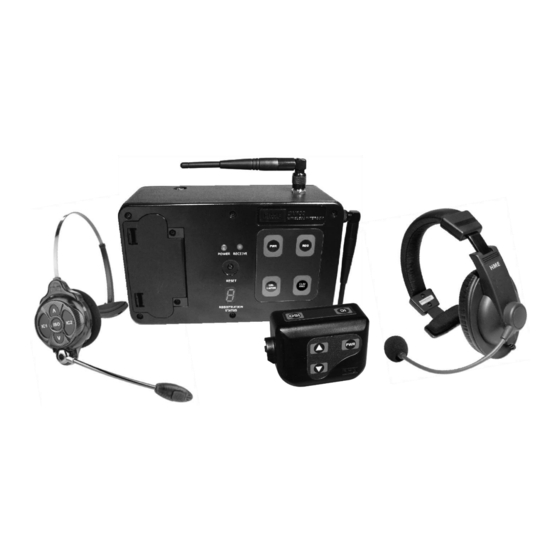
EQUIPMENT IDENTIFICATION The following equipment is standard with the DX100 Wireless Intercom System. As you unpack the equipment, check the enclosed shipping documents to be sure you received all items listed. Base Station Battery Sled Base Station Antennas (2 per Base Station) -
Page 8: Main Equipment Features
MAIN EQUIPMENT FEATURES Base Station Features POWER indicator light UN-LATCH button RESET button CLR/BND (Clear/Band) button REGISTRATION STATUS display Antennas RECEIVE indicator light 10. Power connector REG (Registration) button 11. Battery compartment cover PWR (Power) button 12. Battery compartment cover release latch Beltpac Features (Uses BAT41 battery) Volume-up ... -
Page 9: Wh220 Headset Controls (Uses Bat50 Battery)
WH220 Headset Controls (Uses BAT50 battery) 1. IC1 button 6. Power light 2. ISO (Isolate) button 7. Microphone 3. Volume-up button 8. Power button 4. IC2 button 9. Battery 5. Volume-down button 10. Battery-release latch... -
Page 10: Section 2. Equipment Setup
SECTION 2. EQUIPMENT SETUP AC40 BATTERY CHARGER SETUP The AC40 is the charger for Beltpac batteries. IMPORTANT! – Before installing the system, connect the AC power supply to the AC40 Battery Charger and plug it into an electrical outlet. Charge all the batteries for the Beltpacs while the other equipment is being installed. -
Page 11: Ac50 Battery Charger Setup
AC50 BATTERY CHARGER SETUP Before installing the system, connect the AC power supply to the battery charger and plug it into an electrical outlet. Charge all the batteries while the other equipment is being installed. Charging time is about 2.5 hours. Connect AC Power Supply To connect the AC power supply to the battery charger: Connect the AC power supply cable connector to the... -
Page 12: Base Station Setup
Step 2. Note which of the following applies to you. If using the DX100 with AC power Plug the connector at the end of the AC power supply cable into the power connector on top of the base station. Turn the sleeve on the cable connector clockwise to secure it to the base station. - Page 13 DX100 should be rated at least 12VDC, 500mA. NOTE: Having a fully charged (or new) battery when operating the DX100 with AC or external DC power can prevent interruption of communication during a power outage. This allows the base station to seamlessly switch to battery power.
-
Page 14: Interference Avoidance
DMX systems or other HME Base Stations use the same frequency band. If these systems can be limited to one portion of the band, then the DX100 can be set to the opposite half of the 2.4 GHz to 2.48 GHz band. To avoid this type of interference, select the upper part of the frequency range on one Base Station (or more), and the lower part of the frequency range on the other(s). -
Page 15: Multiple Base Stations
Multiple Base Stations This mode of operation can be used to expand the number of users communicating through multiple HME Base Stations operating in the same portion of the 2.4 GHz to 2.48 GHz frequency band. Primary and Secondary Base Station Settings One base station must be designated as “primary”... -
Page 16: Base Station Initialization
Base Station Initialization For multiple HME Base Stations to operate without interference, they must be properly initialized before performing any other setups. After initializing each base station, register each Beltpacs/Headsets to that base according to the procedures on pages 13 - NOTE: Base stations must be set up for split-band operation prior to initialization. - Page 17 Step 9. Press the RESET button on the primary base, and let it recover. Step 10. Turn on the primary Beltpacs/ Headsets, and let them link. Step 11. Press the RESET button on each secondary base station (one at a time), and let it initialize to the primary base (indicated by a single bar).
-
Page 18: Beltpac / Wh220 Headset Setup And Registration
BELTPAC / WH220 HEADSET SETUP AND REGISTRATION The first time you operate the DX100 system, you must register each Beltpac and/or WH220 Headset for use with a specific base station. The base station will then recognize all registered Beltpacs/ Headsets when their power is on. - Page 19 If registration is successfully completed: A voice message in the headset will say “Power on, Beltpac #, Version #, Begin registration, Registration complete, …” After a delay of up to 15 seconds, the REGISTRATION STATUS display will show the ID number assigned to this Beltpac for about 10 seconds.
-
Page 20: Set Up Wh220 Headsets
Set Up WH220 Headsets Before registering, insert a fully charged battery in each WH220 Headset with the metal contacts on the end of the battery inserted first. Press it in until it snaps. Power On/Off To turn power on Press and release the power button on the inside of the Headset housing. - Page 21 If the registration is successfully completed: A voice message in the Headset will say “Power on, Headset #, Version #, Begin registration, Registration complete, …” After a delay of up to 15 seconds, the REGISTRATION STATUS display will show the ID number assigned to this Headset for about 10 seconds.
-
Page 22: Section 3. Equipment Operation
13 - PWR (Power ) button Press and release to turn the DX100 power on. Press and hold for 2 seconds to turn power off. REG (Registration ) button Use this button to register each Beltpac/Headset used with the DX100. See pages 13 - ... -
Page 23: Beltpac Operation
BELTPAC OPERATION Power The Beltpac control buttons have a snap action. They will activate when lights pressed firmly. Use your fingertips, not fingernails, to press the buttons. Power On/Off Power On — Press and release the PWR (power) button. A voice message in the earpiece will say “Power on, Beltpac #, Version #”, and the red power lights at the corners of the IC and ISO buttons will turn on. -
Page 24: Sidetone Adjustment
Volume Up/Down Volume Up Adjustment — Each time you press and release the volume-up button, you will hear a higher pitch beep in the earpiece as the volume increases one step. If you press and hold the volume-up button, you will hear beeps of ascending pitch as the volume steps up to maximum. -
Page 25: Wh220 Headset Operation
WH220 HEADSET OPERATION The Headset control buttons will activate when pressed lightly. Use your fingertips, not your fingernails, to press the buttons. Power Power On/Off light Power On — Press and release the power button on the inside of the Headset housing. A voice message in the earpiece will say “Power on, Headset #, Version #”... - Page 26 Volume Up/Down Volume Up Adjustment — Each time you press and release the volume-up button, you will hear a higher pitch beep in the earpiece as the volume increases one step. If you press and hold the volume-up button, you will hear beeps of ascending pitch as the volume steps up to maximum.
-
Page 27: Section 4. Advanced Frequency Hopping
SECTION 4. ADVANCED FREQUENCY HOPPING Background The Clear-Com DX wireless intercom systems utilize a Frequency Hopping Spread Spectrum (FHSS) radio in order to provide robust communications. This system operates in the unlicensed 2.4 GHz band. With the proliferation of other devices over the past few years in the same 2.4 GHz band, instances where these devices and systems can interfere with each other has greatly increased. -
Page 28: Operation In Severe Environments
Operation in Severe Environments During normal operation, the fact that the system is constantly changing the channel list in use is transparent to the user. It is possible, however, that in an environment with severe interference that the system may experience a slight degradation. -
Page 29: Interference Mitigation
Physical separation. If possible, equipment operating in the 2.4 GHz spectrum should be operating as far as physically possible from the HME base station. A Wi-Fi access point or router is a common piece of equipment that could interfere with the DX100 system, or vice versa. These two pieces of equipment in particular should not be located close together. -
Page 30: Section 5. Troubleshooting
Beltpac unit. See pages 18-21. 2400MHz cordless telephone interference — If there is a 2400MHz cordless telephone nearby, interference may occur. However, because the DX100 is a frequency-hopping system, this problem is unlikely. If it does occur, changing frequencies on the telephone may alleviate the problem. -
Page 31: Section 6. Technical Data
SECTION 6. TECHNICAL DATA EQUIPMENT SPECIFICATIONS Base Station GENERAL Frequency Range:......All, 2400 to 2483.5 MHz Low, 2401.92 to 2439.94 MHz High, 2443.39 to 2481.41 MHz Frequency Response: ...... 200 Hz to 3.5 kHz Power Requirements: ...... 100-240VAC, 50-60Hz or 12-14VDC Temperature Range: ...... -
Page 32: Beltpac
Beltpac Frequency Range:......2400 MHz – 2483.5 MHz Antenna: .......... Internal, horizontal/vertical diversity Frequency Response: ...... 200 Hz to 3.5 kHz Transmit Power: ......100mW burst RF Sensitivity: ......... <0dBm w 10 Battery Requirements: ....3.6V lithium ion, rechargeable Battery Life: ........Hands-free – up to 14 hours, PTT – up to 20 hours Temperature Range: ...... -
Page 33: General Battery Safety Instructions For Battery Model Bat41, Bat50, Bat60
GENERAL BATTERY SAFETY INSTRUCTIONS FOR BATTERY MODEL BAT41, BAT50, BAT60...
Need help?
Do you have a question about the DX100 and is the answer not in the manual?
Questions and answers