HME DX200 Operating Instructions Manual
Wireless intercom
Hide thumbs
Also See for DX200:
- Operating instructions manual (21 pages) ,
- Operating instructions manual (38 pages)
Table of Contents
Advertisement
Advertisement
Table of Contents

Subscribe to Our Youtube Channel
Related Manuals for HME DX200


Summary of Contents for HME DX200
-
Page 1: Wireless Intercom
HME# 400G579 Rev E 3/19/08 DX200 Wireless Intercom Operating Instructions... -
Page 2: Table Of Contents
HM Electronics, Inc. is not responsible for equipment malfunctions due to erroneous translation of its publications from their original English version. © 2008 HM Electronics, Inc. The HME logo and product names are registered trademarks of HM Electronics, Inc. All rights reserved. -
Page 3: Fcc Notice
Occupational/Controlled Exposure Environment, for work-related use. Transmit only when person(s) are at least the minimum distance from the properly installed, externally mounted antenna. Hereby, HM Electronics, Inc. declares that the DX200 is in compliance with the essential requirements and other relevant provisions of R&TTE Directive 1999/5/EC. - Page 4 Waste Electrical and Electronic Equipment (WEEE) The European Union (EU) WEEE Directive (2002/96/EC) places an obligation on producers (manufacturers, distributors and/or retailers) to take-back electronic products at the end of their useful life. The WEEE Directive covers most HME products being sold into the EU as of August 13, 2005. Manufacturers, distributors and retailers are obliged to finance the costs of recovery from municipal collection points, reuse, and recycling of specified percentages per the WEEE requirements.
-
Page 5: Limited Warranty
LIMITED WARRANTY HM Electronics, Inc. (“HME”) warrants the DX200 for a period of two (2) years* from the date of purchase against defects in materials or workmanship provided it was purchased from an authorized dealer. During the warranty period, defective HME Products will be repaired without charge for parts and labor. -
Page 6: Section 1. Introduction
4-wire intercom channel can be used. Either a monitor speaker or a local headset can be used with the DX200. Using a local headset, the base station operator can talk to crew members on the cabled intercom channel, Beltpacs/Headsets/Speaker Stations only, or all channels. -
Page 7: Equipment Identification
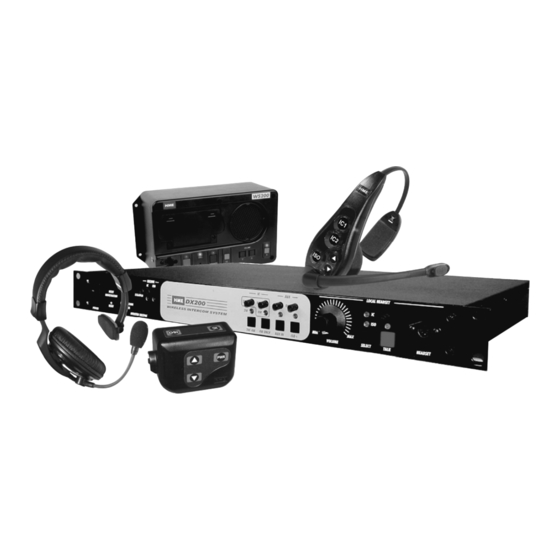
EQUIPMENT IDENTIFICATION The following equipment is standard with the DX200 Wireless Intercom System. As you unpack the equipment, check the enclosed shipping document to be sure you received all items listed. BS200 Base Station 115/230 Volt AC Power Supply Base Station Antennas... -
Page 8: Main Equipment Features
MAIN EQUIPMENT FEATURES Beltpac Features 1. Headset cable connector 6. Volume-up button 2. Beltpac power lights 7. Volume-down button 3. ISO (Isolate) button 8. Battery 4. IC (Intercom) button 9. Battery release latch 5. PWR (Power) button WH200 Headset Features 1. -
Page 9: Speaker Station Features
Speaker Station Features Left side panel Front panel Right side panel 1. SIDE TONE adjustment (recessed) 7. SPEAKER and light 2. Battery compartment cover 8. ISO (Isolate) button and light 3. Battery compartment cover release latches 9. VOLUME down and up buttons 4. -
Page 10: Base Station Features
Base Station Features 4 5 6 11 12 13 14 15 18 19 20 21 Front Panel 1. POWER switch 11. LOCAL HEADSET ISO indicator light 2. RESET REGISTRATION button 12. LOCAL HEADSET IC indicator light 3. REGISTRATION STATUS display 13. -
Page 11: Equipment Setup
SECTION 2. EQUIPMENT SETUP BATTERY CHARGER SETUP IMPORTANT! – Before installing the system, connect the AC power supply to the AC40A Battery Charger and plug it into an electrical outlet. Charge all the batteries for the Beltpacs and/or WH200 Headsets while the other equipment is being installed. -
Page 12: Base Station Setup
BASE STATION SETUP The following description is for a basic, stand-alone DX200 system setup. Connections and setup for multiple, daisy-chained base stations are described on pages 8 – 10. Connections with 2-wire and 4-wire intercoms, and other auxiliary equipment are described in the INTERCOM AND AUXILIARY EQUIPMENT SETUPS on pages 20 and 21. -
Page 13: Multiple Base Stations
Multiple Base Stations Two or more base stations can be “daisy-chained” together with cables connected to the 2-wire connectors /RTS ® ® (#27 and #29) on the rear panel of each base station, following Clear-Com standards. NOTE: The base station does not provide or require 2-wire line power. The cable connectors must be 3-pin XLR type with the Mode... - Page 14 Initialize each base station and register all Beltpacs/Headsets/Speaker Stations as follows: • Turn the primary base station power on. Register any Beltpacs/Headsets/Speaker Stations to be used with the primary base station (See pages 11 - 18). Turn each Beltpac/Headset/Speaker Station off after registering it.
- Page 15 • Repeat these steps for each remaining secondary base. Use a different number for each. Only the primary base and the secondary base you are working with should have power on during initialization. All other equipment should be off. • After all secondary bases are initialized and Beltpacs/Headsets/Speaker Stations are registered power up all bases.
-
Page 16: Beltpac / Wh200 Headset / Speaker Station Setup And Registration
BELTPAC / WH200 HEADSET / SPEAKER STATION SETUP AND REGISTRATION The first time you operate the DX200 system, you must register each Beltpac, WH200 Headset and/or WS200 Speaker Station for use with a specific base station. The base station will then recognize all registered Beltpacs/Headsets/Speaker Stations when their power is on, and will know the difference between them and other electronic equipment operating on the same frequencies. - Page 17 If registration is successfully completed: • A voice message in the headset will say “Power on, Beltpac #, Version #, Begin registration, Registration complete, …” • After a delay of up to 15 seconds, the REGISTRATION STATUS display will show the ID number assigned to this Beltpac for about 10 seconds.
-
Page 18: Set Up Wh200 Headsets
Set Up WH200 Headsets Before registering them, insert a fully charged battery in each Headset, with the metal contacts on the end of the battery inserted first. Press it in until it snaps. Power On/Off • To turn power on Press and release the power button on the inside of the Headset housing. - Page 19 If the registration is successfully completed: • A voice message in the Headset will say “Power on, Headset #, Version #, Begin registration, Registration complete, …” • After a delay of up to 15 seconds, the REGISTRATION STATUS display will show the ID number assigned to this Headset for about 10 seconds.
-
Page 20: Set Up Speaker Stations
Set Up Speaker Stations The WS200 Speaker Station can be used together with Beltpacs and WH200 All-in-one Headsets. It provides wireless communication through its built-in microphone and speaker, or a plug-in headset. A remote speaker can also be connected to the unit. The Speaker Station can be used on a table top or mounted on the wall. - Page 21 Battery Operation Battery cover release latches If using the WS200 with battery power ― • Press down and pull out on the two battery cover release latches and lift the cover to open the battery compartment. • Insert six AA batteries into the battery sled, in the positions shown inside the sled, and install the sled in the battery compartment.
-
Page 22: Register Speaker Stations
Register Speaker Stations The first time you operate a WS200, you must register it for use with a specific base station. The base station will then recognize the WS200 when its power is on, and will be able to tell the difference between it and other electronic equipment operating on similar frequencies, or DX family Beltpacs or All-in-one Headsets. - Page 23 If registration failed: • A voice message will say “Power on, Speaker, Version #, Begin registration, …” The ISO and IC lights on the WS200 will be blinking red, and there may be a delay of up to 90 seconds before you hear “Registration failed.” •...
- Page 24 The instructions under INTERCOM AND AUXILIARY EQUIPMENT SETUPS on the following pages are for setting up additional equipment which you may want to use with your DX200, such as a 2-wire intercom, 4-wire intercom, an external speaker or other auxiliary audio equipment. Instructions are also...
-
Page 25: Intercom And Auxiliary Equipment Setups
INTERCOM AND AUXILIARY EQUIPMENT SETUPS 25 26 27 28 29 35 36 37 Rear Panel 4 5 6 11 12 13 14 18 19 20 21 Front Panel 2-Wire Intercom Step 1. If using a 2-wire intercom, plug it into the base station at #27 or #29, depending on whether a male or female connection is required. -
Page 26: Auxiliary Equipment
The numbers (# ) below refer to items on the illustrations on page 20. Auxiliary Equipment Step 1. If using auxiliary equipment, such as another intercom, a CD player or other audio source, connect its output cable connector (male) to the AUX IN connector (#33), and its input cable connector (female) to the AUX OUT connector (#34) (if applicable). -
Page 27: Section 3. Equipment Operation
SECTION 3. EQUIPMENT OPERATION BASE STATION OPERATION Front Panel Controls, Indicators and Connector 1. POWER Switch Press the upper part of the switch to turn the power on. A light on the switch will be lit when the base station power is on. - Page 28 The following base station indicators and controls are used only if 2-wire or 4-wire intercoms, or other auxiliary equipment is being used with the DX200, as described under INTERCOM AND AUXILIARY EQUIPMENT SETUPS on pages 20 and 21. 6. 2Wire/4Wire IC Indicators and Controls The 2W/4W button turns on/off both 2-wire and 4-wire intercoms simultaneously.
-
Page 29: Beltpac Operation
BELTPAC OPERATION Power The Beltpac control buttons have a snap action. They will activate when lights pressed firmly. Use your fingertips, not your fingernails, to press the buttons. Power On/Off • Power On — Press and release the PWR (power) button. A voice message in the earpiece will say “Power on, Beltpac #, Version #,”... -
Page 30: Sidetone Adjustment
Volume Up/Down • Volume Up Adjustment — Each time you press and release the volume-up button, you will hear a higher pitch beep in the earpiece as the volume increases one step. If you press and hold the volume-up button, you will hear beeps of ascending pitch as the volume steps up to maximum. When maximum volume is reached, you will hear “maximum”... -
Page 31: Wh200 Headset Operation
WH200 HEADSET OPERATION The Headset control buttons will activate when pressed lightly. Use your fingertips, not your fingernails, to press the buttons. Power Power On/Off button • Power On — Press and release the power button on the inside of the headset housing. A voice message in the earpiece will say “Power on, Headset #, Version #”... -
Page 32: Microphone Gain Adjustment
Volume Up/Down • Volume Up Adjustment — Each time you press and release the volume-up button, you will hear a higher pitch beep in the earpiece as the volume increases one step. If you press and hold the volume-up button, you will hear beeps of ascending pitch as the volume steps up to maximum. When maximum volume is reached, you will hear “maximum”... -
Page 33: Speaker Station Operation
SPEAKER STATION OPERATION Headset connector Headset Connection If you are using a headset with the WS200, plug it into the headset connector. When using a headset, if the red light over the SPEAKER button is on, incoming communication can be heard through the headset and the speaker. - Page 34 Routine Operation Power On/Off • To turn WS200 power on, press and release the POWER button. — Red lights will go on over the POWER, ISO and IC buttons. — If listening with a headset, or the speaker is turned on, you will hear “Power on, Speaker #, Version #.” —...
- Page 35 CALL Light Function If the CL200 (optional) Call Light button is pressed, or a call tone from an RTS or ClearCom intercom system is received through the CL200 on the 2-wire circuit: • One short beep will sound in the WS200 speaker or headset, and will also be heard through all Beltpacs or All-in-one Headsets registered to the same base station as the WS200.
-
Page 36: Troubleshooting
2400MHz cordless telephone interference — If there is a 2400MHz cordless telephone nearby, interference may occur. However, because the DX200 is a frequency-hopping system, this problem is unlikely. If it does occur, changing frequencies on the telephone may alleviate the problem. If not, move the phone as far as practical from the base station, or use another type phone. -
Page 37: Section 5. Technical Data
SECTION 5. TECHNICAL DATA EQUIPMENT SPECIFICATIONS Base Station GENERAL ⎯ Frequency Range: 2400 – 2483.5 MHz Frequency Response: 200 Hz to 3.5 kHz Power Requirements: 100-240VAC, 50-60Hz or 12-14VDC Temperature Range: 32-122°F (0-50°C) Size: 19” x 1.72” x 17.13” (1-RU) (48.26 x 4.37 x 43.51 cm) Weight: 9.2 lbs. -
Page 38: Beltpac
Beltpac Frequency Range: 2400 MHz – 2483.5 MHz Antenna: Internal, horizontal/vertical diversity Frequency Response: 200 Hz to 3.5 kHz Transmit Power: 100mW burst RF Sensitivity: <−90dBm w 10 Battery Requirements: 3.6V lithium ion, rechargeable Battery Life: Hands-free – up to 14 hours PTT –... -
Page 39: Block Diagram
BLOCK DIAGRAM DX200 Base Station...
Need help?
Do you have a question about the DX200 and is the answer not in the manual?
Questions and answers