HME DX100 Operating Instructions Manual
Hide thumbs
Also See for DX100:
- Operating instructions manual (31 pages) ,
- Operating instructions manual (36 pages) ,
- Instructions (4 pages)
Table of Contents
Advertisement
Quick Links
Advertisement
Table of Contents

Related Manuals for HME DX100


Summary of Contents for HME DX100
-
Page 1: Wireless Intercom
HME# 400G626 Rev B 1/14/10 DX100 Wireless Intercom Operating Instructions... -
Page 3: Table Of Contents
HM Electronics, Inc. is not responsible for equipment malfunctions due to erroneous translation of its publications from their original English version. © 2010 HM Electronics, Inc. The HME logo and product names are registered trademarks of HM Electronics, Inc. All rights reserved. - Page 4 Environment, for work-related use. Transmit only when person(s) are at least the minimum distance from the properly installed, externally mounted antenna. Hereby, HM Electronics, Inc. declares that the DX100 is in compliance with the essential requirements and other relevant provisions of R&TTE Directive 1999/5/EC.
-
Page 5: Section 1. Introduction
DC power source or six AA batteries. A power supply, cable and a battery sled are included with the base station. This is an example of a typical theatrical application. A variety of other uses for the DX100 are possible. -
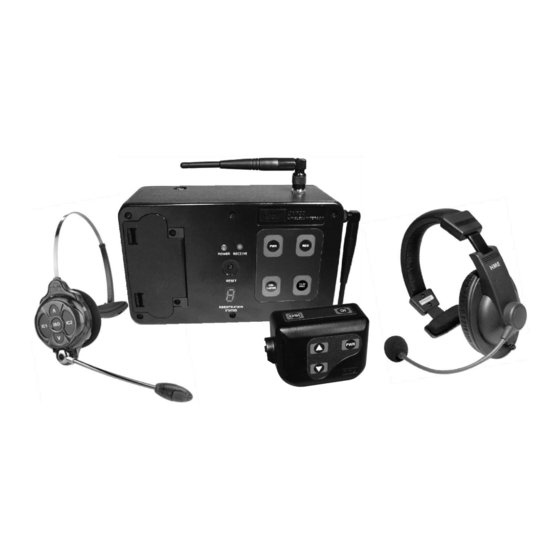
Page 6: Equipment Identification
EQUIPMENT IDENTIFICATION The following equipment is standard with the DX100 Wireless Intercom System. As you unpack the equipment, check the enclosed shipping documents to be sure you received all items listed. Base Station Battery Sled Base Station Antennas (2 per Base Station) -
Page 7: Main Equipment Features
MAIN EQUIPMENT FEATURES Base Station Features POWER indicator light UN-LATCH button RECEIVE indicator light CLR/BND (Clear/Band) button RESET button Antennas REGISTRATION STATU S display 10. Power connector PWR (Power) b 11. Battery com utton partment cover REG (Registration) button 12. Battery compartm ent cover release latches eltpac Features Headset cable connector... -
Page 8: Wh200 Headset Features
W 200 Headset Features Power light Volume-up button Transmit light Volume-down button IC1 & IC2 (Int ercom) buttons Power button ISO (Isolate) b utton Battery release latch Battery peaker Station Features Left side panel Front panel Right side panel SIDE TONE adjustme (recessed) SPEAKER button and ligh ISO (Isolate) button and light... -
Page 9: Equipment Setup
SECTION 2. EQUIPM ENT SETUP BATTERY CHARGER SETUP IMPORTANT! – Before installing the system, connect the AC power supply to the AC40A Battery Charger and plug it into an electrical outlet. Charge all the batteries while the other equipment is being installed. Charging time is about 2.5 hours. -
Page 10: Base Station Setup
BASE STATI ON SETUP Locate the two base station antennas and the AC power adapter and power cord received with the base station, and connect them to the base station as described below. Antenna and Power Setups Antenna connectors Step 1. Connect the two enclosed antennas to the antenna connectors on the top and right side of the base station, shown to... - Page 11 DC power source to the power connector on top of the DX100. Any power supply used with the DX100 should be rated at least 12VDC, 500mA. NOTE: Having a fully charged (or new) battery in its battery compartment when operating the DX100 with AC or external DC power can prevent interruption of communication during a power outage, as the base station will automatically switch to battery power.
-
Page 12: Interference Avoidance
WI-FI systems, wireless DMX systems, other HME Base Stations, etc. use the same frequency band. If these systems can be limited to one portion of the band, then the DX100 can be set to the opposite half of the 2.4 GHz to 2.48 GHz band. -
Page 13: Multiple Base Stations
Multiple Base Stations This mode of operation can be used to expand the number of users communicating through multiple HME Base Stations operating in the same portion of the 2.4 GHz to 2.48 GHz frequency band. Primary and Secondary Base Station Settings One base station must be designated as “primary”... -
Page 14: Base Station Initialization
Base Station Initializatio For multiple HME Base Stations to operate without interference, they must be properly initialized before performing any other setups. After initializing each base station, register each Beltpacs/Headsets/Speaker Station to that base according to the procedures on pages 12 - 19. - Page 15 RESET • Press the RESET button on the prim ary base and let it recover. button • Turn on the primary Beltpacs/ Headsets/Speaker Stations and let them link. • Press the RESET button on each secondary base station one at a ti me and let it initialize to the primary base, as indicated by a single bar.
-
Page 16: Beltpac / Wh200 Headset / Speaker Station Setup And Registration
AKER STATION SETUP AND REGISTRATION The first time you operate the DX100 system, you must register eac h Beltpac, WH200 Headset and/or Speaker Station for use with a specific base station. The base station will then recognize all registered Beltpacs/... - Page 17 f registration is successfully completed: • A voice message in the headset will say “Power on, Beltpac #, V ersion # , Begin registration, Registration complete, …” • After a delay of up to 15 seconds, the REGISTRATION STATUS display w ill show the ID number assigned to this Beltpac for about 10 seconds.
-
Page 18: Set Up Wh200 Headsets
Set Up WH200 Headsets efore registering them, insert a fully charged battery in e ach WH200 Headset, with the metal contacts on the end of the battery i nserted first. Press it in until it snaps. Power On/Off • To turn power on Press and release the power button on the inside of the Headset housing. - Page 19 If the registration is successfully complete • A voice message in the Headset will say “Power on, Headset #, Version #, Begin registration, Registration complete, …” • After a delay of up to 15 seconds, the REGISTRATION STATUS display will show the ID number assigned to this Headset for about 10 seconds.
-
Page 20: Set Up Speaker Station
Set Up Speaker Station The WS200 Speaker Station can be used together with Beltpacs and WH 200 All-in-one Headsets. It provides wireless communication through its built-in microphone and speaker, or a plug-in headset. A remote speaker can also be connected to the un he Speaker Station can be used on a table top or mounted on the wall. - Page 21 Battery Battery sled compartment with batteries NOTE: An HME BAT850 Rechargeable NiMH Battery can be used instead. • Close the battery compartment by pressing down on its cover next to both of the latches at the same time until they snap in place.
-
Page 22: Register Speaker Station
Register Speaker Station The first time you operate the WS200, you must register it for use with a specific base station. The base station will then recognize the WS200 wh en its power is on, and will be able to tell the difference between it and other electronic equipment operating on similar frequencies, or DX family Beltpacs or All-in-one Headsets. - Page 23 f registration failed: • A voice message will say “Power on, Speaker, Version #, Begin registration, …” The ISO and IC lights on the WS200 will be blinki ng red, and there may be a delay of up to 90 seconds REGISTRATION STATUS display goes blank.
-
Page 24: Section 3. Equipment Operation
R (Power ) button ress and release to turn the DX100 power on. Press ress and release to turn the DX100 power on. Press and hold for 2 seconds to turn power off. and hold for 2 seconds to turn power off. -
Page 25: Beltpac Operation
BELTPAC OPERATION Power The Belt pac control buttons have a snap action. They will activate when lights pressed firmly. Use your fingertips, not your fingernails, t o press the buttons. er On/Off • er On — Press and release the PWR (power) button oice message in the earpiece will say “Power on, Beltpac... -
Page 26: Sidetone Adjustment
Volume Up/Dow • Volume Up Adjustment — Each time you press and release the volume-up button, you will hear a higher pitch beep in the earpiece as the volume increases one step. If you press and hold the volume-up button, you will hear beeps of ascending pitch as the volume steps up to maximum. -
Page 27: Wh200 Headset Operation
WH200 HEADSET OPER ATION he Headset control buttons will activate when pressed lightly. Use your fingertips, not your fingernails, to press the buttons. Power Power On/Off button • Power On — Press and release the power button on the inside of the Headset housing. - Page 28 Volume Up/Down • Volume Up Adjustment — Each time you press and release the volume-up button, you will hear a higher pitch beep in the earpiece as the volume increases one step. If you press and hold the volume-up button, you will hear beeps of ascending pitch as the volume steps up to maximum. When maximum volume is reached, you will hear “maximum”...
-
Page 29: Speaker Station Operation
SPEAKER STATION OPERATIO Headset connector Headset Connection If you are using a headset with the WS200, plug it into the headset connector. When using a headset, if the red light over the SPEAKER button is on, incoming communication can be heard through the headset and the speaker. - Page 30 Routine Operation Power On/Off • To turn WS200 power on, press and release the POWER button. — Red lights will go on over the POWER, ISO and IC buttons. — If listening with a headset, or the speaker is turned on, you will hear “Power on, Speaker #, Version #.”...
- Page 31 Rechargeable BAT850 Batteries If you are using the optional HME BAT850 Rechargeable Battery, remove the battery from th e WS200 and replace it with a fully charged battery. Recharge the battery in the optional AC850 Battery Charger according to the instructions received with the charger.
-
Page 32: Se Ction 4. Troubleshooting
00MHz cordless te lephone interference — there is a 2400MHz cordless telephone nearby, interference may occur. However, because the DX100 a frequency-hopping system, this problem is unlikely. If it does occur, changing frequencies on the ephone may alleviate the problem. If not, move the phone as far as practical from the base station, or use other type phone. -
Page 33: Section 5. Technical Data
SECTION 5. TECHNICAL DATA Q IPMENT SPECIFICATIONS Base S tation GENERAL ⎯ Frequency Range: All, 240 0 to 2483.5 MHz Low, 2401.92 to 2439.94 MHz High, 2443.39 to 2481.41 MHz Frequency Response: 200 Hz to 3.5 kHz Power Requirements: 100-240VAC, 50-60Hz or 12-14 Temperature Range: 32-122°F (0-50°C) Size:... -
Page 34: Beltpac
Beltpac Frequency Range: 2400 MHz – 2483.5 MHz Antenna: Internal, horizontal/vertical diversity Frequency Response: 200 Hz to 3.5 kHz Transmit Power: 100mW burst RF Sensitivity: <−90dBm w 10 Battery Requirements: 3.6V lithium ion, rechargeable Battery Life: Hands-free – up to 14 hours, PTT – up to 20 hours Temperature Range: 32-122°F (0-50°C Weight:... - Page 35 The WEEE Directiv overs most HME products being s old into the EU as of August 13, 2005. Manufacturers, distributors and retai lers are obliged to finan...
Need help?
Do you have a question about the DX100 and is the answer not in the manual?
Questions and answers