
Related Manuals for Dell PowerEdge T30


Summary of Contents for Dell PowerEdge T30
- Page 1 Dell PowerEdge T30 Owner's Manual Regulatory Model: D13M Series Regulatory Type: D13M002...
- Page 2 A WARNING indicates a potential for property damage, personal injury, or death. 2016 - 11 Rev. A00 Copyright © 2016 Dell Inc. or its subsidiaries. All rights reserved. Dell, EMC, and other trademarks are trademarks of Dell Inc. or its subsidiaries. Other trademarks may be trademarks of their respective owners.
-
Page 3: Table Of Contents
Contents 1 Dell PowerEdge T30 system overview......................7 Supported configurations for the Dell PowerEdge T30 system.................. 7 Supported operating systems............................8 Front panel..................................9 Front panel features of the PowerEdge T30 system....................9 Back panel..................................11 Back panel features of the PowerEdge T30 system....................11 Diagnostic Indicators................................ - Page 4 BIOS recovery.................................. 33 BIOS recovery using USB key..........................33 Trusted Platform Module specification.........................33 Upgrading Trusted Platform Module to version 2.0....................33 Downgrading the Trusted Platform Module to version 1.2.................. 34 Configuring TPM Bitlocker key..........................35 System and setup password............................36 Assigning a system password and setup password....................36 Deleting or changing an existing system and/or setup password...............37 Disabling a system password............................37 Intel Active Management Technology ........................
- Page 5 Entering the system service tag using Intel Active Management Technology..........89 Entering the system Service Tag by using System Setup................... 90 7 Using system diagnostics..........................91 Dell Embedded System Diagnostics..........................91 Running the Embedded System Diagnostics from Boot Manager...............91 System diagnostics controls............................. 91 8 Jumpers and connectors ..........................92...
- Page 6 Troubleshooting an optical drive..........................102 Troubleshooting a hard drive ............................103 Troubleshooting expansion cards..........................103 Troubleshooting processors............................104 10 Getting help..............................105 Contacting Dell................................105 Documentation feedback.............................. 105 Accessing system information by using QRL......................105 Quick Resource Locator............................106 Locating Service Tag of your system.......................... 106...
-
Page 7: Dell Poweredge T30 System Overview
Dell PowerEdge T30 system overview Dell PowerEdge T30 is a tower system that supports up to: • One Intel Xeon E3-1200 v5 processor or Intel Core i3 series processor or Intel Pentium processor • Four 3.5-inch SATA hard drives and additional two 2.5-inch SATA hard drives (with expansion kit and controller card) •... -
Page 8: Supported Operating Systems
Figure 1. Supported configurations for the Dell PowerEdge T30 system Supported operating systems The Dell PowerEdge T30 system supports the following operating systems based on each configuration: CAUTION: Windows 2008 R2 SP1 installation media does not include native driver support for USB 3.0 controllers, all attached USB devices do not function during the OS installation. -
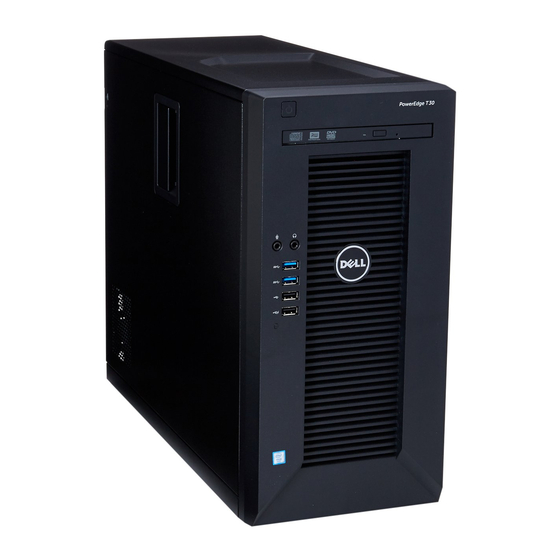
Page 9: Front Panel
OS compatibility. While most OS features work as expected on this platform, some certification tests did not complete successfully. These findings are documented at Dell.com/ostechsheets. For more information on the specific versions and additions, see the information on supported operating systems at dell.com/OSsupport. Front panel The front panel provides access to the features available on the front of the server, such as the power button, status indicator, and USB ports. - Page 10 USB 3.0 port (2) Use the USB 3.0 port to connect USB devices to the system. USB 2.0 port (2) Use the USB 2.0 port to connect USB devices to the system. Dell PowerEdge T30 system overview...
-
Page 11: Back Panel
The back panel provides access to the features available on the back of the server, such as the power supply self-diagnostic button, Ethernet port, HDMI port, two Display port, Serial port, Line-in and Line-out connector, and USB port. Back panel features of the PowerEdge T30 system The following figure and the table describe the back panel features and indicators. -
Page 12: Diagnostic Indicators
Power-on indicator The indicator flashes amber and This is due to component failure white if there is a component in the system. For more failure. information, see the Power on LED indicator codes section. If Dell PowerEdge T30 system overview... -
Page 13: Nic Indicator Codes
The Power on indicator button has a dual color Light Emitting Diode (LED) that is on the front panel of the system. This indicator functions as a system diagnostic LED. NOTE: The diagnostic LED is active and visible only during the POST process. Once the operating system starts to load, it is no longer visible. Dell PowerEdge T30 system overview... -
Page 14: Power Indicator Codes For Power Supply Unit
Power indicator codes for power supply unit To perform a quick health check on the non-redundant power supply unit (PSU) of the system, press the self-diagnostic button. Dell PowerEdge T30 system overview... - Page 15 PSU status indicator Table 8. PSU status indicators Power indicator pattern Condition Green A valid power source is connected to the PSU and the PSU is operational. Not lit Power is not connected. Dell PowerEdge T30 system overview...
-
Page 16: Documentation Resources
Dell.com/support/drivers firmware, see the Methods to download firmware and drivers section in this document. Managing your system For information about upgrading your system, Dell Dell.com/support recommends that you download and install the latest BIOS, driver, and systems management firmware on your system. -
Page 17: Technical Specifications
Technical specifications The technical and environmental specifications of your system are outlined in this section. Chassis dimensions Figure 6. Chassis dimensions of the PowerEdge T30 system Table 10. Dimensions of the PowerEdge T30 system 175.00 mm (6.88 inches) 360.00 mm (14.17 inches) 454.00 mm (17.87 inches) -
Page 18: Chassis Weight
The PowerEdge T30 system supports CR 2032 3.0-V lithium coin cell system battery. Expansion bus specifications The PowerEdge T30 system supports PCI express (PCIe) generation 3 expansion cards, which must be installed on the system board. The following table provides detailed information about the expansion card specifications: Table 13. -
Page 19: Drive Specifications
CAUTION: Dell recommends you to use ECC DIMMs to minimize the risk of uncorrectable system error, data loss and/or silent data corruption. Non-ECC DIMM is not used for mission-critical applications. NOTE: Non-ECC DIMMs are supported only in selected countries, for more information contact your sales representative. -
Page 20: Nic Port
Two 4-pin USB 3.0-compliant Four 4-pin USB 3.0-compliant NIC port The PowerEdge T30 system supports a Network Interface Controller (NIC) port on the back panel, which is available in 10/100/1000 Mbps NIC configurations. Video specification The PowerEdge T30 system supports: •... -
Page 21: Particulate And Gaseous Contamination Specifications
Type Condition Temperature or Specification Storage Six consecutively executed shock pulses in the positive and negative x, y, and z axes (one pulse on each side of the system) of 105 G for up to 2 ms. Maximum Altitude Operating 3,048 m (10,000 ft) Storage 35,000 m (10,688 ft) - Page 22 Gaseous contamination Specifications Silver Coupon Corrosion Rate <200 Å/month as defined by AHSRAE TC9.9. Technical specifications...
-
Page 23: Initial System Setup And Configuration
You can download the firmware and drivers from the Dell support site at Dell.com/support/home. Downloading the drivers and firmware Dell recommends that you download and install the latest BIOS and drivers on your system. Prerequisites Ensure that you clear the web browser cache before downloading the drivers and firmware. -
Page 24: System Setup
System Setup System Setup enables you to manage your system hardware and specify BIOS level options. From the System Setup, you can: • Change the NVRAM settings after you add or remove hardware • View the system hardware configuration • Enable or disable integrated devices •... -
Page 25: Navigation Keys
Option Description Other options The other options displayed in the boot sequence are: • BIOS Setup • BIOS Flash Update • Diagnostics • Intel (R) Management Engine BIOS Extension (MEBx) • NOTE: The Intel (R) Management Engine BIOS Extension (MEBx) option is not available when the system is configured Management Engine lockout mode or Management Engine disabled mode. - Page 26 Option Description • Device Information Specifies the list of devices, in which the system checks for an operating system to install in the Boot Sequence sequence of the listed devices. You can modify the sequence, if necessary. The available devices are: •...
- Page 27 Option Description • Disabled • AHCI • RAID On By default, the RAID On option is selected. Drives Allows you to configure the SATA drives on the system board. The available options are: • SATA-0 • SATA-1 • SATA-2 • SATA-3 By default, all SATA drives are selected.
- Page 28 Option Description • Intel HD Graphics By default, the Auto option is selected. Table 25. Security Option Description Admin password Allows you set, change, or delete the administrator (Admin) password (sometimes called the setup password). The Admin Password enables several security features. The available options are: •...
- Page 29 Option Description Password Change Allows you to enable the disable permission to the System passwords when the administrator password is set. Password Change is set to Allow Non-Admin Password Changes. TPM 1.2 Security Allows you to control whether the Trusted Platform Module (TPM) is visible to the operating system.
- Page 30 Option Description Expert Key Management is set to Enable Custom Mode. By default, this option is disabled. If the Enable Custom Mode option is enabled, the available options are: • • • • Table 27. Performance Option Description Multi Core Support This field specifies whether the processor has one or all cores enabled.
- Page 31 Option Description Table 29. Processors supporting the Hyper-Thread Control configuration Processor type Supports Hyper-Thread Control Intel Core I3-6100 Intel Xeon E3-1225 Intel Pentium G4400 Table 30. Power management Option Description Auto On Time Allows you to set the time at which the system must turn on automatically. The available options are: •...
-
Page 32: Updating The Bios
Displays the system event log and allows you to clear the log by enabling the Clear Log option. Updating the BIOS Prerequisites Dell recommends you to update your BIOS (System Setup), when replacing the system board. Steps Restart the system. -
Page 33: Bios Recovery
Next steps NOTE: Dell recommends not to update the BIOS version for more than 3 revisions. For example, if you want to update the BIOS from 1.0 to 7.0, then install version 4.0 first and then install version 7.0. Related links... -
Page 34: Downgrading The Trusted Platform Module To Version 1.2
Click OK to apply the setting. By clicking OK, the system reboots to the OS. In the folder that has the TPM Update Program, double-click on the Dell TPM 2.0 Update Utility. At the TPM Update Program windows prompt, click OK. -
Page 35: Configuring Tpm Bitlocker Key
Set the TPM 1.2 security to Enabled. Click OK to apply the setting. In the folder that has the TPM Update Program, double-click on the Dell TPM 1.2 Update Utility. At the TPM Update Program windows prompt click OK. In the Confirm TPM Replacement window, click OK to start the TPM update. -
Page 36: System And Setup Password
In the Bitlocker Drive Encryption window ensure that Bitlocker is active. In the Actions pane, click on Prepare the TPM. The Manage the TPM security hardware opens. Wait till the TPM is ready message appears. Close the Manage the TPM security hardware window. The status section now indicates that the TPM is ready for use. -
Page 37: Deleting Or Changing An Existing System And/Or Setup Password
Press Y to save the changes. The system reboots. Deleting or changing an existing system and/or setup password Prerequisites Ensure that the Password Status is Unlocked (in the System Setup) before attempting to delete or change the existing System and/or Setup password. -
Page 38: Intel Active Management Technology
Related links Safety instructions Before working inside your system After working inside your system System Setup Intel Active Management Technology Intel Active Management Technology (AMT) enables you to remotely manage, diagnose, and repair the managed server. NOTE: Intel AMT is supported only on Intel Xeon processor-based systems. It provides the following features: •... -
Page 39: Installing And Removing System Components
Damage due to servicing that is not authorized by Dell is not covered by your warranty. Read and follow the safety instructions that are shipped with your product. -
Page 40: Recommended Tools
Recommended tools You need the following tools to perform the removal and installation procedures: • Phillips #1 screwdriver • Phillips #2 screwdriver • Wrist grounding strap System cover The system cover protects the components inside the system and helps in maintaining air flow inside the system. Removing the system cover activates the intrusion switch. -
Page 41: Installing The System Cover
Figure 7. Removing the system cover Next steps Install the system cover. Place the system upright on its feet on a flat and stable surface. Reconnect the peripherals and connect the system to the electrical outlet. Turn the system on, including any attached peripherals. Related links Safety instructions Installing the system cover... -
Page 42: Bezel
Figure 8. Installing the system cover Next steps Place the system upright on its feet on a flat and stable surface. Reconnect the peripherals and connect the system to the electrical outlet. Turn on the system, including any attached peripherals. Related links Safety instructions Bezel... -
Page 43: Installing The Bezel
Figure 9. Removing the bezel Next steps Install the bezel. Follow the procedure listed in the After working inside your system section. Related links Safety instructions Before working inside your system Installing the bezel After working inside your system Installing the bezel Prerequisites Follow the safety guidelines listed in the Safety instructions section. -
Page 44: Inside The System
Damage due to servicing that is not authorized by Dell is not covered by your warranty. Read and follow the safety instructions that are shipped with your product. -
Page 45: Power Switch
Damage due to servicing that is not authorized by Dell is not covered by your warranty. Read and follow the safety instructions that are shipped with your product. -
Page 46: Installing The Power Switch
Damage due to servicing that is not authorized by Dell is not covered by your warranty. Read and follow the safety instructions that are shipped with your product. -
Page 47: Chassis Intrusion Switch
Damage due to servicing that is not authorized by Dell is not covered by your warranty. Read and follow the safety instructions that are shipped with your product. -
Page 48: Installing The Chassis Intrusion Switch
Damage due to servicing that is not authorized by Dell is not covered by your warranty. Read and follow the safety instructions that are shipped with your product. -
Page 49: Input/Output (I/O) Panel
Damage due to servicing that is not authorized by Dell is not covered by your warranty. Read and follow the safety instructions that are shipped with your product. -
Page 50: Installing The I/O Panel
Damage due to servicing that is not authorized by Dell is not covered by your warranty. Read and follow the safety instructions that are shipped with your product. -
Page 51: Hard Drives
Figure 17. Installing the I/O panel Next steps Install the bezel. Follow the procedure listed in the After working inside your system section. Related links Safety instructions Before working inside your system Removing the bezel Installing the bezel After working inside your system Hard drives Your system supports 2.5-inch and 3.5-inch hard drives. -
Page 52: Removing The Hard Drive Cage
Damage due to servicing that is not authorized by Dell is not covered by your warranty. Read and follow the safety instructions that are shipped with your product. -
Page 53: Installing The Hard Drive Cage
Damage due to servicing that is not authorized by Dell is not covered by your warranty. Read and follow the safety instructions that are shipped with your product. -
Page 54: Removing A 3.5-Inch Hard Drive Carrier From The Hard Drive Cage
Damage due to servicing that is not authorized by Dell is not covered by your warranty. Read and follow the safety instructions that are shipped with your product. -
Page 55: Installing A 3.5-Inch Hard Drive Carrier In The Hard Drive Cage
Damage due to servicing that is not authorized by Dell is not covered by your warranty. Read and follow the safety instructions that are shipped with your product. -
Page 56: Removing A 2.5-Inch Hard Drive(S) From The Optical Drive Bay
Damage due to servicing that is not authorized by Dell is not covered by your warranty. Read and follow the safety instructions that are shipped with your product. - Page 57 Figure 22. Removing a 2.5-inch hard drive from the optical drive bay 2.5-inch hard drive screws (8) NOTE: The screws used to secure the hard drive to the hard drive cage are available on the front of the hard drive cage.
-
Page 58: Installing A 2.5-Inch Hard Drive(S) In The Optical Drive Bay
Damage due to servicing that is not authorized by Dell is not covered by your warranty. Read and follow the safety instructions that are shipped with your product. - Page 59 Figure 23. Installing a 2.5-inch hard drive in the optical drive bay 2.5-inch hard drive screws (8) NOTE: Use the SATA cables to connect hard drives in the hard drive cage to avoid damaging the connector pins. This is applicable for the 2.5-inch hard drives and optical drive. Next steps Insert the hard drive cage into the system.
-
Page 60: Removing A 3.5-Inch Hard Drive Carrier From The Hard Drive Bay
Damage due to servicing that is not authorized by Dell is not covered by your warranty. Read and follow the safety instructions that are shipped with your product. -
Page 61: Removing A Hard Drive From A Hard Drive Carrier
Damage due to servicing that is not authorized by Dell is not covered by your warranty. Read and follow the safety instructions that are shipped with your product. -
Page 62: Installing A Hard Drive Into A Hard Drive Carrier
Damage due to servicing that is not authorized by Dell is not covered by your warranty. Read and follow the safety instructions that are shipped with your product. - Page 63 Steps Align the screw holes on the hard drive with the guide pins on the hard drive carrier. Press the hard drive into the hard drive carrier to secure it. Figure 27. Installing a hard drive into a hard drive carrier pins (4) Next steps Install the hard drive in the hard drive cage or hard drive bay.
-
Page 64: Optical Drive
Damage due to servicing that is not authorized by Dell is not covered by your warranty. Read and follow the safety instructions that are shipped with your product. -
Page 65: Installing The Optical Drive
Damage due to servicing that is not authorized by Dell is not covered by your warranty. Read and follow the safety instructions that are shipped with your product. -
Page 66: Removing The Optical Drive Filler
Damage due to servicing that is not authorized by Dell is not covered by your warranty. Read and follow the safety instructions that are shipped with your product. - Page 67 Steps On the bezel, press down on the retention clip of the optical drive filler and pull the filler out of the bezel. Remove the hard drive cage. Hold the tabs on the optical drive filler and remove the optical drive filler from the optical drive bay. Figure 30.
-
Page 68: Installing The Optical Drive Filler
Damage due to servicing that is not authorized by Dell is not covered by your warranty. Read and follow the safety instructions that are shipped with your product. -
Page 69: System Memory
Your system supports DDR4 unbuffered ECC DIMMs and Non-ECC DIMMs. CAUTION: Dell recommends you to use ECC DIMMs to minimize the risk of uncorrectable system error, data loss and/or silent data corruption. Non-ECC DIMM is not used for mission-critical applications. -
Page 70: General Memory Module Installation Guidelines
Figure 34. Memory socket locations on the system board Memory channels are organized as follows: • Channel 0: memory sockets 1 and 3 • Channel 1: memory sockets 2 and 4 The following table shows the memory population and operating frequencies for the supported configurations. Table 35. -
Page 71: Sample Memory Configurations
The following table shows sample memory configurations for a single processor configuration that follow the appropriate memory guidelines stated in this section. CAUTION: Dell recommends you to use ECC DIMMs to minimize the risk of uncorrectable system error, data loss and/or silent data corruption. Non-ECC DIMM is not used for mission-critical applications. NOTE: 16 GB quad-rank RDIMMs are not supported. -
Page 72: Removing A Memory Module
Damage due to servicing that is not authorized by Dell is not covered by your warranty. Read and follow the safety instructions that are shipped with your product. -
Page 73: Installing A Memory Module
Damage due to servicing that is not authorized by Dell is not covered by your warranty. Read and follow the safety instructions that are shipped with your product. -
Page 74: System Fan
Damage due to servicing that is not authorized by Dell is not covered by your warranty. Read and follow the safety instructions that are shipped with your product. -
Page 75: Installing The System Fan
Damage due to servicing that is not authorized by Dell is not covered by your warranty. Read and follow the safety instructions that are shipped with your product. -
Page 76: Expansion Cards
Damage due to servicing that is not authorized by Dell is not covered by your warranty. Read and follow the safety instructions that are shipped with your product. -
Page 77: Installing An Expansion Card
Damage due to servicing that is not authorized by Dell is not covered by your warranty. Read and follow the safety instructions that are shipped with your product. -
Page 78: Processors And Heat Sinks
Figure 40. Removing the expansion-card filler Figure 41. Installing an expansion card Next steps If applicable, connect the cables to the expansion card. Follow the procedure listed in the After working inside your system section. Related links Before working inside your system After working inside your system Processors and heat sinks Use the following procedures when:... -
Page 79: Removing A Heat Sink
Removing a heat sink Prerequisites CAUTION: Never remove the heat sink from a processor unless you intend to remove the processor. The heat sink is necessary to maintain proper thermal conditions. WARNING: The heat sink is hot to touch. Allow the heat sink to cool for some time after powering down the system. Follow the safety guidelines listed in the Safety instructions section. -
Page 80: Removing The Processor
Damage due to servicing that is not authorized by Dell is not covered by your warranty. Read and follow the safety instructions that are shipped with your product. -
Page 81: Installing A Processor
Damage due to servicing that is not authorized by Dell is not covered by your warranty. Read and follow the safety instructions that are shipped with your product. -
Page 82: Installing A Heat Sink
Damage due to servicing that is not authorized by Dell is not covered by your warranty. Read and follow the safety instructions that are shipped with your product. -
Page 83: Power Supply Unit
Damage due to servicing that is not authorized by Dell is not covered by your warranty. Read and follow the safety instructions that are shipped with your product. -
Page 84: Installing The Power Supply Unit
Damage due to servicing that is not authorized by Dell is not covered by your warranty. Read and follow the safety instructions that are shipped with your product. -
Page 85: System Battery
Damage due to servicing that is not authorized by Dell is not covered by your warranty. Read and follow the safety instructions that are shipped with your product. -
Page 86: System Board
Figure 48. Removing the system battery To install a new system battery, hold the battery with the "+" facing up and slide it under the securing tabs at the positive side of the connector. Press the battery straight down into the connector until it snaps into place. Figure 49. -
Page 87: Removing The System Board
Damage due to servicing that is not authorized by Dell is not covered by your warranty. Read and follow the safety instructions that are shipped with your product. -
Page 88: Installing The System Board
Damage due to servicing that is not authorized by Dell is not covered by your warranty. Read and follow the safety instructions that are shipped with your product. -
Page 89: Entering The System Service Tag Using Intel Active Management Technology
Figure 51. Installing the system board Next steps Install the following: heat sink and processor memory modules expansion cards system fan Connect all cables to the system board. Follow the procedure listed in the After working inside your system section. Enter the system service tag after you install the system board. -
Page 90: Entering The System Service Tag By Using System Setup
Type the optional asset tag information in the Enter Asset Tag section. Click OK to save the changes and exit. NOTE: MANAGEABILITY ENGINE (ME) LOCKOUT is not supported for the PowerEdge T30. Entering the system Service Tag by using System Setup Turn on the system. -
Page 91: Using System Diagnostics
Using system diagnostics If you experience a problem with your system, run the system diagnostics before contacting Dell for technical assistance. The purpose of running system diagnostics is to test your system hardware without using additional equipment or risking data loss. If you are unable to fix the problem yourself, service and support personnel can use the diagnostics results to help you solve the problem. -
Page 92: Jumpers And Connectors
Jumpers and connectors This topic provides specific information about the system jumpers. It also provides some basic information about jumpers and switches and describes the connectors on the various boards in the system. Jumpers on the system board help to disable system and setup passwords. You must know the connectors on the system board to install components and cables correctly. - Page 93 Table 38. System board connectors Item Connector Description SLOT4 PCI Express x16 slot (wired as x4) SLOT3 PCI Express x4 slot SLOT2 PCI slot SLOT1 PCI Express x16 Gen 3 slot USB 3.0 connector R_USB3 HDMI connector HDMI serial port connector SERIAL 2 x Display port DP_PORT1DP_PORT2...
-
Page 94: System Board Jumper Settings
Damage due to servicing that is not authorized by Dell is not covered by your warranty. Read and follow the safety instructions that are shipped with your product. -
Page 95: Troubleshooting Your System
Damage due to servicing that is not authorized by Dell is not covered by your warranty. Read and follow the safety instructions that are shipped with your product. -
Page 96: Troubleshooting System Startup Failure
Troubleshooting system startup failure If you boot the system to the BIOS boot mode after installing an operating system from the UEFI Boot Manager, the system stops responding. To avoid this issue, you must boot to the same boot mode in which you installed the operating system. For all other startup issues, note the system messages that appear on the screen. -
Page 97: Troubleshooting A Serial I/O Device
Damage due to servicing that is not authorized by Dell is not covered by your warranty. Read and follow the safety instructions that are shipped with your product. -
Page 98: Troubleshooting A Damaged System
Damage due to servicing that is not authorized by Dell is not covered by your warranty. Read and follow the safety instructions that are shipped with your product. -
Page 99: Troubleshooting The System Battery
Damage due to servicing that is not authorized by Dell is not covered by your warranty. Read and follow the safety instructions that are shipped with your product. -
Page 100: Power Supply Unit Problems
Power supply unit problems Ensure that no loose connections exist. For example, loose power cables. Ensure that the power supply unit (PSU) handle or LED indicates that the PSU is working properly. For more information about PSU indicators, see the Power indicator codes section. If you have recently upgraded your system, ensure that the PSU has enough power to support the new system. -
Page 101: Troubleshooting Cooling Fans
Damage due to servicing that is not authorized by Dell is not covered by your warranty. Read and follow the safety instructions that are shipped with your product. -
Page 102: Troubleshooting An Optical Drive
Damage due to servicing that is not authorized by Dell is not covered by your warranty. Read and follow the safety instructions that are shipped with your product. -
Page 103: Troubleshooting A Hard Drive
Damage due to servicing that is not authorized by Dell is not covered by your warranty. Read and follow the safety instructions that are shipped with your product. -
Page 104: Troubleshooting Processors
Damage due to servicing that is not authorized by Dell is not covered by your warranty. Read and follow the safety instructions that are shipped with your product. -
Page 105: Getting Help
The Contact Technical Support page is displayed with details to call, chat, or e-mail the Dell Global Technical Support team. Documentation feedback You can rate the documentation or write your feedback on any of our Dell documentation pages and click Send Feedback to send your feedback. -
Page 106: Quick Resource Locator
Your system is identified by a unique Express Service Code and Service Tag number. The Express Service Tag is found on top of the system and Express Service Code is found on back of the system. This information is used by Dell to route support calls to the appropriate personnel. - Page 107 Figure 54. Locating Service Tag of your system Getting help...
Need help?
Do you have a question about the PowerEdge T30 and is the answer not in the manual?
Questions and answers
My graphic screen grain & off on my power edge t30 Can’t get in computer to make change screen goes on & off
Possible causes for the screen flickering and turning off on a Dell PowerEdge T30 include:
1. Memory Issues – A memory failure or compatibility error (error codes 3,1; 3,3; 3,5) could cause system instability, leading to display issues.
2. Peripheral or System Board Failure – A faulty peripheral card or system board issue (error codes 3,1; 3,4; 3,6) may affect video output.
3. USB-Related Problems – A possible USB failure (error code 3,2) could interfere with connected devices, including external display adapters.
4. Power Supply Issues – If the PSU status indicator is not green, the system may not be receiving stable power, affecting the display.
5. Video Hardware Problems – The system uses Intel HD Graphics (P530, 510, or 530), and a failure in these components could result in flickering or loss of display.
Checking memory modules, ensuring the PSU is operational, and testing with a different monitor or video cable may help diagnose the issue.
This answer is automatically generated