Advertisement
Quick Links
S
P
A
D
S
P
A
D
1
/
5
-
S
1
/
5
-
S
I
N
S
T
I
N
S
T
Jacques Raphaël Roques
Jacques Raphaël Roques
The SPAD XIII was a World War I French fighter developed by the Société Pour L'Aviation et ses Dérivés
(SPAD). Derived mainly from the earlier highly successful SPAD S.VII, its larger wings and rudder, more
powerful engine, and twin Vickers machine guns made it superior to its predecessors and one of the most capable
fighters of the war. The SPAD XIII was first flown on April 4, 1917; in May 1917 it was already being delivered
to the French Air Service.
Faster than its contemporaries, the British Sopwith Camel and the German Fokker D.VII, the SPAD XIII was
one of the most-produced fighters of WWI, with at least 8,472 built before the Armistice, barely a year and a half
later on November 11, 1918.
Famous French pilots such as Georges Guynemer and Rene Fonck initially flew the SPAD XIII. Then, follow-
ing the death of Quentin Roosevelt in a Nieuport 28, the Americans and other Allied forces also switched over to
fly the SPAD XIII. Among the Allied aces who flew the SPAD XIII were Eddie Rickenbacker (America's
leading ace with 26 victories – whose aircraft is on display at the National Museum of the U.S. Air Force near
Dayton, Ohio) and American ace Frank Luke (who had 18 confirmed victories, was the first airman to receive
the Medal of Honor, and in whose honor Luke Air Force Base is named). Francesco Baracca, Italy's top World
War I ace with 34 aerial victories was another high-scoring Allied pilot who flew a SPAD XIII.
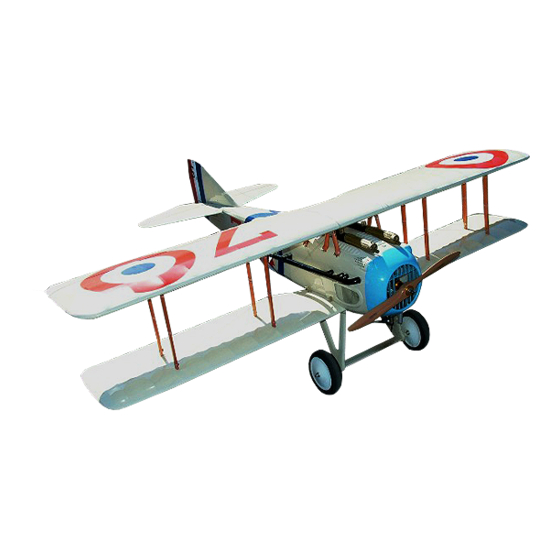
This project to model the SPAD XIII was started in late 2009. We based our version on pilot Jacques Raphaël
Roques' SPAD XIII of the WWI French Air Service, SPA48, Aircraft Serial Number S1893.
This ARF is designed for a gas, glow, or electric power. Adjustable engine and motor mounting boxes are
included, and the model is close in scale to the actual SPAD XIII (though some necessary changes were made to
meet the needs and expectations of RC pilots as well as the requirements of factory-production).
We invite you to enjoy the pride of ownership and the joy of flying
this beautiful model of the famous SPAD XIII.
Shown with optional detail upgrade package
X
I
I
I
G
X
I
I
I
C
A
L
E
A
R
F
R
C
A
L
E
A
R
F
R
R
U
C
T
R
U
C
T
Shown with optional scale machine guns, engine and wooden propeller
Shown with optional scale machine guns, engine and wooden propeller
/
G
G
/
G
A
S
L
A
S
/
C
S
P
O
R
T
-
F
/
C
S
P
O
R
T
-
F
I
O
N
M
I
O
N
M
Page 1 of 16
/
E
/
E
O
W
L
O
W
L
Y
E
R
V
1
.
1
L
Y
E
R
V
1
.
1
A
N
U
A
A
N
U
A
Captain Eddie Rickenbacker
S160205 / Copyright 2016
/
P
P
L
L
Advertisement

Subscribe to Our Youtube Channel
Related Manuals for Maxford USA SPAD XIII


Summary of Contents for Maxford USA SPAD XIII
- Page 1 Vickers machine guns made it superior to its predecessors and one of the most capable fighters of the war. The SPAD XIII was first flown on April 4, 1917; in May 1917 it was already being delivered to the French Air Service.
-
Page 2: Table Of Contents
Maxford USA provides you with a high-quality, thoroughly tested model airplane kit with assembly instructions. However, the quality and capabilities of your finished model airplane depend on how you assemble it, and your safety depends on how you use and fly it. -
Page 3: Warranty, Liability Waiver & Return Policy
Maxford USA from all current or future liability for any personal injury, property damage, or wrongful death, and if you (the buyer or user of this product) are involved in any claim or suit, you will not sue Maxford USA or any of its representatives. -
Page 4: Specifications
3. Returned merchandise that is accepted by Maxford USA for credit is subject to a 10% to 20% restocking fee (the final amount will be determined by Maxford USA upon receipt and examination of the returned merchandise). -
Page 5: Parts List
• The cockpit hatch is secured by a magnetic anchor. • Includes scale markings for WWI French pilot Jacques Raphaël Roques' SPAD XIII aircraft serial number S1893. • Precut mounting slots inside the cockpit for radio and ignition power switches. -
Page 6: Assembly Instructions
VI. ASSEMBLY INSTRUCTIONS: Step 1. A ILERONS 1. Drill 1/16-inch guide holes in the supplied hardwood blocks and attach your aileron servos to the blocks with the mounting screws provided by the manufacturer of your servos. 2. Connect your aileron servos to your radio, power ON the radio, and ‘center’... - Page 7 5. As illustrated at the right, this model uses a metal joiner to connect the two halves of the elevator. Ensure the joiner is well-secured inside both halves of the elevator with 5-minute epoxy. 6. Use thin CA adhesive, the supplied CA hinges, and the precut hinge slots to mount the elevator to the horizontal stabilizer and the rudder to the vertical stabilizer.
- Page 8 12. Attach the clevises to each end your rudder servo’s control arm, then attach one end of each rudder cable to each brass rod. 13. Use the hardware provided with your servo to install the rudder servo in the center opening of the fuselage’s preinstalled servo tray. Secure the rudder servo’s control arm to your rudder servo.
- Page 9 IMPORTANT: If you use a gas- or glow-fueled engine, you will need access to the fuel tank and fuel lines for periodic maintenance; therefore, you must NOT glue your SPAD XIII’s engine mounting box into the fuselage if you use an engine.
- Page 10 16. Install your radio receiver, switch and radio’s power supply (such as a NiMH NiCd battery, BEC, or the ESC’s built-in 5-volt power supply, etc.), as recommended by your radio’s manufacturer. 17. Set up your radio system’s servo-control throws for the rudder, elevator, throttle, and any other controls (such as an engine kill switch, choke control or other device) you may have installed.
- Page 11 10. Install the cockpit hatch (secured with its preinstalled magnet). If you will add an optional Maxford USA 1/5 scale WWI pilot figure, ‘glue’ it into position on the cockpit hatch with a dab of silicone or equivalent caulking. (Some customers prefer to use 5-minute epoxy.) 11.
- Page 12 12. Insert and center the upper wing’s joiners through the upper wing’s center section. Slide both the left and the right top wing panels onto these joiners. As each top wing panel gets near the wing’s center section, connect each wing panel’s servo extension to the Y-cable at the center section’s root rib.
- Page 13 19. Connect the clevis end of the wires to the wing-wire anchors nearest the nose. 20. Using wood screws, secure two(2) wing-wire anchors near the leading and trailing edges of the lower wing approx. 1/4-inch from the fuselage. Harden each hole with CA adhesive where the wing-wire anchor screws are inserted.
- Page 14 24. Begin by attaching the end of one of the second long wire to point ‘1’ on the right-hand set of wing panel. Guide the wire through each anchor point, from number to the next numbered point, as shown below: Right-side wing panels (IMPORTANT: Carefully adjust the tension on each of the wing wires so the wings do not get pulled out of proper alignment to each other.
- Page 15 28. Begin by attaching one end of the shortest wire to point ‘1’ on the left-rear (top of #3 LEFT) cabane. Route the wire through each numbered anchor point to point number ‘4’ as follows … 5 / 9 CABANE STRUTS &...
-
Page 16: Setup & Adjustments
Congratulations! Assembly is finished! VII. SETUP & ADJUSTMENTS: 1. For the initial flight, set the SPAD XIII’s center of gravity (CG) so the model hangs level (neither nose-up nor nose-down) when suspended at a point 3 -to-4 inches back from the leading edge of the top wing.
Need help?
Do you have a question about the SPAD XIII and is the answer not in the manual?
Questions and answers