Advertisement
Quick Links
F
.
2
B
F
.
2
B
SPORT-SCALE ARF R/C MODEL AIRPLANE
I
N
S
T
I
N
S
T
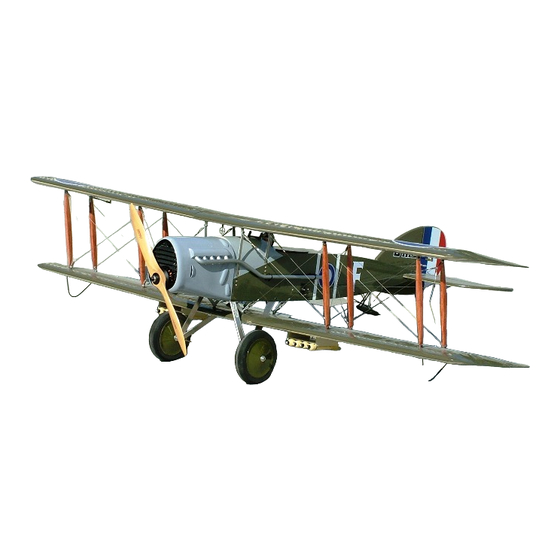
Shown with optional simulated WWI pilot, windshield, pilot's gun sight,
bombs with mounts, electric motor, wood propeller and servos.
The F.2B 'Bristol Fighter' was a British World War I fighter and reconnaissance biplane designed in
1916 by Frank Barnwell. Although a two-seater, the F.2B proved fast and maneuverable enough to be
flown in combat like a single-seat fighter – and it more than held its own against the opposing single-
seat German fighters.
The pilot's fixed forward-firing .303 inch Vickers machine gun was the F.2B's principal weapon; the
observer's flexible .303 inch Lewis Gun provided an additional "sting in the tail" while the pilot went
after the target. The F.2B could also carry up to 240 pounds of bombs.
The most successful F.2B pilot was Canadian Andrew Edward McKeever, who won all 30 of his
victories in this aircraft.
After the war, many surplus F.2Bs were modified for civilian use. Some were fitted with a canopy to
cover one or two passenger seats in the rear cockpit and renamed the 'Bristol Tourer,' which had a
maximum speed of 128 mph.
The Bristol project was first recommend by Mr. Gart Hansford from Dubai UA, one of Maxford USA's
valued customers. With a 70-inch wingspan, this RC version is approximately 1/6 scale and is
designed to use an electric or glow-power system. It is constructed mainly of laser-cut balsa and light
ply and is finished with a Mylar film covering. To enhance its true-to-scale appearance, this model
includes an articulated tail skid and the rudder and elevators are operated by stranded wire control
cables.
We invite you to enjoy the pride of ownership and the joy of flying this
beautiful ARF sport-scale model of the famous F.2B Bristol Fighter.
Copyright 2014 Maxford USA
B
B
R
I
S
T
R
I
S
T
R
U
C
T
I
R
U
C
T
I
Page 1
F
F
O
L
I
G
O
L
I
G
O
N
M
A
O
N
M
A
of 24 pages
H
T
E
R
H
T
E
R
N
U
A
L
N
U
A
L
#S140627
Advertisement

Related Manuals for Maxford USA F.2B BRISTOL FIGHTER


Summary of Contents for Maxford USA F.2B BRISTOL FIGHTER
- Page 1 ‘Bristol Tourer,’ which had a maximum speed of 128 mph. The Bristol project was first recommend by Mr. Gart Hansford from Dubai UA, one of Maxford USA’s valued customers. With a 70-inch wingspan, this RC version is approximately 1/6 scale and is designed to use an electric or glow-power system.
-
Page 2: Table Of Contents
4. Throughout the lifetime of this model, use only the Maxford USA-recommended power system and a new or well-maintained radio-control system. -
Page 3: Warranty, Liability Waiver & Return Policy
Maxford USA from all current or future liability for any personal injury, property damage, or wrongful death, and if you (the buyer or user of this product) are involved in any claim or suit, you will not sue Maxford USA or any of its representatives. -
Page 4: Specifications
Return address: Maxford USA 15939 Illinois Avenue, #B-C Paramount, CA 90723 IMPORTANT: Print the RMA# issued by Maxford USA on your package near our address. III. SPECIFICATIONS Wingspan ................................. 70 inches Wing area ........................... 1,279 square inches Length ................................49 inches ... -
Page 5: Special Features
4 wheel collars. 7. Leave approx. 2¾ inches (the width of the wheel plus 2 wheel collars) of axle outside the struts. Tighten the wheel collars with a 1.5mm hex wrench. Page 5 Copyright 2014 Maxford USA of 24 pages #S140627... - Page 6 12. If you wish to install the optional windshield, cut through the Mylar covering the slotted opening in front of the pilot’s cockpit. Slide the windshield’s mounting base down into its slot. Page 6 Copyright 2014 Maxford USA of 24 pages #S140627...
- Page 7 Page 7 Copyright 2014 Maxford USA of 24 pages #S140627...
- Page 8 3/8-inch wide scrap metal or plastic (not included) to the bottom surface of the tail skid. Page 8 Copyright 2014 Maxford USA of 24 pages #S140627...
- Page 9 15. With the rudder’s control arm mounted on its servo, use crimp tubes to attach an approx. 30-inch long (77cm) rudder pull-pull cable to each side of the rudder servo’s control arm. Page 9 Copyright 2014 Maxford USA of 24 pages #S140627...
- Page 10 Step 34 on the following page explains what to do if a reversed servo is not available.) 28. Use your receiver to center both of the elevator servos. Page 10 Copyright 2014 Maxford USA of 24 pages #S140627...
- Page 11 1. If you wish to use the upper wing’s ailerons, test-fit the ailerons, CA hinges, servo arms, control horns and pushrods to the upper wing panels. Each aileron uses 3 CA hinges. (NOTE: If necessary, cut through any excess Mylar covering the CA hinge slots.) Page 11 Copyright 2014 Maxford USA of 24 pages #S140627...
- Page 12 6. Attach a 12-inch extension to each aileron servo. (NOTE: We recommend using optional Maxford USA servo-extension safety clips to secure all servo/extension/Y-cable connections.) 7. Use a length of coat hanger or heavier wire to guide the aileron exten- sions from each servo bay out through the root rib of each wing panel.
- Page 13 21. Slide each set of upper and lower wing panels off from their wing rods. 22. As shown at the right, lock each tab into its opening by filling the hole with epoxy. Epoxy Page 13 Copyright 2014 Maxford USA of 24 pages #S140627...
- Page 14 RC pilots, the majority of the following power-system-installation instructions are generalized. Adjust the following steps to meet the requirements of your particular choice of engine or motor, radio system and flying style. Page 14 Copyright 2014 Maxford USA of 24 pages #S140627...
- Page 15 CG for large WWI ARFs. A reasonable-size motor such as this is much better than simply adding nose weight. For these reasons, the following detailed instructions apply mainly to installing a Maxford USA motor and 100A high-voltage electronic speed control (ESC). a) As shown at the right, hold the motor’s X-mount against...
- Page 16 7. Use double-sided tape (not included) to secure the ESC behind the motor on an inside wall of the motor mounting box. Guide the ESC’s servo-type connector straight back and into the cockpit. Page 16 Copyright 2014 Maxford USA of 24 pages #S140627...
- Page 17 4. Test-fit and install your throttle servo behind the engine. Connect your throttle pushrod (not supplied) between the throttle servo and engine. Connect the servo to your receiver’s throttle channel. Page 17 Copyright 2014 Maxford USA of 24 pages #S140627...
- Page 18 5. Before the epoxy is fully cured, place the cowl on the nose and “fine-tune” the position of the exhaust pipes to ensure their correct alignment. Page 18 Copyright 2014 Maxford USA of 24 pages #S140627...
- Page 19 65- and crimp tube inch long steel cable to the cable anchor nearest the leading edge of the lower wing’s center section (point A) as shown. Page 19 Copyright 2014 Maxford USA of 24 pages #S140627...
- Page 20 Crimp g. With tension adjusted equally on each segment and sharp bends formed in tube the wire at each anchor point, position the crimp tube approx. -inch Page 20 Copyright 2014 Maxford USA of 24 pages #S140627...
- Page 21 Use epoxy to attach Twin Single the Maxford USA machine machine pilot figures to scrap guns wood and use wood screws to attach the wood across the cockpits’ hatch frames as shown above. Page 21 Copyright 2014 Maxford USA of 24 pages #S140627...
-
Page 22: Setup & Adjustments
4S Lipos connected in series or a single 10S. If stick-on lead weights are used, position them as far forward as possible to maximize their effectiveness.) Page 22 Copyright 2014 Maxford USA of 24 pages #S140627... -
Page 23: Storage, Field Setup & Preflight Checks
Your safety depends on how you use and fly it. Any testing, flying and use of this model airplane is done entirely at your own risk. Page 23 Copyright 2014 Maxford USA of 24 pages #S140627... - Page 24 PLEASE ENJOY YOUR HOBBY AND FLY SAFELY! Manufactured by: Maxford USA RC Model Mfg, Inc. Distributed by: Maxford USA RC Model Distribution, Inc. Telephone (voice) ......(562) 529-3988 15939 Illinois Avenue, #B-C Fax ..........(562) 562-6988 Paramount, CA 90723 Toll free (orders only) ....(866) 706-8288 www.maxfordusa.com...
Need help?
Do you have a question about the F.2B BRISTOL FIGHTER and is the answer not in the manual?
Questions and answers