Arjohuntleigh NIMBUS 4 Instructions For Use Manual
Hide thumbs
Also See for NIMBUS 4:
- Instructions for use manual (40 pages) ,
- Quick reference manual (2 pages) ,
- Instructions for use manual (36 pages)
Table of Contents
Advertisement
Available languages
Available languages
Quick Links
Advertisement
Chapters
Table of Contents

Related Manuals for Arjohuntleigh NIMBUS 4


Summary of Contents for Arjohuntleigh NIMBUS 4
- Page 1 NIMBUS 4 NIMBUS PROFESSIONAL Instructions for Use Návod k použití • Anwendungshinweise • Manual de usuario Mode d’emploi • Instruzioni per l’uso • Gebruiksaanwijzing Instrukcja obsługi • Instruções de Utilização 0086 ...with people in mind...
- Page 3 English Čeština Deutsch Español Français Italiano Nederlands Polska Português...
- Page 5 English...
-
Page 7: Table Of Contents
Intended use ............1 About Nimbus 4 and Nimbus Professional ....... . 1 Nimbus Pump . - Page 8 Routine Maintenance ..........23 Nimbus 4 and Nimbus Professional Systems ......23 Nimbus Pump .
-
Page 9: General Safety
• When not fitted to a bed, the bed hooks on the pump may present a hazard to small children. Store the pump in a safe place. • Only the pump and mattress or seat combination as indicated by ArjoHuntleigh should be used. The correct function of the product cannot be guaranteed if incorrect pump and mattress or seat combinations are used. - Page 10 ArjoHuntleigh. Do NOT use unapproved accessories or attempt to modify, disassemble or otherwise misuse the Nimbus 4 and Nimbus Professional system. Failure to observe this caution could result in injury, or in extreme cases, death. Design Policy and Copyright ®...
-
Page 11: Introduction
If you have any difficulties in setting-up or using the Nimbus 4 and Nimbus Professional systems, contact your local ArjoHuntleigh sales office, listed at the end of this manual. Intended use The intended use of this product is to prevent and/or manage pressure ulcers for patients up to 250 kg (550 lb). -
Page 12: Nimbus Pump
If cardiac arrest occurs, the mattresses can be rapidly deflated using the CPR (Cardio-Pulmonary Resuscitation) control to allow cardiac resuscitation procedures to be performed. A full technical description of the Nimbus 4 Nimbus Professional system can be found in the Service Manual, part No. SER0007, available from ArjoHuntleigh. -
Page 13: Nimbus 4 Mattress
FAST DEFLATE NORMAL TRANSPORT TRANSPORT Tubeset Connector Pump Tubeset These controls are common to both Nimbus 4 and Nimbus Professional mattresses, and are located at the foot end of the mattress on the opposite side to the Vent Valves. -
Page 14: Nimbus Professional Mattress
Nimbus Professional Mattress 5 Heelguard Cells Shoulder Support (4th) Cell (Alternating, No Vent Valve) 3 Thigh Cells CPR/Transport Control 8 Torso 3 Head Section Cells Cells (Alternating Pressure) FOOT END HEAD END 19 Vent Valves Carry Handle Securing Strap Drag Handle Detachable Cover Cable Management Flap CLOSED... -
Page 15: Clinical Applications
2. Clinical Applications Indications The Nimbus 4 and Nimbus Professional systems are indicated for the prevention and/or management of all categories of pressure ulcer, when combined with an individualised, comprehensive pressure ulcer protocol: for example, repositioning, nutritional support, skin care. Selection should be based upon a holistic assessment of the patient’s individual care needs. -
Page 16: Installation
3. Installation The Nimbus 4 and Nimbus Professional systems are simple to install using the following guidelines. Refer to Section 4, Page 10 “Controls, Alarms and Indicators” for a comprehensive description of the controls and indicators on the pump. -
Page 17: Installing The Pump
6. Make sure the CPR control is closed and locked in position and the Transport control is set to NORMAL. NORMAL FAST DEFLATE NORMAL TRANSPORT TRANSPORT CPR Control Transport Control Installing the Pump 1. If the pump is to be hung from the end of the bed, make sure that the bed bracket is securely attached to the pump, and then attach the pump and bed bracket to the bed frame. -
Page 18: Testing The Power Fail Alarm
3. Run the mains power cable along the side of the mattress securing the flap round the cable using the press studs. Press Stud Cable Management Flap Testing the Power The Power Fail Alarm is powered by an internal rechargeable battery. The duration of the alarm will Fail Alarm depend on the level of charge in the battery, which also depends on the age and condition of the battery. -
Page 19: Connecting The Tubeset
approximately two minutes to ensure that it has been adequately recharged. 7. If the alarm does not operate for two minutes, call the service engineer. If the Power Fail Alarm does not operate after this test and a service engineer has been called, the pump can continue to be used with regular checks of the Power-On status. -
Page 20: Controls, Alarms And Indicators
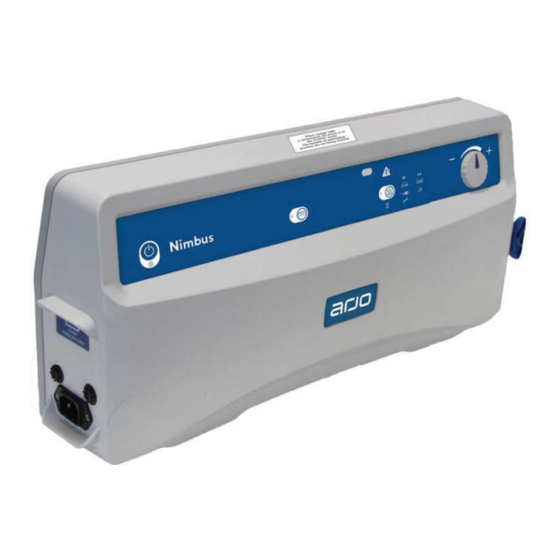
4. Controls, Alarms and Indicators Run/Standby Mute Control Alarm High Pressure Low Pressure Button & Indicator Indicator Indicator Indicator Run Mode Wait Service Comfort Indicator Indicator Indicator Control Static Mode Control Power Fail Pump Fault & Indicator Indicator Indicator Pump Controls The pump front panel has the following controls: Press the Run/Standby button to put the pump into the Run/Standby Button Run mode;... -
Page 21: Pump Indicators
The Nimbus 4 and Nimbus Professional systems Comfort Control automatically compensate for patient weight distribution and position, to optimise the mattress pressure relieving performance. However, the mattress cell pressure can be manually adjusted for patient comfort using the rotary Comfort Control. - Page 22 seconds (Refer to “Alarm Mute” on page 10). The triangular Alarm symbol is displayed with one or more of the following indicators: • Low Pressure (refer to “Low Pressure” on page 11). • High Pressure (refer to “High Pressure” on page 11). •...
-
Page 23: Operation
DO NOT PLACE THE PATIENT ON THE MATTRESS UNTIL IT IS FULLY INFLATED AND NORMAL OPERATING PRESSURE HAS BEEN REACHED. Installing the System Before using the Nimbus 4 or Nimbus Professional system make sure that it has been installed correctly in accordance with Section 3, Page 6 “Installation”. -
Page 24: Comfort Control
• If the pump needs to be completely isolated from the mains power supply, remove the plug from the mains power socket. Mattress Vent Valves On the Nimbus 4 and Nimbus Professional mattresses, the Vent Valves along the side of the mattress enable individual cells to be deflated: 1. -
Page 25: Guidelines For Selecting Mattress Vent Valves To Open
Cells Cells Shoulder Support Cell Guidelines for The following guidelines should be adhered to when selecting Vent Valves to open on the Nimbus 4 and Selecting Mattress Nimbus Professional mattresses: Vent Valves to Open 1. For permanent off-loading/pressure relief: • Select no more than one cell directly under the area you want to relieve (head, torso, calf or heel section). -
Page 26: Transport Control
Transport Control This sets the mattress into Transport mode where the mattress is sealed and the support surface is equally pressurised; the pump and/or tubeset can then be removed. In this mode the mattress will support the patient for up to 12 hours. To set Transport mode: 1. -
Page 27: Cpr Control
CPR Control IMPORTANT IN THE EVENT OF CARDIAC ARREST. In the event of a patient suffering cardiac arrest and CPR needing to be administered: 1. Lift the red CPR handle at the foot end of the To Activate the CPR mattress. -
Page 28: Nimbus Professional Mattress: Patient Positioning Guide
6. Nimbus Professional Mattress: Patient Positioning Guide The Nimbus Professional mattress allows the patient to be placed in either the Supine (face up) or Prone (face down) positions. WARNING A full patient assessment, as to the suitability for Prone Nursing, is essential before commencing the procedure. -
Page 29: General
General In both the Supine and Prone positions, patients should be positioned on the mattress so that the shoulders are in line with the Shoulder Support (4th) cell. It is important for the optimal use of the system that patients are positioned correctly on the mattress. -
Page 30: Prone Position (Face Down) - Not For Homecare Environment
Prone Position (face down) - Not for Homecare Environment • Prone nursing is usually prescribed as an emergency therapy for patients in acute respiratory distress or to manage extensive wounds on the dorsum, such as pressure ulcers or burns. • The decision to adopt the prone position must be authorised by the clinician responsible for the patient’s care. -
Page 31: Decontamination
Healthcare Facility or the country of use. If you are uncertain, you should seek advice from your local Infection Control Specialist. The Nimbus 4 and Nimbus Professional system should be routinely decontaminated between patients and at regular intervals while in use; as is good practice for all reusable medical devices. - Page 32 If an alternative disinfectant is selected from the wide variety available, we recommend that suitability for use is confirmed with the chemical supplier prior to use. DO NOT WRING/MANGLE, AUTOCLAVE OR USE PHENOLIC BASED SOLUTIONS. For information for the mattress top cover, including Thermal Disinfection laundering guidelines, refer to “COVER SPECIFICATION”...
-
Page 33: Routine Maintenance
ArjoHuntleigh trained personnel to repair the system. ArjoHuntleigh recommend that the Nimbus 4 and Service Period Nimbus Professional systems should be serviced after 12 months continuous running time, by an ArjoHuntleigh authorised service agent. -
Page 34: Troubleshooting
9. Troubleshooting The following table provides a troubleshooting guide for the Nimbus 4 and Nimbus Professional systems in the event of malfunction. Refer to Section 4, Page 10 “Controls, Alarms and Indicators” for a comprehensive description of the alarms and indicators on the pump. - Page 35 a. If the pump has not been used for a long period, the internal battery which provides the Power Fail Alarm indication may be discharged. Run the pump for a few hours to recharge the internal battery, and the Power Fail Alarm indication will be provided as normal. To check that the Power Fail Alarm is operating correctly, refer to “Testing the Power Fail Alarm”...
-
Page 36: Technical Specification
10. Technical Specification PUMP Model: Nimbus UK/AUS Euro Part Number 649010 (649STD) 640023 649003 649014 649028 (649STD) Supply Voltage: 230 V 220 V 120 V 230 V Supply Frequency: 50 Hz 60 Hz 60 Hz 50 Hz Power Input: 35 VA 35 VA 35 VA 35 VA... - Page 37 PUMP SYMBOLS The operator must read this document Do not dispose of in (Instructions for Use) Type BF domestic refuse before use. Note: This symbol is blue on the product label. With respect to electric shock, fire and mechanical hazards only in accordance with CAN/ Serial Number Ref:...
- Page 38 MATTRESS SPECIFICATION Nimbus 4 Standard Width Narrow Width Standard Cover 650001DAR 650201DAR 650001ADV 650201ADV ® Advantex Cover 650001EVE 650201EVE ® eVENT Fabric Cover Length 2085 mm (82”) Height: 215 mm (8.5”) Width: 890 mm (35”) 800 mm (31.5”) Weight: 11.5 kg (25.3 lb.) 10.3 kg (22.7 lb.)
- Page 39 COVER SPECIFICATION Standard Cover ® ® Feature Advantex eVENT Fabric ® (Dartex) Removable Cover Moisture Vapour 12 times higher Permeable Air Permeable Low Friction 18% lower 20% lower Water Resistant / Repellent Infection Material coating is Material coating is INERT MATERIAL Control Antimicrobial Antimicrobial...
- Page 40 Guidance and manufacturer’s declaration - electromagnetic emissions The pump is intended for use in the electromagnetic environment specified below. The customer or the user of the pump should assure that it is used in such an environment. Emissions Test Compliance Electromagnetic environment - guidance RF emissions Group 1...
- Page 41 Guidance and manufacturer’s declaration - electromagnetic immunity The pump is intended for use in the electromagnetic environment specified below. The customer or the user of the pump should assure that it is used in such an environment. Immunity IEC 60601 Test Compliance Electromagnetic environment - guidance Test...
- Page 43 Čeština...
- Page 45 Účel použití ............1 O systémech Nimbus 4 a Nimbus Professional ......1 Čerpadlo Nimbus .
- Page 46 Pravidelná údržba ........... 23 Systémy Nimbus 4 a Nimbus Professional ....... 23 Čerpadlo Nimbus .
-
Page 47: Všeobecná Bezpečnost
• Když nejsou uchyceny k posteli, představují háčky na postel nebezpečí pro malé děti. Skladujte čerpadlo na bezpečném místě. • Je možné používat pouze kombinace čerpadla a matrace nebo židle schválené firmou ArjoHuntleigh. Pokud se použije nesprávná kombinace čerpadla a matrace nebo židle, nelze zaručit správnou funkci produktu. (iii) - Page 48 úraz a v extrémních případech smrt. Zásady vnější úpravy a copyright ® a ™ jsou obchodní značky patřící skupině společností ArjoHuntleigh. Naší zásadou je neustále se zlepšovat, čímž si vyhrazujeme právo na změnu designu bez předchozího upozornění.
-
Page 49: Úvod
údržbě. Pokud narazíte na obtíže s nastavením nebo používáním systémů Nimbus 4 a Nimbus Professional, obraťte se na místní pobočku společnosti ArjoHuntleigh (kontakt uveden na konci návodu). Účel použití Tento produkt je určen k prevenci nebo léčbě proleženin u pacientů... -
Page 50: Čerpadlo Nimbus
Při srdeční zástavě mohou být matrace rychle vypuštěny pomocí ovladače CPR (kardiopulmonální resuscitace), aby bylo možné provést srdeční resuscitaci. Úplný technický popis systému Nimbus 4 Nimbus Professional naleznete v Servisní příručce, obj. č. SER0007, která je k dispozici u společnosti ArjoHuntleigh. -
Page 51: Matrace Nimbus 4
Ovladač pro přepravu NORMÁL FAST DEFLATE NORMAL PŘEPRAVA TRANSPORT Konektor sady trubic Sada trubic čerpadla Tyto ovladače jsou společné pro obě matrace Nimbus 4 a Nimbus Professional a nachází se v úpatí matrace na opačné straně od odvzdušňovacích ventilů. -
Page 52: Matrace Nimbus Professional
Matrace Nimbus Professional Podpora ramen – čtvrtá buňka 5 buněk Heelguard (střídavé, bez odvzdušňovacích ventilů) 3 stehenní buňky CPR/přepravní ovladač 8 trupové 3 záhlavní buňky Buňky (střídavý tlak) ÚPATÍ ZÁHLAVÍ 19 odvzdušňovací ventily Rukojeť Bezpečnostní pás Vlečná rukojeť Snímatelný potah Klopa pro vedení... -
Page 53: Klinické Použití
2. Klinické použití Indikace Systémy Nimbus 4 a Nimbus Professional jsou určeny k prevenci nebo léčbě všech kategorií proleženin v kombinaci s individuálním, komplexním programem léčby proleženin: např. polohováním, nutriční podporou, péčí o kůži. Výběr musí být založen na celkovém posouzení... -
Page 54: Instalace
3. Instalace Systémy Nimbus 4 a Nimbus Professional se jednoduše instalují pomocí následujících pokynů. Podrobný popis ovládacích prvků a indikátorů čerpadla najdete v Sekce 4, Strana 10 „Ovládací prvky, alarmy a ukazatele“. Příprava systému Vyjměte systém z obalu. Měli byste mít následující... -
Page 55: Instalace Čerpadla
6. Ujistěte se, že ovladač CPR je uzavřený a zajištěný v bezpečné pozici a že ovladač pro přepravu je nastavený na NORMÁL. NORMÁL FAST DEFLATE NORMAL PŘEPRAVA TRANSPORT Ovladač CPR Ovladač pro přepravu Instalace čerpadla 1. Pokud má být čerpadlo zavěšeno v úpatí lůžka, ujistěte se, že jsou závěsné... -
Page 56: Testování Alarmu Pro Výpadek Proudu
3. Veďte síťový kabel podél strany matrace a zajistěte klopy kolem kabelu pomocí cvočků. Cvoček Klopa pro uspořádání kabelů Testování alarmu pro Alarm pro výpadek proudu je napájený interní dobíjecí baterií. Doba trvání alarmu bude záviset na úrovni nabití výpadek proudu baterie, která... -
Page 57: Připojení Sady Trubic
7. Pokud alarm nevydrží zvonit po dobu dvou minut, přivolejte povolaného údržbáře. Pokud nebude po testu alarm výpadku proudu fungovat a byl povolán údržbář, čerpadlo lze nadále používat s pravidelným ověřováním stavu zapnutí. Všechny ostatní alarmy budou fungovat jako obvykle. -
Page 58: Ovládací Prvky, Alarmy A Ukazatele
4. Ovládací prvky, alarmy a ukazatele Spustit/Standby Vypnutí alarmu Alarm Vysoký tlak Nízký tlak Tlačítko a indikátor indikátor indikátor indikátor Provozní režim Čekat Servis Ovládání indikátor indikátor indikátor pohodlí pacienta Ovladač statického režimu Výpadek proudu Porucha čerpadla a indikátoru indikátor indikátor Ovladače čerpadla Přední... -
Page 59: Indikátory Čerpadla
Systémy Nimbus 4 a Nimbus Professional automaticky Ovládání pohodlí kompenzují distribuci pacientovy váhy a polohy, aby se pacienta optimalizoval výkon procesu odlehčení tlaku. Tlak buněk v matraci lze však manuálně upravit pro pohodlí pacienta, pomocí otočného ovladače pohodlí. Pro pevnější nastavení otočte ovladač pohodlí ve směru hodinových ručiček a pro jemnější... - Page 60 nejméně na 3 sekundy (viz „Vypnutí alarmu“ na straně 10). Zobrazí se trojúhelníkový symbol alarm, společně s jedním nebo více z následujících pokynů: • Nízký tlak (viz „Nízký tlak“ na straně 11). • Vysoký tlak (viz „Vysoký tlak“ na straně 11). •...
-
Page 61: Provoz
NEPOKLÁDEJTE PACIENTA NA MATRACI, DOKUD NENÍ ÚPLNĚ NAFOUKNUTÁ A NEBYLO DOSAŽENO NORMÁLNÍHO PROVOZNÍHO TLAKU. Instalace zařízení Před prvním použitím systému Nimbus 4 nebo Nimbus Professional se ujistěte, že byl systém instalován správně a v souladu s Sekce 3, Strana 6 „Instalace“. -
Page 62: Vypnutí
• Pokud je potřeba čerpadlo úplně izolovat od el. sítě, vytáhněte zástrčku z el. zásuvky. Odvzdušňovací Matrace Nimbus 4 a Nimbus Professional mají po stranách odvzdušňovací ventily, které umožňují ventily matrace vyfouknutí jednotlivých buněk: 1. Matrace Nimbus 4 má pouze 5 odvzdušňovacích ventilů... -
Page 63: Pokyny Pro Výběr Odvzdušňovacích Ventilů K Otevření
Buňka pro podporu ramen Pokyny pro výběr Při výběru odvzdušňovacích ventilů pro otevření u matrací Nimbus 4 a Nimbus Professional je nutné odvzdušňovacích dodržovat následující pokyny: ventilů k otevření 1. Trvalé odlehčení/zmírnění tlaku: • zvolte maximálně jednu buňku přímo pod oblastí, kde je nutná... -
Page 64: Ovladač Pro Přepravu
Ovladač pro Tímto se matrace uvádí do přepravního režimu, při kterém se matrace uzavře a tlak podpůrné plochy se přepravu rovnoměrně rozloží; čerpadlo a/nebo sada trubic se může odpojit. Při tomto režimu bude matrace pacienta podporovat po dobu až 12 hodin. Nastavení... -
Page 65: Ovladač Cpr
Ovladač CPR DŮLEŽITÉ V PŘÍPADĚ ZÁSTAVY SRDCE V případě, že dojde k zástavě srdce pacienta a je nutné vykonat CPR: 1. zvedněte červenou rukojeť CPR v úpatí matrace. Aktivace CPR ovladače FAST DEFLATE NORMAL TRANSPORT 2. otočte rukojeť proti směru hodinových ručiček. FAST DEFLATE NORMAL TRANSPORT... -
Page 66: Matrace Nimbus Professional: Pokyny Pro Polohy Pacienta
6. Matrace Nimbus Professional: Pokyny pro polohy pacienta Matrace Nimbus Professional umožňuje umístění pacienta do pozice na zádech nebo na břiše. VAROVÁNÍ Před započetím léčby pacienta v pozici na břiše je nutné provézt kompletní vyšetření, čímž se prokáže vhodnost takového postupu. V případě... -
Page 67: Obecné
Obecné U pozicí na zádech i na břiše by měl být pacient umístěn na matraci tak, aby jeho ramena byla na úrovni s buňkou na podporu ramen (buňka č. 4). Pro dosažení optimálního použití zařízení je důležité, aby byli pacienti správně umístěni na matraci. -
Page 68: Poloha Na Břiše - Nelze Použít Při Domácí Péči
Poloha na břiše – nelze použít při domácí péči • péče v poloze na břiše se obvykle předepisuje jako nouzová terapie pro pacienty s akutními respiračními problémy nebo při rozsáhlých poraněních na zádech, jako jsou proleženiny nebo popáleniny. • rozhodnutí pro uvedení do polohy vleže musí být schváleno lékařem, odpovědným za léčbu pacienta. -
Page 69: Dekontaminace
Pokud si nejste jisti, požádejte o pomoc místního hygienika. Systémy Nimbus 4 a Nimbus Professional by se měly pravidelně dekontaminovat, a to vždy před použitím u nového pacienta a v pravidelných intervalech během používání, což... - Page 70 Jako alternativu lze použít dezinfekční roztoky na bázi alkoholu (max. koncentrace 70 %). Před uskladněním se ujistěte, že je zařízení suché. Pokud použijete alternativní dezinfekční prostředek vybraný z široké škály dostupných výrobků, doporučujeme před použitím ověřit jeho vhodnost u dodavatele. NEŽDÍMAT/NEMANDLOVAT, NEPOUŽÍVAT AUTOKLÁVOVÁNÍ...
- Page 71 Provádění servisu seznam náhradních dílů a další informace, nezbytné k tomu, aby vyškolení zaměstnanci ArjoHuntleigh mohli systém opravit. ArjoHuntleigh doporučuje, aby byl u systémů Nimbus 4 Servisní období a Nimbus Professional proveden servis zařízení servisním technikem autorizovaným firmou ArjoHuntleigh po uplynutí...
- Page 72 9. Odstraňování problémů Následující tabulka poslouží jako návod k řešení problémů v případě selhání systémů Nimbus 4 a Nimbus Professional. Podrobný popis alarmů a indikátorů čerpadla najdete v Sekce 4, Strana 10 „Ovládací prvky, alarmy a ukazatele“. Indikátor Možná příčina Náprava...
- Page 73 a. Pokud nebylo čerpadlo delší dobu použito, vnitřní baterie, která pohání indikátor alarmu pro výpadek proudu, může být vybitá. Spusťte čerpadlo na několik hodin, čímž se dobije vnitřní baterie a indikátor alarmu pro výpadek proudu bude fungovat jako obvykle. Informace, zda alarm pro výpadek proudu funguje správně, najdete v „Testování alarmu pro výpadek proudu“...
- Page 74 10. Technické údaje ČERPADLO Model: Nimbus Číslo součásti 649014 (649STD) UK Zdrojové napětí: 230 V Frekvence zdroje: 50 Hz Příkon: 35 VA Velikost: 508 x 220 x 100 mm (20 x 8,7 x 4 palce) Hmotnost: 5,7 kg (12,5 lb) Materiál krytu: ABS plast Hodnoty pojistky u zástrčky:...
- Page 75 SYMBOLY NA ČERPADLE Obsluha si musí před použitím přečíst tento dokument (Návod k Nelikvidujte vhozením do použití). Typ BF domácího odpadu Poznámka: Tento symbol je na typovém štítku modrý. With respect to electric shock, fire and mechanical hazards only in accordance with CAN/ sériové...
- Page 76 SPECIFIKACE MATRACE Nimbus 4 Standardní šířka Úzká šířka Standardní potah 650001DAR 650201DAR 650001ADV 650201ADV ® Potah Advantex 650001EVE 650201EVE ® Potahová textilie eVENT Délka 2 085 mm (82”) Výška: 215 mm (8,5”) Šířka: 890 mm (35”) 800 mm (31,5”) Hmotnost: 11,5 kg (25,3 lb.)
- Page 77 SPECIFIKACE POTAHU Standardní potah ® ®(a) Vlastnosti Advantex Textilie eVENT ® (Dartex) Snímatelný potah Propustnost vodních 12 krát vyšší Propustnost vzduchu Nízké tření o 18 % nižší o 20 % nižší Vodovzdornost/ odpudivost vody Kontrola Povrchová úprava Povrchová úprava INERTNÍ MATERIÁL ovladač...
- Page 78 Informace a prohlášení výrobce týkající se emisí elmg. záření Čerpadlo je určeno k použití v elektromagnetickém prostředí specifikovaném níže. Zákazník či uživatel čerpadla musí zajistit, že bude v takovém prostředí používáno. Test emisí Kompatibilita Elektromagnetické prostředí – informace Emise RF záření Skupina 1 Využívá...
- Page 79 Informace a prohlášení výrobce týkající se odolnosti vůči elmg. záření Čerpadlo je určeno k použití v elektromagnetickém prostředí specifikovaném níže. Zákazník či uživatel čerpadla musí zajistit, že bude v takovém prostředí používáno. Test Úroveň testu dle Úroveň Elektromagnetické prostředí – informace odolnosti IEC 60601 shody...
- Page 81 Deutsch...
- Page 83 Vorgesehene Nutzung ..........1 Details zu Nimbus 4 und Nimbus Professional ......1 Nimbus-Kompressor .
- Page 84 Nimbus-Kompressor ..........23 Nimbus 4 und Nimbus Professional-Matratzen ......23 Seriennummern-Aufkleber .
-
Page 85: Allgemeine Sicherheitshinweise
• Die Betthaken des Kompressors können für Kleinkinder eine Gefahr darstellen, wenn sie nicht am Bett angebracht sind. Lagern Sie den Kompressor an einem sicheren Ort. • Nur die von ArjoHuntleigh vorgeschriebenen Kombinationen von Kompressor und Matratze oder Sitzkissen verwenden. Ein ordnungsgemäßes Funktionieren des Produktes kann nicht garantiert werden, wenn falsche Kombinationen von Kompressoren und Matratzen oder Sitzkissen verwendet werden. - Page 86 Tod führen. Design-Richtlinien und Urheberrecht ® und ™ sind Marken der ArjoHuntleigh Unternehmensgruppe. Da wir ständig an Verbesserungen arbeiten, behalten wir uns das Recht unangekündigter Designänderungen vor. Der Inhalt dieser Veröffentlichung darf weder ganz noch in Teilen ohne Zustimmung von ArjoHuntleigh kopiert werden.
-
Page 87: Einleitung
Systems und anschließend als Anleitung zur Durchführung von täglichen Routineaufgaben und Wartungsmaßnahmen. Falls Sie Probleme mit der Einrichtung oder Verwendung der Matratzensysteme Nimbus 4 und Nimbus Professional haben, wenden Sie sich bitte an Ihren ArjoHuntleigh- Vertrieb vor Ort, der am Ende dieses Handbuchs aufgeführt ist. -
Page 88: Nimbus-Kompressor
Matratzenersatz rasch abgelassen werden, indem man die CPR (kardiopulmonale Reanimation)-Funktion verwendet, damit eine Herz-Kreislauf-Wiederbelebung durchgeführt werden kann. Eine vollständige technische Beschreibung der Matratzensysteme Nimbus 4 der Nimbus Professional finden Sie im Service-Handbuch (Bestell-Nr. SER0007), das bei ArjoHuntleigh erhältlich ist. Nimbus-Kompressor Betrieb/Standby-Taste... -
Page 89: Nimbus 4-Matratze
GESCHLOSSEN OFFEN Matratzen-CPR- und Transportfunktion CPR-Verschluss Transportfunktion NORMAL FAST DEFLATE NORMAL TRANSPORT TRANSPORT Schlauch- leitungs- anschluss Schlauchleitungen für den Kompressor Diese Funktionen sind bei Nimbus 4- und Nimbus Professional-Matratzen identisch und befinden sich am Fußende der Matratze, gegenüber den Entlüftungsventilen. -
Page 90: Nimbus Professional-Matratze
Nimbus Professional-Matratze 5 Heelguard-Zellen Schulterstützzelle (4. Zelle) (Wechseldruck, kein Ventil) 3 Oberschenkelzellen CPR-/Transport- kontrolle 8 Torso- 3 Kopfsegmentzellen zellen (Wechseldruck) FUSSENDE KOPFENDE 19 Entlüftungsventile Tragegriff Sicherungsgurte Ziehschlaufen Abnehmbarer Bezug Kabelführung GESCHLOSSEN OFFEN... -
Page 91: Klinische Anwendungsbereiche
2. Klinische Anwendungsbereiche Indikationen Die Matratzensysteme Nimbus 4 und Nimbus Professional werden in Verbindung mit einem individuellen, umfassenden Dekubitusprotokoll (z. B. für Mobilisation, Ernährungsunter stützung oder Hautpflege) zur Vorbeugung und/oder Behandlung aller Arten von Druckgeschwüren angewendet. Die Auswahl des Systems sollte auf einer holistischen Bewertung der individu- ellen Pflegebedürfnisse des Patienten basieren. -
Page 92: Installation
3. Installation Mithilfe der nachstehenden Anleitung können die Matratzensysteme Nimbus 4 und Nimbus Professional problemlos installiert werden. Eine ausführliche Beschreibung der Kontroll- und Anzeigefunktionen des Kompressors finden Sie unter Abschnitt 4, Seite 10 „Steuerungen, Alarmmeldungen und Anzeigen“. Das System für den Nehmen Sie das System aus der Verpackung. -
Page 93: Installieren Des Kompressors
6. Vergewissern Sie sich, dass die CPR-Funktion zu und eingerastet und die Transportfunktion auf NORMAL eingestellt ist. NORMAL FAST DEFLATE NORMAL TRANSPORT TRANSPORT CPR-Verschluss Transportfunktion Installieren des 1. Wenn der Kompressor am Fußende des Bettes befestigt werden soll, vergewissern Sie sich, dass die Halterung Kompressors korrekt am Kompressor befestigt ist. -
Page 94: Prüfen Des Stromausfall-Alarms
3. Legen Sie das Netzkabel entlang der Matratzenseite ein und befestigen Sie die Leiste mithilfe der Druckknöpfe um das Kabel. Druckknopf Kabel- führung Prüfen des Der Stromausfall-Alarm wird durch einen internen Akku betrieben. Die Dauer des Alarms hängt vom Ladezustand Stromausfall-Alarms des Akkus ab, der auch von Alter und Zustand des Akkus abhängt. -
Page 95: Anschließen Der Schlauchleitungen
ausreichend geladen ist, indem Sie den Alarm etwa zwei Minuten lang laufen lassen. 7. Verstummt der Alarm nach weniger als zwei Minuten, rufen Sie einen Servicetechniker. Wenn der Stromausfall-Alarm nach diesem Test nicht ausgelöst wird und ein Servicetechniker gerufen wurde, kann der Kompressor weiterhin benutzt werden, vorausgesetzt der Betriebszustand des Kompressors wird regelmäßig überprüft. -
Page 96: Steuerungen, Alarmmeldungen Und Anzeigen
4. Steuerungen, Alarmmeldungen und Anzeigen Betrieb/Standby- Alarmunterdrückung Alarm- Hochdruck- Niedrigdruck- Taste & Anzeige Anzeige Anzeige Anzeige Betriebsmodus- Warten- Service- Komfort- Anzeige Anzeige Anzeige steuerung Statikmodussteuerung Stromausfall- Kompressorfehler- & Anzeige Anzeige Anzeige Kompressor- Auf dem Bedienfeld des Kompressors befinden sich folgende Kontrolltasten: funktionen Betrieb/Standby-Taste Drücken Sie die Betrieb/Standby-Taste, um den Kompressor... - Page 97 Komfortsteuerung Die Matratzensysteme Nimbus 4 und Nimbus Professional gleichen Gewichtsverteilung und Position des Patienten automatisch aus und sorgen so für eine optimale Druckentlastung. Der Zellendruck in der Matratze kann mithilfe der drehbaren Komfortsteuerung von Hand eingestellt werden, damit der Patient bequem liegt.
- Page 98 Alarm wird angezeigt. Außerdem ertönt ein akustisches Signal, das durch mindestens drei Sekunden langes Drücken der Alarm Aus-Taste vorübergehend abgestellt werden kann (siehe „Alarm Aus“ auf Seite 10). Das dreieckige Alarm-Symbol erscheint gemeinsam mit einer oder mehreren der folgenden Anzeigen: •...
-
Page 99: Betrieb
Abschnitt 6, Seite 18 „Nimbus Professional-Matratze: Anleitung zur Lagerung des Patienten“). Wenn sich der Betrieb des Kompressors während des Gebrauchs ändert, schlagen Sie unter Abschnitt 9, Seite 25 „Fehlerbehebung“ nach, bevor Sie einen Service-Techniker anrufen oder sich an Ihren ArjoHuntleigh-Vertrieb vor Ort wenden. -
Page 100: Komfortsteuerung
• Wenn der Kompressor vollständig vom Stromnetz getrennt werden muss, ziehen Sie den Stecker aus der Steckdose. Matratzen- An den Matratzen Nimbus 4 und Nimbus Professional können mithilfe der Entlüftungsventile an der Matratzenseite Entlüftungsventile einzelne Zellen entlüftet werden: 1. Die Nimbus 4-Matratze hat nur fünf Entlüftungsventile im Heelguard-Bereich am Fußende der Matratze. -
Page 101: Anleitung Zum Öffnen Der Matratzen-Entlüftungsventile
Schulterstützzelle Anleitung zum Diese Anleitung sollte für die Auswahl einzelner Entlüftungsventile beachtet werden, die an der Nimbus 4- Öffnen der und Nimbus Professional-Matratze geöffnet werden sollen: Matratzen- 1. Für dauerhafte Druckentlastung: Entlüftungsventile • Wählen Sie nicht mehr als eine Zelle direkt unter dem Bereich, den Sie entlasten möchten (Kopf-,... -
Page 102: Transportfunktion
Entlüften Sie nicht mehr Zellen in jedem Bereich. Dies könnte die Unterstützung des Patienten während des normalen, wechselnden Zyklus beeinflussen. Transportfunktion Dieser Drehknopf versetzt die Matratze in den Transportmodus. Die Luft aus der Matratze kann nicht mehr entweichen und weist einen gleichmäßigen Druck auf. Der Kompressor und/oder das Schlauchsystem können entfernt werden. -
Page 103: Cpr-Verschluss
CPR-Verschluss WICHTIG IM FALLE EINES HERZSTILLSTANDES. Sollte der Patient einen Herzstillstand erleiden und eine Herz-Lungen-Wiederbelebung benötigen: Aktivieren der CPR- 1. Klappen Sie den roten CPR-Griff am Fußende der Matratze hoch. Funktion FAST DEFLATE NORMAL TRANSPORT 2. Drehen Sie ihn gegen den Uhrzeigersinn. FAST DEFLATE NORMAL TRANSPORT... -
Page 104: Nimbus Professional-Matratze: Anleitung Zur Lagerung Des Patienten
6. Nimbus Professional-Matratze: Anleitung zur Lagerung des Patienten Mit dem Matratzensystem Nimbus Professional kann der Patient entweder in Rückenlage (Gesicht nach oben) oder in Bauchlage (Gesicht nach unten) positioniert werden. WARNUNG Bevor die Bauchlagerungsmaßnahme durchgeführt wird, ist eine vollständige Überprüfung des Patienten erforderlich. Bei Bedarf sind Sicherheitsseiten zu verwenden (siehe „Allgemeine Sicherheitshinweise“... -
Page 105: Allgemein
Allgemein Sowohl in Rücken- als auch in Bauchlage muss der Patient so auf der Matratze positioniert werden, dass die Schultern auf gleicher Linie mit der Schulterstützzelle (4. Zelle) liegen. Damit das System seine optimale Wirkung entfalten kann, muss der Patient korrekt auf der Matratze gelagert werden. -
Page 106: Bauchlage (Gesicht Nach Unten) - Nicht Für Den Häuslichen Pflegebereich
Bauchlage (Gesicht nach unten) - Nicht für den häuslichen Pflegebereich • Die Bauchlage wird normalerweise als Notfalltherapie für Patienten mit lebensbedrohlicher Gasaustauschstörung verwendet, oder um großflächige Wunden am Rücken behandeln zu können, wie Druckgeschwüre oder Verbrennungen. • Die Entscheidung für die Bauchlage muss von dem für die Betreuung des Patienten verantwortlichen Arzt genehmigt werden. -
Page 107: Reinigung Und Desinfektion
Wenn Sie sich unsicher sind, wenden Sie sich an Ihren örtlichen Spezialisten für Krankenhaushygiene. Die Matratzensysteme Nimbus 4 und Nimbus Professional sollten routinemäßig vor jedem Patientenwechsel und in regelmäßigen Abständen während des Betriebs gereinigt und desinfiziert werden, wie bei allen wiederverwendbaren medizinischen Geräten üblich. - Page 108 Alternativ können Desinfektionsmittel auf Alkoholbasis (70 %) verwendet werden. Vergewissern Sie sich, dass das Produkt vollständig trocken ist, bevor Sie es lagern. Wenn eines der zahlreichen alternativen Desinfektionsmittel ausgewählt wird, empfehlen wir, vor dem Gebrauch die Eignung des Mittels vom Lieferanten bestätigen zu lassen. NICHT WRINGEN/MANGELN, AUTOKLAVIEREN UND KEINE LÖSUNGEN AUF PHENOLBASIS VERWENDEN.
-
Page 109: Routinemäßige Wartungs- Und Pflegemaßnahmen
Serviceintervalle ArjoHuntleigh empfiehlt, die Matratzensysteme Nimbus 4 und Nimbus Professional bei Dauerbetrieb alle 12 Monate durch einen autorisierten Wartungstechniker von ArjoHuntleigh warten zu lassen. Dies wird durch das Aufleuchten des Wartungssymbols angezeigt (siehe „Wartungsanzeige“ auf Seite 12). Nimbus-Kompressor Allgemeine Pflege, Überprüfen Sie alle elektrischen Anschlüsse und das... -
Page 110: Seriennummern-Aufkleber
Seriennummern-Aufkleber Kompressor Der Seriennummern-Aufkleber befindet sich an der Rückblende des Kompressorgehäuses. Matratze Der Seriennummern-Aufkleber befindet sich auf der CPR-/ Transportfunktion. Bitte geben Sie diese Seriennummern bei Serviceanfragen an. -
Page 111: Fehlerbehebung
9. Fehlerbehebung Die nachfolgende Tabelle enthält Richtlinien zur Fehlerbehebung bei den Matratzensystemen Nimbus 4 und Nimbus Professional im Fall einer Fehlfunktion. Eine ausführliche Beschreibung der Alarm- und Anzeigefunktionen des Kompressors finden Sie unter Abschnitt 4, Seite 10 „Steuerungen, Alarmmeldungen und Anzeigen“. - Page 112 1. Schließen Sie den 1. Stromausfall-Alarm. Kompressor wieder ans Netz Blinken Der Kompressor hat einen an oder halten Sie die Stromausfall festgestellt. Betrieb/Standby-Taste drei Sekunden gedrückt, um den Kompressor in den Standbymodus zu schalten. Schalten Sie bei einem längeren Stromausfall in die Betriebsart Transport um und nehmen Sie die Schlauchleitungen ab.
-
Page 113: Technische Daten
10. Technische Daten KOMPRESSOR Modell: Nimbus Artikelnummer 649012 (649STD): Deutschland 649019 (649STD): Schweiz 649014 (649STD): Euro Betriebsspannung: 230 V Netzfrequenz: 50 Hz Leistungsaufnahme: 35 VA Größe: 508 x 220 x 100 mm (20 x 8,7 x 4 Zoll) Gewicht: 5,7 kg (12,5 lb) Gehäusematerial: ABS-Kunststoff Sicherungsstärke:... - Page 114 KOMPRESSORSYMBOLE Vor der Verwendung des Systems muss der Bediener dieses Dokument Nicht mit dem Hausmüll (Bedienungsanleitung) Typ BF entsorgen lesen. Hinweis: Dieses Symbol ist auf dem Produktlabel blau. With respect to electric shock, fire and mechanical hazards only in accordance with CAN/ Seriennummer Ref.: Modellnummer...
- Page 115 MATRATZENSPEZIFIKATIONEN Nimbus 4 Standardbreite Schmale Breite Standardbezug 650001DAR 650201DAR 650001ADV 650201ADV ® Advantex -Bezug 650001EVE 650201EVE ® Bezug aus eVENT Material Länge 2085 mm (82”) Höhe: 215 mm (8,5”) Breite: 890 mm (35”) 800 mm Gewicht: 11,5 kg (25,3 lb)
- Page 116 EIGENSCHAFTEN DES BEZUGS Standardbezug ® ® Funktion Advantex eVENT -Material ® (Dartex) Abnehmbarer Bezug Feuchtigkeitsdampf- 12-mal höher durchlässig Atmungsaktiv Nein Nein Reibungsarm 18 % niedriger 20 % niedriger Wasserundurchlässig/ -abweisend Infektionsschutz Materialbeschichtung ist Materialbeschichtung ist INNENMATERIAL, antimikrobiotisch antimikrobiotisch bakterielles Wachstum wird nicht unterstützt Feuerhemmend BS 7175: 0,1 &...
- Page 117 Leitfaden und Herstellererklärung - elektromagnetische Emissionen Der Kompressor ist für den Betrieb in der unten angegebenen elektromagnetischen Umgebung bestimmt. Der Kunde oder Nutzer des Kompressors muss dafür sorgen, dass das Produkt in einer solchen Umgebung genutzt wird. Emissionsprüfung Compliance Elektromagnetische Umgebung – Leitfaden HF-Emissionen Gruppe 1 Der Kompressor verwendet HF-Strahlung...
- Page 118 Leitfaden und Herstellererklärung - elektromagnetische Störfestigkeit Der Kompressor ist für den Betrieb in der unten angegebenen elektromagnetischen Umgebung bestimmt. Der Kunde oder Nutzer des Kompressors muss dafür sorgen, dass das Produkt in einer solchen Umgebung genutzt wird. Unempfind- IEC 60601 Konformitäts- Elektromagnetische Umgebung –...
- Page 119 Español...
- Page 121 Uso indicado ............1 Acerca de Nimbus 4 y Nimbus Professional ....... 1 Compresor Nimbus .
- Page 122 Mantenimiento periódico ..........23 Sistemas Nimbus 4 y Nimbus Professional ......23 Compresor Nimbus .
-
Page 123: Normas Generales De Seguridad
Guarde el compresor en un lugar seguro. • Debe utilizarse únicamente la combinación de compresor y colchón o cojín indicada por ArjoHuntleigh. No es posible garantizar el correcto funcionamiento del producto si se utilizan combinaciones de compresor y colchón o cojín incorrectas. (iii) - Page 124 NO utilice accesorios no aprobados ni intente modificar, desmontar o usar de manera incorrecta el sistema Nimbus 4 y Nimbus Professional. El caso omiso de esta precaución podría causar lesiones o, en casos extremos, la muerte. Política de diseño y Copyright ®...
-
Page 125: Introducción
Si tiene alguna dificultad a la hora de configurar o utilizar los sistemas Nimbus 4 y Nimbus Professional, póngase en contacto con su oficina de ventas de ArjoHuntleigh, que se indica al final de este manual. Uso indicado El uso indicado de este producto es evitar o tratar las úlceras... -
Page 126: Compresor Nimbus
(reanimación cardiopulmonar), que permite la realización de maniobras de reanimación cardíaca. Las especificaciones técnicas completas del sistema Nimbus Nimbus Professional figuran en el manual de mantenimiento, n.º de referencia SER0007, que proporciona ArjoHuntleigh. Compresor Nimbus Botón de funcionamiento/Standby Asa de transporte (entrante) -
Page 127: Colchón Nimbus 4
Conjunto de tubos para conexión al compresor Los colchones Nimbus 4 y Nimbus Professional cuentan con los mismos controles, situados en el piecero del colchón, en el lado opuesto a las válvulas de ventilación. -
Page 128: Colchón Nimbus Professional
Colchón Nimbus Professional 5 celdas Heelguard Celda de apoyo de los hombros (4.ª) (Alterna, sin válvula de ventilación) 3 celdas de muslos Control para RCP/Control 8 de torso Celdas de sección de cabeza Celdas (Presión alterna) PIECERO CABECERO 19 válvulas de ventilación Asa de transporte Correa de fijación Asa de arrastre... -
Page 129: Aplicaciones Clínicas
El colchón Nimbus 4 y Nimbus Professional está diseñado para pacientes de hasta 250 kg (550 lb). Contraindicaciones No utilice los sistemas Nimbus 4 y Nimbus Professional en pacientes con fractura vertebral inestable. Precauciones Si los pacientes padecen otras fracturas inestables o dolencias que pudieran complicarse con una superficie blanda o móvil, consulte a un médico cualificado antes de... -
Page 130: Instalación
3. Instalación Los sistemas Nimbus 4 y Nimbus Professional son de sencilla instalación observando las pautas siguientes. Consulte el apartado Sección 4, Página 10 «Controles, alarmas e indicadores», donde encontrará una descripción detallada de los controles e indicadores del compresor. -
Page 131: Instalación Del Compresor
6. Asegúrese de que el control para RCP está bloqueado en posición cerrada y el control para transporte se encuentra en la posición NORMAL. NORMAL FAST DEFLATE NORMAL TRANSPORTE TRANSPORT Control para RCP Control para transporte Instalación del 1. Si se va a colgar el compresor del extremo de la cama, asegúrese de que el colgador está... -
Page 132: Prueba De La Alarma De Fallo De Corriente
3. Haga discurrir el cable de alimentación a lo largo del lateral del colchón y asegure la solapa en torno al cable por medio de los botones de presión. Botón de presión Solapa de gestión de cables Prueba de la alarma La alarma de fallo de corriente se alimenta por medio de una batería recargable interna. -
Page 133: Conexión Del Conjunto De Tubos
7. Si la alarma no funciona durante dos minutos, llame al servicio técnico. Si la alarma de fallo de corriente no funciona tras llevar a cabo esta prueba, y a la espera de la visita de servicio técnico, el compresor aún se puede utilizar pero requerirá... -
Page 134: Controles, Alarmas E Indicadores
4. Controles, alarmas e indicadores Botón de funciona- Control de silencia- Alarma Presión alta Presión baja miento/en espera miento e indicador Indicador Indicador Indicador Modo Funcionamiento Espera Indicador de Confort Indicador Indicador Indicador Control Control de modo Estático Fallo eléctrico Fallo en el compresor e indicador Indicador... -
Page 135: Indicadores Del Compresor
Control de la Los sistemas Nimbus 4 y Nimbus Professional cuentan con mecanismos de compensación automática de la posición y la comodidad distribución del peso del paciente con el fin de optimizar el rendimiento del colchón en el alivio de la presión. Aun así, la presión de las celdas del colchón se puede ajustar... - Page 136 de 3 segundos (consulte «Alarma silenciada» de la página 10). El símbolo triangular de alarma se muestra acompañado de uno o más de los indicadores siguientes: • Low Pressure (consulte «Presión baja» de la página 11). • High Pressure (consulte «Presión alta» de la página 11). •...
- Page 137 INFLADO POR COMPLETO Y SE HAYA ALCANZADO LA PRESIÓN DE FUNCIONAMIENTO NORMAL. Instalación del Antes de utilizar el sistema Nimbus 4 o Nimbus Professional compruebe que se haya instalado correctamente y de acuerdo sistema con Sección 3, Página 6 «Instalación».
-
Page 138: Modos De Funcionamiento
Válvulas de En los colchones Nimbus 4 y Nimbus Professional, las válvulas de ventilación que hay en los laterales del colchón ventilación del permiten desinflar celdas individuales. - Page 139 Celdas Celda de apoyo de los hombros Directrices para Deben observarse las siguientes directrices al seleccionar válvulas de ventilación para abrir en los colchones Nimbus 4 seleccionar qué y Nimbus Professional: válvulas de 1. Para descarga / alivio de presión permanente: ventilación del...
-
Page 140: Control Para Transporte
No desinfle ninguna celda más en cada zona, ya que podría afectar al soporte del paciente durante el ciclo alternante normal. Control para Configura el colchón en el modo Transporte, en el que el colchón queda sellado y la superficie de apoyo tiene una transporte presión uniforme. -
Page 141: Control Para Rcp
Control para RCP IMPORTANTE EN CASO DE PRODUCIRSE UN PARO CARDÍACO. En caso de que el paciente sufra un paro cardíaco y sea preciso proceder a una reanimación cardiopulmonar: Para activar el 1. Levante la manilla roja de evacuación para RCP situada en el extremo de los pies del colchón. -
Page 142: Colchón Nimbus Professional: Guía De Posición Del Paciente
6. Colchón Nimbus Professional: Guía de posición del paciente El colchón Nimbus Professional permite colocar al paciente bien en posición supina (boca arriba) o de decúbito prono (boca abajo). ADVERTENCIA Antes de iniciar el procedimiento es preciso llevar a cabo una valoración completa del paciente que determine la idoneidad de la administración de cuidados en posición de decúbito prono. -
Page 143: Generalidades
Generalidades Ya sea en la posición supina o en la de decúbito prono, los pacientes deberán estar situados en el colchón de modo que los hombros estén alineados con la celda de apoyo de los hombros (4.ª). Resulta importante para un uso óptimo del sistema que los pacientes estén colocados correctamente sobre el colchón. -
Page 144: Posición De Decúbito Prono (Boca Abajo): No Es Adecuada Para Entornos De Cuidados Domiciliarios
Posición de decúbito prono (boca abajo): no es adecuada para entornos de cuidados domiciliarios. • Los cuidados en posición de decúbito prono suelen prescribirse como terapia de emergencia para pacientes con dificultades respiratorias agudas o para tratar heridas importantes en la espalda, como úlceras por presión o quemaduras. •... -
Page 145: Descontaminación
Si no está seguro, pida consejo a su especialista local en control de infecciones. El sistema Nimbus 4 y Nimbus Professional deberá descontaminarse periódicamente entre utilizaciones por distintos pacientes y a intervalos regulares cuando esté en uso, tal y como está... - Page 146 Asegúrese de que el producto esté completamente seco antes de almacenarlo. En caso de seleccionarse un desinfectante de la amplia variedad disponible, recomendamos que la adecuación para su uso sea previamente confirmada por el proveedor químico. NO EXPRIMA/ESCURRA, ESTERILICE NI UTILICE PRODUCTOS CON BASE DE FENOL.
-
Page 147: Mantenimiento Periódico
ArjoHuntleigh recomienda que un agente de servicio técnico autorizado de ArjoHuntleigh lleve a cabo el mantenimiento programado de los sistemas Nimbus 4 y Nimbus Professional después de doce meses de funcionamiento continuo. Esto se indica al encenderse el símbolo de mantenimiento (consulte «Indicador de mantenimiento»... -
Page 148: Etiquetas De Número De Serie
Etiquetas de número de serie Compresor La etiqueta de número de serie se encuentra en la parte posterior de la carcasa del compresor. Colchón La etiqueta de número de serie se encuentra en la parte superior del control para RCP/transporte. Indique estos números de serie al solicitar mantenimiento. -
Page 149: Localización Y Reparación De Averías
9. Localización y reparación de averías La tabla siguiente ofrece una guía para la resolución de problemas de los sistemas Nimbus 4 y Nimbus Professional, que se debe utilizar en caso de que se produzca una avería. Consulte Sección 4, Página 10 «Controles, alarmas e indicadores», donde encontrará... - Page 150 1. Alarma de fallo de 1. Restituya la alimentación eléctrica o mantenga pulsado Parpadeante corriente. el botón de funcionamiento/ El compresor ha detectado Standby durante 3 segundos un fallo en la alimentación para poner el compresor en eléctrica. el modo Standby. Si la condición de fallo de corriente se prolonga, haga pasar el sistema al modo...
-
Page 151: Especificaciones Técnicas
10. Especificaciones técnicas COMPRESOR Modelo: Nimbus N.º de referencia 649014 (649STD) Tensión de alimentación: 230 V Frecuencia: 50 Hz Alimentación eléctrica: 35 VA Tamaño: 508 x 220 x 100 mm (20 x 8,7 x 4 pulgadas) Peso: 5,7 kg (12,5 libras) Material de la carcasa: Plástico ABS Amperaje de los fusibles... - Page 152 SÍMBOLOS DEL COMPRESOR El operador debe leer este documento (Instrucciones No desechar en de uso) antes de comenzar. Tipo BF contenedores de Nota: este símbolo se basura doméstica muestra en azul en la etiqueta del producto. With respect to electric shock, fire and mechanical hazards only in accordance with CAN/CSA-C22.2 No.
- Page 153 ESPECIFICACIÓN DEL COLCHÓN Nimbus 4 Ancho estándar Estrecho Funda estándar 650001DAR 650201DAR 650001ADV 650201ADV ® Funda Advantex 650001EVE 650201EVE ® Funda de tejido eVENT Longitud 2085 mm (82”) Altura: 215 mm (8,5”) Anchura: 890 mm (35”) 800 mm (31,5”) Peso:...
- Page 154 ESPECIFICACIONES DE LA FUNDA Funda estándar ® ®(a) Característica Advantex Tejido eVENT ® (Dartex) Funda extraíble Sí Sí Sí Permeable al vapor Sí Sí 12 veces más alta Permeabilidad al aire Sí Baja fricción Sí 18% más baja 20% más baja Resistencia/ Sí...
- Page 155 Orientación y declaración del fabricante: emisiones electromagnéticas El compresor ha sido diseñado para su uso en los siguientes entornos electromagnéticos específicos. El cliente o usuario del compresor debe asegurarse de usarlo en dicho entorno. Pruebas de emisión Conformidad Entorno electromagnético (guía) Emisiones de RF Grupo 1 El compresor utiliza energía de RF únicamente para...
- Page 156 Orientación y declaración del fabricante: inmunidad electromagnética El compresor ha sido diseñado para su uso en los siguientes entornos electromagnéticos específicos. El cliente o usuario del compresor debe asegurarse de usarlo en dicho entorno. Prueba de Nivel de prueba Nivel de Entorno electromagnético (guía) inmunidad según IEC 60601...
- Page 157 Français...
- Page 159 Utilisation prévue ........... 1 À propos de Nimbus 4 et de Nimbus Professional ......1 Pompe Nimbus .
- Page 160 Pompe Nimbus ........... . 23 Matelas Nimbus 4 et Nimbus Professional ....... 23 Étiquettes du numéro de série .
-
Page 161: Sécurité Générale
Gardez la pompe dans un endroit sécurisé. • Seule la combinaison pompe matelas ou assise indiquée par ArjoHuntleigh peut être utilisée. Le bon fonctionnement de ce produit ne peut être garanti en cas de mauvaise utilisation des combinaisons pompe matelas ou assise. - Page 162 N'utilisez PAS d'accessoires non agréés et ne tentez PAS de modifier, démonter ou d'utiliser de toute autre manière le système Nimbus 4 et Nimbus Professional. Si vous ne respectez pas cet avertissement, quelqu'un pourrait être blessé ou, dans des cas extrêmes, décéder.
-
Page 163: Introduction
Si vous rencontrez des difficultés à configurer ou utiliser les systèmes Nimbus 4 et Nimbus Professional, contactez votre bureau de vente local ArjoHuntleigh, dont la liste se trouve à la fin de ce manuel. Utilisation prévue Ce produit doit être utilisé pour empêcher et/ou gérer les escarres de patients pesant moins de 250 kg (550 livres). -
Page 164: Pompe Nimbus
à l’aide de la commande RCP (réanimation cardio-pulmonaire) permettant de procéder à une réanimation cardiaque. Vous trouverez une description technique complète des systèmes Nimbus 4 et Nimbus Professional dans le manuel d’entretien, n° de référence SER0007, disponible chez ArjoHuntleigh. Pompe Nimbus Poignée de transport (compartiment) -
Page 165: Matelas Nimbus 4
Commande de transport NORMAL FAST DEFLATE NORMAL TRANSPORT TRANSPORT Connecteur tubulaire Tubulures de la pompe Les matelas Nimbus 4 et Nimbus Professional sont tous les deux équipés de ces commandes situées au pied du matelas, du côté opposé aux purgeurs d’air. -
Page 166: Matelas Nimbusprofessional
Matelas NimbusProfessional (4e) cellule de support d’épaules 5 cellules de la technologie Heelguard (À pression alternée, pas de purgeur d’air) 3 cellules de cuisses Commande RCP/transpor 8 cellules 3 cellules de la zone de tête dorsales (À pression alternée) PIED TÊTE 19 purgeurs d’air Poignée de transport... -
Page 167: Applications Cliniques
2. Applications cliniques Indications Les systèmes Nimbus 4 et Nimbus Professional sont indiqués pour la prévention et/ou la gestion de toutes les catégories d’escarres, en combinaison avec un protocole d’escarres individualisé et complet, comme le repositionnement, l’aide nutritionnelle ou les soins cutanés, par exemple. La sélection doit être établie sur la base d’une évaluation globale des... -
Page 168: Installation
3. Installation Les systèmes Nimbus 4 et Nimbus Professional s’installent facilement en suivant les directives suivantes. Reportez-vous à la section 4, page 10 «Commandes, alarmes et voyants» pour obtenir une description complète des commandes et voyants de la pompe. -
Page 169: Installation De La Pompe
6. Veillez à ce que la commande RCP soit bien fermée et verrouillée et que la commande de transport soit bien sur NORMAL. NORMAL FAST DEFLATE NORMAL TRANSPORT TRANSPORT Commande RCP Commande de transport Installation de la 1. Si la pompe doit être pendue au pied du lit, veillez à ce que la console du lit soit solidement fixée à... -
Page 170: Test De L'alarme De Panne De Courant
3. Placez le câble d’alimentation secteur le long du matelas en serrant le passe-câble autour du câble à l’aide des boutons-pression. Bouton-pression Passe- câbles Test de l’alarme de L’alarme de panne de courant est alimentée par une batterie rechargeable interne. La durée de l’alarme dépendra du panne de courant niveau de la batterie, qui dépend quant à... -
Page 171: Raccordement Des Tubulures
7. Si l’alarme ne fonctionne pas pendant deux minutes, appelez le technicien. Si l’alarme de panne de courant ne fonctionne pas après ce test et qu’un technicien a été appelé, la pompe peut toujours être utilisée en vérifiant régulièrement l’état de fonctionnement. -
Page 172: Commandes, Alarmes Et Voyants
4. Commandes, alarmes et voyants Bouton Commande et Voyant Voyant de Voyant de Marche/Veille voyant de silence d’alarme pression élevée pression faible Mode Marche Voyant Voyant Commande d’attente d’entretien de confort Voyant et commande Voyant de panne Voyant d’erreur du mode Statique de courant de la pompe Commandes... -
Page 173: Voyants De La Pompe
Commande de confort Les systèmes Nimbus 4 et Nimbus Professional compensent automatiquement la position et la répartition du poids du patient, afin d’optimiser les performances du matelas anti- escarres. Toutefois, la pression des cellules du matelas peut être ajustée manuellement pour le confort du patient, à l’aide de la Commande de confort rotative. - Page 174 Interruption de l’alarme (Reportez-vous à « Interruption de l’alarme » à la page 10). Le symbole triangulaire Alarme s’affiche avec un ou plusieurs des voyants suivants : • Pression faible (reportez-vous à « Pression faible » à la page 11). •...
-
Page 175: Fonctionnement
NE SOIT TOTALEMENT GONFLÉ ET QUE LA PRESSION DE FONCTIONNEMENT NORMALE N’AIT ÉTÉ ATTEINTE. Installation du Avant d’utiliser le système Nimbus 4 ou Nimbus Professional, veillez à ce qu’il ait été installé correctement système selon la section 3, page 6 «Installation». -
Page 176: Commande De Confort
: 1. Le matelas Nimbus 4 ne possède que cinq purgeurs d’airs la zone de la technologie Heelguard au pied du matelas. 2. Matelas Nimbus Professional : •... -
Page 177: Purgeurs D'air Du Matelas
Directives pour Les directives suivantes doivent être respectées lorsque vous sélectionnez les purgeurs d’air à ouvrir sur les matelas sélectionner les Nimbus 4 et Nimbus Professional : purgeurs d’air du 1. Pour un dégonflage/soulagement de la pression matelas à ouvrir permanent : •... -
Page 178: Commande De Transport
Ne dégonflez pas d’autres cellules dans chaque zone, pour ne pas affecter le soutien du patient pendant le cycle normal de pression alternée. Commande de Cette commande permet de configurer le matelas en mode Transport en scellant le matelas et en plaçant la surface de transport soutien sous pression équilibrée ;... -
Page 179: Commande Rcp
Commande RCP ATTENTION EN CAS D’ARRÊT CARDIAQUE. Si le patient subit un arrêt cardiaque et que la RCP doit être administrée : Pour activer la RCP 1. Tirez la poignée RCP rouge au pied du matelas. FAST DEFLATE NORMAL TRANSPORT 2. -
Page 180: Matelas Nimbus Professional : Guide De Positionnement Du Patient
6. Matelas Nimbus Professional : Guide de positionnement du patient Le matelas Nimbus Professional permet au patient d’être soit en décubitus dorsal (tourné vers le haut) soit en décubitus ventral (tourné vers le bas). AVERTISSEMENT Une évaluation complète du patient, pour déterminer s’il peut recevoir des soins en position couchée sur le ventre, est essentielle avant d’entamer la procédure. -
Page 181: Généralités
Généralités Tant en position couchée sur le ventre que sur le dos, les patients doivent être positionnés sur le matelas de sorte que les épaules soient alignées sur la (4e) cellule de soutien d’épaules. Pour une utilisation optimale du système, il est important que les patients soient bien positionnés sur le matelas. -
Page 182: Décubitus Ventral (Tourné Vers Le Bas) - À Ne Pas Effectuer Chez Soi
Décubitus ventral (tourné vers le bas) - À ne pas effectuer chez soi • Des soins prodigués en position couchée sur le ventre sont généralement prescrits dans le cadre d’un traitement d’urgence pour des patients souffrant d’une détresse respiratoire aigüe ou de blessures dorsales étendues, telles que des escarres ou des brûlures. -
Page 183: Décontamination
En cas de doute, il convient de solliciter l’avis de votre spécialiste du contrôle des infections. Les systèmes Nimbus 4 et Nimbus Professional doivent faire l’objet d’une procédure de décontamination entre chaque patient et à une fréquence régulière en cours d’utilisation, conformément aux bonnes pratiques applicables à... - Page 184 Des désinfectants à base d’alcool (70 %) peuvent être utilisés comme solution alternative. Veillez à ce que le produit soit sec avant de le ranger. Si vous choisissez un autre désinfectant parmi la large palette disponible, nous vous conseillons d’obtenir l’aval du laboratoire chimique concernant sa compatibilité...
-
Page 185: Maintenance Régulière
Entretien ArjoHuntleigh recommande un entretien des systèmes Nimbus 4 et Nimbus Professional tous les 12 mois de fonctionnement continu par un agent agréé ArjoHuntleigh. Cet entretien est signalé par le symbole lumineux Entretien (reportez-vous à « Voyant Entretien » à la page 12). -
Page 186: Dépistage Des Anomalies
9. Dépistage des anomalies Le tableau suivant contient un guide de dépistage des anomalies pour les systèmes Nimbus 4 et Nimbus Professional en cas de dysfonctionnement. Reportez-vous à la section 4, page 10 «Commandes, alarmes et voyants» pour une description complète des alarmes et des voyants de la pompe. - Page 187 1. Alarme de panne de 1. Rebranchez la pompe à l’alimentation secteur ou Clignotant courant. appuyez et maintenez La pompe a détecté une enfoncé le bouton Marche/ panne de courant. Veille pendant 3 secondes pour mettre la pompe en veille. Si la panne de courant se prolonge, passez en mode Transport et débranchez les...
-
Page 188: Caractéristiques Techniques
10. Caractéristiques techniques POMPE Modèle : Nimbus Référence 649015 (649STD): France 649019 (649STD): Suisse 649014 (649STD): Euro Tension d’alimentation : 230 V Fréquence d’alimentation : 50 Hz Courant d’entrée : 35 VA Tailles : 508 x 220 x 100 mm (20 x 8,7 x 4 pouces) Poids : 5,7 kg (12,5 livres) Matériau du boîtier :... - Page 189 SYMBOLES DE LA POMPE L’opérateur doit lire ce document (mode d’emploi) avant toute utilisation. Ne pas jeter avec les Type BF Remarque : Ce symbole déchets domestiques est bleu sur l’étiquette du produit. With respect to electric shock, fire and mechanical hazards only N°...
- Page 190 CARACTÉRISTIQUES DU MATELAS Nimbus 4 Largeur standard Largeur réduite Housse standard 650001DAR 650201DAR 650001ADV 650201ADV ® Housse Advantex 650001EVE 650201EVE ® Housse en tissu eVENT Longueur 2 085 mm (82”) Épaisseur : 215 mm (8,5”) Largeur : 890 mm (35”) 800 mm (31,5”)
- Page 191 CARACTÉRISTIQUES DE LA HOUSSE Housse standard ® ®(a) Caractéristiques Advantex eVENT ® (Dartex) Housse amovible Perméable à 12 fois supérieur l’humidité Respirant Faible friction 18 % en moins 20 % en moins Imperméable/ Hydrofuge Contrôle de l’infection Le revêtement est Le revêtement est MATIÈRE INERTE antimicrobien...
- Page 192 Recommandations et déclarations du fabricant – émissions électromagnétiques La pompe est destinée à être utilisée dans l’environnement électromagnétique indiqué ci-dessous. L’acheteur ou l’utilisateur de la pompe doit s’assurer que l’appareil est utilisé dans l’environnement indiqué. Essai de contrôle des Conformité Environnement électromagnétique –...
- Page 193 Recommandations et déclarations du fabricant – immunité électromagnétique La pompe est destinée à être utilisée dans l’environnement électromagnétique indiqué ci-dessous. L’acheteur ou l’utilisateur de la pompe doit s’assurer que l’appareil est utilisé dans l’environnement indiqué. Essai Niveau d’essai Niveau de Environnement électromagnétique –...
- Page 195 Italiano...
- Page 197 Applicazioni previste ..........1 Informazioni su Nimbus 4 e Nimbus Professional ......1 Pompa Nimbus .
- Page 198 Manutenzione ordinaria ..........23 Sistemi Nimbus 4 e Nimbus Professional ....... . 23 Pompa Nimbus .
-
Page 199: Sicurezza: Informazioni Generali
Conservare la pompa in un luogo sicuro. • Utilizzare solamente le combinazioni di pompa e materasso o cuscino indicate da ArjoHuntleigh. Il corretto funzionamento del prodotto può essere garantito solo se viene utilizzata una combinazione pompa e materasso o cuscino appropriata. - Page 200 Politica di progettazione e copyright ® e ™ sono marchi di proprietà del gruppo di società ArjoHuntleigh. Poiché la politica dell’azienda è volta al miglioramento costante, essa si riserva il diritto di modificare i prodotti senza preavviso.
-
Page 201: Introduzione
L’uso previsto di questo prodotto è la prevenzione e/o la gestione delle piaghe da decubito per pazienti di peso fino a 250 kg (550 lb). I sistemi Nimbus 4 e Nimbus Professional devono essere utilizzati nel contesto di un programma terapeutico prescritto (si veda “Indicazioni” a pagina 5). -
Page 202: Pompa Nimbus
CPR (rianimazione cardio- polmonare) per permettere l’esecuzione delle procedure per la rianimazione cardio-polmonare. Una descrizione tecnica completa dei sistemi Nimbus 4 e Nimbus Professional è contenuta nel Manuale di assistenza, codice SER0007, disponibile presso ArjoHuntleigh. Pompa Nimbus... -
Page 203: Materasso Nimbus 4
FAST DEFLATE NORMAL TRANSPORT TRANSPORT Tubo di collegamento Raccordo Raccordi di collegamento pompa-materasso Questi comandi sono presenti sui materassi Nimbus 4 e Nimbus Professional e si trovano sul lato piedi del materasso dalla parte opposta rispetto alle valvole di sfiato. -
Page 204: Materasso Nimbus Professional
Materasso Nimbus Professional 5 celle Heelguard (4°) Cella per il supporto delle spalle (Alternata, senza valvola di sfiato) 3 celle coscia CPR/Trasporto Comando 8 per il dorso 3 Celle per la testa Celle (pressione alternata) LATO PIEDI LATO TESTA 19 valvole di sfiato Maniglia di trasporto Fascetta di ancoraggio Maniglia di... -
Page 205: Applicazioni Cliniche
2. Applicazioni cliniche Indicazioni I sistemi Nimbus 4 e Nimbus Professional , combinati con un programma completo e personalizzato di cura delle piaghe da decubito, sono raccomandati per la prevenzione e il trattamento di tutte le categorie di piaghe da decubito: per esempio riposizionamento, supporto nutrizionale, cura della cute. -
Page 206: Installazione
3. Installazione L’installazione dei sistemi Nimbus 4 e Nimbus Professional è semplice. È sufficiente osservare le seguenti linee guida. Consultare Sezione 4, pagina 10 “Comandi, allarmi e spie” per una descrizione dettagliata dei comandi e delle spie posti sulla pompa. -
Page 207: Installazione Della Pompa
6. Verificare che il comando CPR sia chiuso e bloccato e che il comando Trasporto sia impostato su NORMAL. NORMAL FAST DEFLATE NORMAL TRANSPORT TRANSPORT Comando CPR Comando Trasporto Installazione della 1. Se si desidera appendere la pompa ai piedi del letto, verificare che la relativa staffa sia saldamente fissata pompa alla pompa, quindi collegare la pompa e la staffa al... -
Page 208: Collaudo Del Sistema Di Allarme Per Mancanza Di Corrente
3. Stendere il cavo lungo il lato del materasso, avvolgere l’aletta intorno al cavo e chiuderla con i ganci a pressione. Gancio a pressione Aletta di alloggiamento del cavo Collaudo del sistema L’allarme per mancanza di corrente è alimentato da una batteria ricaricabile interna. -
Page 209: Collegamento Del Gruppo Tubi
Se l’allarme per mancanza di corrente non funziona dopo il collaudo ed è stato chiamato un tecnico dell’assistenza, la pompa può continuare ad essere utilizzata a condizione di controllarne periodicamente il corretto funzionamento. Tutti gli altri allarmi continuano a funzionare normalmente. Collegamento del Per collegare il gruppo tubi al materasso e alla pompa: 1. -
Page 210: Comandi, Allarmi E Spie
4. Comandi, allarmi e spie Start/Standby Comando per la tacitazione Allarme Alta pressione Bassa Pressione Pulsante dell’allarme e spia Spia Spia Spia Modalità di funziona- Comfort Manutenzione Attendere mento (Run) Spia Comando Spia Spia Comando modalità Mancanza di corrente Guasto pompa Statica e spia Spia Spia... -
Page 211: Spie Pompa
Comando Comfort I sistemi Nimbus 4 and Nimbus Professional compensano automaticamente la posizione e la distribuzione del peso del paziente al fine di ottimizzare le prestazioni del materasso. Il comfort del paziente può essere regolato manualmente tramite la ghiera di regolazione Comfort Control. - Page 212 • Bassa pressione (consultare “Bassa pressione” a pagina 11). • Alta pressione (consultare “Alta pressione” a pagina 11). • Guasto pompa (consultare “Guasto pompa” a pagina 12). • Interruzione di corrente (consultare “Interruzione di corrente” a pagina 12). Fatta eccezione per l’interruzione di corrente, dopo che la condizione di allarme è...
-
Page 213: Funzionamento
NON COLLOCARE IL PAZIENTE SUL MATERASSO FINCHÉ QUEST’ULTIMO NON È INTERAMENTE GONFIATO E NON È STATA RAGGIUNTA LA NORMALE PRESSIONE OPERATIVA. Installazione del Prima di utilizzare il sistema Nimbus 4 o Nimbus Professional, assicurarsi che sia stato installato sistema correttamente conformemente a Sezione 3, pagina 6 “Installazione”. -
Page 214: Comando Comfort
1. Il materasso Nimbus 4 è dotato di cinque sole valvole di sfiato nella sezione Heelguard ai piedi del materasso. 2. Materasso Nimbus Professional: • Le tre celle della sezione della testa sono dotate di valvole di sfiato. - Page 215 Celle Cella per il supporto delle spalle Linee guida per Attenersi alle linee guida seguenti quando si procede alla scelta delle valvole di sfiato da aprire sui materassi Nimbus 4 scegliere le valvole e Nimbus Professional: di sfiato del 1. Per scarico/sollievo dalla pressione permanenti: materasso da aprire •...
-
Page 216: Comando Trasporto
Comando Trasporto Imposta l’unità in modalità Trasporto in cui il materasso viene sigillato e la superficie di supporto è pressurizzata in modo omogeneo; è quindi possibile rimuovere la pompa e/o il gruppo tubi. In questa modalità il materasso dà sostegno al paziente fino a 12 ore. -
Page 217: Comando Cpr
Comando CPR IMPORTANTE IN CASO DI ARRESTO CARDIACO. Procedura da seguire per utilizzare la funzione CPR in caso di arresto cardiaco: Per attivare 1. sollevare la manopola CPR rossa posta ai piedi del materasso; l’unità CPR FAST DEFLATE NORMAL TRANSPORT 2. -
Page 218: Materasso Nimbus Professional: Guida Per Il Posizionamento Del Paziente
6. Materasso Nimbus Professional: Guida per il posizionamento del paziente Il materasso Nimbus Professional consente di sistemare il paziente in posizione prona (faccia in giù) o supina (faccia in su). AVVERTENZA Prima di iniziare la procedura è necessario sottoporre il paziente a una visita completa per stabilirne l’idoneità... -
Page 219: Caratteristiche Generali
Caratteristiche generali Sia nella posizione supina che nella posizione prona, i pazienti devono essere posizionati sul materasso in modo che le loro spalle siano in linea con la cella per il supporto delle spalle (4°). Per un uso ottimale del sistema, è importante che il paziente sia posizionato correttamente sul materasso. -
Page 220: Posizione Prona (Faccia In Giù) - Non Per L'ambiente Di Assistenza Domiciliare
Posizione prona (faccia in giù) - Non per l’ambiente di assistenza domiciliare • L’assistenza medica in posizione prona si effettua di solito in casi di emergenza quando il paziente presenta difficoltà respiratoria acuta o per gestire ferite estese sul dorso, come piaghe da decubito o ustioni. -
Page 221: Sanificazione
In caso di incertezza, consultare uno specialista nella prevenzione delle infezioni. I sistemi Nimbus 4 e Nimbus Professional devono essere sistematicamente decontaminati prima di passare al paziente successivo e, comunque, a intervalli regolari anche se utilizzati dallo stesso paziente, come da buona pratica per tutte le apparecchiature mediche riutilizzabili. - Page 222 In alternativa, è possibile usare disinfettanti a base di alcol (concentrazione massima 70%). Accertarsi che il prodotto sia completamente asciutto prima di riporlo. Nel caso in cui si scegliesse di utilizzare un disinfettante alternativo fra i tanti disponibili, si consiglia di verificarne l’idoneità...
-
Page 223: Sistemi Nimbus 4 E Nimbus Professional
ArjoHuntleigh di riparare il sistema. Periodo di ArjoHuntleigh raccomanda di effettuare la manutenzione dei sistemi Nimbus 4 e Nimbus Professional dopo 12 mesi di manutenzione funzionamento continuo, rivolgendosi a un tecnico ArjoHuntleigh autorizzato. Questo viene indicato dall’accensione del simbolo Manutenzione (consultare “Spia... -
Page 224: Etichette Numeri Di Serie
Etichette numeri di serie Pompa L’etichetta del numero di serie è fissata al pannello posteriore della pompa. Materasso L’etichetta del numero di serie è posta nella parte superiore del comando CPR/Trasporto. Indicare questi numeri di serie in caso di richiesta di assistenza. -
Page 225: Risoluzione Dei Problemi
9. Risoluzione dei problemi La tabella seguente contiene una guida di risoluzione dei problemi che possono verificarsi sui sistemi Nimbus 4 e Nimbus Professional. Consultare Sezione 4, pagina 10 “Comandi, allarmi e spie” per una descrizione dettagliata degli allarmi e delle spie posti sulla pompa. - Page 226 1. Allarme mancanza di 1. Ricollegare l’alimentazione di rete o tenere premuto il Lampeggiante corrente. pulsante Start/Standby per La pompa ha rilevato una 3 secondi per portare la mancanza di corrente. pompa in Standby. Se la mancanza di corrente è prolungata, passare alla modalità...
-
Page 227: Specifiche Tecniche
10. Specifiche tecniche POMPA Modello: Nimbus Codice 649017 (649STD): Italiano 649014 (649STD): Euro Tensione di alimentazione: 230 V Frequenza di alimentazione: 50 Hz Assorbimento: 35 VA Dimensioni: 508 x 220 x 100 mm (20 x 8,7 x 4 pollici) Peso: 5,7 kg (12,5 lb) Materiale della scocca: Plastica ABS... - Page 228 SIMBOLI POMPA L’operatore deve leggere il presente documento (Istruzioni per l’uso) prima Non smaltire con i rifiuti Tipo BF dell’utilizzo. domestici Nota: questo simbolo è blu sull’etichetta del prodotto. With respect to electric shock, fire and mechanical hazards only in accordance with CAN/CSA-C22.2 No.
- Page 229 SPECIFICHE DEL MATERASSO Nimbus 4 Larghezza standard Larghezza vers. stretta Rivestimento standard 650001DAR 650201DAR Rivestimento in 650001ADV 650201ADV ® Advantex Rivestimento in tessuto 650001EVE 650201EVE ® eVENT Lunghezza 2085 mm (82") Altezza: 215 mm (8,5") Larghezza: 890 mm (35") 800 mm (31,5”)
- Page 230 SPECIFICHE DEL RIVESTIMENTO Rivestimento standard ® ®(a) Caratteristica Advantex Tessuto eVENT ® (Dartex) Rivestimento Sì Sì Sì rimovibile Permeabilità al vapore Sì Sì 12 volte superiore Traspirabilità Sì Basso attrito Sì inferiore del 18% inferiore del 20% Impermeabilità/ Sì Sì Sì...
- Page 231 Raccomandazioni e dichiarazione del produttore - emissioni elettromagnetiche La pompa è pensata per l’utilizzo negli ambienti elettromagnetici indicati di seguito. Il cliente o l’utente della pompa deve accertarsi di utilizzarla in tali ambienti. Test delle emissioni Conformità Ambiente elettromagnetico - raccomandazioni Emissioni RF Gruppo 1...
- Page 232 Raccomandazioni e dichiarazione del produttore - immunità elettromagnetica La pompa è pensata per l’utilizzo negli ambienti elettromagnetici indicati di seguito. Il cliente o l’utente della pompa deve accertarsi di utilizzarla in tali ambienti. Test di Livello di test Livello di Ambiente elettromagnetico - immunità...
- Page 233 Nederlands...
- Page 235 Beoogd gebruik ........... . . 1 Informatie over Nimbus 4 en Nimbus Professional ......1 Nimbus-pomp .
- Page 236 Dagelijks onderhoud ..........23 Nimbus 4- en Nimbus Professional-systemen ......23 Nimbus-pomp .
-
Page 237: Algemene Veiligheid
• Wanneer de bedhaken op de pomp niet aan een bed zijn bevestigd, kunnen deze een gevaar voor kleine kinderen vormen. Bewaar de pomp op een veilige plaats. • Gebruik uitsluitend de door ArjoHuntleigh aangegeven combinatie van pomp en matras of zitkussen. Wij kunnen een goede werking van het product niet garanderen als u een onjuiste combinatie van pomp en matras of zitkussen gebruikt. - Page 238 Beleid en auteursrecht m.b.t. het design ® en ™ zijn handelsmerken van de ArjoHuntleigh Groep. Wij voeren een beleid van continue ontwikkeling en behouden ons daarom het recht voor ontwerpen en specificaties zonder vooraankondiging te wijzigen. Het is zonder de toestemming van ArjoHuntleigh niet toegestaan de inhoud van deze publicatie geheel of gedeeltelijk te kopiëren.
-
Page 239: Inleiding
Als u problemen ondervindt bij het instellen of gebruik van de Nimbus 4- en Nimbus Professional-systemen, kunt u contact opnemen met uw ArjoHuntleigh- verkoopkantoor. Contactgegevens vindt u achteraan in deze gebruiksaanwijzing. -
Page 240: Nimbus-Pomp
In geval van een hartstilstand kan het matras snel worden leeggelaten dankzij de CPR (Cardio-Pulmonaire Resuscitatie)-eenheid waardoor cardio-pulmonaire resuscitatieprocedures kunnen worden uitgevoerd. Een volledige technische beschrijving van de Nimbus 4- en Nimbus Professional-systemen is te vinden in de onderhoudshandleiding, onderdeelnummer SER0007, verkrijgbaar bij ArjoHuntleigh. -
Page 241: Nimbus 4-Matras
Bedieningstoetsen matras CPR en vervoer CPR-knop Transportknop NORMAAL FAST DEFLATE NORMAL TRANSPORT TRANSPORT Slangenset Aansluitstuk Slangenset pomp Deze bedieningselementen gelden voor zowel de Nimbus 4-matrassen als de Nimbus Professional-matrassen en bevinden zich aan het voeteneinde van het matras, tegenover de ontluchtingsventielen. -
Page 242: Nimbus Professional-Matras
Nimbus Professional-matras 5 Heelguard-cellen Schouderondersteuning (4e) cel (wisselend, geen ontluchtingsventiel) 3 dijcellen CPR/Vervoer- regeling 8 romp 3 Hoofdsectie-cellen Cellen (wisselende druk) VOETEN- EINDE HOOFD- EINDE 19 ontluchtingsventielen Handgreep Bevestigingsband Sleephandgreep Afneembare hoes Snoergeleider GESLOTEN OPEN... -
Page 243: Klinische Toepassingen
De Nimbus 4- en Nimbus Professional-matrassen zijn bedoeld voor cliënten tot maximaal 250 kg (550 lb). Contra-indicaties Gebruik de Nimbus 4- en Nimbus Professional-systemen niet voor cliënten met instabiele fracturen aan de ruggengraat. Voorzorgsmaatregelen Als cliënten andere instabiele fracturen hebben of... -
Page 244: Installatie
3. Installatie De Nimbus 4- en Nimbus Professional-systemen zijn aan de hand van de volgende aanwijzingen zeer eenvoudig te installeren. Zie Paragraaf 4, Pagina 10 “Bedieningsknoppen, alarmen en indicatielampjes” voor een uitgebreide beschrijving van de bedieningsknoppen en indicatielampjes op de pomp. -
Page 245: De Pomp Installeren
6. Zorg ervoor dat de CPR-bediening gesloten is, en in die positie vergrendeld en dat de Transportknop op NORMAAL staat. NORMAAL FAST DEFLATE NORMAL TRANSPORT TRANSPORT CPR-knop Transportknop De pomp installeren 1. Zorg ervoor dat als de pomp aan het einde van het bed moet worden gehangen de bedbeugel stevig aan de pomp is bevestigd. -
Page 246: Het Alarm Voor Stroomuitval Testen
3. Leid de stroomkabel langs het matras en bevestig de flap rond de kabel met behulp van de drukknopjes. Drukknopje Kabel beheer Flap Het alarm voor Het alarm voor stroomuitval wordt gevoed via een interne oplaadbare batterij. De duur van het alarm is afhankelijk stroomuitval testen van het oplaadniveau van de batterij;... -
Page 247: De Slangenset Aansluiten
Als het alarm voor stroomuitval na deze test niet werkt, en een servicemonteur is ingeschakeld kan de pomp in gebruik blijven, maar er dient regelmatig gecontroleerd te worden of de stroom is ingeschakeld. Alle andere alarmfuncties blijven normaal werken. De slangenset Aansluiten van de slangenset op het matras en de pomp: 1. -
Page 248: Bedieningsknoppen, Alarmen En Indicatielampjes
4. Bedieningsknoppen, alarmen en indicatielampjes Aan/uit- Alarm dempen Alarm- Hoge druk- Lage druk- knop & indicatielampje indicatielampje indicatielampje indicatielampje Bedrijfsmodus- Wacht- Onderhouds- Comfort- indicatielampje indicatielampje indicatielampje regelknop Bedieningstoets Statische stand Stroomuitval- Pompstoring- & indicatielampje indicatielampje indicatielampje Regelknoppen pomp Het voorpaneel van de pomp heeft de volgende knoppen: Aan/Stand-by-knop Druk op de knop Aan/Stand-by om de pomp weer in de Aan-stand te zetten. -
Page 249: Indicatielampjes Pomp
De Nimbus 4- en Nimbus Professional-systemen bieden Comfortregelknop automatische compensatie voor de gewichtsverdeling en positie van de cliënt, waardoor de drukverlichtende werking van het matras wordt geoptimaliseerd. Ten behoeve van het comfort van de cliënt kan de druk van de matrascellen echter handmatig worden ingesteld door middel van de Comfort Draaiknop. - Page 250 3 seconden ingedrukt te houden (zie “Alarm Mute” op pagina 10). De Alarmdriehoek wordt weergeven met een of meer van de volgende indicatielampjes: • Lage druk (zie “Lage druk” op pagina 11). • Hoge druk (zie “Hoge druk” op pagina 11). •...
-
Page 251: Bediening
PLAATS DE CLIËNT NIET OP HET MATRAS VOORDAT DEZE VOLLEDIG IS OPGEBLAZEN EN DE NORMALE BEDRIJFSDRUK IS BEREIKT. Het systeem Voordat u het Nimbus 4- of Nimbus Professional-systeem gaat gebruiken, moet u ervoor zorgen dat dit correct is installeren geïnstalleerd overeenkomstig Paragraaf 3, Pagina 6 “Installatie”. -
Page 252: Ontluchtingsventielen Matras
• Als de netvoeding naar de pomp volledig moet worden onderbroken, moet u de stekker uit het stopcontact halen. Ontluchtings- Op de Nimbus 4- en Nimbus Professional-matrassen maken de ontluchtingsventielen aan de zijkant van het matras het ventielen matras mogelijk om afzonderlijke cellen te laten leeglopen: 1. -
Page 253: Richtlijnen Voor Het Selecteren Van De Te Openen Ontluchtingsventielen
Cellen Cellen Cellen Schouderondersteuningscel Richtlijnen voor het Houd u aan de volgende richtlijnen wanneer u wilt bepalen welke ontluchtingsventielen van de Nimbus 4- en Nimbus selecteren van Professional-matrassen geopend moeten worden. de te openen 1. Voor permanente drukopheffing/drukverlichting: ontluchtings- • Selecteer niet meer dan een cel direct onder het... -
Page 254: Het Matras Leeg Laten Lopen
Transportknop Dit zet het matras in de Transport-stand waarin het matras wordt afgesloten en de druk van het ondersteuningsopper- vlakte gelijkmatig wordt verdeeld. De pomp en/of de slangenset kunnen dan worden verwijderd. In deze mode ondersteunt het matras de cliënt tot 12 uur. Het inschakelen van de Transport-stand: 1. -
Page 255: Cpr-Knop
CPR-knop BELANGRIJK IN GEVAL VAN HARTSTILSTAND. In geval van hartstilstand en toepassing van reanimatie: De CPR te activeren 1. Til de rode CPR-hendel aan het voeteneinde van het matras omhoog. FAST DEFLATE NORMAL TRANSPORT 2. Draai de hendel tegen de klok in. FAST DEFLATE NORMAL TRANSPORT... -
Page 256: Nimbus Professional-Matras: Gebruiksaanwijzing Voor Het Positioneren Van De Cli
6. Nimbus Professional-matras: gebruiksaanwijzing voor het positioneren van de cliënt Met de Nimbus Professional-matras kan de cliënt in zowel rugligging als buikligging worden geplaatst. WAARSCHUWING Een volledige assessment van de cliënt ten aanzien van verpleging in buikligging is essentieel voordat aan de procedure wordt begonnen. -
Page 257: Algemeen
Algemeen Zowel in rugligging als buikligging moeten cliënten zodanig op het matras worden gelegd dat de schouders zich op een lijn met cel (4e) bevinden die de schouders ondersteunt. Voor een optimaal gebruik van het systeem is het van belang dat cliënten op de juiste wijze op het matras worden gelegd. -
Page 258: Buikligging - Niet Voor Thuiszorgomgeving
Buikligging – niet voor thuiszorgomgeving • Verpleging in buikligging wordt gewoonlijk voorgeschreven als noodtherapie voor cliënten met acute respiratieproblemen of voor de behandeling van extensief letsel aan de rug, zoals decubituszweren of brandwonden. • De beslissing om een buikligging te gebruiken moet door de clinicus worden genomen die verantwoordelijk is voor de verzorging van de cliënt. -
Page 259: Reiniging En Desinfectie
Bij twijfel moet u contact opnemen met uw plaatselijke specialist op het gebied van infectiebeheersing. De Nimbus 4- en Nimbus Professional-systemen moeten bij het wisselen van cliënten routinematig en tijdens gebruik regelmatig worden ontsmet; dit is een standaardwerkpraktijk voor alle herbruikbare medische hulpmiddelen. - Page 260 Zorg ervoor dat het apparaat volledig droog is voordat het wordt opgeborgen. Als een alternatief ontsmettingsmiddel is geselecteerd uit de grote variëteit die beschikbaar is, raden wij aan dat de geschiktheid voor gebruik van het middel door de leverancier ervan wordt bevestigd. NIET WRINGEN/MANGELEN, GEEN AUTOCLAAF OF FENOLHOUDENDE OPLOSSINGEN GEBRUIKEN.
-
Page 261: Nimbus 4- En Nimbus Professional-Systemen
ArjoHuntleigh stelt voor reparatie van de apparatuur desgewenst onderhoudshandboeken, onderdelenlijsten en overige noodzakelijke informatie beschikbaar voor gekwalificeerde ArjoHuntleigh-medewerkers. ArjoHuntleigh adviseert om de Nimbus 4- en Nimbus Serviceperiode Professional-systemen na een continue bedrijfstijd van 12 maanden te laten nakijken door een door ArjoHuntleigh gecertificeerde technische dienst. -
Page 262: Serienummerlabels
Serienummerlabels Pomp Het serienummerlabel bevindt zich aan de achterzijde van de behuizing van de pomp. Matras Het serienummerlabel bevindt zich aan de aan de bovenzijde van de CPR/Transport-knop. Vermeld deze serienummers bij het aanvragen van onderhoud. -
Page 263: Problemen Verhelpen
9. Problemen verhelpen De volgende tabel helpt u bij het verhelpen van problemen die zich kunnen voordoen bij de Nimbus 4- en Nimbus Professional-systemen. Zie Paragraaf 4, Pagina 10 “Bedieningsknoppen, alarmen en indicatielampjes” voor een uitgebreide beschrijving van de alarmsignalen en indicatielampjes op de pomp. - Page 264 1. Pompstoring. 1. Gebruik de pomp niet. Neem contact op met Knipperende ArjoHuntleigh. 1. De pomp heeft een 1. Neem contact op met ArjoHuntleigh. servicebeurt nodig. Matrascellen worden niet 1. Ontluchtingsventielen zijn 1.
-
Page 265: Technische Specificatie
10. Technische specificatie POMP Model: Nimbus Onderdeelnummer 649020 (649STD): Nederlands 649014 (649STD): Euro Voedingsvoltage: 230 V Voedingsfrequentie: 50 Hz Ingangsvermogen: 35 VA Maat: 508 x 220 x 100 mm (20 x 8,7 x 4 in) Gewicht: 5,7 kg (12,5 lb) Materiaal behuizing: ABS plastic Zekeringenwaarde:... - Page 266 POMPSYMBOLEN De bediener moet dit document lezen (Gebruiksaanwijzing) Niet met huisvuil Type BF voor gebruik. meegeven Opmerking: dit symbool is blauw op het productlabel. With respect to electric shock, fire and mechanical hazards only in accordance with CAN/CSA-C22.2 No. Serienummer Ref.: Modelnummer 60601.1 (2008).
- Page 267 SPECIFICATIE MATRAS Nimbus 4 Standaardbreedte Smalle breedte Standaardhoes 650001DAR 650201DAR 650001ADV 650201ADV ® Advantex -hoes 650001EVE 650201EVE ® eVENT stoffen hoes Lengte 2085 mm (82”) Hoogte: 215 mm (8,5”) Breedte: 890 mm (35”) 800 mm (31,5”) Gewicht: 11,5 kg (25,3 lb)
- Page 268 SPECIFICATIE HOES Standaardhoes ® ® Eigenschap Advantex eVENT -stof ® (Dartex) Afneembare hoes Dampdoorlatend 12 keer hoger Luchtdoorlatend Lage wrijving 18% minder 20% minder Waterresistent/ afstotend Infectie Materiaalcoating heeft Materiaalcoating heeft INERT WEEFSEL regeling antimicrobiële werking antimicrobiële werking ondersteunt geen bacteriële groei Brandvertrager BS 7175: 0,1 &...
- Page 269 Richtsnoer en verklaring fabrikant – elektromagnetische emissies De pomp is bedoeld voor gebruik in de hieronder aangegeven elektromagnetisch omgeving. De klant of gebruiker van de pomp dient ervoor te zorgen dat de pomp wordt gebruikt in een dergelijke omgeving. Emissietest Naleving Elektromagnetische omgeving –...
- Page 270 Richtsnoer en verklaring fabrikant – elektromagnetische immuniteit De pomp is bedoeld voor gebruik in de hieronder aangegeven elektromagnetisch omgeving. De klant of gebruiker van de pomp dient ervoor te zorgen dat de pomp wordt gebruikt in een dergelijke omgeving. Immuniteits- IEC 60601 Naleving- Elektromagnetische omgeving –...
- Page 271 Polska...
- Page 273 Przeznaczenie ........... . . 1 Urządzenia Nimbus 4 i Nimbus Professional ......1 Pompa Nimbus .
- Page 274 Pompa Nimbus ........... . 23 Materace Nimbus 4 i Nimbus Professional ....... 23 Etykiety z numerem seryjnym .
-
Page 275: Bezpieczeństwo - Informacje Ogólne
Pompę należy przechowywać w bezpiecznym miejscu. • Pompa i materac lub siedzisko mogą być używane razem wyłącznie w sposób wskazany przez ArjoHuntleigh. W przypadku zastosowania nieprawidłowej kombinacji pompy i materaca lub siedziska nie ma gwarancji prawidłowego funkcjonowania produktu. - Page 276 śmierci. Zasady projektowania i prawo autorskie ® i ™ są znakami towarowymi należącymi do grupy firm ArjoHuntleigh. W związku z tym, że nasza polityka zakłada nieustanne podnoszenie jakości, zastrzegamy sobie prawo do modyfikacji projektów urządzeń...
-
Page 277: Wstęp
Instrukcji należy użyć przy wprowadzaniu wstępnych ustawień urządzenia oraz stosować jako pomoc w trakcie codziennej eksploatacji i konserwacji. W razie problemów z konfiguracją lub obsługą urządzeń Nimbus 4 i Nimbus Professional prosimy o kontakt z lokalnym punktem sprzedaży ArjoHuntleigh wymienionym w końcowej części instrukcji. Przeznaczenie Produkt jest przeznaczony do zapobiegania powstawaniu i leczenia odleżyn u pacjentów do 250 kg (550 lb). -
Page 278: Pompa Nimbus
W przypadku zatrzymania akcji serca można natychmiast spuścić powietrze z materaców przy użyciu funkcji CPR (resuscytacja krążeniowo-oddechowa), aby umożliwić wykonanie resuscytacji krążeniowej. Pełny techniczny opis urządzeń Nimbus 4 Nimbus Professional znajduje się w instrukcji serwisowej dostępnej w ArjoHuntleigh, nr części SER0007. -
Page 279: Regulacja Materaca Do Resuscytacji I Transportu
Regulacja materaca do resuscytacji i transportu Regulacja do Regulacja do resuscytacji transportu NORMALNIE FAST DEFLATE NORMAL TRANSPORT TRANSPORT Złącze do rurek Zestaw rurek pompy Te regulatory są wspólne dla materaców Nimbus 4 i Nimbus Professional i znajdują się w nogach łóżka, naprzeciwko wentyli. -
Page 280: Materac Nimbus Professional
Materac Nimbus Professional 5 kieszeni na odcinku pięt i łydek Kieszeń podpierająca barki (nr 4) (ciśnienie zmienne, bez wentyla) 3 kieszenie na Regulacja odcinku ud do resuscytacji/transportu 8 komór na 3 kieszenie podgłówkowe odcinku tułowia (ciśnienie zmienne) NOGI WEZGŁOWIE 19 wentyli Uchwyt do przenoszenia zestawu Pasek mocujący... -
Page 281: Zastosowania Kliniczne
Materace Nimbus 4 i Nimbus Professional są przeznaczone dla pacjentów o masie ciała do 250 kg (550 lb). Przeciwwskazania Urządzeń Nimbus 4 i Nimbus Professional nie można stosować dla pacjentów z niestabilnym złamaniem kręgosłupa. Ostrzeżenia Pacjenci z niestabilnymi złamaniami innego rodzaju lub znajdujący się... -
Page 282: Montaż
3. Montaż Urządzenia Nimbus 4 i Nimbus Professional są proste w montażu — wystarczy wykonać następujące czynności. Pełny opis regulatorów i wskaźników pompy, zob. Część 4, Strona 10 “Regulatory, alarmy i wskaźniki”. Przygotowanie Wyjąć urządzenie z opakowania. Kompletny zestaw zawiera następujące elementy:... -
Page 283: Instalacja Pompy
6. Sprawdź, czy regulator resuscytacji jest zablokowany, a regulator transportu ustawiony w pozycji NORMALNIE. NORMALNIE FAST DEFLATE NORMAL TRANSPORT TRANSPORT Regulacja do resuscytacji Regulacja do transportu Instalacja pompy 1. Jeśli pompa ma zwisać z krawędzi łóżka, warto sprawdzić, czy ma dobrze przymocowany uchwyt, a następnie przymocować... -
Page 284: Próba Alarmu Braku Zasilania
3. Poprowadź przewód zasilający wzdłuż boku materaca, mocując go wewnątrz klapki przy użyciu zatrzasków. Zatrzask Klapka do prowadzenia przewodów Próba alarmu braku Alarm braku zasilania jest zasilany wewnętrzną baterią przeznaczoną do wielokrotnego ładowania. Długość alarmu zasilania będzie zależeć od poziomu naładowania baterii, który z kolei zależy od jej wieku i stanu. -
Page 285: Podłączenie Zestawu Rurek
wystarczy regularnie sprawdzać wskaźnik zasilania. Pozostałe alarmy działają prawidłowo. Podłączenie zestawu Aby podłączyć zestaw rurek do materaca i pompy: 1. Dopasuj spód złącza zestawu rurek do spodu gniazda rurek pompy/materaca. 2. Pociągnij górną część złącza zestawu rurek do góry i ponad gniazdem pompy/materaca, aż wtyczka zestawu rurek zaskoczy. -
Page 286: Regulatory, Alarmy I Wskaźniki
4. Regulatory, alarmy i wskaźniki Tryb pracy/czuwania Regulacja dźwięku Alarm Wysokie ciśnienie Niskie ciśnienie Przycisk i wskaźnik Wskaźnik Wskaźnik Wskaźnik Tryb pracy Serwis Komfort do Oczekiwanie Wskaźnik Wskaźnik resuscytacji/ Wskaźnik transportu Regulacja trybu statycznego Awaria zasilania Awaria pompy i wskaźnik Wskaźnik Wskaźnik Regulatory pompy... -
Page 287: Wskaźniki Pompy
Regulacja komfortu Urządzenia Nimbus 4 i Nimbus Professional automatycznie równoważą rozkład wagi ciała pacjenta i jego ułożenie, aby zapewnić optymalne właściwości przeciwuciskowe materaca. W trosce o wygodę pacjenta ciśnienie w kieszeniach materaca można również regulować ręcznie pokrętłem regulacji komfortu. Obróć pokrętło kontroli komfortu w kierunku zgodnym z ruchem wskazówek zegara, aby zwiększyć... - Page 288 Wyświetlany jest trójkąt ostrzegawczy razem z następującymi wskaźnikami: • Niskie ciśnienie (zob. „Niskie ciśnienie” na stronie 11). • Wysokie ciśnienie (zob. „Wysokie ciśnienie” na stronie 11). • Awaria pompy (zob. „Awaria pompy” na stronie 12). • Zasilanie (zob. „Awaria zasilania” na stronie 12). ...
-
Page 289: Obsługa
NIE KŁAŚĆ PACJENTA NA MATERACU DO CZASU, AŻ BĘDZIE CAŁKOWICIE NADMUCHANY I OSIĄGNIE NORMALNE CIŚNIENIE ROBOCZE. Instalacja urządzenia Przed użyciem urządzenia Nimbus 4 lub Nimbus Professional należy sprawdzić, czy urządzenie zostało poprawnie zainstalowane, zob. Część 3, Strona 6 “Montaż”. • Urządzenie do resuscytacji, dołączone do materaca, jest zamknięte i zablokowane. -
Page 290: Tryby Pracy
Wentyle ułożone wzdłuż boków materaca Nimbus 4 i Nimbus Professional umożliwiają spuszczanie powietrza z poszczególnych kieszeni: 1. Materac Nimbus 4 ma tylko pięć wentyli na odcinku pięt i łydek u dołu materaca. 2. Materac Nimbus Professional: • Trzy kieszenie w części podgłówkowej mają... -
Page 291: Wskazówki Ułatwiające Wybór Wentyli Materaca, Które Zostaną Otwarte
Kieszeń podpierająca barki Wskazówki Wybierając, które wentyle materaca Nimbus 4 i Nimbus Professional zostaną otwarte, należy postępować zgodnie ułatwiające wybór z poniższymi wskazówkami: wentyli materaca, 1. W celu trwałego odciążenia / zwolnienia ucisku: które zostaną... -
Page 292: Regulacja Do Transportu
Nie spuszczaj powietrza z pozostałych kieszeni w poszczególnych częściach, ponieważ mogłoby to pozbawić pacjenta podparcia w czasie normalnego cyklu zmian ciśnienia. Regulacja do Pozwala przygotować materac do transportu: materac uszczelniony, równe ciśnienie na całej powierzchni transportu podparcia, pompa i (lub) zestaw rurek odłączone. W tym trybie materac zapewni pacjentowi podparcie do 12 godzin. -
Page 293: Regulacja Do Resuscytacji
Regulacja do resuscytacji WAŻNE W RAZIE ZATRZYMANIA AKCJI SERCA. W razie zatrzymania akcji serca pacjenta i konieczności przeprowadzenia resuscytacji krążeniowo-oddechowej: Aby włączyć 1. Podnieś uchwyt do resuscytacji umieszczony na dole materaca. urządzenie do resuscytacji FAST DEFLATE NORMAL TRANSPORT 2. Obróć go w lewo. FAST DEFLATE NORMAL TRANSPORT... -
Page 294: Materac Nimbus Professional: Instrukcja Zmiany Ułożenia Pacjenta
6. Materac Nimbus Professional: Instrukcja zmiany ułożenia pacjenta Materac Nimbus Professional umożliwia ułożenie pacjenta w pozycji na wznak lub na brzuchu. OSTRZEŻENIE Przed przystąpieniem do tej czynności należy dokładnie ocenić, czy stan pacjenta pozwala na pielęgnację w pozycji na brzuchu. W razie potrzeby korzystać... -
Page 295: Informacje Ogólne
Informacje ogólne Zarówno w pozycji na wznak, jak i na brzuchu, pacjent powinien być ułożony na materacu w taki sposób, aby barki spoczywały na kieszeni podpierającej barki (nr 4). Poprawne ułożenie pacjenta na materacu ma duże znaczenie dla optymalnego użycia urządzenia. -
Page 296: Pozycja Na Brzuchu (Twarzą W Dół) - Nie Stosować W Warunkach Domowych
Pozycja na brzuchu (twarzą w dół) — nie stosować w warunkach domowych • Pielęgnacja w pozycji na brzuchu jest zwykle zalecana jako terapia ratunkowa dla pacjentów z ostrymi zaburzeniami oddechowymi lub przy leczeniu rozległych ran na grzbiecie, takich jak odleżyny lub poparzenia. •... -
Page 297: Odkażanie
W razie wątpliwości zasięgnąć rady miejscowego specjalisty ds. kontroli zakażeń. Urządzenia Nimbus 4 i Nimbus Professional należy regularnie odkażać, zarówno przed przekazaniem nowemu pacjentowi, jak i podczas użycia — podobnie jak w przypadku wszystkich urządzeń... - Page 298 Przed odstawieniem do przechowania upewnić się, że produkt jest suchy. W przypadku wyboru innego środka dezynfekującego z szerokiej gamy dostępnych produktów zaleca się, by przed użyciem potwierdzić jego przydatność do stosowania na urządzeniu u dostawcy produktów chemicznych. NIE WYŻYMAĆ/MAGLOWAĆ, NIE STERYLIZOWAĆ W AUTOKLAWIE ANI NIE UŻYWAĆ...
-
Page 299: Urządzenia Nimbus 4 I Nimbus Professional
ArjoHuntleigh do naprawy urządzenia. Okres serwisowy Firma ArjoHuntleigh zaleca, aby urządzenia Nimbus 4 i Nimbus Professional były serwisowane po 12 miesiącach ciągłej eksploatacji przez autoryzowany serwis ArjoHuntleigh. Termin serwisu jest sygnalizowany świecącym się... -
Page 300: Etykiety Z Numerem Seryjnym
Etykiety z numerem seryjnym Pompa Etykieta z numerem seryjnym pompy znajduje się z tyłu obudowy pompy. Materac Etykieta z numerem seryjnym znajduje się na górze regulacji do resuscytacji/transportu. Zamawiając serwis, należy podać te numery seryjne. -
Page 301: Rozwiązywanie Problemów
9. Rozwiązywanie problemów W poniższej tabeli przedstawiono instrukcje rozwiązywania problemów w przypadku awarii urządzeń Nimbus 4 i Nimbus Professional. Pełny opis alarmów i wskaźników pompy, zob. Część 4, Strona 10 “Regulatory, alarmy i wskaźniki”. Wskaźnik Prawdopodobna Rozwiązanie przyczyna Na panelu sterowania pompy 1. - Page 302 1. Awaria pompy 1. Nie używaj pompy. Wezwij pracownika serwisu. Migające 1. Wymagany jest serwis 1. Wezwij pracownika serwisu. pompy. Nie można nadmuchać kieszeni 1. Wentyle są otwarte. 1. Zamknij wentyle. materaca. 2. Regulacja do resuscytacji nie 2. Zamknij regulację do jest całkowicie zamknięta.
-
Page 303: Dane Techniczne
10. Dane techniczne POMPA Model: Nimbus Nr części 649014 (649STD) Napięcie zasilania: 230 V Częstotliwość zasilania: 50 Hz Moc wejściowa: 35 VA Wymiary: 508 x 220 x 100 mm (20" x 8,7" x 4") Masa: 5,7 kg (12,5 lb) Materiał obudowy: Tworzywo ABS Prąd znamionowy bezpiecznika 5A wg normy BS1362 (DOTYCZY TYLKO WIELKIEJ BRYTANII) - Page 304 SYMBOLE POMPY Przed użyciem należy się zapoznać z tym dokumentem Nie wyrzucać z odpadami (instrukcją obsługi). Typ BF domowymi Uwaga: Na etykiecie urządzenia ten symbol jest niebieski. With respect to electric shock, fire and mechanical hazards only in accordance with CAN/ Numer seryjny Ref: Numer modelu...
- Page 305 DANE TECHNICZNE MATERACA Nimbus 4 Szerokość standardowa Szerokość wąska Pokrowiec standardowy 650001DAR 650201DAR 650001ADV 650201ADV ® Pokrowiec Advantex Pokrowiec z tkaniny 650001EVE 650201EVE ® eVENT Długość 2085 mm (82”) Wysokość: 215 mm (8,5”) Szerokość: 890 mm (35”) 800 mm (31,5”) Masa: 11,5 kg (25,3 lb.)
- Page 306 SPECYFIKACJA POKROWCA Pokrowiec standardowy Właściwość/element ® ®(a) Advantex Tkanina eVENT ® wyposażenia (Dartex) Pokrowiec wymienny Przepuszczalność 12 razy większa wilgoci Przepuszczalność powietrza Niskie tarcie 18% niższe 20% niższe Wodoodporność / impregnacja Kontrola Powłoka materiałowa ma Powłoka materiałowa ma MATERIAŁ OBOJĘTNY infekcji właściwości właściwości...
- Page 307 Wskazówki i oświadczenie producenta — emisja zakłóceń elektromagnetycznych Pompa jest przeznaczona do użycia w określonym poniżej środowisku elektromagnetycznym. Zapewnienie użytkowania urządzenia w takich warunkach należy do klienta lub użytkownika. Test emisji Zgodność Środowisko elektromagnetyczne — wskazówki Emisja częstotliwości Grupa 1 Pompa wykorzystuje energię...
- Page 308 Informacja i deklaracja producenta – odporność elektromagnetyczna Pompa jest przeznaczona do użycia w określonym poniżej środowisku elektromagnetycznym. Zapewnienie użytkowania urządzenia w takich warunkach należy do klienta lub użytkownika. Test Poziom testu IEC Poziom Środowisko elektromagnetyczne — odporności 60601 zgodności wskazówki Przenośny i komórkowy sprzęt komunikacyjny wykorzystujący częstotliwości radiowe, włączając w to kable, nie powinien być...
- Page 309 Português...
- Page 311 Utilização a que se destina ..........1 Acerca do Nimbus 4 e do Nimbus Professional ......1 Bomba Nimbus .
- Page 312 Manutenção de Rotina ..........23 Sistemas Nimbus 4 e Nimbus Professional ......23 Bomba Nimbus .
-
Page 313: Segurança Geral
• Apenas deve ser usada a combinação de bomba e colchão ou assento indicadas pela ArjoHuntleigh. Não é possível garantir o funcionamento correcto do produto se forem usadas combinações incorrectas de bomba e colchão ou assento. - Page 314 Política de Concepção e Direitos de Autor ® e ™ são marcas registadas que pertencem ao grupo de empresas da ArjoHuntleigh. Dado que temos uma política de aperfeiçoamento contínuo, reservamos o direito de modificar as concepções sem aviso prévio.
-
Page 315: Introdução
(consulte “Indicações” na página 5). Acerca do Nimbus 4 O Nimbus 4 e o Nimbus Professional são Sistemas de Flutuação Dinâmica muito eficazes, que proporcionam uma e do Nimbus terapia ativa na prevenção, no tratamento e na gestão das Professional úlceras por pressão. -
Page 316: Bomba Nimbus
CPR (Ressuscitação Cardiopulmonar), os colchões podem ser rapidamente esvaziados para permitir a execução dos procedimentos de ressuscitação cardíaca. A descrição técnica completa dos sistemas Nimbus 4 e Nimbus Professional pode ser consultada no Manual de Manutenção, peça n.º SER0007, disponível através da ArjoHuntleigh. -
Page 317: Controlos Do Colchão Para Ressuscitação Cardiopulmonar (Cpr) E Transporte
NORMAL TRANSPORTE TRANSPORT Conjunto de Tub Conector Conjunto de Tubos para a Bomba Estes controlos são comuns aos dois colchões, Nimbus 4 e Nimbus Professional, e estão localizados aos pés do colchão, no lado oposto às Válvulas de Ventilação. -
Page 318: Colchão Nimbus Professional
Colchão Nimbus Professional 5 Células Heelguard Célula de Apoio do Ombro (4ª) 3 Células Alternante, sem Válvula de Ventilação) das Coxas CPR/Transporte Controlo 8 Células Células da Secção da Cabeça Células (Pressão Alternante) LADO DOS PÉS LADO DA CABEÇA 19 Válvulas de Ventilação Pega de Transporte Correia de Fixação Pega de Arraste... -
Page 319: Aplicações Clínicas
2. Aplicações Clínicas Indicações Os sistemas Nimbus 4 e Nimbus Professional são indicados para a prevenção e/ou a gestão de todas as categorias úlceras por pressão, quando combinados com um protocolo individual e completo para as úlceras por pressão: por exemplo, reposicionamento, apoio nutritivo, cuidados de pele. -
Page 320: Instalação
3. Instalação Usando as orientações que se seguem, os sistemas Nimbus 4 e Nimbus Professional são muito fáceis de instalar. Consulte a Secção 4, Página 10 “Controlos, Alarmes e Indicadores” para obter uma descrição pormenorizada dos controlos e indicadores da bomba. -
Page 321: Instalação Da Bomba
6. Certifique-se de que o controlo de CPR está fechado e trancado na posição e que o controlo de Transporte está na posição NORMAL. NORMAL FAST DEFLATE NORMAL TRANSPORTE TRANSPORT Controlo para a Ressuscitação Controlo para Cardiopulmonar (CPR) o Transporte Instalação da Bomba 1. -
Page 322: Testar O Alarme De Falha De Corrente
3. Passe o cabo eléctrico ao longo do colchão, fechando a passadeira à volta do cabo, utilizando os botões de mola. Botão de mola Passagem do Cabo Eléctrico do Cabo Testar o Alarme de O Alarme de Falha de Corrente é alimentado por uma pilha recarregável interna. -
Page 323: Acoplar O Ligador Dos Tubos
Se o Alarme de Falha de Corrente não funcionar depois deste teste e já tiver chamado o técnico, a bomba pode continuar a ser utilizada com verificações regulares ao estado da alimentação eléctrica. Todos os outros alarmes continuarão a funcionar normalmente. Acoplar o Ligador Para acoplar o ligador dos tubos ao colchão e à... -
Page 324: Controlos, Alarmes E Indicadores
4. Controlos, Alarmes e Indicadores Botão Ligado/ Controlo p/desactivar Indicador Indicador de Indicador de Em Espera o Som e Indicador de Alarme Pressão Alta Pressão Baixa Modo Ligado Indicador de Indicador de Conforto Indicador de Aguardar Manutenção Controlo Controlo do Modo Estático Indicador de Indicador de e Indicador... - Page 325 Controlo de Conforto Os sistemas Nimbus 4 e Nimbus Professional compensam automaticamente a distribuição de peso e a posição do paciente para otimizar o desempenho do alívio da pressão. No entanto, a pressão das células do colchão pode ser ajustada manualmente, para o conforto do paciente, através do Controlo de Conforto rotativo.
- Page 326 O símbolo triangular de Alarme é apresentado com um ou mais dos indicadores que se seguem: • Pressão Baixa (consulte “Pressão Baixa” na página 11). • Pressão Alta (consulte “Pressão Alta” na página 11). • Avaria da Bomba (consulte “Avaria da Bomba” na página 12).
-
Page 327: Indicadores Da Bomba
COMPLETAMENTE INSUFLADO E A PRESSÃO NORMAL DE FUNCIONAMENTO TER SIDO ALCANÇADA. Instalação do Antes de utilizar o sistema Nimbus 4 ou Nimbus Professional, certifique-se de que este está corretamente Sistema instalado, de acordo com a Secção 3, Página 6 “Instalação”. -
Page 328: Controlo De Conforto
Ventilação do vazamento de células individuais: Colchão 1. O colchão Nimbus 4 tem apenas cinco Válvulas de Ventilação na secção Heelguard, aos pés do colchão. 2. Colchão Nimbus Professional: • As três células da Secção da Cabeça têm Válvulas de Ventilação. -
Page 329: Linhas De Orientação Para A Seleção Da Abertura Das Válvulas De Ventilação Do Col- Chão
Linhas de Orientação As orientações que se seguem devem ser cumpridas quando seleciona a abertura das Válvulas de Ventilação nos colchões para a Seleção da Nimbus 4 e Nimbus Professional: Abertura das 1. Para vazamento/alívio da pressão permanente: Válvulas de •... -
Page 330: Controlo Para O Transporte
Controlo para o Isto coloca o colchão em modo de Transporte, no qual o colchão é selado e a superfície de apoio é pressurizada por Transporte igual. Assim, a bomba e/ou o conjunto de tubos podem ser desengatados. Neste modo, o colchão suportará o paciente até... -
Page 331: Controlo Para A Ressuscitação Cardiopulmonar (Cpr)
Controlo para a Ressuscitação Cardio- pulmonar (CPR) IMPORTANTE NO CASO DE PARAGEM CARDÍACA. Caso um doente tenha uma paragem cardíaca e seja necessá- rio administrar a Ressuscitação Cardiopulmonar (CPR): Para Activar o CPR 1. Levante o manípulo vermelho de CPR, situado aos pés do colchão. -
Page 332: Colchão Nimbus Professional: Guia Para Posicionamento Do Doente
6. Colchão Nimbus Professional: Guia para Posicionamento do Doente O colchão Nimbus Professional permite que o paciente seja colocado na posição de Decúbito Dorsal (virado para cima) ou Ventral (virado para baixo). CUIDADO Antes de iniciar o procedimento, é essencial efectuar uma avaliação completa do estado do paciente para determinar se a Enfermagem em Decúbito Ventral é... -
Page 333: Geral
Geral Quer na posição de Decúbito Dorsal quer Ventral, os pacientes devem ser posicionados no colchão de forma aos ombros ficarem alinhados com a célula de Apoio do Ombro (4ª). Para uma utilização optimizada do sistema, é importante que os pacientes sejam correctamente posicionados no colchão. - Page 334 Decúbito Ventral (virado para baixo) - Não adequado para cuidados domiciliários • A enfermagem em decúbito ventral é normalmente prescrita como uma terapia de emergência em pacientes com dificuldades respiratórias agudas ou com ferimentos extensos no dorso, como escaras de pressão ou queimaduras. •...
- Page 335 Controlo Infeccioso. De acordo com as boas práticas de utilização de todos os aparelhos médicos reutilizáveis, os sistemas Nimbus 4 e Nimbus Professional devem ser rotineiramente descontaminados entre pacientes e a intervalos regulares enquanto estão em utilização.
- Page 336 Se for escolhido um desinfetante alternativo a partir da ampla variedade disponível, recomendamos que a adequação ao uso seja confirmada com o fornecedor de produtos químicos antes da respetiva utilização. NÃO TORCER/ENRUGAR, AUTOCLAVAR OU UTILIZAR SOLUÇÕES À BASE DE FENOL. Para informações acerca da cobertura do colchão, incluindo Desinfecção Térmica as indicações de lavagem, consultar “ESPECIFICAÇÕES...
- Page 337 ArjoHuntleigh repararem o sistema. Período de Revisão A ArjoHuntleigh recomenda que os sistemas Nimbus 4 e Nimbus Professional sejam revistos por um agente autorizado da ArjoHuntleigh após 12 meses de funcionamento contínuo.
- Page 338 9. Resolução de problemas Em caso de avaria, a tabela que se segue fornece indicações para a resolução de problemas nos sistemas Nimbus 4 e Nimbus Professional. Consulte a Secção 4, Página 10 “Controlos, Alarmes e Indicadores” para obter uma descrição pormenorizada dos alarmes e indicadores da bomba.
- Page 339 1. Alarme de Falha de 1. Volte a ligar a alimentação elétrica ou prima o botão A piscar Corrente. Ligado/Em Espera e A bomba detectou uma falha mantenha-o premido durante de corrente. 3 segundos para colocar a bomba Em Espera. Se a falha de corrente for prolongada, mude para o modo de Transporte e...
- Page 340 10. Especificações Técnicas BOMBA Modelo: Nimbus Número do componente 649014 (649STD) Voltagem da Alimentação: 230 V Frequência de Alimentação: 50 Hz Entrada de Energia: 35 VA Tamanho: 508 x 220 x 100 mm (20 x 8,7 x 4 pol.) Peso: 5,7 kg (12,5 lb) Material da Caixa: Plástico ABS...
- Page 341 SÍMBOLOS DA BOMBA O operador deve ler este documento (Instruções Não eliminar com o lixo de Utilização) antes da Tipo BF doméstico utilização. Nota: Este símbolo é azul na etiqueta do produto. With respect to electric shock, fire and mechanical hazards only Número de in accordance with CAN/ Ref:...
- Page 342 ESPECIFICAÇÕES DO COLCHÃO Nimbus 4 Largura Normal Estreito Cobertura Normal 650001DAR 650201DAR 650001ADV 650201ADV ® Cobertura Advantex Cobertura de Tecido 650001EVE 650201EVE ® eVENT Comprimento 2085 mm (82”) Altura: 215 mm (8,5”) Largura: 890 mm (35”) 800 mm (31,5”) Peso: 11,5 kg (25,3 lb.)
- Page 343 ESPECIFICAÇÕES DA COBERTURA Cobertura Normal ® ®(a) Características Advantex Tecido eVENT ® (Dartex) Cobertura Amovível Permeável ao Vapor 12 vezes mais de Humidade Permeável ao Ar Não Não Atrito Reduzido Menos 18% Menos 20% Resistente/Repelente à água Infecção O material do O material do MATERIAL INERTE Controlo...
- Page 344 Orientações e declaração do fabricante - emissões eletromagnéticas A bomba destina-se a ser utilizada no ambiente eletromagnético especificado abaixo. O cliente ou o utilizador da bomba deve certificar-se de que esta é utilizada neste tipo de ambiente. Teste de emissões Conformidade Ambiente eletromagnético - instruções Emissões de RF...
- Page 345 Orientações e declaração do fabricante - imunidade eletromagnética A bomba destina-se a ser utilizada no ambiente eletromagnético especificado abaixo. O cliente ou o utilizador da bomba deve certificar-se de que esta é utilizada neste tipo de ambiente. Teste de Nível de teste IEC Nível de Ambiente eletromagnético - instruções imunidade...
- Page 347 Free: +1 800 072 040 Fax: +33 (0) 3 20 28 13 14 Fax: + 61 89337 9077 E-mail: info.france@arjohuntleigh.com POLSKA ArjoHuntleigh Polska Sp. z o.o. BELGIQUE / BELGIË HONG KONG ul. Ks Piotra Wawrzyniaka 2 ArjoHuntleigh NV/SA ArjoHuntleigh (Hong Kong) Ltd...
- Page 348 We operate under the three brands of ArjoHuntleigh, GETINGE and MAQUET. ArjoHuntleigh focuses on patient mobility and wound management solutions. GETINGE provides solutions for infection control within healthcare and contamination prevention within life sciences.
Need help?
Do you have a question about the NIMBUS 4 and is the answer not in the manual?
Questions and answers