
Related Manuals for SPX W+


Summary of Contents for SPX W+
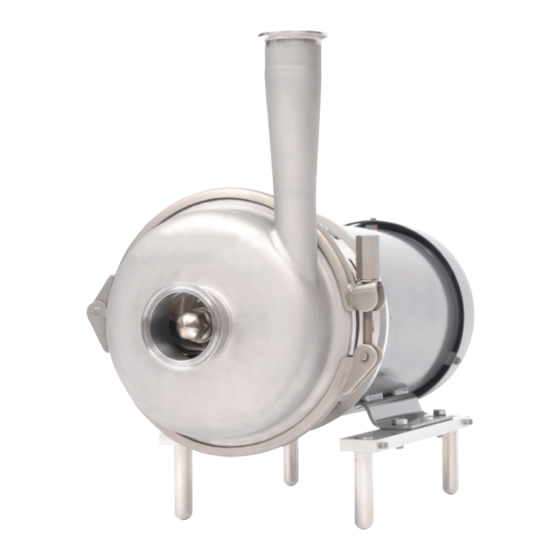
- Page 1 Instruction Manual W+ Pump Read and understand this manual prior to operating or servicing this product.
-
Page 3: Table Of Contents
453342 ISS 07.2010 Contents: Section Page Description Introduction Warnings Important Warnings Sectional Drawing Introduction to the W+ W+ range W+ pump features Identifying the pump model Installation of the pump Positioning Lining up the pipe system Power supply Water supply for water-flushed shaft seal Connecting steam or steam condensate for aseptic use Before start-up Checking the pump body for foreign material... -
Page 5: Introduction
453343 ISS S 07.2010 Introduction Congratulations, you are the owner of a quality built item from SPX Flow Technology. This pump was manufactured by the skilled personnel of a company which has served the needs of the dairy, food and process industries for more than 100 years. - Page 6 We bring this potentially serious problem to your attention in order to safeguard your best interest and those of your employees. If you have any questions, please feel free to call your local SPX Flow Technology contact.
-
Page 7: Warnings
Policy regarding availability of service parts SPX Flow Technology will attempt to remain in a position to supply replaceable parts during the normal life of any item of SPX Flow Technology equipment. This is contingent upon availability of tools, material and facilities of our own as well as of our suppliers. - Page 8 453343 ISS S 07.2010 Warnings Rotating Parts Hazard Routine cleaning and maintenance procedures require pump disassembly. The pump contains close fitting parts which rotate during operation. Should the pump start unexpectedly while disassembled, severe injury could result. To minimize the risk of this hazard: 1.
- Page 9 453343 ISS S 07.2010 Warnings High Pressure Hazard Fluids processed by a pump are under pressure. This creates a hazard to personnel working in the area should a leak occur. Leaking high pressure fluid may cause injury by startling personnel or from actual contact with the leaking fluid.
-
Page 10: Important Warnings
453343 ISS S 07.2010 Important Warnings The following important cautions describe ways to avoid incorrect operating procedures which will cause serious damage to the pump. Cavitation Cavitation is a condition within the pump which results in extreme hydraulic forces which can create a risk of severe damage to pump components. Cavitation makes a characteristic "rattling"... - Page 11 453343 ISS S 07.2010 Important Warnings Motor Overload Depending on the impeller diameter and motor horsepower, there is a risk the pump motor will overload if operated with a fully opened, unrestricted discharge. To minimize this risk: 1. Before operating the pump, review performance curve and application giving consideration to motor horsepower and impeller diameter versus expected discharge flow rate and pressure.
-
Page 12: Sectional Drawing
453344 ISS S 07.2010 Sectional Drawing Section 1 Section 2 Shaft size ø25 and ø35 Shaft size ø25 and ø35... - Page 13 453344 ISS S 07.2010 Sectional Drawing Pump housing Cap nut O-ring Impeller O-ring Back plate Locating pin Clamp ring O-ring Shaft Extension frame Section 1 Single seal for shaft size ø25 and ø35 Section 2 Double seal with liquid/steam flushing for shaft size ø25 and ø35 5.1: Seal housing 5.3:...
-
Page 14: Introduction To The W
(Wa+ pumps) and pumps with inducer (Wi+ pumps). Check the pump's nameplate to make sure that you have one of the above versions. The WHP+ and W+140/50 pump versions are described in a special manual which will come with the pump. The WK+ (pedestal pump version) is described in a supple mentary manual. -
Page 15: Installation Of The Pump
453345 ISS S 07.2010 2. Installation of the Pump 2.1 Positioning The pump must be positioned so that the suction pipe is as short as possible and there is a sloping gradient towards the suction port. Keep the number of valves, bends and tee-pieces on the suction side to an absolute minimum. -
Page 16: Connecting Steam Or Steam Condensate For Aseptic Use
453345 ISS S 07.2010 2. Installation of the Pump 2.5 Connecting steam or steam condensate for aseptic use Shaft seals for aseptic use are supplied with stainless steel connectors (18” NPT x 1/4” Tube). The connection for steam or steam condensate with a static double seal in the pump body is supplied with stainless steel fittings (1/8”... -
Page 17: Putting The Pump Into Service
453345 ISS S 07.2010 4. Putting the Pump into Service Check the following before starting the pump: - that the shaft guard has been fitted properly - that there is free access for liquid - that the valve on the discharge side is closed The valve on the discharge side (if fitted) is closed during start-up to reduce motor starting current, but should be opened again as soon as the pump has been started. - Page 18 453345 ISS S 07.2010 5. Maintenance Remove the O-ring (item 5.5) from the rotary seal face. Clean the stator and rotary seal face locations, if necessary with air or water. 9a. In the case of water-flushed/aseptic shaft seals, the back plate must be removed to dismantle the rear shaft seal.
-
Page 19: Replacement Of Motor
453345 ISS S 07.2010 5. Maintenance 16. Fit the impeller (item 4). Remember to use the proper tightening torque: M10: 33 ft-lb (45 Nm) M14: 52 ft-lb (70 Nm) M20: 148 ft-lb (200 Nm) 17. Check that the locating pin (item 8), where fitted, in the top of the back plate mates with the detent in the pump body and carefully, to avoid damaging the O-ring, press the pump body (item 1a) in over the O-ring (item 6) and fasten with the clamp ring (item 9a) or body... -
Page 20: Recommended Spare Parts
453345 ISS S 07.2010 5. Maintenance 13. Place the plastic star against the impeller (fig. 7). Fig. 7: Place plastic star against impeller Impeller 14. Fit the pump body (item 1a) with the clamp ring (item 9a). Plastic star 15. Push the shaft (item 11) forward until the impeller (pos 4) is Pump body touching the plastic star (fig. -
Page 21: Technical Data
6.1 Maximum permissible outlet pressure The maximum pump outlet pressures specified below must not be exceeded (applies to water at 68°F/20°C). Max. 260 psig (18 bar): W+10/8, W+22/20, W+30/80, W+35/55, W+35/35, W+110/130 Max. 200 psig (14 bar): W+25/210, W+30/120, W+50/8, W+55/35,... - Page 24 For more information about our worldwide locations, approvals, certifi cations, and local representatives, please visit www.spxft.com. SPX reserves the right to incorporate our latest design and material changes without notice or obligation. Design features, materials of construction and dimensional data, as described in this bulletin, are provided for your information only and should not be relied upon unless confi...
Need help?
Do you have a question about the W+ and is the answer not in the manual?
Questions and answers