Advertisement
ASSEMBLY INSTRUCTIONS
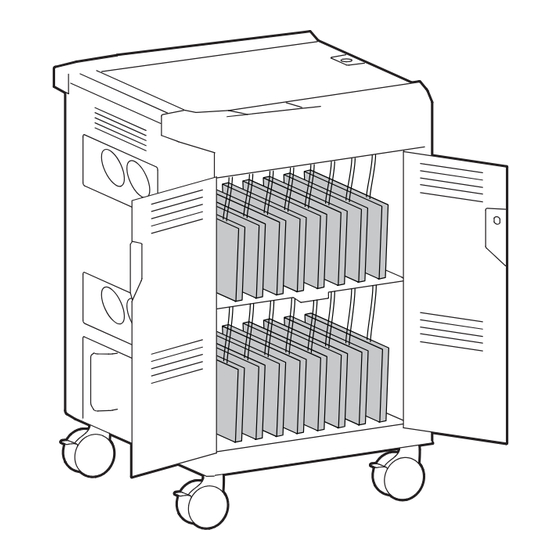
The Ergotron PowerShuttle™ Laptop Charging Cart transports, secures, and charges any
combination of 20 laptop or tablet PCs.
FCC Compliance Statement
This Cart has been tested and found to comply with the limits for a Class A digital device, pursuant to Part 15 of the FCC rules. These limits are designed to provide reason-
able protection against harmful interference when the equipment is operated in a commercial environment. This equipment generates, uses, and can radiate radio fre-
quency energy and, if not installed and used according to the instructions, may cause harmful interference to radio communications. Operation of this device in a residential
area is likely to cause harmful interference in which case the user will be required to correct the interference at their own expense.
Operation of this device is subject to the following two conditions: (1) this device may not cause harmful interference, and (2) this device must accept any interference
received, including interference that may cause undesired operation.
FCC Caution: Changes or Modifi cations not expressly approved by Ergotron could void the user's authority to operate the equipment.
This Class A digital apparatus complies with Canadian ICES-003. / Cet appareil numérique de la classe A est conforme à la norme NMB-003 du Canada.
888-24-280-W-00 rev. A • 03/14
1 of 13
Advertisement
Table of Contents

Related Manuals for Ergotron PowerShuttle


Summary of Contents for Ergotron PowerShuttle
-
Page 1: Assembly Instructions
FCC Caution: Changes or Modifi cations not expressly approved by Ergotron could void the user’s authority to operate the equipment. This Class A digital apparatus complies with Canadian ICES-003. / Cet appareil numérique de la classe A est conforme à la norme NMB-003 du Canada. -
Page 2: Table Of Contents
Table of Contents Features ....................3 Hazard Symbols Review ..............4 Components ..................4 Set-up ..................... 5 LED ......................10 Cleaning & Maintenance ..............11 Equipment Electrical Safety ............11 Safe Use Recommendations ............12 Specifi cations ..................13 Warranty and Service ................ 13 888-24-280-W-00 rev. -
Page 3: Features
8. Lockable rear access door 9. Two country specifi c outlet strips (20 total devices) 10. AC adapter storage shelves with velcro strap 11. PowerShuttle 12. Available storage space 13. 12V DC continuous operating fan 888-24-280-W-00 rev. A • 03/14... -
Page 4: Hazard Symbols Review
Hazard Symbols Review These symbols alert users of a safety condition that demands attention. All Charging and Managed Cart users should be able to recognize and understand the signifi cance of the following Safety Hazards if encountered on the Cart or within Cart documentation. Children who are not able to recognize and respond appropriately to Safety Alerts should not use the Cart without adult supervision! Symbol Signal Word... -
Page 5: Set-Up
Set-up Use same key to open and remove rear panel. Install laptop/tablet AC adapters: Start with the bottom 10 adapters: route the female ends of the adapter power cords into each of the ten cutouts in the middle of the back panel. - Page 6 Connect the power cables to the laptops/tablets on the bottom shelf. a. Starting with the bottom shelf only, insert the laptops so that the power connector is located toward the front of the cart. Drop each AC adapter cable through the appropriate hole in the shelf.
- Page 7 Insert the laptop/tablet dividers in the top compartment. Push each divider down into place, then slide forward until it locks in place. The dividers will hold power cables in their channels. NOTE: there are three divider styles, one for the right end of the compartment, one for the left end and seven for the middle area.
- Page 8 Returning to the back of the cart: install the remaining AC adapters for the top shelf. Route female ends through cut outs. Route the cables around the tabs in the cable tray leaving enough slack for cables to be plugged into laptop/tablet when removed from slot. Drop each AC adapter cable through the appropriate hole in the shelf.
- Page 9 Install the remaining AC adapters onto their storage shelves. Pull any remaining cord slack from front into back. Plug male ends into cart power receptacles and bundle and wrap cables as instructed in Step 5. Close front compartment Insert the laptops/tablets doors and lock.
-
Page 10: Led
Connect power cords to facility power. Refer to the chart below for the meaning of LED signals. Indicator Signal Meaning Blue light, solid Power “ON” Scanning Notebook and Ethernet/WAP Blue light, fast fl ashing power draw (30 seconds per bank) Notebook bank charging (10 minutes Blue light, slow fl ashing per bank), identifi es which banks are... -
Page 11: Cleaning & Maintenance
Electrical: Do not use fl ammable cleaners on Cart surfaces. CAUTION: Adjustment, Service, Replacement - DO NOT attempt to adjust, service or replace any part of the Cart unless directed to do so through Ergotron-approved documentation (i.e. installation instructions). Only Ergotron, Inc. or an Ergotron-certifi ed entity may adjust, service or replace Cart components. If any component on the Cart is missing or damaged, the Cart must not be used. -
Page 12: Safe Use Recommendations
(2.9 kg) possible injury. CAUTION: Changes or Modifi cations not expressly approved by Do not push Ergotron could void the user’s authority to operate the equipment. side of cart. Do not pull cart. Product of China 826-138-01 888-24-280-W-00 rev. -
Page 13: Specifi Cations
≤6.5 lb (2.9 kg) Environmental Temperature range: Cooling/ventilation Operating 0° to 30°C (32° to 86°F) One 12V AC fan in PowerShuttle top compartment Storage -40° to 60°C (-40° to 140°F) Relative humidity (maximum): Operating 10%–90% (non condensing) Storage 5%–95% (non condensing)
Need help?
Do you have a question about the PowerShuttle and is the answer not in the manual?
Questions and answers