Table of Contents
Advertisement
Advertisement
Table of Contents

Related Manuals for KEENCUT OVAL 6


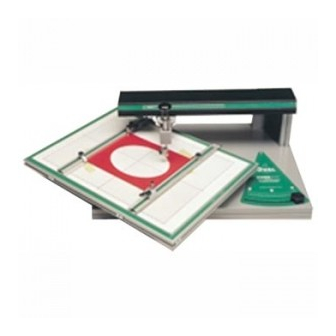
Summary of Contents for KEENCUT OVAL 6
- Page 1 OVAL 6 INSTRUCTION MANUAL Keencut – the world’s finest cutting machines...
-
Page 2: Table Of Contents
Maintenance & Blades Introduction Thank you for choosing a Keencut Oval 6. Every effort has been made to bring you a superbly built product with the promise of many years of good service. Please read these instructions carefully in order to obtain maximum benefit from your machine and remember, in case of difficulties ask your distributor or Keencut Limited for assistance. -
Page 3: Unpacking Your Machine
Unpacking your Machine Main Base M8 washer x 2 Beam M6 thumbscrew x 4 Turntable M6 washer x 4 Cutting Head M6 screws x 2 LH clamp bar M6 spring washer x 2 RH clamp bar Blades Bevel/vertical blade holder 5mm Hexagon wrench M8 thumbscrew x 2 Plastic feet x 6... -
Page 4: Assembly
Assembly Fitting the Beam and Cutting Head NOTE: Do not carry the machine by the Turntable or Beam. Attach the Beam to the hinge of the Main Base using the two M6 screws and spring washers. Ensure precise alignment of the Beam by positioning it carefully on the small ledge of the hinge. -
Page 5: Fitting The Turntable
NOTE: The optional MAXI Turntable attaches in the same way as the standard Turntable. When cutting on the Oval 6 the blade tip runs on a sheet of glass this is not supplied with the machine. Cutting on to a glass surface is the most safe, reliable and economical method. -
Page 6: Fitting The Clamp Bars
Assembly Fitting the Clamp Bars Find the two Sliding Nuts in one of the long edges of the Table. Fit the two Clampbars to the Turntable using the M8 thumb screws and washers. -
Page 7: Operation
Operation Setting the size of the Oval/Circle There are two scales that require setting dependant upon the size of the oval/circle: The width of the oval (or diameter of the circle) is set on the beam scale by squeezing the release lever and cutter head support then sliding the cutter until the red line in the window indicates the required dimension. -
Page 8: Setting The Blade Depth And Using The Clamps
Operation Setting blade depth and using the clamps Setting the blade depth The blade should be set deep enough to penetrate the board being cut with a clearance of approximately 1.5mm [ ”] under the blade holder (thickness of regular matboard). a. -
Page 9: Cutting An Oval/Circle
Operation Cutting an Oval/Circle Bevel cutting The following refers to cutting a 14 x 10 oval centrally in a matboard 20 x 16 (cms. or ins.) Lift and park the beam to give easy access to the turntable. Set the two clamp bars to 10 either side of the zero point on the table edge scale. -
Page 10: Calibrating The Scales
Operation Calibrating the scales Small variations in cut dimensions can occur dependant upon the size and proportion of the oval, in most cases the error is insignificant but care needs to be used when cutting ovals below 10 cm [4”]. If in doubt check before cutting and correct as follows:- Metric Imperial For this example say an 8cm wide by 11cm long... -
Page 11: The Centre Pointer
Operation The Centre Pointer Using the centre pointer The centre pointer indicates the centre of rotation of the turntable to enable the matboard to be placed without using the scales on the turntable. It is used for precise positioning when cutting multiple openings. The centre pointer should be pivoted into its park position under the beam when not in use. -
Page 12: Cutting Small Ovals And Circles
Operation Cutting small Ovals and Circles SM03 NOTE: When cutting very small ovals/circles better results can be achieved using the more acute SM03 blade. Small ovals Distortions will occur when making very small diameter circles or ovals owing to the self alignment action of the tools. Note the position of the cutting head against the lazy oval scale. - Page 13 5.1 The Craftsman Toolset (optional) Embossing The ‘Craftsman Toolset’ includes two types of embossing tool:- A half round edged wheel that produces a narrow embossed line A flat edged wheel that produces a wide embossed line A half round edged wheel A flat edged wheel Cut an oval/circle of the desired size.
-
Page 14: The Craftsman Toolset (Optional)
5.2 The Craftsman Toolset (optional) Penlining Penlining Embossing an indent before drawing the penline provides a smooth surface for the ink, prevents bleeding and ensures a reliable alignment for the pen. For most lines the thin half round embossed indent is appropriate, for a very thick pen use the broad flat embossing tool. -
Page 15: Cutting V-Grooves
5.3 The Craftsman Toolset (optional) Cutting V-grooves NOTE: The blade tips of the V-groove tool are set one behind the other but when viewed from the cutting direction the tips should appear to meet exactly without overlap. The V-groove width and depth may be changed by adjusting the nylon screw in the centre of the blade holder. -
Page 16: Cutting Glass Ovals/Circles
5.4 The Craftsman Toolset (optional) Cutting glass Ovals/Circles 1. Clamp a piece of matboard on the turntable that is larger than the glass blank do not lay the glass on it yet. 2. Set the width and differential scales to the desired size of oval and fit the glass scoring tool to the cutting head. -
Page 17: Cutting Glass Ovals/Circles (Cont'd)
5.5 The Craftsman Toolset (optional) Cutting glass Ovals/Circles Rotate the turntable one complete revolution only. Stop when the score line joins up. Turn the glass over on the matboard or a felt surface. Press around the score line with the thumb or tap it to make the cut. -
Page 18: Looking After Your Oval 6
Replacement blades and glass cutting wheels are available through your Keencut distributor or from Keencut direct. Cleaning and Lubrication Clean the Oval 6 frequently with a damp or dry cloth and keep it covered when not in use. Dirt can spoil your work Do not use solvents, they can harm the paint finish, remove silicone lubrication and effect plastic components.
Need help?
Do you have a question about the OVAL 6 and is the answer not in the manual?
Questions and answers