Table of Contents
Advertisement
Before attempting to operate this product, you should thoroughly read and fully
understand the contents of this manual.
The administrators of the PT-R4300 should not let anyone who does not
understand the contents of this manual operate or inspect the PT-R4300.
For operators (including
the machine administrator)
USERS MANUAL
Thermal Plate Recorder
No. 100027907V00
PT-R4300
Ver. 1.0-
Advertisement
Table of Contents

Summary of Contents for DAINIPPON SCREEN PLATE RITE 4300
- Page 1 No. 100027907V00 For operators (including the machine administrator) USERS MANUAL Thermal Plate Recorder PT-R4300 Ver. 1.0- Before attempting to operate this product, you should thoroughly read and fully understand the contents of this manual. The administrators of the PT-R4300 should not let anyone who does not understand the contents of this manual operate or inspect the PT-R4300.
- Page 2 After reading this manual, keep it nearby the PT-R4300 for immediate reference whenever necessary. As a safeguard in case the manual is lost, write down or make a copy of the Dainippon Screen sales offices and agencies listed at the end of this manual.
-
Page 3: Warning Labels
Safety information in the USERS MANUAL In the text of this manual, we draw your attention to and supply safety information about matters accompanying operations of the PT-R4300 which are potentially dangerous to you or the people around you. Be sure to read this information well and act in accordance with it. -
Page 4: Compliance With Fcc Rules
Therefore, be aware that it is possible that a portion of this manual may not match exactly with your product. • Dainippon Screen takes absolutely no responsibility for results that occur if the product is used for purposes or applications other than the original ones intended for the PT-R4300 or other than those expressed in a contract made beforehand. -
Page 5: About This Manual
Introduction Thank you for purchasing the Dainippon Screen Thermal Plate Recorder PlateRite 4300. The PT-R4300 is intended for the purpose of exposing image data on a printing plate by laser. We are confident that the PT-R4300 will provide you with many years of high quality recording performance. -
Page 6: Related Manuals
Related manuals In addition to this manual, Dainippon Screen also provides the following manual, which is related to the PT-R. Please use in conjunction with the PT-R. Document name Parts Code Contents SA-L4300 100027911V00 A detailed explanation of the Single... -
Page 7: Table Of Contents
Contents Ensuring Safety 1. Safety Rules ......................... 1-2 2. Precautions Regarding the Electrical System..............1-4 2.1 Power Supply ......................1-4 2.2 Precautions Regarding the Handling of Power Cables and Hoses ......1-4 2.3 Performing an Emergency Stop .................. 1-5 2.4 Handling Power Failures ..................... 1-5 3. - Page 8 8.3 Set Next Plate while Exposure is in Progress ............. 4-16 9. Dot Gain Calibration ......................4-20 User Menu 1. Offline Mode ........................5-2 1.1 Offline Mode Hierarchy ....................5-2 1.2 Steps for Setting the Media Type ................5-4 1.3 Steps for Setting the Printing Machine Information ........... 5-5 1.4 User Maintenance Mode Hierarchy ................
- Page 9 16. Canceling Calibration ......................5-50 17. Calibration Information ....................... 5-52 18. Sending an Interrupt Command to the Host Computer ............5-56 19. Turning the Buzzer during Plate Eject On and Off ............. 5-57 20. Viewing Information ......................5-58 21. Setting the Punch Name ...................... 5-60 Maintenance 1.
-
Page 11: Ensuring Safety
Chapter 1 Ensuring Safety This chapter gives information necessary for safe use of the PT-R. -
Page 12: Safety Rules
21 CFR Chapter 1 Subchapter J, and Class 1 Laser Product based on JIS C6802. Please refer to the list at the end of this manual to consult a Dainippon Screen office or agent regarding problems related to laser operation or regarding laser replacement. - Page 13 Chapter 1 Ensuring Safety CAUTION Before attaching the plate to the PT-R, verify that no paper or pieces of packaging remain on either side of the plate. The thermal laser may cause paper or packaging to ignite and start a fire in the PT-R.
-
Page 14: Precautions Regarding The Electrical System
OFF, and contact your nearest Dainippon Screen sales office or agent. Do not step on or forcefully pull a power cable or hose. -
Page 15: Performing An Emergency Stop
Chapter 1 Ensuring Safety 2.3 Performing an Emergency Stop If trouble occurs during operation and you want to stop the PT-R immediately, press the forced drum stop switch. When the forced drum stop switch is pressed, it takes approximately 4 seconds for the drum to stop rotating. -
Page 16: General Precautions
Slippers or sandals Fig. 1-3 Operator clothing If you discover any abnormality or problem in the PT-R, contact your nearest Dainippon Screen office or agency to have appropriate measures taken. Even in cases where the PT-R is capable of continuous operation, correct unattended operation is not guaranteed. -
Page 17: Warning And Caution Labels
• If a warning or caution label has peeled off or is dirty, replace it with a new label. Failure to replace the label is extremely dangerous. If you need a new warning or caution label, consult your nearest Dainippon Screen NOTE sales office or agent listed at the end of this manual. - Page 18 PT-R4300 USERS MANUAL INVISIBLE UNSICHTBAREN RAYONNEMENT LASER LASER RADIATION LASER-STRAHLUNG NON VISIBLE AVOID EYE OR SKIN BESTRAHLUNG VON AUGE EXPOSITION DANGEREUSE EXPOSURE TO DIRECT ODER HAUT DURCH DE L'CEIL OU DE LA PEAU OR SCATTERED RADIATION DIREKTE ODER STREUSTRAHLUNG AU RAYONNEMENT DIRECT VERMEIDEN ! OU DIFFUS 32W MAX CW 808nm...
- Page 19 Chapter 1 Ensuring Safety Label indicating that laser radiation exists inside. Label indicating the existence of a alaser aperture where the label is attached. Label indicating high leakage current. Label indicating that the product meets the requirements for CE marking. Label indicating that This device complies with Part 15 of the FCC Rules.
- Page 20 PT-R4300 USERS MANUAL Label indicating that this is a Class 1 Laser Product Label indicating the power M O D E L specifications. MFG.No. D A T E V O L T S A M P S . P H A S E MADE IN JAPAN Z830B-L8 Label indicating that the product...
-
Page 21: Interlock System
Chapter 1 Ensuring Safety 6. Interlock System The PT-R is equipped with an interlock system to protect the operator. When any of the doors is opened, the interlock switch placed at the door activates and cuts off the laser light. WARNING With the exception of times when maintenance personnel are performing maintenance procedures, do not disengage the... - Page 22 PT-R4300 USERS MANUAL Soft switch for Interlock switch for drum slowdown left side cover Interlock switch for rear cover Fig. 1-9 Interlock switches (rear) Interlock switch for right side cover Fig. 1-10 Interlock switches (right side) 1-12...
-
Page 23: Disposal Of The Pt-R
If you have any questions regarding disposal, please consult the place of purchase or contact the Dainippon Screen sales office or agency listed at the end of this manual. 1-13... -
Page 24: Enviromental Protection
In March of 2001, Dainippon Screen and all its manufacturing facilities, including affiliate companies, acquired ISO14001 Environment Management System certification. Further to this, Dainippon Screen has and still continues to do its best for environmental preservation by promoting manufacturing practices that do not harm on the environment. - Page 25 Chapter 1 Ensuring Safety Handling of dangerous and toxic waste The following procedures are required, in addition to the usual handling procedure by disposal companies, for waste such as that which is explosive, poisonous, contagious, or otherwise potentially dangerous to human health or to the environment.
- Page 26 PT-R4300 USERS MANUAL End of Chapter 1 1-16...
-
Page 27: Installing And Moving The Pt-R
Chapter 2 Installing and Moving the PT-R This chapter explains precautions for installing and moving the PT-R. -
Page 28: Installation Location
Dainippon Screen extends no guarantees regarding safety in such a case. If you need to have the PT-R moved or installed, consult one of the Dainippon Screen offices or agency listed at the end of this manual. -
Page 29: Space Required For Installation
Chapter 2 Installing and Moving the PT-R 3. Space Required for Installation To allow escape in the event of danger and enable access for maintenance, leave at least 800 mm open around the periphery of the PT-R. Keep the floor free of obstacles and keep a path to the building side power switch clear. -
Page 30: Load Tolerance Of Building
PT-R4300 USERS MANUAL 4. Load Tolerance of Building The site of installation requires a floor load tolerance of at least 4010 N/m (410 kgf/ ) . To prevent the formation of cracks in the floor, it is recommended that the adjuster foot of the PT-R rest on the framework of the building;... -
Page 31: Names Of Each Part
Chapter 3 Names of Each Part This chapter gives an overview of the PT-R and explains its configuration. -
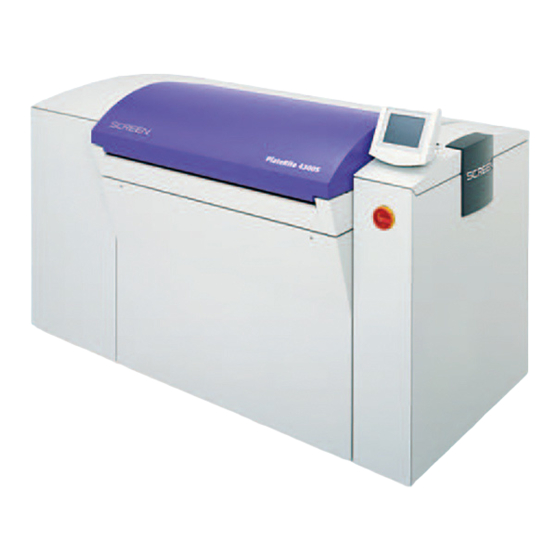
Page 32: The Pt-R4300
PT-R4300 USERS MANUAL 1. The PT-R4300 Positioning labels (for small-sized plate) Operation door Transport roller Ejection table Power switch Insertion table Positioning labels (for large-sized plate) Fig. 3-1 Plate transport section Operation door Operation panel Front cover External cover filter Fig. - Page 33 Chapter 3 Names of Each Part Punch debris outlet Exposed plate from Forced drum stop switch the rear outlet Peripheral device connectors Vacuum hose connector Attachment hooks for punch debris receptacle Rear cover Power cable connector Fig. 3-3 Full view (rear and right sides) External cover External fan Rectangular holes...
- Page 34 PT-R4300 USERS MANUAL F-PIF connector (25-pin) F-PIF connector (50-pin) Service connector (RS-232C, 9-pin) Blower control connector (14-pin) Developer unit Power supply connector connector for blower (25-pin) Fig. 3-5 Peripheral device connectors...
- Page 35 Chapter 3 Names of Each Part Drum Optics unit Front cover attachment hooks Fig. 3-6 Inside of front cover Cleaning roller Punching unit (standard) Rear cover attachment hook Drum Rear cover attachment hook Fig. 3-7 Inside of rear cover...
-
Page 36: Accessories
PT-R4300 USERS MANUAL 2. Accessories The following accessories are provided with the PT-R. 2.1 Standard Accessories Blower unit Blower unit Vacuum hose (2 m) Communication cable (UL2464 AWG24 × 7P, 2 m) × 3 wires 300V) for blower unit which plugs into PT-R Power cable (0.75 mm (2 m) Blower unit... -
Page 37: Optional Accessories
2.2 Optional Accessories The following items are available as options. For more information or to place an order, contact one of the Dainippon Screen offices or agents listed at the end of this manual. Punch unit (types: Dainippon Screen, Bacher, Protocol, Komori, others) - Page 38 PT-R4300 USERS MANUAL End of Chapter 3...
-
Page 39: Basic Operation
Chapter 4 Basic Operation This chapter explains the basic procedures for operating the PT-R. -
Page 40: Overview
PT-R4300 USERS MANUAL 1. Overview The general procedure for operating the PT-R is explained here. For detailed operating procedures, refer to the appropriate section. 1. Verify that all doors and covers are closed. Turn on the power switch of the peripheral devices first, and then the power switch of the PT-R. - Page 41 Chapter 4 Basic Operation 4. Based on the plate to be used, set the proper parameters in “Printing machine information settings,” “Plate settings,” and “Media type settings.” For more details, refer to Chapter 5 “User Menu.” 5. Press [ONLINE] to return to the online screen. 6.
-
Page 42: Connecting The Cables
PT-R4300 USERS MANUAL 2. Connecting the Cables Verify that all power to the system and host computer is off, and then make sure that the cables are connected correctly. The following diagram shows the cables connected to the PT-R and where they are connected. The cables to be connected are the two PIF cables. -
Page 43: Turning The Power On And Off
Chapter 4 Basic Operation 3. Turning the Power On and Off Faulty operation and errors are caused by turning off and then CAUTION immediately on the PT-R power switch. Wait about five seconds before turning the power switch back on. Fig. -
Page 44: Turning Off The Power
PT-R4300 USERS MANUAL 3.2 Turning Off the Power 1. Shut down the host computer and turn off the power. 2. Rotate the power switch lever of the PT-R in the counter-clockwise direction until it is horizontal. (Power has been cut when you can see “ OFF” in the power switch window.) 3. -
Page 45: Messages During Initialization
If a check sum error occurs during the memory check, the following screen NOTE will appear. If this screen appears, software must be downloaded from the personal computer. Please contact a Dainippon Screen sales office or agent. Memory check error Please download control program. -
Page 46: Overview Of Information Settings
PT-R4300 USERS MANUAL 5. Overview of Information Settings The information settings in the PT-R have the following configuration. This information must be set before a plate can be loaded in the PT-R and exposed. Printing machine information Plate information Media type information Comments Comments Comments... -
Page 47: Difference In Procedures Depending On Host Computer And Possible Output Image Sizes
Chapter 4 Basic Operation 6. Difference in Procedures Depending on Host Computer and Possible Output Image Sizes When you output an image from the host computer to the PT-R, the related plate is selected by choosing the registered printing machine information. There are two procedures (type A and type B) for selecting registered printing machine information from the host computer, as follows. - Page 48 PT-R4300 USERS MANUAL Type B Edit (paginate) and output the image by compliant plate size. Printing machine information that agrees with the output image size is selected (the printing machine information that has a plate size that differs the least within ±1.0 mm from the image size output from the host computer).
-
Page 49: Effective Exposure Area
Chapter 4 Basic Operation 7. Effective Exposure Area When loading the plate onto the drum of the PT-R, clamps are used to secure the leading and trailing edges. For this reason, the parts of the plate that are hidden by or in the shadow of the clamps cannot be exposed by the laser. -
Page 50: Online Mode
PT-R4300 USERS MANUAL 8. Online Mode The PT-R automatically enters online mode when initialization ends after turning on the power. Online mode is used to receive an image from the host computer and expose it onto the plate. Ready 1: Plate 1 OFFLINE OPEN Fig. - Page 51 Chapter 4 Basic Operation 2. Press [OK]. The buzzer sound will stop and the operation door open screen will appear. Press [Open] button to open door. No. 1 A4-8page Set plate listed above. CANCEL OPEN Fig. 4-18 Operation door open screen 3.
- Page 52 PT-R4300 USERS MANUAL 5. Align the plate on the gradations corresponding to the size of the plate on the left and right positioning labels, and push the plate in until it touches the shutter inside the transport. NOTE Since the edges for thin plates (thickness: 0.15, 0.20, etc.) can be easily bent, do not push them in with your hands, but place them on the roller and turn the knob until the plate hits the shutter at the back.
-
Page 53: Load Plate Before An Exposure Instruction Comes From The Host Computer
Chapter 4 Basic Operation 8.2 Load Plate before an Exposure Instruction Comes from the Host Computer The plate can also be loaded before sending an exposure command from the host computer. However, if the loaded plate differs from the plate specifications (size, punch, etc.) in the exposure command from the host computer, it will be necessary to unload the plate and then reload following the procedure in “8.1 Load Plate Using an Exposure Instruction from the Host Computer.”... -
Page 54: Set Next Plate While Exposure Is In Progress
PT-R4300 USERS MANUAL 8.3 Set Next Plate while Exposure is in Progress Insertion and ejection of plates is performed on the PT-R using separate insertion and ejection tables, and thus it is possible to set the next plate on the insertion table while exposure is in progress. - Page 55 Chapter 4 Basic Operation When exposure of the previously set plate ends and the plate is ejected, the next plate loads. When loading is completed, the operation door lock releases, the plate removal request screen is displayed, and the buzzer beeps repeatedly. Remove exposed plate and close door.
- Page 56 PT-R4300 USERS MANUAL Precautions when the STOP button is pressed to stop the PT-R during exposure Action when STOP button is pressed Action after STOP button is pressed Exposure continues from stopped plate Image output from RIP is exposed. according to command to continue from the (Display shows "Recording".) RIP.
- Page 57 Chapter 4 Basic Operation Stopping the buzzer when ejecting plates You can set the machine so that the buzzer will not sound when plates are ejected. For more details, refer to Chapter 5 “19. Turning the Buzzer during Plate Eject On and Off.”...
-
Page 58: Dot Gain Calibration
PT-R4300 USERS MANUAL 9. Dot Gain Calibration Dot gain (dot thickening) occurs as a result of printing and causes the colors of the exposed material to become darker than the colors specified in the PostScript file. For example, a 50% PostScript tint on the screen increases from 65% to 80% when printed on paper due to a dot gain of 15% to 30%. - Page 59 Chapter 4 Basic Operation The general methods for calibrating a plate exposed with the PT-R are as follows: • Perform linear calibration on the plate. The dot area on the plate will not be exactly equal to that of the PostScript file. When creating a linear plate with the PT-R, perform linear calibration (note that there are some media types that do not require linear calibration).
- Page 60 PT-R4300 USERS MANUAL End of Chapter 4 4-22...
-
Page 61: User Menu
Chapter 5 User Menu This chapter explains the procedures for setting PT-R parameters. -
Page 62: Offline Mode
PT-R4300 USERS MANUAL 1. Offline Mode 1.1 Offline Mode Hierarchy Press [OFFLINE] in the online screen to display the offline screen. To return to the online screen, press [ONLINE]. The hierarchy of the offline mode is as shown below. Press [ESC] at any screen to return the previous screen. NOTE Set information in the following order: Media type, Plate, Printing machine information, and Exposure conditions. - Page 63 Chapter 5 User Menu Cont. from previous page Processor/ Manual Select [Set exposure mode] and press [OK]. Set the exposure conditions, including mirror, positive/negative, and layout settings. For more details, refer to “5. Setting the Exposure Conditions.” Select [User maintenance] and press [OK]. ETC.
-
Page 64: Steps For Setting The Media Type
PT-R4300 USERS MANUAL 1.2 Steps for Setting the Media Type Select [Set media type] and then press [OK] in the offline screen. The media type screen appears. To return to the offline screen, press [ESC]. The flow for setting the media type is shown below. Press [ESC] at any screen to return the previous screen. -
Page 65: Steps For Setting The Printing Machine Information
Chapter 5 User Menu 1.3 Steps for Setting the Printing Machine Information Select [Set printing machine] and then press [OK] in the offline screen. The printing machine setting screen appears. To return to the offline screen, press [ESC]. The flow for setting the printing machine information is shown below. Press [ESC] at any screen to return the previous screen. -
Page 66: User Maintenance Mode Hierarchy
PT-R4300 USERS MANUAL 1.4 User Maintenance Mode Hierarchy This mode allows the user to load and eject plates, perform test exposures to determine the optimum exposure conditions for a plate, set the date and time, and select the language used in the display. Press [User maintenance] and then press [OK] in the offline screen. - Page 67 Chapter 5 User Menu Cont. from previous page Select and press [OK]. focus zoom Select this to perform a test exposure. For more details, refer to “9. Test Exposure.” Set Date/Time ETC. and press [OK]. Select Punch for cleaning Consumable Timer Select this to set other user parameters.
-
Page 68: User Settings Hierarchy
PT-R4300 USERS MANUAL 1.5 User Settings Hierarchy Use this to make various settings such as the date, time, and display language. Select and then press [OK] in the user maintenance mode screen. The user setting ETC. selection screen appears. The hierarchy of the user setting selection is as shown below. - Page 69 Chapter 5 User Menu Cont. from previous page English Japanese Select [Language] and press [OK]. Set the language used in the display. For more details, refer to “13. Selecting the Display Language.” R e s o l u t i o n 1200 2000 2400...
- Page 70 PT-R4300 USERS MANUAL Cont. from previous page Calibration period: xx h Time to next calibration: xx h Reso. Channel Pow. Cal. Warning 1200 xxch xxx% Exxxx Select [Calibration info.] and press [OK]. 2000 xxch xxx% Exxxx 2400 xxch xxx% Exxxx 4000 xxch xxx%...
-
Page 71: Setting The Media Type
Chapter 5 User Menu 2. Setting the Media Type The information for a maximum of 15 media types can be registered. The procedure for setting the information is as follows in 2.1 to 2.9. (Refer to the setting hierarchy in “1.2 Steps for Setting the Media Type.”) To save the data after you have completed the settings, press [OK] several times. -
Page 72: Entering Comments
PT-R4300 USERS MANUAL 3. Select the plate type and press [OK]. The plate thickness setting screen appears. When positive plate is exposed, the section exterior to the image will burn out. NOTE 2.2 Entering Comments Add a file name for saved data. 1. -
Page 73: Setting The Plate Thickness
If the media type information to be used is not preset in one of the types 31 NOTE to 45, follow these steps or contact a Dainippon Screen sales office or agent: • Copy a media type from 31 to 45 that has the same thickness as your media. -
Page 74: Selection Of Plate Eject Direction
PT-R4300 USERS MANUAL 1. Enter the detection distance for the plate poor contact sensor and press [ENT]. Do not change the value unless instructed to do so by a service CAUTION technician. Enter this value correctly. If an incorrect value is entered, plate displacement will not be detected accurately during high-speed drum rotation and this may result in damage to the PT-R. -
Page 75: Setting The Laser Power Value And Drum Rpm Value
Chapter 5 User Menu 2.7 Setting the Laser Power Value and Drum Rpm Value Set, for the plate, the laser power values and drum rpm values for each resolution. These keys also move [rpm] the highlighted portion. 1200 80.0 2000 81.0 2400 82.0... -
Page 76: Setting The Focus Value
PT-R4300 USERS MANUAL 2.8 Setting the Focus Value Set, for the plate, the focus value for each resolution. These keys also move [pulse] the highlighted portion. 1200 2220 2000 2300 2400 2220 Focus values 4000 2300 2438 2000 2540 2000 —... -
Page 77: Setting The Zoom Value And Absolute Precision Correction Value
Chapter 5 User Menu 2.9 Setting the Zoom Value and Absolute Precision Correction Value For each resolution of the plate, set the zoom value and the absolute precision correction value for the primary scanning direction. The absolute precision correction value is a correction of the length of the primary NOTE scanning direction. -
Page 78: Setting The Plate
PT-R4300 USERS MANUAL 3. Setting the Plate The information for a maximum of 15 media types can be registered. The procedure for setting the information is as given in 3.1 to 3.3, below. To save the data after you have completed the settings, press [OK] several times. Display the plate size setting screen (Fig. -
Page 79: Entering Comments
Chapter 5 User Menu Media Type 1 Media Type 2 Media Type 3 Media Type 4 Media Type 5 NEXT Move to the media type selection screen NEXT not currently dispalyed. Fig. 5-19 Media type selection screen For the procedure for registering media types, see “2. Setting the Media Type.” NOTE 4. -
Page 80: Setting The Plate Size
PT-R4300 USERS MANUAL 3.3 Setting the Plate Size Set the plate size. The size to be set is the total area including the print area and the leading and trailing grip settings. The maximum plate size that can be set is 830 × 660 mm, and the minimum size is NOTE 324 ×... -
Page 81: Setting The Printing Machine Information
Chapter 5 User Menu 4. Setting the Printing Machine Information Up to 15 sets of output conditions such as the media type, leading grip margin, trailing grip margin and image centering can be associated and saved as printing machine information. Up to 15 different printing machine information types can be registered. -
Page 82: Entering Comments
PT-R4300 USERS MANUAL 3. Press [Plate] in the comment/plate setting screen. The plate selection screen appears. Plate 1 Plate 2 Plate 3 Plate 4 Plate 5 NEXT Move to the plate selection screen NEXT that is not displayed. Fig. 5-25 Plate selection screen For the procedure for registering plates, see “3. -
Page 83: Setting The Grip Direction
Chapter 5 User Menu 4.3 Setting the Grip Direction Set the direction of plate gripping. Spiral/Step Grip direction Fig. 5-27 Grip direction setting screen : Select horizontal gripping (at the top and bottom) of the plate. : Select vertical gripping (at each side) of the plate. 1. -
Page 84: Setting The Image Centering Method
PT-R4300 USERS MANUAL 4.5 Setting the Image Centering Method The image centering function is used to center the image data in the center of the print area minus the leading and trailing grip margins. (The following screen illustration assumes that the grip direction has been set to horizontal gripping.) Centering Fig. -
Page 85: Setting The Image Offset
Chapter 5 User Menu 4.6 Setting the Image Offset If centering in either or both of the scanning directions was set to OFF in the procedure described in “4.5 Setting the Image Centering Method” the offset value (the image output position on the plate) for the non-centered scanning direction can be adjusted. - Page 86 PT-R4300 USERS MANUAL The following diagrams show the relation of the image centering and offset value settings to the image output position. Trailing grip Offset V Offset V Leading grip Trailing grip Leading grip Trailing grip Offset H Offset V Offset V Offset H Leading grip...
-
Page 87: Setting The Punch
Chapter 5 User Menu 4.7 Setting the Punch Set the punch type and punch for drum positioning pins. Punch Fig. 5-32 Punch setting screen 1. Press [Punch]. The punch selection screen appears. Punch 1 Punch 2 Punch 3 Punch 4 NEXT Move to the punch selection screen NEXT... -
Page 88: Fine Adjustment Of The Image Position
PT-R4300 USERS MANUAL 4.8 Fine Adjustment of the Image Position Perform fine adjustment (shifting the print area) of the image output position on the plate. These keys also move the Paper Position H highlighted portion. Shift amount in the secondary scanning (horizontal) direction Paper Position V Shift amount in the primary... -
Page 89: Setting The Exposure Conditions
Chapter 5 User Menu 5. Setting the Exposure Conditions Set the plate ejection method for output, and select mirror output, positive/negative output, and exposure conditions for the layout method. 1. Select [Set exposure mode] in the offline screen and press [OK]. The ejection method selection screen appears. - Page 90 PT-R4300 USERS MANUAL Normally is selected and the host computer outputs a positive image. The PT-R NOTE checks whether the media type is set to positive or negative and then adjusts exposure so that a positive image is output. If the image output from the host computer is a negative image, select in the exposure condition setting screen.
- Page 91 Chapter 5 User Menu Multi-output If the length of the subsequent image to be exposed is longer in the feed direction than the remaining available exposure area (length) on the plate, the plate will be ejected. Plate (first) Image Image Image (first) (second)
-
Page 92: Manually Loading The Plates
PT-R4300 USERS MANUAL 6. Manually Loading the Plates When performing a test exposure, the plate must be manually loaded in the PT-R. 1. Select in the user maintenance mode screen and press [OK]. The operation door open screen appears. Press [Open] button and open door. OPEN Fig. -
Page 93: Manually Ejecting The Plates
Chapter 5 User Menu 4. Check the information shown in the screen and then press [LOAD]. Plate loading begins. If necessary, press [Plate] or [Printing] to change the plate data or printing machine data. To change the plate data or the printing machine data, the new data must already NOTE be registered. -
Page 94: Test Exposure
PT-R4300 USERS MANUAL 9. Test Exposure For the test exposure, begin with a rough estimated initial value and large NOTE incremental value. Then examine the exposure conditions and make the minute adjustments of the values. Perform test exposures to set values for the laser power, drum rpm, focus, and zoom suitable for the plate to be used for printing. -
Page 95: Test Exposures For Adjusting The Laser Power, Drum Rpm, Focus, And Zoom
Chapter 5 User Menu 9.1 Test Exposures for Adjusting the Laser Power, Drum Rpm, Focus, and Zoom The procedure for performing test exposures for adjusting the laser power, drum rpm, focus value, and zoom value is explained here. The test exposure setting screen for laser power adjustment is used as an example. - Page 96 PT-R4300 USERS MANUAL • When performing a test exposure, the settings for the media type registered in the NOTE data that is selected when the plate is loaded are used for settings other than the initial value, increment value, and count (in the case of a laser power test exposure, the drum rpm, focus value, and zoom value settings).
-
Page 97: Test Exposure For Simultaneous Adjustment Of Laser Power And Drum Rpm, Or Focus And Zoom
Chapter 5 User Menu 9.2 Test Exposure for Simultaneous Adjustment of Laser Power and Drum Rpm, or Focus and Zoom The procedure for performing a test exposure for simultaneously adjust the laser power and drum rpm, or focus and zoom, is explained here. Resolution key These keys can also move 2400dpi... - Page 98 PT-R4300 USERS MANUAL 3. Enter the desired initial laser power (or zoom value) and then press [ENT]. The highlight will move to the left increment value setting. 4. Enter the desired increment value for the drum rpm (or focus value) and then press [ENT].
- Page 99 Chapter 5 User Menu Check the displayed information and then press [START]. The test exposure begins using the set information. Test exposure for simultaneous adjustment exposes the patterns shown in the following diagram incrementing the laser power (or focus value) in the secondary scanning direction and the drum rpm (or zoom) in the primary scanning direction.
-
Page 100: Exposing A Test Pattern
PT-R4300 USERS MANUAL 9.3 Exposing a Test Pattern Expose a test pattern registered in the PT-R. Resolution key These keys can also move the highlight. Test pattern selection key Exposure width 50.0 Exposure start point Fig. 5-52 Setting screen for test pattern exposure 1. - Page 101 Chapter 5 User Menu Table. 5-2 Test patterns Pattern name Dot % Dot angle Line number / pitch Remarks Dot 0% 0˚ 4000 dpi: 250 lines/inch Pseudo dots Dot 3% 2400 dpi: 150 lines/inch (refer to Fig. 5-54) Dot 5% 2000 dpi: 125 lines/inch Dot 10% 1200 dpi: 75 lines/inch...
-
Page 102: Setting The Date And Time
PT-R4300 USERS MANUAL 10. Setting the Date and Time Set the date and time. 1. Select [Set Date/Time] in the user setting selection screen and then press [OK]. The date and time setting screen appears. These keys also move the highlighted portion. -
Page 103: Cleaning The Punch Interior
Chapter 5 User Menu 11. Cleaning the Punch Interior Activate idle punching to clean the inside of the punching machine. 1. Select [Punch for cleaning] in the user setting selection screen and press [OK]. The punch for cleaning screen appears. Start OK Fig. -
Page 104: Checking The Running Time And Setting The Consumable Timers
PT-R4300 USERS MANUAL 12. Checking the Running Time and Setting the Consumable Timers View the running time of the PT-R and the number of exposures performed, and set the consumable timer for replacement of consumables. 1. Select [Consumable Timer] in the user setting selection screen and then press [OK]. - Page 105 Chapter 5 User Menu 3. When the following screen appears, press [NEXT]. Punch cycles No.1 (Max:10000) Punch cycles No.2 (Max:10000) Punch cycles No.3 Punch cycles of each punch block (Max:10000) Punch cycles No.4 (Max:10000) NEXT Move to punch cycle screens No. 5 to SAVE NEXT No.
-
Page 106: Selecting The Display Language
PT-R4300 USERS MANUAL 13. Selecting the Display Language You can change the language used in the display. 1. Press [Language] and then [OK] in the user setting selection screen. The display language selection screen appears. English Japanese Fig. 5-62 Display language selection screen .... -
Page 107: Laser Power Measurement
Chapter 5 User Menu 14. Laser Power Measurement With this function, you can check if the PT-R is properly calibrated at a specific laser power. 1. Select [Laser power measure] in the user setting selection screen and press [OK]. The resolution selection screen appears. Resolution 1200 2000... -
Page 108: Laser Calibration
PT-R4300 USERS MANUAL This screen shows you the laser power percentage for a specific laser power for each channel. If the laser power percentage for each channel is between 95% and 105%, then there is no problem with exposure quality. If there is a channel at 94% or below, or a channel at 106% or above, then perform NOTE laser calibration. - Page 109 Chapter 5 User Menu Calibration is begun and the calibration screen appears. Processing Now Please wait ! Fig. 5-68 Calibration screen Calibration of one channel takes approximately 20 seconds, and calibration of all NOTE channels takes approximately two minutes. When calibration ends, the user setting selection screen reappears. 5-49...
-
Page 110: Canceling Calibration
PT-R4300 USERS MANUAL 16. Canceling Calibration On rare occasions the exposure quality may be worse after calibrating from the user setting screen or by automatic calibration than it was before calibration. In this case, cancel the effect of calibration and restore the laser to its previously calibrated state. 1. - Page 111 Chapter 5 User Menu 3. Select the number of the calibration you want to restore and press [OK]. The calibration cancel confirmation screen appears. Start OK Fig. 5-71 Calibration cancel confirmation screen 4. Press [YES] and then press [OK] to return to the past calibration state that you selected.
-
Page 112: Calibration Information
PT-R4300 USERS MANUAL 17. Calibration Information This displays the calibration state of the laser head. 1. Select [Calibration information] in the user setting selection screen and press [OK]. The calibration information screen appears. Calibration period: xx h xx h Time to next calibration: Reso. -
Page 113: Automatic Calibration
It is normal when “32ch” appears for the channels used, “100%” appears for the NOTE laser power, and nothing appears under “Warning.” If this does not appear, please contact a Dainippon Screen sales office or agent. Automatic calibration To maintain excellent exposure quality, the laser is automatically calibrated after every 10 hours of exposure. -
Page 114: Measuring The Laser Power
Even if one of messages 1 to 3 appears, image quality will not be affected. However, because there is a channel nearing life-over, please contact a Dainippon Screen sales office or agent to have the laser diode replaced. If calibration is not possible even with method 3, the following error message... - Page 115 5. Open the calibration information screen and the laser power measurement screen, and continue using the PT-R only after verifying the condition of the laser head for which calibration was performed. If you have any questions please consult a Dainippon Screen office or agent. 5-55...
-
Page 116: Sending An Interrupt Command To The Host Computer
PT-R4300 USERS MANUAL 18. Sending an Interrupt Command to the Host Computer Interruption during exposure cannot be performed from RENATUS, TaigaSPACE or other host computers. When PT-R power is turned OFF during exposure and in other cases, an interrupt command is sent to the host computer. 1. -
Page 117: Turning The Buzzer During Plate Eject On And Off
Chapter 5 User Menu 19. Turning the Buzzer during Plate Eject On and Off When exposed plates are ejected to the online processor, a buzzer beeps at one- second intervals to indicate that you cannot insert plates to the bridge while this action is in progress. -
Page 118: Viewing Information
PT-R4300 USERS MANUAL 20. Viewing Information You can view the version number of the software currently installed in the PT-R, and the automatically created error log that shows the errors that have occurred. 1. Select [Information] and then press [OK] in the offline screen. The information mode screen appears. - Page 119 Chapter 5 User Menu The “nnn” of the error log outline screen is the numbers 1 through 160, “mm/dd” is the date the error occurred, and “Exxxx” is the error or warning code. Below is an outline message for the error or warning. Press [Detail].
-
Page 120: Setting The Punch Name
PT-R4300 USERS MANUAL 21. Setting the Punch Name When an optional punch unit is installed, a service technician will set the punch number (1 to 9) where the punch is installed to enable the punch, and the punch hole pitch. The punch can be used at this point; however, to make it easier to select a punch in the printing machine settings, you can assign a name to the punch. - Page 121 Chapter 5 User Menu Save Data ? Fig. 5-83 Save confirmation screen 4. To save the name for Punch 1, press [YES] and then [OK]. The data is saved and you are returned to the offline screen. Press [NO] and then [OK] if you do not want to save the data. You are returned to the offline screen.
- Page 122 PT-R4300 USERS MANUAL End of Chapter 5 5-62...
-
Page 123: Maintenance
Chapter 6 Maintenance This chapter explains daily maintenance and inspection procedures for the PT-R. -
Page 124: Cleaning The Drum
PT-R4300 USERS MANUAL WARNING • Be sure to turn off the power of the PT-R before attempting any maintenance or inspection procedures. There is a danger of electrical shock if inspection or maintenance is performed with the power on. • Never remove a cover unless instructed to do so as part of an inspection or maintenance procedure. - Page 125 Chapter 6 Maintenance 4. While rotating the drum by hand, wipe the surface of the drum with a cloth moistened with ethyl alcohol or film cleaner (the cloth should soft, clean and produce little cotton dust). Sensor stay Drum Fig. 6-2 Inside of rear face When cleaning the drum surface, do not touch the sensor stay.
-
Page 126: Removing Punch Debris
PT-R4300 USERS MANUAL 2. Removing Punch Debris It is necessary to remove the punch debris that results from hole punching on a regular basis. Be sure to remove punch debris regularly as explained below. 1. Slide the punch debris receptacle upward to remove it from the installation hooks on the rear cover. -
Page 127: Cleaning The Roller
Chapter 6 Maintenance 3. Cleaning the Roller 3.1 Cleaning the Cleaning Roller Clean the cleaning roller by following the procedure given below. WARNING • Do not under any circumstance remove screws or covers not indicated in this step. • Do not touch the drum and sensor stay. 1. - Page 128 PT-R4300 USERS MANUAL 5. Remove the cleaning roller (brown). 6. Wipe clean the cleaning roller with a rag, or other piece of cloth, soaked in water (make sure the cloth is free of lint, soft, and clean). Cleaning roller Cloth Fig.
- Page 129 Chapter 6 Maintenance 9. Set the bottom edge of the rear cover on the two hooks on the unit, and attach the cover so that the thumb screws align with the thumb screws holes. Thumb screws Hooks Rear cover Fig. 6-9 Attaching the rear cover 10.
-
Page 130: Cleaning The Plate Insertion Roller
PT-R4300 USERS MANUAL 3.2 Cleaning the Insertion Roller Clean the insertion roller by following the procedure given below. 1. Press [OPEN] at the online (Ready) screen. The lock is released and the operation door slightly opens. 2. Turn off the PT-R. 3. - Page 131 Chapter 6 Maintenance 5. Loosen the thumb screw of the securing bracket for the insertion roller. 6. Slide the insertion roller to the right, lift up the left end, and remove the insertion roller. Securing bracket Insertion roller Thumb screw Fig.
- Page 132 PT-R4300 USERS MANUAL 8. Align the right end of the insertion roller into its installation hole in the PT-R and install the insertion roller as shown in the figure below. Then tighten the thumb screw at the securing bracket to secure the insertion roller in place. Securing bracket Insertion roller Installation...
-
Page 133: Cleaning The Transport Roller
Chapter 6 Maintenance 3.3 Cleaning the Transport Roller Clean the transport roller by following the procedure given below. 1. Press [OPEN] at the online (Ready) screen. The lock is released and the operation door slightly opens. 2. Turn off the power switch. 3. -
Page 134: Cleaning The External Cover Filter
PT-R4300 USERS MANUAL 4. Cleaning the External Cover Filter Clean the external cover filter by following the procedure given below. 1. Remove the external cover, and then remove the external cover filter from the external cover. External fan External cover filter External cover Fig. - Page 135 Chapter 6 Maintenance 6-13...
-
Page 136: Maintenance Parts
PT-R4300 USERS MANUAL 5. Maintenance Parts 5.1 Consumables The following parts are consumables, and therefore a charge is required to purchase the parts and have replacement work done even if the warranty period has not expired. To maintain the performance of the PT-R, we recommend regular inspections and prompt replacement of consumable parts. -
Page 137: Messages
Chapter 7 Messages This chapter explains the messages that appear in the display of the PT-R operation panel. -
Page 138: Display Of Operation Request Messages
PT-R4300 USERS MANUAL 1. Display of Operation Request Messages When certain operations are required of the operator by output command from the host computer or other reasons. A message like one of those shown in Fig. 7-1 through Fig. 7-15 and Fig. 7-17 through Fig. 7-19 will appear in the display and a buzzer will beep intermittently. - Page 139 Chapter 7 Messages Remove plate in transport unit and close door. Process resumes when door is closed. CANCEL Fig. 7-3 Plate removal request message (3) Remove the plate from the ejection table and then close the operation door. If you press [CANCEL] without closing the operation door, the process will be cancelled.
- Page 140 PT-R4300 USERS MANUAL Press [OPEN] button and open door Set plate listed above This message appears if it is necessary to set a plate due to the output command from the host computer. Press [OPEN] button and open door. No.1 A4-8page Set plate listed above.
- Page 141 Chapter 7 Messages Set Plate Listed below and Close Door This message appears if the operation door is open when it is necessary to set a plate due to the output instructions from the host computer. Set plate listed below and close door.
- Page 142 PT-R4300 USERS MANUAL Either conveyor, processor, or stocker is not turned on or is in busy status or is in error status. Operation will resume when the ready status is reached. When REMOVE is pressed, the exposed plate will be discharged onto the discharge table.
- Page 143 Chapter 7 Messages If [CANCEL] or [REMOVE] is pressed, the following screen will appear and the exposed plate will be ejected to the ejection table. Unloading 1: Plate 1 Fig. 7-12 Plate ejecting screen When ejecting is completed, the following screen will appear. Remove exposed plate and close door.
- Page 144 PT-R4300 USERS MANUAL Either the conveyor, processor, or stocker is not turned on or is in the busy status or is in error status. Operation will resume when the ready status is reached. When REMOVE is pressed, the exposed plate will be discharged onto the discharge table This message appears when plate ejection to an online processor is selected and an exposed plate cannot be ejected because the bridge, processor or stocker is...
-
Page 145: Warning Messages
Chapter 7 Messages 2. Warning Messages If a mistaken operation is performed or if it becomes necessary to warn the operator for some reason, a four-digit hexadecimal error code “Exxxx” and an error message like the following will appear in the display. Error code Error message Fig. -
Page 146: Error Displays
PT-R4300 USERS MANUAL 3. Error Displays If an error occurs, the following screen appears and the buzzer beeps continuously. The “Exxxx” displayed in the upper left hand corner of the screen is four-digit NOTE hexadecimal error code. The last three digits of the four-digit hexadecimal error code describe the contents of the error. -
Page 147: Errors That Do Not Need To Be Reset
Chapter 7 Messages 3.1 Errors that Do Not Need to be Reset If there is no need to perform anything to reset the error, pressing [OK] at the error display screen will bring back the original screen (or its previous menu screen) so you can resume operation. - Page 148 PT-R4300 USERS MANUAL Close door. Initialization begins when door is closed Exxxx : Close door. Initialization begins when door is closed. Detail Fig. 7-22 Error reset request screen (3) When the operation door is closed, initialization (error reset) will begin. After initialization is properly completed, you will return to the original screen (or the previous menu screen).
-
Page 149: Error Code/Error Message
[Detail] for more detailed information. Exxxx : System error If this message appears, it is most likely a problem with the controlling software. Call a Dainippon Screen sales office or agency. Press [Detail] for more detailed information. Exxxx : Remove plate in transport unit This message appears when there is a plate in the transport section when there must not be one (during initialization, etc.). - Page 150 PT-R4300 USERS MANUAL Exxxx : Some LD cannot be calibrated to target power. Contact our office or agency and ask to replace them. This message is displayed if an LD (laser diode) is found that could not be adjusted to the specified laser power when calibration was performed. Once this error occurs and error resetting is performed, exposure can be performed, but the image quality will be affected (irregularities may occur).
- Page 151 Chapter 7 Messages Ex150 : A plate exists on the insertion table in the transport unit during initialization. This appears if a plate exists on the insertion table in the transport section during initialization. Remove the plate from the insertion table and close door. The initialization operation will resume.
- Page 152 PT-R4300 USERS MANUAL Ex600 : Ex601 : Either the conveyor, processor, or stocker is not turned on or is in the busy status or is in error status. This warning message appears when plate eject to an online processor is selected and the bridge, online processor or stocker is not turned on, an error has occurred, or one of the units is busy.
- Page 153 “How calibration is performed” on page 5-53). The image quality is not affected when this message appears. However, as there is a channel nearing life-over, please contact a Dainippon Screen sales office or agent to have the laser diode replaced.
- Page 154 Ex820 : Trail clamps are nearing the end of its usable life. Please contact our office or agency and ask to replace them. If this message appears please contact a Dainippon Screen office or agent and request a trail clamp replacement.
- Page 155 Chapter 7 Messages Exexx : Temperature of the LD block in the exposure head rises. Lower temperature of the environment. Exexx : Temperature of the LD block in the exposure head rises. Wait for a while until temperature inside the machine falls down. Exexx : Temperature of the LD block in the exposure head lowers.
-
Page 156: Service Calls
(A): This type of error involves the rear edge clamp. This type of error cannot be cleared without the help of a certified Dainippon Screen service technician. After such an error even power switch operation does not work. Please call a Dainippon Screen office or agent as soon as possible. -
Page 157: Jamming
Chapter 8 Jamming This chapter explains this typical PT-R problem and the solutions. -
Page 158: Plate Jam Removal
PT-R4300 USERS MANUAL 1. Plate Jam Removal To protect the PT-R, plates are not automatically discharged in the event of a plate jam. Accordingly, it is required that you open the rear cover of the PT-R and remove the plate. When doing so, [Remove] will appear on the lower left of the error message screen. - Page 159 Chapter 8 Jamming After plate removal preparation is completed, the plate removal screen appears. Exxxx : Turn off the power, remove the rear cover, and remove the plate. After removing the plate, replace the rear cover and turn on the power. Fig.
- Page 160 PT-R4300 USERS MANUAL 4. After you have removed the plate, reattach the rear cover to its original position. For more details, refer to Chapter 6 “1. Cleaning the Drum” steps 5 and 6. CAUTION Be sure to sufficiently tighten the rear cover screws. If the screws are not properly tightened, an error will occur during exposure.
- Page 161 Detail Fig. 8-7 Error message screen (example) 2. Press [OK]. The service call (B) screen appears. Please contact an office or agency of Dainippon Screen. Exxxx : This machine cannot be to restore automatically from the status of error (B) Detail Fig.
- Page 162 PT-R4300 USERS MANUAL 4. Since the drum is free (it only takes light force to rotate it), hold it and rotate it slowly, up to down, until you can see the leading edge clamp. 5. While pushing the lower part of the leading edge clamp (indicated by arrow), remove the plate from the leading edge clamp.
-
Page 163: Technical Information
Chapter 9 Technical Information This chapter gives technical information on the PT-R. -
Page 164: Specifications
Less than 69.7 dB (A) Grounding: Grounding resistance must be in accordance with operation site regulations. Standard accessories: Blower unit Punch debris receptacle Users Manual Optional accessories: Punch unit (type: Dainippon Screen, Bacher, Protocol, Komori, others) Cassette auto loader (single, multi) -
Page 165: External Dimensions
Chapter 9 Technical Information 2. External Dimensions 1750 1030 1537 1178 Fig. 9-1 PT-R4300 external dimensions (Units: mm) Fig. 9-2 Blower external dimensions (Units: mm) - Page 166 PT-R4300 USERS MANUAL End of Chapter 9...
- Page 167 Thermal Plate Recorder Publication DAINIPPON SCREEN MFG. CO., LTD. PT-R4300 Ver. 1.0- The contents of this publication may be changed USERS MANUAL without notice. 2002.05. (R0) Ra Te PARTS CODE 100027907V00 Printed in Japan...
Need help?
Do you have a question about the PLATE RITE 4300 and is the answer not in the manual?
Questions and answers
the drum is rotated to ''squeeze position'', but status of servo controller is not changed to ready
The servo controller status may not be changing to ready because the thumb screw on the rear cover is not tightened securely. If the hold-down screw for the rear cover is not completely tightened or if the drum stop switch is being pressed, the servo stop switch will remain OFF, preventing the system from reaching the ready state. Fully tightening the rear cover hold-down screw should resolve the issue.
This answer is automatically generated
where can i get a thermister TH1 for a plate rite 4300. the fault says E0e25: sensor for the periphery of the optical unit has not been connected
I have an error EXE25