
Related Manuals for Riva RC6702HD-6311


Summary of Contents for Riva RC6702HD-6311
-
Page 1: Installation Guide
RC6702HD-6311 Installation Guide www.rivatech.de Specification subject to change without notice... -
Page 2: Precaution
HD Series RC6702HD-6311 Installation Guide Precaution Please read this manual carefully before installing the unit. Never disassemble the camera. Unauthorized disassembly may cause equipment failure or damage to the unit. Please do not install the camera in a place exposed to direct sunlight. -
Page 3: Table Of Contents
HD Series RC6702HD-6311 Installation Guide Table of Contents Precaution ........................ 2 1. FEATURES ......................4 2. PACKAGE CONTENTS..................... 5 3. PART NAMES ......................6 4. CAMERA INSTALLATION ..................8 4.1. Installing the camera ..................... 8 Installation without bracket ....................8 Corner Mount ........................ -
Page 4: Features
HD Series RC6702HD-6311 Installation Guide 1. FEATURES Camera Full HD Indoor / Outdoor IR Compact Bullet IP Camera SONY EXMOR 1/2.9” 1080p CMOS Image Sensor True Day / Night DC Auto Iris Lens Embedded IR Illuminator with Smart IR Control ... -
Page 5: Package Contents
HD Series RC6702HD-6311 Installation Guide 2. PACKAGE CONTENTS Please unpack the package carefully and handle the equipment with care. The package contains: Camera DC Power Adaptor Universal Plugs Screws and anchor blocks Quick Installation Guide Hex Wrench Driver Silicon Waterproof Band... -
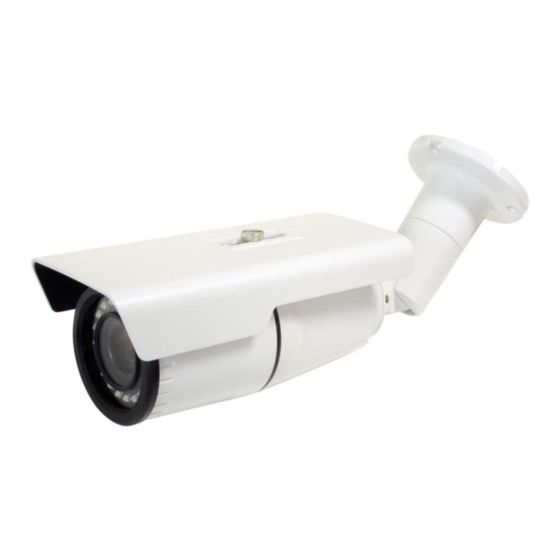
Page 6: Part Names
HD Series RC6702HD-6311 Installation Guide 3. PART NAMES ① ⑥ ⑧ ⑦ ⑤ SD Card ⑦ ④ Reset ② Video Out ② ③ PAL/NTSC * Models herein and their appearance are subject to change without any prior notice. ① Sunshield Position the sunshield to prevent direct sunshine. - Page 7 HD Series RC6702HD-6311 Installation Guide ⑦ Power Adaptor Connector Use DC12V for the power supply. ⑧ LAN connector RJ45 LAN connector for 10/100 Base-T Ethernet (PoE supported). 05-2014-A www.rivatech.de...
-
Page 8: Camera Installation
HD Series RC6702HD-6311 Installation Guide 4. CAMERA INSTALLATION tion template 4.1. Installing the camera Installation without bracket Installation Template (Unit: mm) Installation template’s image size scale in this installation guide is not 1:1. Caution The correct-size template paper can be found inside the package separately. - Page 9 HD Series RC6702HD-6311 Installation Guide 1) Place the installation template included in the package on the desired installation surface. 2) Drill three holes in correct positions based on the template paper, and insert the anchor blocks into the holes. 3) Attach the silicon waterproof band included in the package to the camera’s...
-
Page 10: Corner Mount
HD Series RC6702HD-6311 Installation Guide Corner Mount Model Name CMA-6000 Contents PH M4x12L Bolt 4ea 5/16” Anchor Bolt 8ea PMA-6000/CMA-6000 This guide illustrates how to assemble the corner mount adapter and pole mount adapter. Check the letter of the alphabet assigned to each adapter and tighten CMA-3000/PMA-3000 the screws in the corresponding holes to assemble the adapter. - Page 11 HD Series RC6702HD-6311 Installation Guide PMA-6000/CMA-6000 Location of the holes to attach the camera on the corner mount adaptor This guide illustrates how to assemble the corner mount adapter and This guide illustrates where the camera should be attached on the corner mount adaptor pole mount adapter.
-
Page 12: Pole Mount
HD Series RC6702HD-6311 Installation Guide Pole Mount Model Name PMA-6000 Contents PMA-6000/CMA-6000 This guide illustrates how to assemble the corner mount adapter and pole mount adapter. Check the letter of the alphabet assigned to each adapter and tighten the screws in the corresponding holes to assemble the adapter. - Page 13 HD Series RC6702HD-6311 Installation Guide Screw Hole 2. Encircle the pole with the SUS bands Fastener attached on the pole bracket, and push the SUS band end through the fastener’s holes located on the SUS band heads. 3. Fasten both fasteners enough by...
- Page 14 HD Series RC6702HD-6311 Installation Guide Location of the holes to attach the camera on the pole mount adaptor This guide illustrates where the camera should be attached on the pole mount adaptor (PMA- PMA-6000/CMA-6000 6000). Check the location of the alphabet letter, B on the image below, and tighten the bolts (PH M4x12L) in the corresponding holes to assemble the camera.
-
Page 15: Adjusting Angle Of The Camera
HD Series RC6702HD-6311 Installation Guide 4.2. Adjusting angle of the camera 1. Adjust the camera to the desired angle by unscrewing the joints referring to the following pictures. Adjust the joint to install Tilting adjustment Panning adjustment the camera on the wall. -
Page 16: Adjusting Zoom And Focus
2. Click One Click Focus to automatically set the lens. *Refer to the “RIVA Web Interface Manual Full HD Line” for more detailed configuration about zoom and focus on the webpage. 05-2014-A... -
Page 17: Setting Image Attribute
Video Appearance menu in Setup > Video & Audio > Camera. The following features can be adjusted: Brightness, Contrast, Saturation, Sharpness and Orientation For more detailed information, refer to the provided “RIVA Web Interface Manual Full HD Line”. All Manual’s and Installation Guides can downloaded from www.rivatech.de... -
Page 18: Connections
HD Series RC6702HD-6311 Installation Guide 5. CONNECTIONS GREEN : DI WHITE : DI COM ORNAGE : DO ①&② YELLOW : DO COM ① ④ ③ (not included) DC 12V 05-2014-A www.rivatech.de... - Page 19 HD Series RC6702HD-6311 Installation Guide ① Sensor (DI) connection Sensor (DI) can be connected to either a voltage type sensor or a relay type sensor as the following figures. Settings can be done through the camera’s webpage. Input voltage range: 0VDC minimum to 5VDC maximum, Max 50mA Do not exceed the maximum input voltage or relay rate.
- Page 20 HD Series RC6702HD-6311 Installation Guide ③ LAN connection This is a RJ45 LAN connector for 10/100 Base-T Ethernet. Use the Ethernet cable (RJ45) to connect the device to a hub or a router in the network. Refer to “Appendix (B). Power over Ethernet”...
-
Page 21: Configuration
HD Series RC6702HD-6311 Installation Guide 6. CONFIGURATION 6.1. Set up network environment The default IP address of the device is 192.168.XXX.XXX. Users can identify the IP address of the device from converting the MAC address’s hexadecimal numbers, which is attached to the device. -
Page 22: Custom Ip Environment
4. Click Setup to complete the modification. More Information To learn more about using other features of your devices, refer to the manuals as “RIVA Web Interface Manual Full HD Series” or “VCAsys Manual ”, which is available on www.rivatech.de... -
Page 23: View Video On Web Page
HD Series RC6702HD-6311 Installation Guide 6.2. View video on web page Type the proper IP address to view the live streaming images through a web browser. The default username and password is root / pass. 6.2.1. ActiveX Installation When the browser asks to install the AxUMF software, click Install to proceed. -
Page 24: View Video Using Ipadmin Tool
HD Series RC6702HD-6311 Installation Guide 6.2.2. View video using IPAdmin Tool IPAdminTool automatically searches all activated network encoders and IP cameras and shows the product name, IP address, MAC address and etc. 1. From the IPAdminTool’s product list, select the device by highlighting it. -
Page 25: Factory Default
HD Series RC6702HD-6311 Installation Guide 6.4. Factory Default Resetting the device back to the factory default will initialize all parameters including the IP address back to the factory defaults. To reset back to the factory default: 1. Press the reset button and hold it while the device is in use. - Page 26 HD Series RC6702HD-6311 Installation Guide How to recover your system from Safe Mode Browse The messages above will appear on the webpage when your device has been rebooted in ‘safe mode’. Then, you should follow the instructions on the webpage according to the steps in a row.
-
Page 27: Appendix (A): Specifications
HD Series RC6702HD-6311 Installation Guide APPENDIX (A): SPECIFICATIONS Summary Camera Module Image Sensor 1/2.9” 1080p CMOS CMOS Effective Pixels 1920x1080 Scanning system Progressive scanning Resolution 1920 x 1080 Min. ELECTRICAL Color: 1.0 lux, BW: 0 lux (IR LED On) Illumination... -
Page 28: Electrical Characteristics
HD Series RC6702HD-6311 Installation Guide Electrical Characteristics Power Source DC 12V / PoE Power Consumption Max. 7.6W @ DC 12V Video Output 1 Vp-p, 75Ω, Composite Audio Input Audio Output Max 50mA@5VDC, TTL level 1.5V threshold Max 50mA@24VDC On-state resistance: 50 Ω (max continuous) Environment Condition [DC12V] -20°C ~ 50°C (-4°F ~ 122°F) -
Page 29: Appendix (B): Power Over Ethernet
HD Series RC6702HD-6311 Installation Guide APPENDIX (B): POWER OVER ETHERNET The Power over Ethernet (PoE) is designed to extract power from a conventional twisted pair Category 5 Ethernet cable, conforming to the IEEE 802.3af Power-over-Ethernet (PoE) standard. IEEE 802.3af allows for two power options for Category 5 cables. -
Page 30: Appendix (C): Dimensions
HD Series RC6702HD-6311 Installation Guide APPENDIX (C): DIMENSIONS (Unit: mm) 05-2014-A www.rivatech.de... -
Page 31: Appendix (D): Hexadecimal-Decimal Conversion Table
HD Series RC6702HD-6311 Installation Guide APPENDIX (D): HEXADECIMAL-DECIMAL CONVERSION TABLE Refer to the following table when you convert the MAC address of your device to IP address. 05-2014-A www.rivatech.de... -
Page 32: Revision History
HD Series RC6702HD-6311 Installation Guide REVISION HISTORY MAN# DATE(M/D/Y) Comments 11-2013-A 11/12/2013 First release version 01-2014-A 01/15/2014 Added safe mode section 02-2014-A 02/12/2014 Minor update on specification 03-2014-A 03/10/2014 Updated safe mode section Added waterproof band installation on 4.1. Installing the camera...
Need help?
Do you have a question about the RC6702HD-6311 and is the answer not in the manual?
Questions and answers