Unify OpenStage WL3 User Manual
Wlan telephones
Hide thumbs
Also See for OpenStage WL3:
- Configuration manual (188 pages) ,
- Administration manual (113 pages) ,
- User information (29 pages)
Table of Contents
Advertisement
Quick Links
Advertisement
Table of Contents

Related Manuals for Unify OpenStage WL3


Summary of Contents for Unify OpenStage WL3
- Page 1 OpenStage WL3 OpenStage WL3 Plus User Manual A31003-M2000-U101-2-7619...
- Page 2 ISO9001 and ISO14001 standards and are certified by an external certification company. © Unify Software and Solutions GmbH & Co. KG 12/2015 Mies-van-der-Rohe-Str. 6, 80807 Munich/Germany All rights reserved. Reference No.: A31003-M2000-U101-2-7619 The information provided in this document contains merely general descriptions or characteristics of performance which in case of actual use do not always apply as ...
-
Page 3: Table Of Contents
Contents Contents Introduction ........5 Prerequisite . - Page 4 Contents Advanced Functions ....... . 58 Device Information ............58 Advanced Messaging.
-
Page 5: Introduction
• OpenStage WL3 • OpenStage WL3 Plus with messaging and alarm functions. WL3 may be upgraded by license to use messaging. Refer to the Data Sheet for a complete list of licenses. Read chapter "Safety and Regulatory In- structions" on page 6 before using the WLAN Handset. -
Page 6: Safety And Regulatory Instructions
OpenStage WL3 desktop charging unit and power supply unit: European Union, Order number: S30122-X8008-X24 • OpenStage WL3 desktop charging unit and power supply unit: UK, USA, CAN, AUS, Order number: S30122-X8008-X26 • OpenStage WL3 desktop charging unit without power supply unit: Order number: S30122-... -
Page 7: Frequency Range
Safety and Regulatory Instructions • Do not use auxiliary equipment with the handset which is not exclusively recommended by the manufacturer, see the User Manual. The use of any auxiliary equipment not recommended by the manufacturer may result in fire, electric shock, or injury, and will void the warranty. •... -
Page 8: Regulatory Compliance Statements (Eu/Efta Only)
Safety and Regulatory Instructions Regulatory Compliance Statements (EU/EFTA only) This equipment is intended to be used in the whole EU & EFTA. This equipment is in compliance with the essential requirements and other relevant provisions of R&TTE Directive 1999/5/EC and 2009/125/EC (Eco Design). -
Page 9: Exposure To Radio Frequency Signals
Safety and Regulatory Instructions Exposure to Radio Frequency Signals This equipment complies with FCC radiation exposure limits set forth for an uncontrolled environ- ment. This device complies with FCC SAR limit of 1.6 W/kg. The maximum SAR value measured when used at the ear is 1.38 W/kg. The telephone has also been tested when worn on the body using belt clip. -
Page 10: Battery Disposal
Safety and Regulatory Instructions • 60 % Chlorhexidine 0.5 mg/ml • Acetone can be damaging to the plastic casing of the handset and should not be used. Battery • Do not immerse the battery into water. This could short-circuit and damage the battery. •... -
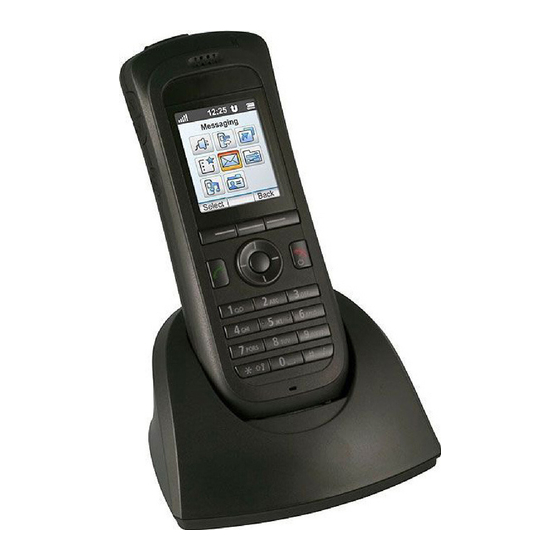
Page 11: Description
Description Description WLAN Handset Figure 2 The WLAN Handset. Multifunction /Alarm button This button can be used as a short cut to functions. The button has two modes, long mode or double press mode. In the WL3 Plus, the button is used as an alarm push button only. See "Define Multifunction Button"... - Page 12 Description Five-way navigation key Navigation key with Left, Right, Up, Down, and Confirmation (in the middle). It is also pos- sible to program these keys for short cuts, except the middle key. The Up is by default a short cut to the Inbox, and Down is a short cut to Call contact. See also "Define Navigation Key"...
- Page 13 Description Loudspeaker The handset has a separate loudspeaker for the loudspeaking function. It is placed on the back side of the handset. Microphone The microphone is placed on the front bottom side of the handset. Clip There are two different belt clip options for the handset; a hinge-type clip (standard), and a swivel- type clip.
-
Page 14: Alphanumeric Keys
Description Alphanumeric Keys Figure 3 Available characters. a b c à â æ ç 2 . , ? ! - ‘ ” 1 d e f é è ê ë 3 j k l 5 g h i î ï 4 m n o ñ... -
Page 15: Icons And Text In The Display
Description Icons and Text in the Display The icons and text in the display indicate functions and settings that the user has access to. The display shows the date and time, the Owner ID, and handset number. The Owner ID can be set by the user manually. - Page 16 Description “New message” icon or “Interactive message” icon indicates that a new text message (or messages) has arrived. The icon remains in the status bar until all new messages in the inbox are read. “New message with request for answer” icon in front of a message indicates that the message must be acknowledged or rejected.
-
Page 17: Menu Icons
Description Handset with WL3 Plus license including Personal Alarm. Handset with WL3 Messaging license. Menu Icons The “Contacts” menu contains all names/numbers in the local phonebook. In addition, a company phonebook with up to 1000 entries can be downloaded to the phone using the Device Manager. -
Page 18: Accessories
Description Accessories Desktop Charger Figure 5 Desktop Charger for WLAN Handset There is one desktop charger available, (DC3) which charges the handset. There is also a desktop programmer (DP1) used to download new software and to synchronize parameters. They look the same except that the DP1 has a USB connection. -
Page 19: Security Cord
Description Security Cord The security cord is 800 mm long. It is attached directly to the handset. Leather Casing The leather casing is specially designed for the handset. The casing comes with a swivel type belt clip, and the handset is fully operational while it is placed in the casing. Headset A headset is recommended if the handset is frequently used and/or if the user wants to have both hands free. -
Page 20: Basic Operation
Basic Operation Basic Operation For information on how to answer/end a call, see "Incoming Call" on page 23. Switch the Handset On/Off Switch the Handset On 1. Press and hold the End key When pressing the End key, the display lights up. Switch the Handset Off The handset must be in idle mode. -
Page 21: Turn The Audible Signal On/Off
Basic Operation If a handset is shared and one of the users logs off the shared phone, the lock that prevents the handset from unauthorized use is deactivated. For additional information, see "Lock and Unlock the Handset" on page 22. Turn the Audible Signal On/Off The handset must be in idle mode. -
Page 22: Lock/Unlock The Keypad
Basic Operation Lock/Unlock the Keypad To prevent accidentally pressing keys and making a call, the keys can be locked. Lock Keypad 1. Press 2. Press “Lock”. Unlock Keypad 1. Press 2. Press “Yes”. An incoming call can be answered and the alarm button can be pressed while the keypad is locked. -
Page 23: Calling
Calling Calling Incoming Call The flashing LED, accompanied by a ring signal and/or a vibrating handset signals a call. Ring sig- nal and vibrator can be disabled, see "Sound and Alert Settings" on page 48. The calling party’s handset information or name is shown. The local phonebook name is displayed if the calling par- ty’s handset number is stored in the local phonebook, else the calling name or calling number is shown. -
Page 24: Outgoing Call
Calling Outgoing Call Pre-Dial Enter the number and press or the soft key “Call” to get the line. The number is shown on the display while dialing. If needed, press “Clear” to erase the number. By using the Navigation key, it is possible to step and add/delete a digit in a number. -
Page 25: In Call
Calling 3. Select “Call contact”. 4. Select contact from the list, or search name/number by entering characters in the search field. 5. Press “Call” or to make the call. TIP: Use the Navigation key Down in the Idle mode to open the local phonebook. Dial a Number from the Company Phonebook 1. -
Page 26: Switch Between Calls
Calling The icon indicates a muted microphone. This means that the other party in an ongoing call cannot hear you. To turn the microphone back on, do as follows: 1. Press “More” during the call 2. Select “Microphone on”. 3. Press “Select”. It also possible to turn the microphone off/on by a long press on Start New Call During Conversation If configured in the Device Manager, it is possible to make an emergency call while the hand-... -
Page 27: Conference Call
Calling 4. Enter the number to which the other party will be connected. It is also possible to make a phonebook lookup to select a contact in the local phonebook and the company phone- book. 5. Press “OK” or to transfer the call. Conference Call Prerequisite: A new call has been started during the conversation, see "Start New Call During Con- versation"... -
Page 28: Call Waiting
Calling Call Waiting During an ongoing conversation, when a short two-beep tone sounds and the Incoming call dialog window appears, do as follows: 1. Press “Accept” to answer the other call (the first call is put on hold), or press “Decline” to reject the call (which is indicated as missed call). -
Page 29: Call Diversion
Calling Call Diversion All calls; internal calls, external calls, calls when busy, or calls at no answer can be diverted to an- other handset number. The diversion is made via the Divert calls menu. See "Call Diversion" on page 36 or edit the Profile, see "Edit Profile" on page 41. It is also possible to program a Soft key, Hot key, or Multifunction button with a short cut to the “Call diversion”... -
Page 30: Decline A Ptt Invitation
Calling When the invitation is accepted, you can delete or close the invitation by clicking the soft key “Delete” or “Close”, respectively. The call is not disconnected when clicking these soft keys. The soft key “Re-join” is used for re-joining a group only. 2. -
Page 31: Alarm Operation
Alarm Operation Alarm Operation The following system dependent features are applicable to WL3 Plus WLAN Handset only. If a shared phone is used, it must be logged in to the system to be able to send alarm. See "Log a Shared Phone On/Off" on page 20. Push-button Alarm Press the red alarm button twice within two seconds to activate the alarm. -
Page 32: Automatic Call After Alarm
Alarm Operation • For a predefined period of time (default 10 minutes) if the Mute button is pressed during the alert signal. Activate/Deactivate the Man-down and/or No-movement Alarm Enter “Settings” , and step to “Alarm”. Then select the wanted alarm(s) and press Back repeatedly. The corresponding icon(s) appear on the display. -
Page 33: Alarm With Data
Alarm Operation An approximate location of the handset is added to alarms sent from the handset. The handset sends the current and previous AP location to indicate where the alarm was activated. Alarm with Data The data can be defined and stored manually by the user. To use the function, one Soft/Hot key/ Navigation key in the handset must be defined as a shortcut to the menu “Edit alarm data”, see "Short Cuts"... -
Page 34: Menu Operation
Menu Operation Menu Operation Figure 7 The Main menu. Messaging 13:00 Calls Connections Short cuts Services Settings Profiles Contacts Select Back Calls Call List The 25 last received, dialed, missed, or declined calls are stored in a call list. If a number appears more than once, the last time stamp, together with the total number of occurrences, is shown. - Page 35 Menu Operation 7. Select “Edit number”. Save Number 1. Enter the menu by pressing the “Menu” soft key. 2. Select “Calls” in the menu. 3. Press “Select”. 4. Select “Call list”. 5. Step with Up and Down to select number in the list. 6.
- Page 36 Menu Operation 1. Enter the menu by pressing the “Menu” soft key. 2. Select “Calls” in the menu. 3. Press “Select”. 4. Select “Missed calls”. 5. Step with Up and Down to select number in the list. 6. Press “Call”, or to call back.
-
Page 37: Call Services
Menu Operation 2. Select “Calls” in the menu. 3. Select “Call services”. 4. Select “Divert calls” > Internal or External. 5. Press “When busy” > “Edit”. 6. Enter number (maximum 24 digits) to divert to. 7. Select “OK” or “Back” > “Yes”. The check box is marked. 8. -
Page 38: Contacts
Menu Operation Contacts The handset has a local phonebook with 250 entries, where names and numbers freely can be added, deleted, and edited by the user. The phonebook lists all names in alphabetical order (lan- guage dependent), where three numbers can be added for each contact; work number, mobile number, and other number. -
Page 39: Edit Contact
Menu Operation 3. Select “Add contact”. 4. Select “From call list”. 5. Select number in the list. 6. Press “Add”. 7. Select “Work Number”, “Mobile number”, or “Other number”. 8. Press “Add”. 9. Enter name, see "Alphanumeric Keys" on page 14. 10.Press “OK”. -
Page 40: Profiles
Menu Operation When the search result is displayed, it is possible to view contact information, add the number to new contact, and to send a message by pressing “More”. You can also call the number by pressing “Call”. When the search result is displayed, it is possible to view contact information and add the number to new contact by pressing “More”. -
Page 41: Messaging
Menu Operation 2. Select “Profiles” in the menu. 3. Select profile from the list. When a profile is activated, the icon and the name of the profile is displayed in idle mode. Delete Profile 1. Enter “Menu”. 2. Select “Profiles” in the menu. - Page 42 Menu Operation 5. Press “View”. Reply to Sender 1. Press “Menu”. 2. Select “Messaging” in the menu. 3. Select “Inbox” to view the message list. 4. Select a message by using Up and Down on the Navigation key. 5. Press “View”. 6.
-
Page 43: Unsent Messages
Menu Operation 5. Press “View”. 6. Press “More”. 7. Select “Call no. in text” 8. Select number from the list. 9. Press “Call” Save Number 1. Press “Menu”. 2. Select “Messaging” in the menu. 3. Select “Inbox” to view the message list. 4. -
Page 44: Sent Messages
Menu Operation Sent Messages 1. Press “Menu”. 2. Select “Messaging” to view the message list. 3. Select “Sent” to view the list. 4. Select message in the list. 5. Press “View”. Forward message 1. Press “Menu”. 2. Select “Messaging” to view the message list. 3. -
Page 45: Services
Menu Operation Services The following features are applicable to WL3 Plus only. Please contact your administrator to get support.. With this menu you can customize your own menu with services/functions that are used often. Af- ter adding a name for a new service, a list of predefined services/functions is available: Phone call, Send data, Send message, PTT, and Edit alarm data. -
Page 46: Define Hot Keys
Menu Operation 10.Select “Value” (only for some of the functions), and press “Select”. Enter a value, for example a number. Press “OK”. 11. Select “Control question”, and press “Select”. It is off by default. Press “Back”. If the control question is enabled, a dialog window “Proceed?” is displayed when pressing the defined Soft key. -
Page 47: Define Multifunction Button
Menu Operation Define Multifunction Button Applicable to WL3 and WL3 Messaging only. The Multifunction button can be defined with two different functions, a long press activates one function, and a double press activates another function. 1. Press “Menu”. 2. Select “Short cuts” in the menu. -
Page 48: Settings
Menu Operation Settings Sound and Alert Settings Adjust the Ringer Volume 1. Press “Menu”. 2. Select “Settings” in the menu. 3. Select “Sound & Alerts”. 4. Select “Volume”. 5. Use the Navigation key to adjust the volume. Press “OK” to save the setting. It is also possible to adjust the ringer volume with the volume buttons in idle mode. - Page 49 Menu Operation Set the Key Sound This means that every time a key is used, the handset produces a small sound. 1. Press “Menu”. 2. Select “Settings” in the menu. 3. Select “Sound & Alerts”. 4. Select “Key sound”. 5. Select “Silent, “Click”, or “Tone”. You can listen to the key sound by pressing “Play”.
- Page 50 Menu Operation 2. Select “Settings” in the menu. 3. Select “Locks”. 4. Select “Automatic key lock”. 5. Select “Off” for deactivation of automatic key lock. Activate the Phone Lock The handset can be protected for unauthorized use. If this function is activated, a PIN code has to be entered at power on, or when the handset is placed in a charger.
-
Page 51: Display Settings
Menu Operation Automatic lock time You can change the lock time for the phone lock or key lock to suit personal choice, for example, to shorten it from 20 seconds (default) to 5 seconds, for example, to avoid accidental redialling when the handset is in a pocket. - Page 52 Menu Operation Rotate Display Text The handset can be configured to show the contents of the display (except the soft key bar) up- side-down at incoming calls or messages. This setting makes it possible to check the display while the handset remains clipped to a belt or pocket. The display reverts to normal when any key is pressed (except up/down on the Navigation key).
-
Page 53: Change Text Size For Messages
Menu Operation DD-MM-YYYY 10-01-2009 DD.MM.YYYY 10.01.2009 6. Press “Select” to save the setting. Answering The default setting for the handset is to use the Call key when answering a call. The answering behavior can be configured to answer the call automatically, that is, without pressing a key, or/and in loudspeaking mode. -
Page 54: Change Owner Id
Menu Operation 2. Enter “Settings” in the menu. 3. Select “*Language”. 4. Select: Czech (Ceština) Danish (Dansk) German (Deutsch) Greek ( ) English (English) Spanish (Español) French (Français) Italian (Italiano) Hungarian (Magyar) Dutch (Nederlands) Norwegian (Norsk) Polish (Polski) Portuguese, Brazilian (Português (Br)) Russian ( )... - Page 55 Menu Operation Edit Alarm Data Information (for example a handset’s location) can be sent along with an alarm. It is recommended to create a shortcut for quick access to the “Edit alarm data“ menu, see "Short Cuts" on page 45. 1.
-
Page 56: Connections
Menu Operation Connections Headset To achieve optimal audio quality with the different headset types, it is recommended to select the corresponding headset profile. The default setting is microphone on a boom, that is, the audio is optimized for using a headset with microphone on a boom. - Page 57 Menu Operation If handset restrictions are enabled, the handset might not be switched off/muted when placed in the charger. 1. Enter the menu by pressing the “Menu” soft key. 2. Select “Connections” in the menu. 3. Select “In charger”. 4. Select “Sound off”. Change profile The handset can change profile automatically when it is placed in the charger (WL3 Plus only).
-
Page 58: Advanced Functions
Advanced Functions Advanced Functions Device Information In the Device Information menu, you can view information about the handset, which can be useful when contacting the system administrator to get support: • Software version • Hardware version • Licenses • WLAN information •... -
Page 59: Advanced Messaging
Advanced Messaging Advanced Messaging The following features are applicable to WL3 Messaging and WL3 Plus only. Please contact your administrator to get support. Voice Mail This feature is only available, if configured in the system. Receive a Voice Mail When receiving a voice mail, this is indicated by the icon in the status bar. -
Page 60: Colored Messaging
Advanced Messaging Colored Messaging You can receive colored messages in the handset. The application that sends the message deter- mines the color. Colored messaging can be useful for categorizing messages. In the figure below, there are two colored messages (a new message, and a read message) in the Message inbox (left in the figure). -
Page 61: Mobile Data
Advanced Messaging Mobile data from the handset can initiate the application to send the interactive message, see "Mo- bile Data" on page 61. The user can then select one action from the list. The action can be sending a message back to the application and/or dialing a specific number etc. Mobile Data Send Mobile Data You can send data entered by a user from the handset by selecting a service. -
Page 62: Operation Notice
Operation Notice Operation Notice Accessibility and Voice Quality The WLAN network is not always available. If you do not get in contact with your system, contact your system administrator. For best voice quality, avoid positioning near computer, radio or similar equipment. -
Page 63: Maintenance
Maintenance Maintenance Maintenance of Batteries Battery Warnings The “Low battery” icon is displayed when the battery has 10% or lower of its capacity left. In addition; a warning signal sounds every minute, the LED flashes orange, and the dialog window “Battery low! Charge now!” appears. The “Empty battery”... -
Page 64: Attach The Hinge-Type Clip
Maintenance Replace the Battery If the standby time for the handset becomes too low, the battery should be replaced by a new one. Please contact your system administrator or your supplier, for information about new batteries. At- tach the battery as described in the illustration below. The battery is easy to replace. It is attached inside the battery lid and is connected to the handset in such a way that no improper contact is possible. -
Page 65: Attach The Swivel-Type Clip
Maintenance Attach the Swivel-type Clip Attach the swivel-type belt clip as described in the illustration below. Figure 12 Screw the swivel-type clip into position. Attach Cover for No Clip Attach the enclosed cover as described in the illustration below, when no clip is to be used. Figure 13 Screw the cover into position. -
Page 66: Troubleshooting
Troubleshooting Troubleshooting This section contains information on how to solve common operational problems and warnings. Go through the following lists, if you encounter any problems. If this checklist does not solve the problem, contact your system administrator. If others have similar problems, there may be a system error. Operational Problems Fault Probable cause... -
Page 67: Menu Tree
Menu Tree Menu Tree Calls Call list > 1234 12:00 > Call 1235 14:00 More > Time of call etc. Edit number Save number > Work number Mobile number Other number Send message > Delete > Delete all > Back Missed calls >... -
Page 68: Profiles
Menu Tree Other number Ring signal > Delete contact > Search From contact list > Central Phonebook > Search by name > Call (First name:) More > View contact (Last name:) Add to cont. Send message Search by number > Call (Phone number:) More... -
Page 69: Messaging
Menu Tree Messaging Applicable to WL3 Messaging and WL3 Plus only. Inbox > Message > View > Reply > Enter text > Send list More > Delete Forward Call sender Call no. in text > Call Back Save number Close More >... -
Page 70: Services
Menu Tree Services Applicable to WL3 Messaging and WL3 Plus only. This function is configured by the administrator. Add new > Enter name > Phone call > Phone number > Enter number > Save “Contacts access” > Save Back Send data >... -
Page 71: Connections
Menu Tree Logout Divert calls Show RSSI Value Control question > Middle > (same as Left key) Right > (same as Left key) – Hot Keys > 0, 2 > Function > (same as above) Control question > Navigation > >... -
Page 72: Settings
Menu Tree Settings – Sound & Alerts > Volume > Silent, Volume: 1 15 different Ring signals > Internal call > signals External call > (same as above) Callback > (same as above) Message alert > Message alert 1 >... -
Page 73: In Call
Menu Tree 01.07.2010 Answering > Answering key > Call key Any key Answering behavior > Automatically > Change Back Loudspeaking > (same as above) Quick answer > (same as above) Messages > Text size > Normal Large Language > Czech (Ceština) Danish (Dansk) German (Deutsch) Greek (... -
Page 74: Customizing The Menu Tree
Menu Tree > Cancel Retrieve > Hold > Retr. More Conference > Contacts > Call contact > Call View Back Add contact > > Name > Work number > Mobile number > > Other number > > Ring signal > From call list >... -
Page 75: Abbreviations And Glossary
Abbreviations and Glossary Abbreviations and Glossary Graphical User Interface. Internet Protocol: Global standard that specifies the format of datagrams and the addressing scheme. Portable Device Manager: Used for management of portables, editing of parameters and updating the portables with new software. SNMP Simple Network Management Protocol VoIP... -
Page 76: Index
Index Index Call list ............24 – Case ................. 12 Central phonebook ........25 Charge battery ............63 charging behaviour ..........56 charging rack ............18 Accessories .............. 18 Clip ..............13 Acoustic Location Signal .......... 32 attach ...............64 Alarm ..............33 Coloured messages .......... - Page 77 Index Message ............ 44 ??– , ??– alert ............... 48 Icons coloured ..............60 display ..............15 delete ..............42 Inbox ................ 41 display time ............59 Interactive messages ..........60 forward ..............42 interactive .............. 60 priority ..............59 queue ..............
- Page 78 Index Rack charger ............18 WLAN information ............ 58 Regulatory compliance ...........8 WLAN restrictions ............8 –?? Replace handset ............65 Write text/numbers ........... 14 Ring signal turn on/off .............. 21 type ............... 48 volume ..............48 Safety precautions ............. 6 Screen saver ............
Need help?
Do you have a question about the OpenStage WL3 and is the answer not in the manual?
Questions and answers