Table of Contents
Advertisement
Quick Links
1
2
4
5
7
8
0
Modulo pulsantiera digitale serie Profi-
IT
lo per sistema
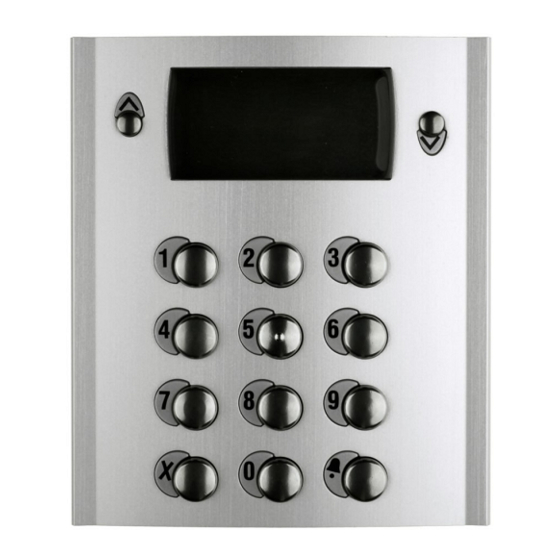
Pulsantiera in alluminio serie Profilo con 14 tasti in acciaio e
display LCD. La pulsantiera permette di effettuare chiamate
e conversazioni citofoniche su sistemi di comunicazione con
tecnologia GSM. La chiamata agli interni può avvenire tramite
ricerca del nominativo in rubrica o composizione sulla tastiera
del numero abbinato all'utente.
Dati tecnici
Alimentazione:
Assorbimento a riposo:
Assorbimento massimo:
Tempo azionamento serratura:
Display LCD:
Numero di chiamate:
Memoria:
Numero relè:
Contatti relè:
Dimensioni:
Temperatura di funzionamento:
Massima umidità ammissibile:
3
6
9
12Vca/cc ± 1
1÷60 secondi
grafico 128x64
250 nominativi
12÷24Vca/cc - 1A
Italiano
Mi 2488
Digital push-button module series Profilo
EN
for
Profilo series aluminum push-button panel with 14 steel
buttons and LCD display. The push-button panel allows
making an intercom call using GSM technology. Call can be
done by searching the user name in the electronic directory
or dialing directly the user number on the keypad.
Technical features
Power supply:
Operating current:
0,15A
Maximum absorption:
0,25A
Door-opening time:
LCD display:
Number of calls:
127
Electronic index:
2
Number of relays:
Contact ratings:
Dimensions:
1 modulo
Operating temperature:
0°÷+40°C
90% RH
Maximum humidity acceptable:
English
- 1 -
TD10PLG
system
12÷24Vac/dc - 1A
12Vac/dc ± 1
0.15A
0.25A
from 1 to 60 sec.
graphic 128x64
127
250 names
2
1 module
0°÷+40°C
90% RH
Mi 2488
Advertisement
Table of Contents

Related Manuals for Farfisa Profilo TD10PLG


Summary of Contents for Farfisa Profilo TD10PLG
- Page 1 Mi 2488 TD10PLG Digital push-button module series Profilo Modulo pulsantiera digitale serie Profi- system lo per sistema Profilo series aluminum push-button panel with 14 steel Pulsantiera in alluminio serie Profilo con 14 tasti in acciaio e buttons and LCD display. The push-button panel allows display LCD.
-
Page 2: Installazione
2 INSTALLAZIONE 2 INSTALLATION Fissaggio dei telai portamoduli al ri- porto superiore tramite le 2 viti piccole fornite a corredo delle scatole da in- casso. PL10G Fixing of module frames to the upper side by the 2 small screws included in the back boxes. - Page 3 SPECIFICHE OPERATIVE OPERATING SPECIFICATION Presa stereo per la programmazio- Cavetto per il collegamento al modulo ne dell'unità tramite Personal Com- puter. audio GSM (PL10G ÷ PL124G). Jack stereo for programming the Flat cable for the connection to the unit through a Personal Computer. audio module (PL10G...
-
Page 4: Schemi Di Collegamento
2.2 SCHEMI DI COLLEGAMENTO 2.2 CONNECTING DIAGRAMS I due schemi seguenti permettono di effettuare la chiamata The two following diagrams allow to make an intercom call citofonica selezionando il nominativo presente nella rubrica by selecting the user name in the electronic directory or o componendo il numero del gruppo abbinato all'utente dialling, on the keypad of the module TD10PLG, the group direttamente sulla tastiera del modulo TD10PLG (numeri... -
Page 5: Programming Mode
PROGRAMMAZIONE PROGRAMMING MODE Una corretta programmazione è essenziale per il funzionamento Programming is essential for the proper operation of the system, so dell’impianto, pertanto deve essere effettuata da personale esperto ed the function is accessible by entering an administrator password. è... - Page 6 Indirizzo Address KPA4..KPA4..dottor Rossi Dr Moss portinaio concierge Indirizzo Address KPA5..KPA5..ACI Farfisa Intercoms ACI Farfisa Intercoms Premere Press or dial comporre numero the user number Rubrica Contacts dottor Rossi Dr Moss portinaio Concierge...
- Page 7 You can load names directly from your PC. Spegnere la pulsantiera e il Personal Computer. Load the user-names on the PC using the Farfisa software Collegare la porta seriale del PC alla presa stereo PC presente sul application (supplied on demand).
- Page 8 Porta seriale del PC Spina stereo Ø=2,5mm PC serial port Stereo jack Ø=2.5mm TD10PLG TD10PLG LP LN LP LN Accendere il PC e poi la pulsantiera. Turn on the PC and then the push-button panel. Seguire le istruzioni fornite con il software. Follow the instructions provided with the software.
- Page 9 - Relè 2 - Relay 2 - Selezionare "Relè 2" e premere ; compare il valore precedente- - Select “Relay 2” and press ; the previously programmed mente programmato (di fabbrica è 3 secondi); address (default is 3 seconds). - Cancellare il valore esistente premendo ; - Delete the existing value by pressing .
- Page 10 Default. Default. Per riportare la tastiera alla programmazione di fabbrica e quindi To restore the keypad setting made at the factory and then delete all cancellare tutte le variazioni effettuate in fase di programmazione, changes made during programming you must: occorre: - select “Default”...
-
Page 11: Funzionamento
4 FUNZIONAMENTO 4 OPERATION Check that all connections are correct. Connect the power supply unit Controllare che i collegamenti dell'impianto siano effettuati corretta- mente. Mettere in funzione l'impianto collegando a rete l'alimentatore; to the mains; the push-button panel automatically checks the status la pulsantiera visualizza per 5 secondi "TD10PLG Release .."... - Page 12 Mi 2488 TD10PLG Módulo placa de calle digital serie Profilo Module plaque de rue numérique série para sistema Profilo pour système Placa de calle de aluminio serie Profilo con 14 teclas de Plaques de rue en aluminium, série Profilo à 14 boutons- acero y pantalla LCD.
-
Page 13: Instalación
2 INSTALLATION 2 INSTALACIÓN Fixation des cadres port modules au report supérieur par les 2 petites vis qui trouvent dans boîtes d’encastrement. PL10G Montaje de los marcos porta-módulos al agregado superior por los 2 tornillos pequeños que se encuentran en las cajas de empotrar. - Page 14 SPÉCIFICATIONS OPÉRATIONNELLES ESPECIFICACIONES OPERATIVAS Jack stéréo pour la programmation Petit câble pour la liaison au module de l'appareil via un ordinateur per- sonnel. audio GSM (PL10G÷PL124G). Jack estéreo para la programación Cablecito por la conexión al módulo de la unidad a través de un ordena- audio GSM (PL10G÷PL124G).
-
Page 15: Schémas D'installation
2.2 SCHÉMAS D'INSTALLATION 2.2 ESQUEMAS DE INSTALACIÓN Les 2 schémas suivants permettent d’effectuer l’appel Los 2 esquemas siguientes permiten hacer la llamada interphonique en sélectionnant le nom présent dans l’agenda seleccionando el nombre en la guía o marcando el número ou en composant le numéro du groupe associé... - Page 16 PROGRAMMATIONS PROGRAMACIONES Les programmations sont essentielles pour le fonctionnement correct Las programaciones son esenciales para el funcionamiento correcto du circuit; elles sont donc accessibles à l’aide de la saisie d’un mot de de la instalación, por lo tanto, puede accederse a ellas mediante la passe.
- Page 17 à appel prioritaire Adresse Dirección KPA4..KPA4..Dr Dubois Dr. Pérez Concierge Porter Adresse Dirección KPA5..KPA5..ACI Farfisa Intercoms ACI Farfisa Intercoms Appuyer Pulsar composez le numéro marque el número Contacts Agenda Dr Dubois Dr. Pérez Concierge Porter Dupont Marie...
- Page 18 Modification d’un utilisateur Modificación de un usuario - Seleccionar el usuario que se desea modificar y pulsar - Sélectionner l’utilisateur que l’on veut modifier et appuyer sur - Seleccionar “Modificación” y pulsar - Sélectionner “Modification” et appuyer sur Para eliminar o modificar el nombre se puede sobrescribir el texto existente o borrarlo completamente y, a continuación, volver a Pour effacer ou modifier le nom, on peut refrapper le texte sur celui escribir el nuevo nombre.
- Page 19 Port série de l'ordi- Prise stéréo Ø=2,5mm Puerta serial ordenador Toma estéreo Ø=2,5mm nateur TD10PLG TD10PLG LP LN LP LN Mettre sous tension l’ordinateur et la plaque de rue. Encender el ordenador y luego la placa de calle. Suivre les instructions fournies avec le logiciel. Seguir las instrucciones proporcionadas con el software.
- Page 20 programmée précédemment (par défaut est de 3 secondes). programado (por defecto es de 3 segundos). - Effacer la valeur existante en appuyant sur ; - Borrar el valor existente pulsando . - Saisir la nouvelle valeur comprise entre 0 et 60 (secondes) et - Introducir el nuevo valor comprendido entre 0 y 60 (segundos) y appuyer sur pulsar...
- Page 21 Pour accéder aux programmations, il faut: Para acceder a las programaciones es necesario: - entrer dans programmation comme décrit dans le paragraphe “Entrer - entrar en programación como se ha descrito en el apartado “Entrar en programmation”; en programación”; - seleccionar "Varias" y pulsar ;...
- Page 22 4 FONCTIONNEMENT 4 FUNCIONAMIENTO Averiguar que las conexiones de la instalación se han hecho Contrôler que les branchements de l’installation sont correctement correctamente. Poner en función la instalación conectando el effectués. Mettre en fonction l’installation en branchant l’alimentation alimentador a la red; la placa de calle efectúa automáticamente un au secteur;...
- Page 23 Italiano English Mi 2488 - 12 -...
Need help?
Do you have a question about the Profilo TD10PLG and is the answer not in the manual?
Questions and answers