Table of Contents

Subscribe to Our Youtube Channel
Related Manuals for Farfisa Alba CV2144AB


Summary of Contents for Farfisa Alba CV2144AB
- Page 1 Chapter 3 EXTERNAL DOOR STATIONS pag. CV2144AB/CA2144AB DD2140AB 3.16 PD2100AB 3.21 TD2000He 3.29 olvo TD2000 3.38 TD2000A 3.38 TD2000rl 3.38 TD2000RAL 3.38 gorà forcHApTer kiT AD2101Agl 3.48 vD2101Agl 3.48...
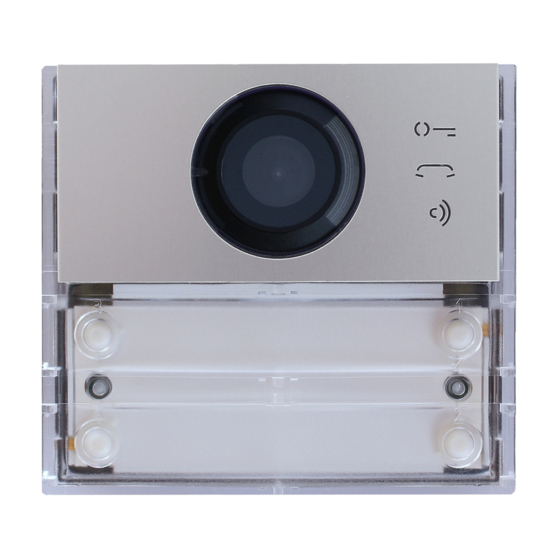
- Page 2 Art. CV2144AB Art. CA2144AB Programming via DUO System app Modulators manage- 99,60 mm ment Audio/video or only audio modules for DUO sistem The modules are equipped with: - voice messages;; - 2 Single-Button or 4 Double-Buttons con- figuration; - programming via Bluetooth; - auxiliary relay (contacts C and NA);...
- Page 3 Art. AB21 Art. AB00 Art. CT2138AB Key with Braille Reliefs Art. AB20 Additional button module. Neutral module Technical data Power supply: from DUO line Key cover Absorption: 0,01 A Art. AB50 House number module. The complete set includes 2 connection ca- Technical data bles EC733 Power supply:...
- Page 4 Art. SC1 45 mm 302 mn 210 mm 122 mm 119 mm Built-in boxes Art. AB71 AB72 AB73 EC733 560 mm connecting cable, not included in the CT2138AB module scope of delivery, which must be purchased in case the connection from one button module to the next is made by switching from one carrier frame to the frame immediately next to it.
- Page 5 Mounting and installation EC733 click click...
- Page 6 AB71-AB72-AB73 AB61-AB62-AB63 click AB21 AB20 click...
- Page 7 Disassembling AB21...
- Page 8 Art. AB91 AB92 AB93 140 mm 62 mm Art. AB94 AB96 EC733 264 mm 560 mm connection cable, not included with the CT2138AB module, which must always be purchased when installing the CT2138AB modules in the AB94 and AB96 canopies. Roofs for surface mounting Art.
- Page 9 AB81S-AB83S: maximum 20 users (10 if configured on single row). Using the area of the website www.farfisa.com ‘CONFIGURE YOUR SYSTEM’ it is possible to obtain a complete list of all the articles required for the composition of any configuration (from among those admissible) of the entry panels in the system.
-
Page 10: Factory Settings
The Audio and Audio-Video Modules are press the “+” button and enter the address of Attention: after composing the number, compatible with Extended Range DUO Farfisa the Cx2144AB module. With the XE2921: launch always remember to confirm the entry digital systems as they support the possibility the app;... - Page 11 121 Enable tone while electrical lock is open- in the “Entering Codes and Values” section; press 1/ to confirm: you will hear a tone and 122 Switching OFF the video signal while symbol will stop flashing and the electrical lock is opening. symbol will flash quickly, notifying the 123 Activate auxiliary relay with PB-GN con- operator that the device is awaiting a new...
- Page 12 Programming sequential addresses in Single-Button Enabling the activation of the auxiliary the call buttons (codes 112-113). relay with PB-GN contact (code 123) A u d i o -V i d e o In extended range DUO systems, each user By enabling this function when closing the PB- Module must be identified by a Block Address (000 to GN contacts, instead of activating the electri-...
- Page 13 Presence of door keeper exchangers Auxiliary relay Block Address (code 148) enter the address of the main camera (the one from which the cyclic display sequence (code 142) Enter code 148; starts) chosen between the VM1÷VM8 ad- press button1/ to confirm; The door station must be suitably programmed dresses programmed earlier.
- Page 14 Single-Button Double-Buttons Example: to divide the pushbutton into three Continue with the next programming or exit groups so that the P1 and P2 buttons call the programming. addresses stored in the factory settings (Block 000 Device 099 and Block 000 Device 100), and Muting the call in progress tone (code 323) buttons from P3 to P6 call users with Block Ad- Reardless of whether voice messages are ena-...
- Page 15 OPERATION In addition to the LEDs illuminating the three icons on the front panel, there are voice messages describing the action performed: call sending, conversation, lock opening and end of conversation.
- Page 16 Art. DD2140AB Programmable with DUO System app ALBA Display modu- le for DUO system Allows calls to be made from the phonebook in DUO Systems: when connected to a PD2100AB keypad module, calls can also be sent by ente- ring the number of the desired extension. The capacity of the phone book integrated in the module is 1000 users.
- Page 17 Montaggio ed installazione click click Fig. Abb.4. Signalling meanings The DD2140AB module indicates the outcome PD2100AB signals extension called during conversation of a code entered or the status of a call by The digital keypad PD2100AB can operate displaying graphic icons whose meaning is with the Display DD2140AB.
- Page 18 DD2140AB functions related to the time and ·Password DD2140AB is an ALBA series display module day of the week). ·Actuations that can be used with FARFISA DUO and MYCOM ·Time intervals systems alone or connected to the PD2100AB ·Delete Manual programming...
- Page 19 the first digit and confirm using the key; System operation in bistable mode) of the second the cursor automatically positions itself on relay of the module PD2100AB (C/NA con- It features the following items the next box. Look for the 2nd number and nector J7).
- Page 20 Tap the key to go back to the previous menu. -Welcome Messages In standby, the display shows the Farfisa fac- tory logo, which can be alternated with maxi- -Date Format mum two custom messages of 4 rows each, (year/month/day by default).
- Page 21 Art. PD2100AB Programmable with DUO System app Access control with Smart Access app ALBA Keypad Modu- le for DUO system Consente di effettuare chiamate in impianti ed eseguire funzioni di controllo accessi. Può essere collegato all’interfaccia XE2921/XE2922 per sfruttare le potenzialità di un orologio di sistema e per la programmazione via Bluetooth.
- Page 22 Installation and assembly example in stand-alone configuration (used as access control) click click Signalling power supply unit connected Cyan: module synchronised with sys- to the module also powers Green: valid code, actuators enabled. tem clock. subsequent modules. Red: invalid code. Timed access codes that depend on the system If the access code entered is valid, the keypad clock (time schedules) are enabled.
-
Page 23: Manual Programming
Module connected to DUO systems ming of the device. Attention: if during the programming To use the module in FARFISA DUO digital sys- phase some access codes are linked to Enter manual programming tems, the jumper J2 must be in position 1-2... - Page 24 ning of the programming phase, i.e. to insert John Brown2, etc.). ously associated services and press the code of the parameter to be programmed. - enter the three-digit number of the first Depending on the type of system, each access service to be associated (see previous table) Table 1.
- Page 25 (factory setting). from door unit. In this mode, the actua- programming. • 003 In FARFISA DUO or MyCom systems, tor can also be activated by directly press the keys to enter access dialling its address (if known), followed Fourth system actuator address (code 34) control mode (factory setting).
- Page 26 PD2100AB PIN codes with one or more schedule; when the after entered any address. module is synchronised with a system clock, When used in a FARFISA MyCom system, keypad keys are cyan. PD2100AB can be used also for access control...
- Page 27 ALBA video flush-mounted push-button panel dialling table with double row call (*). Calls Dimensios A/V module Key mod- Mod- Built- Con- Mount- LxHxP mm (**) cover in box necting ternal neutral cable frame frame (***) 124x124x11 CV2144AB AB21 AB20 AB71 AB61 CV2144AB AB21...
- Page 28 ALBA video surface-mounted push-button panel dialling table with double row call (*). Calls Dimensios A/V module Key mod- Mod- Surface Con- Mount- LxHxP mm (**) cover mount- necting ternal neutral ing box cable frame frame (***) 140x138x62 CV2144AB AB21 AB20 AB91 AB71 AB61...
- Page 29 Art. TD2000HE Programmable via DUO System app 499,2 467,2 Access control via Smart Access app Managing modula- tors Vandal proof door station with Braille and speech synthe- sis for DUO system AISI 316L steel push-button panel with 14 large (25x25mm) backlit buttons with Braille embossing, 4 symbols for system status and 3’...
- Page 30 Bluetooth module mounting For fixing the XE2921/XE2922 module, do not use the screws supplied with the product but those supplied with TD2000HE. For inputs P2, P3 use the supplied RFID mounting connectors. Mounting adapter for Vigik...
-
Page 31: Installation
Installation A - Before mounting the flush- mounting box, protect the fixing holes in the plate. B - Position the push-button panel so that sunlight or other direct or reflected light sources of strong intensity do not strike the camera lens. - Page 32 Adjustments Adjusting the Microphone Volume To adjust the microphone volume, use the trimmer Regolazione volume microfono Microphone volume Adjusting loudspeaker volume To adjust the loudspeaker volume, proceed as follows: - with the system in stand-by, access programming for TD2000HE: dial 00 + then 0039 (factory setting) + ; - from one of the monitors connected to TD2000HE perform auto power on and enter conversation;...
- Page 33 PROGRAMMING once you enter the menu item, press key - Name to delete the data inserted, if any, and (Empty by default.) User name, there are The main factory settings are reported in the type in the new value by pressing keys 0 - 9; 20 characters available, that can be let- following.
-
Page 34: External Station
correctly, the user whose address is as- You will see the following items: See paragraph Entering a numeric value to sociated with the password will ring one - External Station learn how to enter addresses. If needed, time; - PDX proceed in the same manner and program - Call: when the password is entered cor- - AUX CAM... -
Page 35: Activate Relay
be enabled with the mode set in the - Actuator1, Actuator2, Actuator3, Actua- programming and press key to return to menu “System” “Timings” “Activate tor4: enabling of up to 4 remote DUO the previous menu. Programming options: relay”. actuators, if any, the addresses of which have been set in the System/Addresses - Activate S+S-: activation time of the lock - User address. -
Page 36: Date Format
Date and time - Disable - Address (Enabled by default) Press key to enter - Enable (255 by default, not programmed.) Sys- programming. The following items will be tem address to send Call and Ring-me ac- displayed: Use the arrows to select func- tions (or any Gate-info), from 001 to 200 - Disable tion and press key... - Page 37 XE2922 can offer an alternative to proximity screen and the symbol will remain on. readers. Thanks to the new FARFISA SMART When the handset is placed back on the video ACCESS app, available for iOS and Android, intercom or key is pressed on push-but- access via Bluetooth technology is possible.
- Page 38 Art. TD2000RL TD2000RAL TD2000 TD2000A 137 mm 137 mm 306 mm 306 mm Programmable via DUO System app 272 mm 272 mm 170 mm 170 mm Managing modula- 137,00 170,00 61,00 tors 40,00 Vandal proof door station for DUO sy- stem Push-button panel with 16 keys, 4 symbols for system status and alphanumeric LCD, allows...
- Page 39 TD2000RLTD2000RAL 170 cm TD2000-TD2000A 170 cm...
- Page 40 Adjustments Volume adjustment To adjust the microphone and speaker volumes, use the trimmers Antilocal adjustment Regolazione innesco (effetto Larsen) Antilocal adjustment To eliminate a possible trigger (Larsen effect), proceed as follows: - make the call from the door unit and lift the handset of the called party; - in the push-button panel, remove the microphone from its housing, place it over the loudspeaker of the speech unit and adjust the trim- until the whistling is cancelled;;...
-
Page 41: Default Settings
PROGRAMMING With arrows it is possible to scroll Browses downward the programming the functions, while key confirms the se- Default settings menu. Scrolls the alphabet forward lection. key backwards you and exits the while entering characters; - System password = 0039 programming mode. - Page 42 - Activate S+S-: releases the door lock - Sort by Address; all the users are listed - Activate S+S-: release the door lock con- connected to the terminals S+ and S-; by their address. Before the address, be- nected to terminals S+ ed S-; with the with the arrows select <YES>...
-
Page 43: Format Memory
Accessing the menu “Delete all”, the first currently stored value is reported (no ad- Format memory? With arrows line of LCD shows: select <YES> or <NO> and then press dress from factory). With button erase - Delete all? With arrows select the old address, if present, and, with the choosing <NO>... -
Page 44: Administrator Password
To program the address select “Relay ad- and enter the new one, then confirm by button. button backwards you to the dress” and press . LCD shows “Enter pressing the , system returns to the previous menu. block address”, while on the bottom of the previous menu. -
Page 45: Firmware Version
<YES> or <NO> and then press two massages you wish to modify, then FARFISA (www.farfisa.com). ; the system stores your selection press to confirm. LCD shows a blanked To exchange data it is necessary to operate and returns to the previous menu. - Page 46 6b. In the “Contact Manager” program, How to use the building directory select the voice “Upload from USB device”. Directory stores, in alphabetical order, all the 7b. Data transfer starts and at the end, users of the building and it is possible to scroll the display of TD2000 and the moni- them with arrows.
- Page 47 Surface mounting with outdoor roof For TD2000RL-TD2000RAL - TD1000CN (IP EVO) Art. 290C/0 (AISI 316L steel) 170 cm For TD2000-TD2000A Art. 290S/0 174 mm L I C 75 mm 311 mm 170 cm...
- Page 48 Art. AD2101AGL VD2101AGL AGL21 Programmable via Do not use DUO System app Modulators manag- EXTERNAL STA- TIONS FOR KIT Only audio or audio/ video external door station for DUO Sy- stem Agora series external door stations with 1 or maximum 2 buttons. Allows calls to be sent on the DUO digital line.
- Page 49 Installation of VD2101AGL and AD2101AGL door stations In video intercom systems, position the came- ra so that sunlight or other direct or reflected light sources of strong intensity do not hit the camera lens. Application of the second button on the door station faceplate click click AGL21...
- Page 50 Adjustments Volume adjustment Per regolare i volumi del microfono e dell’altoparlante, agire sui trimmer Antilocal adjustment To eliminate a possible trigger (Larsen effect), proceed as follows: - make the call from the door unit and lift the handset of the called party; - in the push-button panel, remove the microphone from its housing, place it over the loudspeaker of the speech unit and adjust the trimmer until the whistling is cancelled;;...
-
Page 51: Factory Setting
PROGRAMMING - Enter one digit at a time by pressing the “P2” 112. Entering the P1 Button address. button for a number of times “n”, where “n” The P1 button is coded by default with address To program the device it is necessary to is the value of the digit you want to enter, 100;... - Page 52 enter code 142 and press P1; you hear a con- OPERATION ù firmation tone and the red LED start flashing; enter address 201 if the door station operates Check that all the connections of the system with 1 or more main door keeper exchangers are correct.
Need help?
Do you have a question about the Alba CV2144AB and is the answer not in the manual?
Questions and answers