Advertisement
Available languages
Available languages
Quick Links
Advertisement

Related Manuals for Proline PGH465GM-N


Summary of Contents for Proline PGH465GM-N
- Page 1 PGH465GM-N PGH460GL-EU ORERATING AND INSTALLATION INSTRUCTIONS BUILT-IN GAS HOB...
-
Page 2: Table Of Contents
CONTENTS 1. DESCRIPTION OF THE HOB 2. SAFETY INSTRUCTIONS 3. INSTALLATION 4. USAGE 5. MAINTENANCE & CARE... -
Page 3: Dear Customer
Dear Customer, Thank you for purchasing this Proline Cooking Hob. The safety precautions and recommendations in these instructions are for your own safety and that of others. They will also provide a means by which to make full use of the features offered by your appliance. -
Page 4: Description Of The Hob
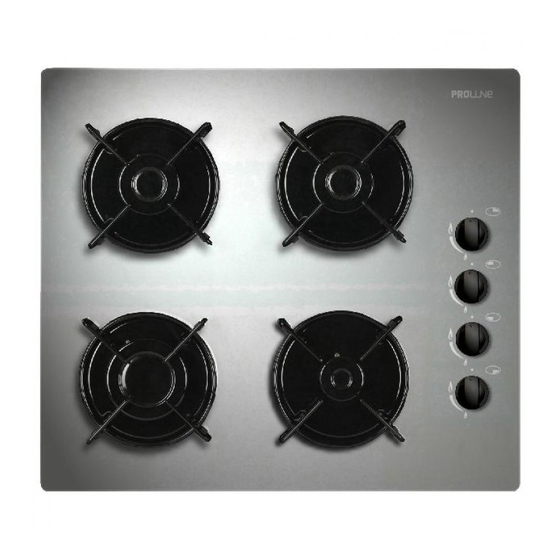
DESCRIPTION OF THE HOB Descriptions: 1. Ceramic glass 6. Rapid burner 2. Pan support 7. Semi-rapid burner 3. Burner cap 8. Auxillary burner 4. Burner body 9. Base cover 5. Control knob... -
Page 5: Safety Instructions
SAFETY INSTRUCTIONS READ ALL IMPORTANT SAFEGUARDS AND ALL INSTRUCTIONS BEFORE USING THE APPLIANCE The adjustment conditions for this appliance are stated on the rating label. This appliance shall be installed in accorance whit the regulations in force and only used in a well ventilated space. -
Page 6: Installation
INSTALLATION PRIOR TO INSTALLATION, ENSURE THAT THE LOCAL DISTRIBUTION CONDITIONS AND THE ADJUSTMENT OF THE APPLIANCE ARE COMPATIBLE. This appliance must be installed by a qualified gas installer who must also be a qualified electrician if the appliance requires connecting to a mains electricity supply. - Page 7 Create a space to install your hob , following the dimensions indicated on figure. • 100 mm from edge of cooker to combustible materials. • 0 mm underside of overhead cupboards, shelving • 750mm underside of overhead exhaust fans. This appliance must be installed according to the manufacturers installation instructions, local building regulations, gas authority codes and electrical wiring instructions.
- Page 8 • For all types of gas using the D type connection in United Kingdom and Ireland, the flexible gas hose should neither pass behind an oven or be in contact with objects that may cause combustion. MPORTANT • The appliance should be installed, regulated and adapted to function with o ther types of gas by a QUALIFIED INSTALLATION ENGINEER.
- Page 9 Table for the choice of the injectors Gas Category G 31 G 30 28-30 mbar 28-30/37 mbar 50 mbar 20 mbar 25 mbar RAPID BURNER Injector diam.(%mm) Nominal Rating (kw) Min. Rating (kw) 0.85 0.85 1.23 0.82 218.13 gr/h Consumption in 1h 218.13 gr/h 214.28 gr/h Consumption in 1h...
- Page 10 LOCATION The appliance may be installed in a kitchen, kitchen/diner or a bed sitting room, but not in a room or space containing a bath or a shower. The appliance must not be installed in a bed-sitting room of less than 20 m . The appliance is designed and approved for domestic use only and should not be installed in a commercial, semi commercial or communal environment.
- Page 11 Locating the built-in hob Neigboorhood walls A [mm] B [mm] Combustible Non-combustible...
-
Page 12: Electrical Connection
ELECTRICAL CONNECTION Before proceeding with the electrical connection verify that : • The current carrying capacity of the system and the socket is adequate for the maximum power rating of the hob. • The voltage indicated on the capacity label is the same as the supply voltage •... - Page 13 ELECTRICAL CONNECTION (UK ONLY) For your safety please read the following information Warning: This appliance must be earthed. The appliance must be connected to a 240 volts 50 cycle AC supply by means of a three pin socket, suitably earthed and should be protected by a 3 amp fuse in the plug.
-
Page 14: Usage
USAGE 4.1 Usage of Your Gas Burners Manual Ignition To ignite one of the burners, approach a match to its upper circumference and push the corresponding conrol knob and turn it counter clock-wise. Medium regulation of the flame will be obtained by turning the control knob between maximum position (big flame) and the minimum position (small flame). -
Page 15: Gas Connection
GAS CONVERSIONS Transformation For The Gas Cookers Replacement Of Injectors GAS CONNECTION The installation of the gas appliance to natural gas or LPG must be carried out by a gas safe registered engineer. Engineers shall take due account of the provisions of the relevant British Standards Code of practice, the gas safety regulations and the building standards (Scotland) (Consolidation) regulations issued by the Scottish... - Page 16 • With the help of a small screwdriver fasten or loosen the by pass screw by 90°, which makes the flame of the burner reduce to the minimum. When the flame has a length of at least 4 mm, the gas is well distributed. Make sure that the flame does not die out when passing from the maximum position to the minimum position.
-
Page 17: Maintenance & Care
MAINTENANCE & CARE Disconnecting: Before cleaning disconnect the hob from the electricity supply by closing the main gas supply. Burner Caps: Periodically, enamelled pan supports, enamelled covers, burner heads must be washed with soapy warm water rinsed and dried. After drying them thoroughly, replace them correctly in their placement. Pan Supports: In order to keep them a new, it is necessary to clean them frequently with mildly warm soapy water and then dry with a soft tissue. - Page 18 If something doesn't seem to work If there is something about your appliance which you do not understand and you live in the UK you can phone our help line during normal office hours on: 0844 8009595 If you require service, call the number on your sales receipt.
- Page 19 PGH465GM-N BEDIENING EN INSTALLATIE INSTRUCTIES INGEBOUWDE...
- Page 20 INHOUD BESCHRIJVING VAN DE KOOKPLAAT VEILIGHEIDSINSTRUCTIES INSTALLATIE HET IN GEBRUIK NEMEN VAN DE KOOKPLAAT ONDERHOUD AAN HET APPARAAT...
- Page 21 Beste klant, Dank u voor uw aankoop van een Proline gaskookplaat. De veiligheidsmaatregelen en aanbevelingen in deze instructies gelden voor uw veiligheid en die van anderen. Ze bieden ook een mogelijkheid om alle functies van uw toestel optimaal te gebruiken.
- Page 22 BESCHRIJVING VAN DE KOOKPLAAT Beschrijvingen: 1. Keramisch glas 6. Grote brander 2. Pandragers 7. Kleine brander 3. Branderdop 8. Hulpbrander 4. Toestel 9. Basisdeksel 5. Bedieningsknop...
- Page 23 VEILIGHEIDSINSTRUCTIES LEES ALLE BELANGRIJKE VEILIGHEIDSMAATREGELEN EN ALLE INSTRUCTIE VOOR U HET TOESTEL IN GEBRUIK NEEMT De instellingen voor dit toestel worden vermeld op het label Dit toestel moet worden geïnstalleerd volgens de geldige reglementering en het mag enkel worden gebruikt in een goed geventileerde ruimte. Lees voor dit apparaat te installeren of te gebruiken de instructies.
- Page 24 INSTALLATIE VOOR DE INSTALLATIE MOET U ERVOOR ZORGEN DAT DE LOKALE DISTRIBUTIEVOORWAARDEN EN DE AFSTEMMING VAN HET TOESTEL COMPATIBEL ZIJN. Dit toestel moet worden geïnstalleerd door een gekwalificeerd gasinstallateur die ook een gekwalificeerd elektricien moet zijn als het toestel op het elektrisch netwerk moet worden aangesloten.
- Page 25 Creëer ruimte om uw kookplaat te installeren, volg de afmetingen vermeld in afbeelding 1. • 100 mm van de rand van de kookplaat en brandbaar materiaal. • 700 mm onder de kasten, laden • 750mm onder de ventilatoren. Dit toestel moet worden geïnstalleerd conform de installatie instructies van de fabrikant, de lokale bouwreglementering, gas autoriteitscodes en elektrische bedradinginstructies.
- Page 26 • Voor alle gastypes met een D-type verbinding in het Verenigd-Koninkrijk en Ierland mag de flexibele slang niet achter een oven lopen of in contact komen met voorwerpen die brandbaar zijn. BELANGRIJK Het apparaat moet worden geïnstalleerd, gereguleerd en aangepast zodat het kan ●...
- Page 27 Tabel voor de selectie van injectoren Gascategorie 28-30 mbar 28-30/37 mbar 50 mbar 20 mbar 25 mbar SNELLE BRANDER Injectiediam. (% mm) Nominaal Vermogen (kw) Min. Vermogen (kw) 0.85 0.85 1.23 0.82 218,13 gr/u Verbruik/uur 218,13 gr/u 214,28 gr/u Verbruik/uur 285,7 lt/u 332,2 lt/u (aan 1 5...
- Page 28 LOCATIE Het toestel mag worden geïnstalleerd in een , keuken/eetkamer of een woonkamer, maar niet in een kamer met een bad of douche. Het toestel mag niet worden geïnstalleerd in een kamer van minder dan 20m Het toestel is enkel ontworpen en goedgekeurd voor huishoudelijk gebruik en mag niet worden geï...
- Page 29 Locatie van uw ingebouwde kookplaat Muren A [mm] B [mm] Brandbaar Niet-brandbaar...
- Page 30 ELEKTRISCHE AANSLUITING Voor u overgaat tot de elektrische aansluiting moet u controleren dat: • Het stroomdragend vermogen van het systeem en het stopcontact toereikend is voor het maximum vermogen van de kookplaat. • De spanning vermeld op het vermogenlabel dezelfde is als de toevoerspanning •...
- Page 31 ELEKTRISCHE AANSLUITING (ENKEL VK) Lees de volgende informatie voor uw veiligheid Waarschuwing: Dit toestel moet worden geaard. Het apparaat moet worden aangesloten op een 240 Volt 50 cyclus AC voeding via een stekker met drie polen, correct geaard en beveiligd met een 3 amp zekering in de stekkering.
- Page 32 HET IN GEBRUIK NEMEN VAN DE KOOKPLAAT 4.1 Het gebruik van uw gasbranders Handmatige ontsteking Om een van de branders te ontsteken, brengt u een lucifer aan op de bovenste ring en u drukt de overeenstemmende knop in en draait deze met de wijzers van de klok.
- Page 33 GAS OMSCHAKELING Transformatie van de gasbranders Vervanging van de injectoren GASVERBINDING De installatie van het gasapparaat op aardgas of LPG-gas moet worden uitgevoerd door een gas geregistreerde installateur. Ingenieurs moeten de voorzieningen van de praktijkcode van de relevante Britse normen, het gas veiligheidsreglement en de bouwnormen (Schotland) (Consolidatie) reglementeringen strikt naleven die werden uitgevaardigd door het Schotse Departement voor...
- Page 34 • Maak de overbruggingsschroef 90° losser of vaster behulp van een kleine schroevendraaier, dit laat de vlam van de brander tot een minimum komen. Wanneer de vlam een omvang heeft van 4 mm, dan is het gas goed verdeeld. Zorg ervoor dat de vlam niet uitdooft tijdens de overgang van de maximum op minimum stand.
- Page 35 ONDERHOUD AAN HET APPARAAT De verbinding wordt verbroken: Voor u schoonmaakt, moet u de kookplaat loskoppelen van het elektrisch netwerk door de gastoevoer af te sluiten. Branderdoppen: De email pansteunen, deksels, koppen moeten regelmatig worden gewassen met een warm zeepsopje, afgespoeld en gedroogd. Nadat u ze grondig hebt gedroogd, moet u ze opnieuw correct aanbrengen.
- Page 36 Als er iets niet werkt Als er iets met uw toestel is wat u niet begrijpt en u woont in het VK, kunt u met ons contact opnemen tijdens de normale werkuren op: 0844 8009595. Als u onderhoud vereist, kunt u het nummer bellen op uw ontvangstbewijs.
Need help?
Do you have a question about the PGH465GM-N and is the answer not in the manual?
Questions and answers