Proline IH680P-U Operating Instructions Manual
Induction cooker hob
Hide thumbs
Also See for IH680P-U:
- Instruction manual (7 pages) ,
- Instructions for use manual (8 pages) ,
- Operating instructions manual (74 pages)
Advertisement
Available languages
Available languages
Quick Links
Advertisement
Chapters

Related Manuals for Proline IH680P-U


Summary of Contents for Proline IH680P-U
- Page 1 IH680P-U Inductiekookplaat GEBRUIKSAANWIJZING...
-
Page 2: Table Of Contents
TABLEDESMATIÈRES TABLE DES MATIÈRES..............ϭ ATTENTION……………………………………………………………………………….. Ϯ MISESENGARDEIMPORTANTES............ DESCRIPTION.................. ϳ .............. PRINCIPE DE L'INDUCTION ϴ INSTALLATION................. ϴ BRANCHEMENTSÉLECTRIQUES............ϭϬ UTILISATION.................. ϭϮ ustensiles ..............Qualitédes ϭϮ Dimensionsdesustensiles............ ϭϯ... -
Page 3: Attention
ATTENTION Cetappareilestdestiné un à usage domestiqueuniquement. Toute utilisation autrequecelleprévuepourcetappareil,ou pouruneautreapplicationquecelleprévue, parexempleuneapplicationcommerciale,est interdite. Si le câbled'alimentationest endommagé, il doitêtreremplacéparlefabricant,son serviceaprèsventeoudespersonnesde qualificationsimilaireafind'éviterundanger. MISEENGARDE:L’appareiletsesparties accessiblespeuventdevenirtrèschauddurant l’utilisation.Attention à ne jamais toucher les élémentschauffants.Lesenfantsde moins 8ansdoiventêtremaintenus... - Page 4 mentalesréduites ou manqued’expérience etdeconnaissances à conditionqu’ellesaient reçuunesupervision oudes instructions concernantl’utilisationdel’appareilentoute sécuritéetqu’ellescomprennent les dangers encourus.Lesenfantsnedoiventpasjouer avecl’appareil.Lenettoyageetl’entretienpar l’usagernedoiventpasêtre effectués des enfants,sauf s’ilsontplus de 8 etqu’ils sontsurveillés. Maintenirl’appareiletsoncordonhorsde portéedesenfantsdemoinsde 8 ans. MISE ENGARDE:Unecuisson, sans ...
- Page 5 MISEENGARDE: Danger defeu:Nejamais placerd’objetssurlaplaquedecuisson. MISEENGARDE:Si la surfaceestfêlée, déconnecter l'appareil del'alimentationpour éviterunrisque de choc électrique. Nepasutiliserd’appareildenettoyage à la vapeur. L'usagernedoitpasfixerdes yeux lesfoyers decuisson. Cetappareiln’estpasdestiné à êtremisen fonctionnementaumoyend'uneminuterie extérieureouparun système commande à distanceséparé....
- Page 6 La tempér ature des surfaces accessibles peut être élevée lorsque l'appareil est en fonctionnement. La fiche prise de courant doit demeurer facilement accessible après l'installation de l'appareil. La surface extérieure peuvent devenir chaudes lorsque l'appareil fonctionne. Les informations détaillées sur la manière de nettoyer les surfaces en contact avec les aliments sont définis en page 21 dans la section “ENTRETIEN ET NETTOYAGE”.
-
Page 7: Mises En Garde Importantes
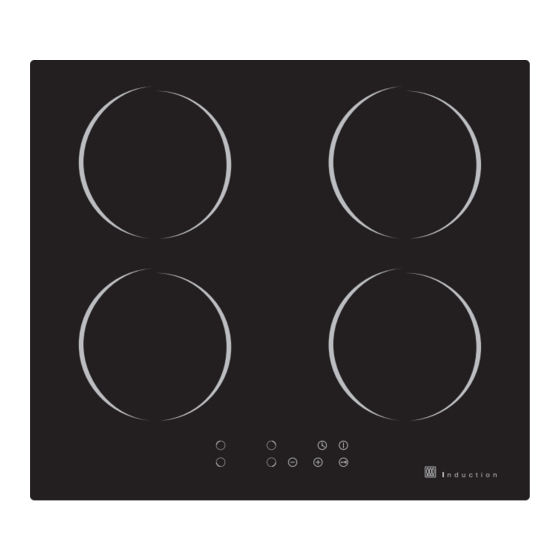
MISES EN GARDE IMPORTANTES x Lisez attentivement le mode d’emploi avant d’installer et d’utiliser cette table de cuisson. x Aucun produit ou matériau combustible ne doit être posé sur la table sous quelque prétexte que ce soit. x Pour des raisons de sécurité, la table doit être installée d’une manière conforme aux instructions du mode d’emploi. - Page 8 DESCRIPTION Vue du dessus Foyer max. 1500 2. Foyer max. 2000 W 3. Foyer max. 1500 W 4. Foyer max. 2000 W 5. Table 6. Bandeau de commande Bandeau de commande 1. Touche de sélection de foyer 2. Touche de réglage puissance/minuterie 3.
-
Page 9: Principe De L'induction
PRINCIPE DE L'INDUCTION Sous chaque plaque de cuisson se trouve une bobine d'induction. Lorsqu'une plaque est allumée, cette bobine crée un champ magnétique qui se transmet directement au fond de l'ustensile cuisine (compatible), entraînant une production instantanée de chaleur pour cuire les aliments. Ustensile de cuisine Circuit magnétique Plaque... - Page 10 Il est essentiel que la table cuisson soit correctement aérée et les arrivées et les sorties d'air ne soient jamais bloquées. AssurezͲvous que l'installation est conforme au schéma ciͲdessous. (mm) (mm) (mm) 50 mini 20 mini Arrivée d'air Sortie d'air 5 mm Pour des raisons...
-
Page 11: Branchements Électriques
Attention : x Cette table de cuisson doit être installée par un professionnel qualifié. N'essayez en aucun cas d'installer cet appareil vousͲmême. x Le fabricant décline toute responsabilité pour les dommages corporels et matériels résultant d'une installation incorrecte. x Cette table de cuisson ne doit être... - Page 12 Les couleurs peuvent ne pas correspondre aux marques d’identification des pôles dans votre prise. Si tel est cas, procédez de la manière suivante 1) Le fil jaune et vert doit être relié à la borne jaune et verte ou marquée de la lettre E (Earth, "Terre") ou du symbole mise à...
-
Page 13: Utilisation
UTILISATION Qualité des ustensil es Matériaux compatibles: acier, acier émaillé, fonte, inox ferromagnétique, aluminium avec fond ferromagnétique. Matériaux non compatibles: aluminium et inox sans fond ferromagnétique, cuivre, laiton, verre, céramique, porcelaine. fabricants ustensiles indiquent si leurs produits sont compatibles avec les appareils à induction. Pour vérifier si un ustensile est compatible: x Versez un d’eau... -
Page 14: Dimensions Des Ustensiles
Dimensions des ustensiles Les plaques de cuisson sont, dans la mesure de possible, automatiquement adaptées diamètre des ustensiles. Néanmoins, pour chaque plaque donnée, l’ustensile utilisé doit avoir un diamètre minimum. Afin que plaque fonctionne au mieux ses capacités, placez toujours l’ustensile bien au centre. Quelle plaque utiliser en fonction du diamètre l'ustensile? Plaque de... - Page 15 1. Appuyez sur x Un signal sonore retentit et tous les témoins affichent " " ou " ", indiquant que la table est passée en mode veille. x Au bout d'1 minute d'inactivité, la table s'éteint automatiquement. 2. Appuyez sur la touche de commande plaque souhaitée.
- Page 16 x Faire revenir x Cuire des pâtes xFaire sauter xFaire griller xPorter de la soupe à ébullition xPorter de l'eau à ébullition Pour éteindre une plaque cuisson 1. Appuyez sur la touche correspondante. 2. Appuyez de manière répétée sur ou appuyez en même temps sur et .
- Page 17 REMARQUE : Une fois la table éteinte, "H" s'affiche pour indiquer que la plaque est encore brûlante. Il disparaît lorsque la plaque a refroidi. Minuterie La minuterie a deux fonctions différentes: Indiquer le temps de cuisson restant Programmer l'heure d'extinction automatique d'une plaque.
- Page 18 y Si vous appuyez en même temps sur et "00" clignote à l'écran. 3. Puis le compte à rebours commence, minute par minute. La durée restante s'affiche à l'écran. 4. Une fois la durée écoulée, la plaque sonne pendant environ 30 secondes et l’écran affiche “Ͳ...
- Page 19 3. À l'aide des touches et , réglez le temps de cuisson minute à 99 minutes. REMARQUE : y Chaque pression sur augmente ou diminue le temps de cuisson d'1 minute. y Maintenez les touches enfoncées pour régler le temps de cuisson par paliers de 10 minutes.
- Page 20 Mijoter, cuire du riz x Mijoter consiste à faire cuire en dessous du point d’ébullition, aux ȗ alentours de 85 C, lorsque les bulles ne montent qu’occasionnellement à la surface du liquide de cuisson. Cette méthode permet de réaliser soupes délicieuses et des ragoûts très tendres, car les saveurs peuvent se développer sans que l’aliment ne soit trop cuit.
-
Page 21: Dispositifs De Sécurité
grandes quantités d’aliments de cette manière, procédez par petites fournées. 3. Préchauffez la poêle brièvement et ajoutez deux cuillères à soupe d’huile. 4. Cuisez d’abord la viande, puis mettezͲla de côté et gardezͲ chaud. 5. Faites sauter les légumes. Lorsqu’ils sont chauds et encore croustillants, baissez la température de plaque puis remettez... -
Page 22: NettoyageEtEntretien
Extinctionautomatique Cettefonction s'active chaquefoisque vousoubliezd'éteindre desplaques. Lesdélaisd'extinctionpardéfautfigurentdansletableauciͲdessous: Niveaude Lesplaquesdecuissons'éteignent puissance automatiquement au boutde 1~3 8 heures 4~6 4 heures 7~9 2heures NETTOYAGEETENTRETIEN x AssurezͲvousquel'appareilestéteintetdébranché. x Nettoyez l'appareil avec un chiffonmouilléseulement. ... - Page 23 Lestouchesde Lestouchessont Déverrouillez commandesont verrouillées. touches.(Voirsection inopérantes. "Verrouillage"pourplus dedétails). Lestouchessont Celapeutêtredû à la AssurezͲvousque difficiles à présenced'unmince touchesrestentsèches utiliser. filmd'eausur etappuyeztoujours touches,ouaufaitque aveclapulpedudoigt. vousappuyezavecle boutdesdoigts. Certains Celapeutêtredûau Cephénomèneest ustensilesfont modedeconstruction normaletn'indiquepas dubruit. del'ustensile(les undysfonctionnement....
- Page 24 195.4 184.2 197.0 196.5 193.3...
- Page 25 Le service après-vente est joignable au +32 2 334 00 00, du lundi au samedi de 8h à 18h. Hotline Fnac France Quels que soient votre panne et le lieu d'achat de votre produit en France, avant de vous déplacer en magasin Fnac, appelez le 0 969 324 334 du lundi au samedi (8h30-21h00) et le dimanche et jours fériés (10h00-18h00).
- Page 26 CONTENTS WARNINGS……………………………………………………………………………………. IMPORTANTSAFETY INSTRUCTIONS………………………………………………. OVERVIEW……………………………………………………………………………………. THEINDUCTIONPRINCIPLE……………………………………………………………. INSTALLATION………………………………………………………………………………… ELECTRICAL CONNECTION.............. OPERATION……………………………………………………………………………………. PanQuality……………………………………………………………………………….. PanDimension………………………………………………………………………….. InductionCooking………………………………………………………………………. Timer………………………………………………………………………….... COOKINGTIPS……………………………………………………………….... SAFETYFEATURES…………………………………………………………………………... CLEANINGAND...
-
Page 27: Warnings
WARNINGS Thisapplianceisintendedfordomestic household use onlyandshouldnotbe used forany otherpurposeorin other application, suchasfor Ͳdomesticuseor in a commercialenvironment. Ifthe supply cordisdamaged,itmustbe replacedbythemanufacturer, its service agentorsimilarlyqualifiedpersonsinorderto avoid a hazard. WARNING:Theapplianceanditsaccessible partsbecomehotduringuse.Careshouldbe takentoavoidtouchingheatingelements. Childrenlessthan 8 yearsofage shall be kept ... - Page 28 in a safe way and understand the hazards involved. Children shall not play with the appliance. Cleaning and user maintenance shall not be made by children without supervision. Keeptheapplianceand its cordoutofreach ofchildrenlessthan 8 years. WARNING:Unattendedcookingon a hobwith fator oil ...
- Page 29 Donot touch surface.Usethehandle whilemovingtheproduct. notplacetheapplianceinor near hotgas or electric burner,orpermittotouch a heated v enorminioven. Thetemperatureofaccessiblesurfacesmay behighwhen the applianceisoperating. plugmustberemainedeasily accessible after installationoftheappliance. The outer surface may get hot when the appliance is operating. For the details on how to clean surfaces in contact with food please see section “Cleaning and maintenance”...
-
Page 30: ImportantSafety Instructions
IMPORTANTSAFETYINSTRUCTIONS x Read these instructions carefully before installing or using this hob. x Do not place combustible material or products on the hob at any ... -
Page 31: Overview
OVERVIEW TopView 1. Max.1500 W zone 2. Max.2000 W zone 3. Max.1500 W zone 4. Max.2000 W zone 5. Plate 6. Controlpanel ControlPanel 1.Cookingzoneselectioncontrols 2.Power / Timer regulatingkey 3.Lockkey 4.PowerON/OFFkey... -
Page 32: The Induction Principle
THE INDUCTION PRINCIPLE Aninductioncoilis cooking zone.When a locatedundereach cooking zone switchedon,thiscoilcreates a magneticfieldwhich impactsdirectlyon thebase thesuitablecookware, which causes aninstantbuildͲupofheat to cookthefood. INSTALLATION Cut a holein worktop of the ... - Page 33 (mm) (mm) (mm) 760 50mini 20 mini Airintake Airexit mm Forsafety,thegapbetweenthehobandanycupboard above it shouldbeatleast760mm. Fixthe worktop using 2 bracketson hob baseof hob. Thepositionofthebracketscan be adjusted according to the ...
-
Page 34: Electrical Connection
Cautions: x The hob must be installed by a qualified authorised person. Never try to install appliance the byyourself. x Incorrect installation may cause harm and damage to people or ... -
Page 35: Operation
1) The wirewhichis coloured greenandyellowmustbe connected terminal markedwiththeletter E (Earth) tothe or with symbol coloured greenandyellow. theearth or 2) The wirewhichis coloured blueorgreymustbeconnectedto theterminalmarked N (Neutral),or coloured Grey. 3) The wirewhichis coloured brownorblackmustbe... -
Page 36: Pan Dimension
Panmanufacturersspecify with iftheirproductsarecompatible inductionappliances. Tocheckifpansarecompatible: x Put a little water in a pan placed on an induction heating zone set water heat in a fewseconds. level [9].This... -
Page 37: InductionCooking
ofthe pan? Whichcookingzone to beused to the diameter according Cooking Theminimum zone diameterofthepan 140 m 180 InductionCooking Putthe a cookware centre foodinto positionit onthe of circulardesignontheplate. ... - Page 38 2. Touch the desired cooking zone control key . 3. Set the power lev el by repeatedly touching or . x To change the power level during cooking, touch the cooking zone and then touch or until the desired power level is set. Power level guideline Power level Suitable for...
- Page 39 To switch off one cooking zone 1. Touch the corresponding key . 2. Repeatedly touch or touch and at the same time. Make sure the display will show “0”. To switch off all cooking zones, touch NOTE: After the hob is switched off, “H” will illuminate to indicate cooking zone is hot.
-
Page 40: Timer
Timer The timer can be used in two wa ys: To set the minute minder To set a cooking zone to switch off automatically. To set the minute minder 1. Touch y “10” will flash timer display. 2. Set the desired time from 1 minute to 99 minutes touching... - Page 41 4. When the set time has lapsed, the hob will buzz for approx 30 the “Ͳ Ͳ” seconds and will illuminate timer display. To switch a cooking zone off automatically 1. Touch the cooking zone that you want to set the timer for. 2.
-
Page 42: Cooking Tips
y If or are touched simultaneously, “00” will flash on the timer display. 4. The time then counts down in minutes. The time remaining seen on the display. 5. When the set time has lapsed, the cooking zone will automatically be switched off. -
Page 43: Safety Features
Searing steak To cook juicy, flavourful steaks: Leave meat at room temperature about minutes before cooking. 2. Heat up a heavyͲbased frying pan. 3. Brush both sides of the steak with oil. Drizzle small amount of oil into the hot pan and then lower the meat onto... -
Page 44: Cleaning And Maintenance
Touch , the lock indicator light will illuminate and timer display will show “ ”. The hob enters the locking mode. To unlock the controls, touch and hold until a beep is heard and the hob will return to normal working mode. Protection from OverͲheating A temperature sensor equipped can monitor the temperature inside hob. -
Page 45: Troubleshooting
water with a mild detergent is advisable when dealing with surfaces that come into contact with food. Correct food hygiene practises should always be followed at all times to avoid possibility of food poisoning /cross contamination. TROUBLESHOOTING Problem Possible Cause Possible Solution The appliance... - Page 46 195.4 184.2 197.0 196.5 193.3...
-
Page 47: TechnicalData Sheet
Etablissements Darty & fils ©, 18/03/2022 9 Rue des Bateaux-Lavoirs, 94200 Ivry-sur-Seine, France... - Page 48 INHOUD...
- Page 49 WAARSCHUWINGEN Dit apparaat is alleen bestemd voor huishoudeli- jk gebruik en mag niet voor andere doeleinden of toepassingen worden gebruikt, zoals niet-hu- ishoudelijk gebruik of in een commerciële om- geving. Als het snoer beschadigd is, moet het worden vervangen door de fabrikant, een erkend ser- vicecentrum of een gelijkwaardig vakbekwaam persoon om elk gevaar te vermijden.
- Page 50 een veilige manier kunnen gebruiken en op de hoogte zijn van de gevaren die het gebruik van het apparaat met zich meebrengt. Laat kin- deren nooit met het apparaat spelen. Kinderen mogen het apparaat niet zonder toezicht reini- gen of onderhouden. Houd het apparaat en het snoer buiten het bereik van kinderen jonger dan 8 jaar.
- Page 51 wanneer het oppervlak gebarsten is, om een mogelijke elektrische schok te vermijden. Gebruik geen stoomreiniger. Staar niet naar de verwarmingselementen. Het apparaat is niet bestemd om gebruikt te ǁŽƌĚĞŶ ŵĞƚ ĞĞŶ ĞdžƚĞƌŶĞ ƟŵĞƌ ŽĨ ĞĞŶ Ă lijk afstandsbedieningssysteem. Deze oppervlakken kunnen heet worden. De oppervlakken kunnen heet ǁŽƌĚĞŶ...
- Page 52 De temperatuur van de toegankelijke oppervlak- ŬĞŶŬĂŶƟũĚĞŶƐĚĞǁĞƌŬŝŶŐǀĂŶŚĞƚĂƉƉĂƌĂĂƚ hoog oplopen. De stekker moet na het installeren van het ap- paraat eenvoudig bereikbaar zijn. ĞďƵŝƚĞŶŬĂŶƚŬĂŶƟũĚĞŶƐĚĞǁĞƌŬŝŶŐǀĂŶŚĞƚ apparaat heet worden. sŽŽƌŵĞĞƌŝŶĨŽƌŵĂƟĞŽǀĞƌŚŽĞŽƉƉĞƌǀůĂŬŬĞŶ die met voeding in contact komen schoon te maken zie de rubriek "Reiniging en onderhoud" op pagina 43 en 44.
- Page 53 BELANGRIJKE VEILIGHEIDSINSTRUCTIES! >ĞĞƐĚĞnjĞŝŶƐƚƌƵĐƟĞƐŐƌŽŶĚŝŐĚŽŽƌǀŽŽƌĚĂƚ u deze kookplaat installeert of gebruikt. Plaats nooit brandbare materialen of producten op de kookplaat. KŵĞůŬŐĞǀĂĂƌƚĞǀŽŽƌŬŽŵĞŶŝŶƐƚĂůůĞĞƌͻŝŶ ŽǀĞƌĞĞŶƐƚĞŵŵŝŶŐŵĞƚĚĞŝŶƐƚĂůůĂƟ- ĞǀŽŽƌƐĐŚƌŝŌĞŶ Deze kookplaat mag alleen door een vakbe- kwaam persoon worden geïnstalleerd. Gebruik deze kookplaat nooit voor het opwar- men of verwarmen van de kamer. Laat nooit metalen voorwerpen op de kook- plaat achter, deze kunnen zeer snel heet worden.
- Page 54 opslagoppervlak Laat nooit voorwerpen of keukengerei, tenzij gepast kookgerei, op het apparaat achter. Sta niet op de kookplaat. Gebruik geen pannen met een gekartelde rand of sleep geen pannen over het keramisch glas, het glas kan worden bekrast. Maak de kookplaat niet schoon met agressieve schoonmaakmiddelen.
- Page 55 BESCHRIJVING VAN DE ONDERDELEN Bovenaanzicht 1. Max. 1500 W zone 2. Max. 2000 W zone 3. Max. 1500 W zone 4. Max. 2000 W zone 5. Plaat 6. Bedieningspaneel Bedieningspaneel Kookveld-keuzetoetsen Vermogen / Timer-regeltoets Vergrendelingstoets AAN/UIT-toets Timer insteltoets...
- Page 56 PRINCIPE VAN INDUCTIE ƌďĞǀŝŶĚƚnjŝĐŚĞĞŶŝŶĚƵĐƟĞƐƉŽĞůŽŶĚĞƌĞůŬĞŬŽŽŬǀĞůĚtĂŶŶĞĞƌĞĞŶ ŬŽŽŬǀĞůĚǁŽƌĚƚŝŶŐĞƐĐŚĂŬĞůĚĐƌĞģĞƌƚĚĞnjĞƐƉŽĞůĞĞŶŵĂŐŶĞƟƐĐŚǀĞůĚ wat voor een directe impact op de bodem van het gepaste kookgerei en een onmiddellijke warmteontwikkeling zorgt om de levensmiddelen te bereiden. INSTALLATIE DĂĂŬĞĞŶŐĂƚŝŶŚĞƚĂĂŶƌĞĐŚƚǀŽůŐĞŶƐĚĞĂĨŵĞƟŶŐĞŶĚŝĞŝŶ ŽŶĚĞƌƐƚĂĂŶĚĞĂĩĞĞůĚŝŶŐnjŝũŶǁĞĞƌŐĞŐĞǀĞŶŽƌŐǀŽŽƌĞĞŶƌƵŝŵƚĞ van minstens 50 mm rondom het gat. Het werkblad moet minstens 30 mm dik zijn en van een warmtebestendig materiaal zijn gemaakt.
- Page 57 A (mm) B (mm) C (mm) D 760. 50 mini 20 mini >ƵĐŚƟŶůĂĂƚ Luchtuitlaat 5 mm Voor de veiligheid, zorg dat de vrije ruimte tussen de kookplaat en een keukenkast minstens 760 mm is. Maak de kookplaat aan het aanrecht vast met behulp van de 2 beugels die zich aan de onderkant van de kookplaat bevinden.
- Page 58 Waarschuwingen: ͻ>ĂĂƚĚĞŬŽŽŬƉůĂĂƚĂůůĞĞŶŝŶƐƚĂůůĞƌĞŶĚŽŽƌĞĞŶǀĂŬďĞŬǁĂŵĞĞŶ erkende persoon. Probeer nooit om het apparaat zelf te installeren. ͻĞŶǀĞƌŬĞĞƌĚĞŝŶƐƚĂůůĂƟĞŬĂŶůĞƚƐĞůĂĂŶƉĞƌƐŽŶĞŶŽĨƐĐŚĂĚĞĂĂŶ eigendommen veroorzaken waarvoor de fabrikant niet aansprakelijk is. ͻ/ŶƐƚĂůůĞĞƌĚĞŬŽŽŬƉůĂĂƚŶŽŽŝƚďŽǀĞŶĞĞŶŬŽĞůŬĂƐƚĚŝĞƉǀƌŝĞnjĞƌ vaatwasser of droogtrommel. ͻ/ŶƐƚĂůůĞĞƌĚĞŬŽŽŬƉůĂĂƚƵŝƚĚĞďƵƵƌƚǀĂŶǁĂƌŵƚĞďƌŽŶŶĞŶnjŽĂůƐĞĞŶ oven of direct zonlicht. ͻKŵƐĐŚĂĚĞƚĞǀŽŽƌŬŽŵĞŶŵŽĞƚĚĞŬŝƚŽĨĂŶĚĞƌŵĂƚĞƌŝĂĂůǁĂĂƌĚĞƌĂŶĚ ǀĂŶĚĞƉůĂĂƚŽƉŚĞƚĂĂŶƌĞĐŚƚďůĂĚƌƵƐƚŚŝƩĞďĞƐƚĞŶĚŝŐnjŝũŶ ͻ'ĞďƌƵŝŬŐĞĞŶƐƚŽŽŵƌĞŝŶŝŐĞƌ ELEKTRISCHE AANSLUITING Opgelet! ͻ>ĂĂƚĚĞŝŶƐƚĂůůĂƟĞǀĂŶĚĞŬŽŽŬƉůĂĂƚƵŝƚǀŽĞƌĞŶĚŽŽƌĞĞŶǀĂŬďĞŬǁĂŵĞ ĞůĞŬƚƌŝĐŝĞŶĞŶŽǀĞƌĞĞŶŬŽŵƐƟŐĂůůĞůŽŬĂůĞƌŝĐŚƚůŝũŶĞŶĞŶǀŽŽƌƐĐŚƌŝŌĞŶ inzake elektrische bedrading. ͻsŽŽƌĚĂƚƵĞůĞŬƚƌŝƐĐŚĞǁĞƌŬnjĂĂŵŚĞĚĞŶĂĂŶŚĞƚĂƉƉĂƌĂĂƚƵŝƚǀŽĞƌƚ...
- Page 59 3) De bruin of zwart gekleurde draad moet worden aangesloten op de ĂĂŶƐůƵŝƚŬůĞŵĚŝĞŵĞƚĚĞůĞƩĞƌ>;>ŝǀĞͿŽĨĚĞnjǁĂƌƚĞŽĨďƌƵŝŶĞŬůĞƵƌŝƐ gemarkeerd. Geel / groen Geel / groen Zwart Zwart Bruin Bruin Blauw Blauw N2 1 N2 1 WAARSCHUWINGEN: ͻ Als het apparaat rechtstreeks op de netvoeding wordt aangesloten, installeer een meerpolige beveiligingsschakelaar met een vrije ruimte ǀĂŶŵŝŶƐƚĞŶƐϯŵŵƚƵƐƐĞŶĚĞĂĂŶƐůƵŝƚŬůĞŵŵĞŶĞŶŽǀĞƌĞĞŶŬŽŵƐƟŐ...
- Page 60 ͻ'ŝĞƚĞĞŶďĞĞƚũĞǁĂƚĞƌŝŶĞĞŶƉĂŶĞŶƉůĂĂƚƐĚĞnjĞŽƉĞĞŶ ŝŶĚƵĐƟĞŬŽŽŬǀĞůĚĚŝĞŽƉŶŝǀĞĂƵϵŝƐŝŶŐĞƐƚĞůĚŝƚǁĂƚĞƌŵŽĞƚďŝŶŶĞŶ enkele seconden warm zijn. ͻĞŶŵĂŐŶĞĞƚŬůĞĞŌĂĂŶĚĞďŽĚĞŵǀĂŶĚĞƉĂŶ Bepaalde pannen kunnen lawaai maken wanneer deze op een ŝŶĚƵĐƟĞŬŽŽŬǀĞůĚǁŽƌĚĞŶŐĞƉůĂĂƚƐƚŝƚůĂǁĂĂŝĚƵŝĚƚŐĞĞŶĚĞĨĞĐƚǀĂŶ ŚĞƚĂƉƉĂƌĂĂƚĂĂŶĞŶŚĞĞŌŐĞĞŶŝŶǀůŽĞĚŽƉŚĞƚŬŽŽŬƉƌŽĐĞƐ ĨŵĞƟŶŐǀĂŶĚĞƉĂŶ ĞŬŽŽŬǀĞůĚĞŶǁŽƌĚĞŶƚŽƚĞĞŶďĞƉĂĂůĚĞŐƌĞŶƐĂƵƚŽŵĂƟƐĐŚ aangepast aan de diameter van de pan. De bodem van de pan moet echter een minimale diameter hebben naar gelang de ŽǀĞƌĞĞŶŬŽŵƐƟŐŬŽŽŬǀĞůĚKŵĚĞďĞƐƚĞĞĸĐŝģŶƟĞƵŝƚƵǁ...
- Page 61 Welk kookveld moet worden gebruikt naargelang de diameter van de pan? Kookveld Minimum diameter van de pan 180 mm 140 mm /ŶĚƵĐƟĞŬŽŬĞŶ Doe de levensmiddelen in een pan en plaats de pan in het midden van het cirkelvormig ontwerp op de plaat. OPMERKING ͻ...
- Page 62 2. Tik op de gewenste kookveld-keuzetoets. ϯ^ƚĞůŚĞƚŐĞǁĞŶƐƚĞǀĞƌŵŽŐĞŶŶŝǀĞĂƵŝŶĚŽŽƌŚĞƌŚĂĂůĚĞůŝũŬŽƉнŽĨͲƚĞƟŬŬĞŶ ͻKŵŚĞƚǀĞƌŵŽŐĞŶŶŝǀĞĂƵƟũĚĞŶƐŚĞƚŬŽŬĞŶƚĞǁŝũnjŝŐĞŶƟŬŽƉŚĞƚŬŽŽŬǀĞůĚĞŶ vervolgens op - of - totdat het gewenste vermogenniveau is bereikt. Gids voor vermogenniveau Vermogenniveau Geschikt voor ͻKƉǁĂƌŵĞŶǀĂŶŬůĞŝŶĞŚŽĞǀĞĞůŚĞĚĞŶůĞǀĞŶƐŵŝĚĚĞůĞŶ ͻŚŽĐŽůĂĚĞĞŶďŽƚĞƌƐŵĞůƚĞŶ ͻĂĐŚƚũĞƐƐƵĚĚĞƌĞŶ ͻ>ĂŶŐnjĂĂŵǀĞƌǁĂƌŵĞŶ ͻKƉǁĂƌŵĞŶ ͻ^ŶĞůƐƵĚĚĞƌĞŶ ͻZŝũƐƚŬŽŬĞ Pannenkoeken ͻ^ĂƵƚĞƌĞŶ ͻWĂƐƚĂŬŽŬĞŶ ͻZŽĞƌďĂŬŬĞŶ ͻ^ĐŚƌŽĞŝĞŶ ͻ^ŽĞƉĂĂŶĚĞŬŽŽŬďƌĞŶŐĞŶ ͻtĂƚĞƌŬŽŬĞŶ...
- Page 63 Om één kookveld uit te schakelen ϭdŝŬŽƉĚĞŽǀĞƌĞĞŶŬŽŵƐƟŐĞƚŽĞƚƐ ϮdŝŬŚĞƌŚĂĂůĚĞůŝũŬŽƉͲŽĨƟŬƚĞŐĞůŝũŬĞƌƟũĚŽƉͲĞŶнŽƌŐĚĂƚϬŽƉŚĞƚ display verschijnt. Om alle kookvelden uit te schakelen, ƟŬŽƉ OPMERKING: EĂĚĂƚĚĞŬŽŽŬƉůĂĂƚŝƐƵŝƚŐĞƐĐŚĂŬĞůĚǀĞƌƐĐŚŝũŶƚ,ŽŵĂĂŶ te geven dat het kookveld heet is. Dit verdwijnt wanneer het kookveld is afgekoeld. Timer ĞƟŵĞƌŬĂŶǀŽŽƌƚǁĞĞǀĞƌƐĐŚŝůůĞŶĚĞĨƵŶĐƟĞƐǁŽƌĚĞŶŐĞďƌƵŝŬƚ - sŽŽƌŚĞƚĂŌĞůůĞŶǀĂŶĚĞƟũĚŝŶŵŝŶƵƚĞŶ - sŽŽƌŚĞƚŝŶƐƚĞůůĞŶǀĂŶĞĞŶŬŽŽŬǀĞůĚŽŵĂƵƚŽŵĂƟƐĐŚƚĞǁŽƌĚĞŶ uitgeschakeld.
- Page 64 ŌĞůůĞŶǀĂŶĚĞƟũĚŝŶŵŝŶƵƚĞŶ 1. Tik op ͻϭϬŬŶŝƉƉĞƌƚŽƉŚĞƚƟŵĞƌĚŝƐƉůĂLJ Ϯ^ƚĞůĚĞŐĞǁĞŶƐƚĞƟũĚŝŶƚƵƐƐĞŶϭĞŶϵϵŵŝŶƵƚĞŶĚŽŽƌƚĞƟŬŬĞŶŽƉͲŽĨн OPMERKING: ͻdŝŬĞĞŶŵĂĂůŽƉͲŽĨнŽŵĚĞƟũĚŵĞƚϭŵŝŶƵƵƚƚĞǀĞƌůĂŐĞŶŽĨƚĞǀĞƌŚŽŐĞŶ ͻdŝŬĞŶŚŽƵĚͲŽĨнŝŶŐĞĚƌƵŬƚŽŵĚĞƟũĚŝŶƐƚĂƉƉĞŶǀĂŶϭϬŵŝŶƵƚĞŶƚĞ verlagen of te verhogen. ͻ,ĞƚĐŝũĨĞƌϬϬŬŶŝƉƉĞƌƚŽƉŚĞƚƟŵĞƌĚŝƐƉůĂLJĂůƐƚĞŐĞůŝũŬĞƌƟũĚŽƉͲĞŶн ǁŽƌĚƚŐĞƟŬƚ ϯ,ĞƚĂŌĞůůĞŶŝŶŵŝŶƵƚĞŶƐƚĂƌƚĞƌĞƐƚĞƌĞŶĚĞƟũĚǁŽƌĚƚŽƉŚĞƚĚŝƐƉůĂLJ weergegeven. ϰůƐĚĞŝŶŐĞƐƚĞůĚĞƟũĚŝƐǀĞƌƐƚƌĞŬĞŶŵĂĂŬƚĚĞŬŽŽŬƉůĂĂƚĐŝƌĐĂϯϬƐĞĐŽŶĚĞŶ ŐĞůƵŝĚĞŶǁŽƌĚƚͲͲŽƉŚĞƚƟŵĞƌĚŝƐƉůĂLJǁĞĞƌŐĞŐĞǀĞŶ...
- Page 65 ĞŶŬŽŽŬǀĞůĚŝŶƐƚĞůůĞŶŽŵĂƵƚŽŵĂƟƐĐŚƚĞǁŽƌĚĞŶƵŝƚŐĞƐĐŚĂŬĞůĚ ϭdŝŬŽƉŚĞƚŬŽŽŬǀĞůĚǁĂĂƌǀŽŽƌƵĚĞƟŵĞƌǁŝůƚŝŶƐƚĞůůĞŶ 2. Tik op ͻĞƌŽĚĞƐƟƉŶĂĂƐƚĚĞǀĞƌŵŽŐĞŶƐŶŝǀĞĂƵͲŝŶĚŝĐĂƚŽƌŐĞĞŌĂĂŶĚĂƚŚĞƚ kookveld geselecteerd is. ͻϭϬŬŶŝƉƉĞƌƚŽƉŚĞƚƟŵĞƌĚŝƐƉůĂLJ ϯ^ƚĞůĚĞŐĞǁĞŶƐƚĞƟũĚŝŶƚƵƐƐĞŶϭĞŶϵϵŵŝŶƵƚĞŶĚŽŽƌƚĞƟŬŬĞŶŽƉͲŽĨн OPMERKING: ͻdŝŬĞĞŶŵĂĂůŽƉͲŽĨнŽŵĚĞƟũĚŵĞƚϭŵŝŶƵƵƚƚĞǀĞƌůĂŐĞŶŽĨƚĞǀĞƌŚŽŐĞŶ ͻdŝŬĞŶŚŽƵĚͲŽĨнŝŶŐĞĚƌƵŬƚŽŵĚĞƟũĚŝŶƐƚĂƉƉĞŶǀĂŶϭϬŵŝŶƵƚĞŶƚĞ verlagen of te verhogen. ͻ,ĞƚĐŝũĨĞƌϬϬŬŶŝƉƉĞƌƚŽƉŚĞƚƟŵĞƌĚŝƐƉůĂLJĂůƐƚĞŐĞůŝũŬĞƌƟũĚŽƉͲĞŶн ǁŽƌĚƚŐĞƟŬƚ ϰ,ĞƚĂŌĞůůĞŶŝŶŵŝŶƵƚĞŶƐƚĂƌƚĞƌĞƐƚĞƌĞŶĚĞƟũĚǁŽƌĚƚŽƉŚĞƚĚŝƐƉůĂLJǁĞĞƌŐĞŐĞǀĞŶ ϱůƐĚĞŝŶŐĞƐƚĞůĚĞƟũĚŝƐǀĞƌƐƚƌĞŬĞŶǁŽƌĚƚŚĞƚŬŽŽŬǀĞůĚĂƵƚŽŵĂƟƐĐŚƵŝƚŐĞƐĐŚĂŬĞůĚ KOOKTIPS ͻĞŶŵĂĂůĚĞůĞǀĞŶƐŵŝĚĚĞůĞŶŬŽŬĞŶǀĞƌůĂĂŐĚĞƚĞŵƉĞƌĂƚƵƵƌŝŶƐƚĞůůŝŶŐ ͻ'ĞďƌƵŝŬĞĞŶĚĞŬƐĞůŽŵĚĞŬŽŽŬƟũĚƚĞǀĞƌŬŽƌƚĞŶĞŶĞŶĞƌŐŝĞƚĞďĞƐƉĂƌĞŶ ĚĞǁĂƌŵƚĞďůŝũŌĂůĚƵƐďĞŚŽƵĚĞŶ...
- Page 66 ͻ'ĞďƌƵŝŬnjŽǁĞŝŶŝŐŵŽŐĞůŝũŬǀůŽĞŝƐƚŽĨŽĨǀĞƚŽŵĚĞŬŽŽŬƟũĚƚĞďĞƉĞƌŬĞŶ ͻ^ƚĂƌƚŵĞƚŬŽŬĞŶŽƉĞĞŶŚŽŽŐǀĞƌŵŽŐĞŶŶŝǀĞĂƵĞŶǀĞƌůĂĂŐŚĞƚŶŝǀĞĂƵ eenmaal de levensmiddelen voldoende zijn opgewarmd Sudderen, rijst koken ͻ^ƵĚĚĞƌĞŶǀŝŶĚƚƉůĂĂƚƐŽŶĚĞƌŚĞƚŬŽŽŬƉƵŶƚŽƉĐŝƌĐĂϴϱΣǁĂŶŶĞĞƌďĞůůĞŶ sporadisch aan het oppervlak van de kookvloeistof verschijnen. Dit is belangrijk bij het bereiden van soepen of stoofschotels zodat de smaken vrijkomen zonder de levensmiddelen teveel te koken. Kook tevens saus op basis van eieren en bloem onder het kookpunt.
- Page 67 dŝŬŽƉŚĞƚǀĞƌŐƌĞŶĚĞůŝŶŐƐůĂŵƉũĞďƌĂŶĚƚĞŶŚĞƚƟŵĞƌĚŝƐƉůĂLJŐĞĞŌΗ weer. De kookplaat is nu vergrendeld. KŵĚĞďĞĚŝĞŶŝŶŐƐĞůĞŵĞŶƚĞŶƚĞŽŶƚŐƌĞŶĚĞůĞŶƟŬĞŶŚŽƵĚŝŶŐĞĚƌƵŬƚ ƚŽƚĚĂƚƵĞĞŶŐĞůƵŝĚƐƐŝŐŶĂĂůŚŽŽƌƚĞŶĚĞŝŶĚƵĐƟĞŬŽŽŬƉůĂĂƚŶĂĂƌĚĞŶŽƌŵĂůĞ werkingsmodus terugkeert. ĞǀĞŝůŝŐŝŶŐƚĞŐĞŶŽǀĞƌǀĞƌŚŝƫŶŐ De voorziene temperatuursensor kan de temperatuur binnenin de ŬŽŽŬƉůĂĂƚĐŽŶƚƌŽůĞƌĞŶůƐĞĞŶŽǀĞƌŵĂƟŐĞƚĞŵƉĞƌĂƚƵƵƌǁŽƌĚƚ ǁĂĂƌŐĞŶŽŵĞŶǁŽƌĚƚĚĞŬŽŽŬƉůĂĂƚĂƵƚŽŵĂƟƐĐŚƵŝƚŐĞƐĐŚĂŬĞůĚ Waarschuwing voor warmte EĂĚĞǁĞƌŬŝŶŐǀĂŶĚĞŬŽŽŬƉůĂĂƚŝƐĞƌŶŽŐĞŶŝŐĞƌĞƐƚǁĂƌŵƚĞ, knippert als waarschuwing om uit de buurt van de kookplaat te blijven. ƵƚŽŵĂƟƐĐŚĞƵŝƚƐĐŚĂŬĞůŝŶŐ ,ĞƚƚŽĞƐƚĞůǁŽƌĚƚĂƵƚŽŵĂƟƐĐŚƵŝƚŐĞƐĐŚĂŬĞůĚǁĂŶŶĞĞƌƵǀĞƌŐĞĞƚĞĞŶ...
- Page 68 PROBLEEMOPLOSSING Mogelijke oplossing Probleem Mogelijke oorzaak Zorg dat het apparaat op de netvoeding is Het apparaat kan aangesloten en dat het Staat niet onder stroom. niet worden is ingeschakeld. Controleer of er geen ingeschakeld. stroomuitval is. Als het probleem niet is opgelost, neem contact op met een vakbekwame reparateur.
- Page 69 195,4 184,2 197,0 196,5 193,3...
- Page 70 De dienst na verkoop is bereikbaar van maandag tot zaterdag op +32 2 334 00 00, maandag tot zaterdag van 08.00 tot 18.00 uur. Etablissements Darty & fils ©, 9 Rue des Bateaux-Lavoirs, 94200 Ivry-sur-Seine, France 18/03/2022...
- Page 71 TABLE DE CUISSON $,1'8&7,21 ,1'8&7,21 COOKER HOB Product Description: ,1'8&7,(.22.3/$$7 Productbeschrijving: 3/$&$'(,1'8&&,Ï1 Descripcion del producto: Descriçào do produto: Marque – Proline Brand /Merk /Marca: Référence commerciale – /,ϲϴϬWͲh Model number: /Modelnummer / Numero de modelo / Numero do modelo: /¶REMHWGHODGpFODUDWLRQGpFULWFLGHVVXVHVWFRQIRUPHjODOpJLVODWLRQ G¶KDUPRQLVDWLRQGHO¶8QLRQDSSOLFDEOH:...
- Page 72 Reference number Title /03/4102 ܈EU EMC Directive (EMC) /53/4102 ܈EU Low Voltage Directive (LVD) /521/9002 ܈EC Eco design requirements for energy-related products (ErP) /56/1102 ܈EU & (EU) 2015/863 RoHS EMC: (1 ,(& LVD : (1 (1$$$$$ EN 62233:2008 ErP : (EU) No 66/2014 EN 60350-2:2013+A11 (EC) No 1275/2008...
Need help?
Do you have a question about the IH680P-U and is the answer not in the manual?
Questions and answers