
Related Manuals for Proline PGH461SS-B


Summary of Contents for Proline PGH461SS-B
- Page 1 OPERATING AND INSTALLATION INSTRUCTIONS OF BUILT-IN GAS HOB PGH461SS-B PGH461W-B PGH461SS-F PGH461W-F PGH461SS-N PGH461W-N PGH461SS-S PGH461W-S PGH461SS-U PGH461W-U...
- Page 2 Dear Customer, This manual is supplied to help you use your appliance that is manufactured by the most recent technology, for maximum effciency. Before using your appliance, carefully read this guide that includes the basic information for safe installation, maintenance and use please contact the nearest qualified installer for the installation of your product.
-
Page 3: Table Of Contents
CONTENTS: 1. Part : PRESENTATION AND SIZES OF PRODUCT 2. Part : IMPORTANT SAFETY INSTRUCTIONS 3. Part : INSTALLATION AND PREPARATIONS FOR USE Locating your built-in hob Emptying of the Burned Gases from Environment 3.3 Gas connection 3.4 Electric connection and security 3.5 Electric connection (UK ONLY) 3.6 General warnings and measures... -
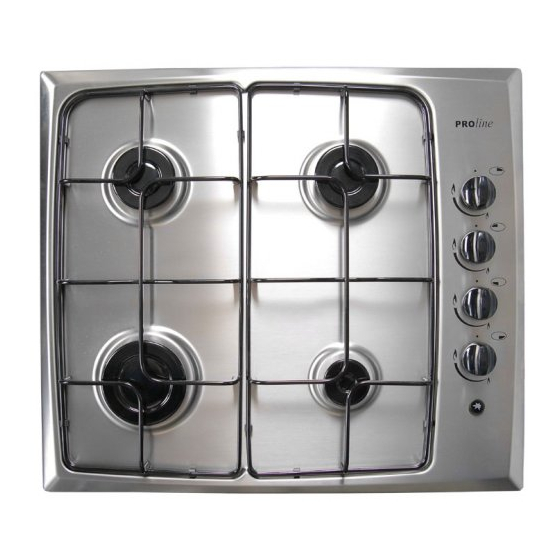
Page 4: Part : Presentation And Sizes Of Product
1. Part : PRESENTATION AND SIZES OF PRODUCT PRESENTATION: List of Components: Medium Burner 5- Electrical Ignition Button For 2- Medium Burner Gas Burners 3- Control Knobs 6- Rapid Burner 4- Auxillary Burner * The appearance of your hob may be different than the model shown above due to its configurations. -
Page 5: Part : Important Safety Instructions
2. Part : IMPORTANT SAFETY INSTRUCTIONS After having unpacked the appliance, check to ensure that it is not damaged. If you have any doubts, do not use it and consult your supplier or a professionally qualified technician. Packing elements (i.e. plastic bags, polystyrene foam, nails, packing straps, etc.) should not be left around within easy reach of children, as these may cause serious injuries. - Page 6 2. Part : IMPORTANT SAFETY INSTRUCTIONS IMPORTANT PRECAUTIONS AND RECOMMENDATIONS FOR USE OF ELECTRICAL APPLIANCES Use of any electrical appliance implies the necessity to follow a series of fundamental rules. Never touch the appliance with wet hands or feet; do not operate the appliance with wet hands or feet or when barefooted; do not allow children or disabled people to use the appliance without your supervision.
-
Page 7: Part : Installation And Preparations For Use
3. Part : INSTALLATION AND PREPARATIONS FOR USE 3.1. Locating your built-in hob Create a space to install your hob, following the dimensions indicated on Figure1. 150 mm from edge of cooker to combustible materials such as wallpaper or • curtains. - Page 8 3. Part : INSTALLATION AND PREPARATIONS FOR USE Fastening the installation brackets Each cooker top is provided with an • installation kit including brackets and t > 25mm t > 25mm screws for fastening the top to the worktop. Turn the hob upside down and fasten •...
-
Page 9: Emptying Of The Burned Gases From Environment
3. Part : INSTALLATION AND PREPARATIONS FOR USE 3.2. Emptying of the Burned Gases from Environment The cooking appliances that operate with gas, throw the burned gas wastes out directly to the outside or through cooker hoods that are connected to the a chimney that opens directly to the outisde. - Page 10 FIG 6...
- Page 12 COOKER HOOD...
- Page 13 Do not use naked flame to check gas leakage. All metal components used during gas connection must be clear of rust. Also check the expiry dates of components used. The points that must be checked during Fixed gas connection assembly To assemble a fixed gas connection (gas connection made by threads, e.g.
-
Page 14: Electric Connection And Security
3. Part : INSTALLATION AND PREPARATIONS FOR USE 3.4. Electric connection and security During the electric connection, follow the instructions stated in the user manual The earthing cable must be connected to the earth terminal • • You have to ensure the power cord with suitable insulation to be connected to the power source during the connection If there is no appropriate earthed electric outlet in accordance with regulations in the place where the appliance will be installed, get one installed by a qualified electrician. -
Page 15: Electric Connection (Uk Only)
3. Part : INSTALLATION AND PREPARATIONS FOR USE 3.5. Electrical connection (UK ONLY) For your safety please read the following information. WARNING: This appliance must be earthed. The appliance must be connected to a 240 volts 50 Hz AC supply by means •... - Page 16 be carried out by a gas...
-
Page 18: Part : Use Of Your Hob
4. Part : USE OF YOUR HOB 4.1 Use of gas burners Ignition of the burners To determine which knob controls which burner, check the position symbol above the knob. • Manual Ignition If your appliance is not equipped with any ignition aid or in case there is a failure in the electricity network, follow the procedures listed below To ignite one of the burners, press and turn its knob counter-clockwise so that the knob is in max. - Page 19 4. Part : USE OF YOUR HOB Control of the hob burners The knob has 3 positions: Off (0), max (big flame symbol) and min (small flame symbol). After you ignite the burner in max. position; you can adjust the flame length between max.
- Page 20 4. Part : USE OF YOUR HOB WARNING: Use only flat pans and with a sufficiently thick base. • • Ensure that the base of the pan is dry before placing it on the burners. • The temperature of accessible parts may be high when the appliance is operating.
-
Page 21: Part : Cleaning And Maintenance
5. Part : CLEANING AND MAINTENANCE 5.1 Cleaning Be sure that all control switches are off and your appliance cooled before cleaning your oven. Plug off the appliance. Check whether they are appropriate and recommended by the manufacturer before using the cleaning materials on your oven. -
Page 22: Maintenance
5. Part : CLEANING AND MAINTENANCE Stainless Steel: Stainless steel parts must be cleaned frequently with mildly warm soapy water and a soft sponge and then dry with a soft cloth. Do not use abrasive powders or abrasive cleaning metarials. Do not leave vinegar, coffee, milk, salt, water, lemon or tomato juice to remain in contact with stainless steel parts long periods of time. - Page 23 6. Part : SERVICE AND TRANSPORT 6.1 Basic troubleshooting before contacting service If the electrical ignition does not operate : • The hob may be plugged off, there has been a black out. The hob burners do not operate correctly : Check if the burner parts are correctly assembled(especially after cleaning).
- Page 24 INJECTOR TABLE...
- Page 25 If something doesn't seem to work If there is something about your appliance which you do not understand and you live in the UK you can phone our help line during normal office hours on: 0844 8009595 If you require service, call the number on your sales receipt.
- Page 26 INSTRUCTIONS D’UTILISATION ET D’INSTALLATION PLAQUE À GAZ ENCASTRABLE PGH461SS-B PGH461W-B PGH461SS-F PGH461W-F PGH461SS-N PGH461W-N PGH461SS-S PGH461W-S PGH461SS-U PGH461W-U...
- Page 27 Chère cliente, cher client, Ce manuel contient toutes les informations nécessaires à l’utilisation de cet appareil conçu avec une technologie de pointe, en toute confiance et efficacité. Avant de commencer à utiliser nos appareils, nous vous suggérons de lire ce guide, qui contient tous les renseignements de base pour leur installation, leur entretien, ainsi que leur utilisation.
- Page 28 TABLE DES MATIÈRES: 1. Première partie: PRÉSENTATION ET DIMENSIONS DU PRODUIT 2. Deuxième partie: CONSIGNES DE SÉCURITÉ IMPORTANTES 3. Troisième partie: INSTALLATION ET PRÉPARATION À L’UTILISATION Local d’installation de la plaque encastrable Echappement des gaz brûlés de l’environnement 3.3 Connexion du gaz 3.4 Branchement électrique et sécurité...
-
Page 29: Première Partie: Présentation Et Dimensions Du Produit
1. Première partie: PRÉSENTATION ET DIMENSIONS DU PRODUIT PRÉSENTATION: Liste des parties du four: 1- Brûleur moyen 5- Bouton d’allumage électrique pour brûleurs à gaz 2- Brûleur moyen 6- Brûleur rapide 3- Boutons de réglage 4- Brûleur auxiliaire * Votre plaque peut être différente du modèle présenté ci-dessus à cause de sa configuration. -
Page 30: Deuxième Partie: Consignes De Sécurité Importantes
2. Deuxième partie: CONSIGNES DE SÉCURITÉ IMPORTANTES Après avoir sorti l’appareil de son emballage, vérifiez-le pour vous assurer qu’il n'est pas endommagé. En cas de doute, ne vous en servez pas immédiatement. Consultez plutôt votre fournisseur ou un technicien dûment qualifié. Les matériaux d’emballage (sacs en plastique, mousse en polystyrène, clous, bandes d’emballage, etc.) ne doivent pas être laissés à... - Page 31 2. Deuxième partie: CONSIGNES DE SÉCURITÉ IMPORTANTES PRÉCAUTIONS IMPORTANTES ET RECOMMANDATIONS RELATIVES À L'UTILISATION DES APPAREILS ÉLECTRIQUES L’utilisation de tout appareil électrique commande le respect d’un ensemble de règles fondamentales: évitez de toucher à l’appareil avec des mains ou des pieds mouillés; évitez de faire fonctionner l’appareil avec des mains ou des pieds mouillés, ou encore lorsque vous êtes pieds nus ;...
-
Page 32: Troisième Partie: Installation Et Préparation À L'utilisation
3. Troisième partie: INSTALLATION ET PRÉPARATION À L’UTILISATION 3.1. Local d’installation de la plaque encastrable Prévoyez un espace où installer votre plaque, conformément aux dimensions indiquées dans le schéma 1. 150 mm du bord de la cuisinière aux matières combustibles comme la tapisserie •... - Page 33 3. Troisième partie: INSTALLATION ET PRÉPARATION À L’UTILISATION Fixation des supports d’installation • Chaque table de cuisson est fournie avec un kit d’installation comprenant des supports et des vis prévus pour la fixation de la partie supérieure du plan de travail. t >...
-
Page 34: Echappement Des Gaz Brûlés De L'environnement
3. Troisième partie: INSTALLATION ET PRÉPARATION À L’UTILISATION 3.2. Echappement des gaz brûlés de l’environnement Les cuisinières à gaz émettent le gaz brûlé directement vers l’extérieur ou à travers les hottes d’échappement branchées à une cheminée qui donne directement à l’extérieur. S’il n’est pas possible d’installer une hotte de cuisinière, installez un ventilateur électrique sur la fenêtre ou le mur ouvert vers l’extérieur. - Page 35 3. Troisième partie: INSTALLATION ET PRÉPARATION À L’UTILISATION RACCORDEMENT AU GAZ Le raccordement de la plaque à gaz au gaz naturel ou au gaz de pétrole liquéfié doit se faire par un installateur qualifié. Les installateurs doivent veiller au respect scrupuleux des dispositions du code de pratique des normes britanniques appropriées, de la Réglementation en matière de sécurité...
- Page 36 PARTIE 3 : INSTALLATION ET PRÉPARATION À L’UTILISATION IMPORTANT • L’appareil doit être installé, régulé et adapté pour fonctionner avec les autres types de gaz par un TECHNICIEN QUALIFIÉ EN MATIÈRE D’INSTALLATION d’un tel appareil. Le non-respect de la présente condition annulera la garantie. La table de caisson doit uniquement être installée par un installateur agréé.
- Page 37 REMARQUE IMPORTANTE RELATIVE À L'INSTALLATION DU GAZ L’appareil a été conçu pour fonctionner au GAZ NATUREL uniquement et ne saurait être compatible avec un autre type de gaz sans modification préalable. Le présent appareil a été fabriqué pour conversion au GLP. Pour acheter un kit de conversion au GPL, veuillez contacter directement le service chargé...
- Page 38 Évitez d’utiliser une flamme nue pour vérifier les fuites de gaz. Aucune composante métallique utilisée pendant la connexion du gaz ne doit être rouillée. Vérifiez également les dates d’expiration des composantes utilisées. Points à vérifier pendant le montage du tuyau fixe Pour procéder au montage d’une connexion au gaz fixe (connexion de gaz effectuée à...
-
Page 39: Branchement Électrique Et Sécurité
3. Troisième partie: INSTALLATION ET PRÉPARATION À L’UTILISATION 3.4. Branchement électrique et sécurité Pendant le branchement électrique, respectez les consignes prescrites dans le manuel d’utilisation. • Le conducteur de terre doit être connecté à la borne de terre. • Vous devez sécuriser le cordon d’alimentation avec une isolation appropriée à raccorder à... -
Page 40: Branchement Électrique (Ru Uniquement)
3. Troisième partie: INSTALLATION ET PRÉPARATION À L’UTILISATION 3.5. Branchement électrique (RU UNIQUEMENT) Pour votre sécurité, veuillez lire ce qui suit. AVERTISSEMENT: Cet appareil doit être relié à la terre. • L’appareil doit être branché à une alimentation de 240 volts 50 Hz AC au moyen d’une prise trois broches, convenablement mise à... -
Page 41: Changement Du Gaz
CONVERSION DE GAZ CHANGEMENT DE LA CONNEXION DE GAZ Le raccordement de l’appareil au gaz naturel ou au gaz de pétrole liquéfié doit se faire par un installateur qualifié. Les installateurs doivent veiller au respect scrupuleux des dispositions du code de pratique des normes britanniques appropriées, de la Réglementation en matière de sécurité... - Page 42 • À l’aide d’un petit tournevis, resserrer ou desserrer la vis de dérivation de 90°, afin que la flamme du brûleur atteigne le minimum. Lorsque la flamme a atteint une longueur d’au moins 4 mm, le gaz est bien réparti. Assurez-vous que la flamme ne s’éteigne pas en passant de la position maximale à...
-
Page 43: Utilisation Des Brûleurs
4. Quatrième partie: UTILISATION DE LA PLAQUE 4.1: Utilisation des brûleurs Allumage des brûleurs Pour savoir quel bouton va avec quel brûleur, vérifiez le symbole de la position au- dessus du bouton. • Allumer manuellement Si votre appareil n’est doté d’aucune aide favorisant l’allumage ou si le réseau électrique est en panne, respectez les procédures présentées ci-dessous Pour allumer l’un des brûleurs, appuyez et tournez son bouton dans le sens antihoraire jusqu’à... - Page 44 4. Quatrième partie: UTILISATION DE LA PLAQUE Commande des brûleurs de la table de cuisson La table de cuisson a 3 positions: Off (0), Max (symbole de grosse flamme) et Min (symbole de petite flamme). Après avoir allumé le brûleur réglé sur la position “Max”, vous pouvez ajuster la longueur de la flamme entre les positions “Max”...
- Page 45 4. Quatrième partie: UTILISATION DE LA PLAQUE AVERTISSEMENT: • Utilisez uniquement des casseroles à fond plat et assez épais. • Veillez à ce que la base de la casserole soit sèche avant de la placer sur les brûleurs. • La température des parties exposées peut être élevée lorsque l'appareil est utilisé. C’est pourquoi il est impératif de tenir les enfants et les animaux hors de portée des brûleurs pendant et après la cuisson.
-
Page 46: Nettoyage
5. Cinquième partie: NETTOYAGE ET ENTRETIEN 5.1 : Nettoyage Veillez à ce que tous les boutons de contrôle soient éteints et que l’appareil soit refroidi avant d’effectuer le nettoyage du four. Débranchez l’appareil. Contrôlez si les produits de nettoyage sont approuvés et recommandés par le fabricant avant de les utiliser. Comme ils peuvent endommager les surfaces, n’utilisez pas de crèmes caustiques, de poudres nettoyantes abrasives, de laine de fer épaisse ou d'outils durs. -
Page 47: Entretien
5. Cinquième partie: NETTOYAGE ET ENTRETIEN Acier inoxydable: Les parties en acier inoxydable doivent être nettoyées fréquemment avec de l’eau chaude savonneuse et une éponge douce, puis être séchées avec un chiffon doux. Ne jamais utiliser de poudres ou matériaux nettoyants abrasifs. Ne pas laisser de vinaigre, café, lait, sel, eau, citron, ou jus de tomate en contact prolongé... - Page 48 6. Sixième partie: SERVICE APRES-VENTE ET TRANSPORT 6.1 Dépannage de base à effectuer avant de contacter le service Clients Si l’allumage électrique ne fonctionne pas • La plaque peut être débranchée, il peut y avoir une coupure de courant. Les brûleurs de la table de cuisson ne fonctionnent pas correctement •...
- Page 50 Si quelque chose ne semble pas fonctionner S’il existe quelque chose à propos de votre appareil que vous ne comprenez pas et que vous vivez en Grande-Bretagne vous pouvez contacter votre ligne d’assistance durant les heures d’ouverture normales au 0844 8009595. Si vous avez besoin d’un service, composez le numéro de téléphone figurant sur le reçu de vente.
- Page 51 BEDIENING EN INSTALLATIE ISTRUCTIES VAN INGEBOUWDE GASKOOKPLAAT PGH461SS-B PGH461W-B PGH461SS-F PGH461W-F PGH461SS-N PGH461W-N PGH461SS-S PGH461W-S PGH461SS-U PGH461W-U...
- Page 52 Beste klant, Deze handleiding wordt geleverd om u te helpen bij het gebruik van uw apparaat dat werd gefabriceerd met de meest recente technologie voor een optimale efficiëntie. Voor u het apparaat in gebruik neemt, dient u deze handleiding zorgvuldig door te lezen.
- Page 53 INHOUDSOPGAVE: 1. Deel: VOORSTELLING EN AFMETINGEN VAN HET PRODUCT 2. Deel: BELANGRIJKE VEILIGHEIDSINSTRUCTIES 3. Deel: INSTALLATIE EN VOORBEREIDING VOOR GEBRUIK 3.1 Locatie van uw ingebouwde kookplaat 3.2 Verbrande gassen verwijderen van de omgeving 3.3 gasaansluiting 3.4 Elektrische aansluiting en veiligheid 3.5 Elektrische aansluiting (ENKEL VK) 3.6 Algemene waarschuwingen en maatregelen 3.7 Gas conversies...
- Page 54 1. Deel: VOORSTELLING EN AFMETINGEN VAN HET PRODUCT Voorstelling: Onderdelenlijst: Gemiddelde brander Elektrische ontstekingsknop voor Gemiddelde brander gasbranders Snelle Brander Bedieningsknop Hulpbrander * Uw kookplaat kan er anders uitzien dan het hierboven weergegeven model omwille van de configuraties.
- Page 55 2. Deel: BELANGRIJKE VEILIGHEIDSINSTRUCTIES Nadat u het apparaat uit de verpakking hebt verwijderd, moet u controleren dat het niet beschadigd is. Bij twijfel mag u het apparaat niet gebruiken en moet u uw leverancier of een professioneel gekwalificeerde technicus raadplegen. De verpakking (bijv. plastic zakken, po lystyreen sch uim, nage ls, verp akkingstroken, etc.) mogen niet worden achtergelaten bin nen h et bere ik v an kind eren want d it kan ernstige l etsels...
- Page 56 2. Deel: BELANGRIJKE VEILIGHEIDSINSTRUCTIES BELANGRIJKE VOORZORGSMAATREGELEN EN AANBEVELINGEN VOOR GEBRUIK VAN ELEKTRISCHE APPARATEN Het gebruik van een elektrisch apparaat veronderstelt de noodzaak een reeks fundamentele regels na te leven. Het apparaat nooit aanraken met natte handen of voeten. bedien het apparaat niet met natte handen of voeten of op blote voeten; kinderen of mindervaliden mogen het apparaat niet gebruiken zonder uw toezicht.
- Page 57 3. Deel: INSTALLATIE EN VOORBEREIDING VOOR GEBRUIK 3.1. Locatie van uw ingebouwde kookplaat Creëer ruimte om uw kookplaat te installeren, volg de afmetingen vermeld in Afbeelding 1. 150 mm van de rand van het kooktoestel met ontbrandbaar materiaal zoals • behangpapier of gordijnen •...
- Page 58 3. Deel: INSTALLATIE EN VOORBEREIDING VOOR GEBRUIK Bevestiging van de installatiebeugels • Iedere kookplaat is voorzien van een installatiekit met beugels en schroeven t > 25mm t > 25mm voor de bevestiging van de plaats op de werkruimte. • Draai de kookplaat onderste boven en SECTION XSEC0001-XSEC0001 bevestig de beugels “A"...
- Page 59 3. Deel: INSTALLATIE EN VOORBEREIDING VOOR GEBRUIK 3.2. Verbrande gassen verwijderen van de omgeving Voor kookapparaten die op gas werken, moet u de verbrande gas afvalproducten rechtstreeks naar buiten of via kooktoestel ventilatie verwijderen die verbonden zijn met de schouw die uitgeeft op de buitenzijde. Als het onmogelijk blijkt een dergelijke kast te installeren, moet een elektrische ventilator aangebracht worden in het venster of de muur die naar buiten uitgeeft.
- Page 60 3. Deel: INSTALLATIE EN VOORBEREIDING VOOR GEBRUIK GASVERBINDING De installatie van de gaskookplaat op aardgas of LPG-gas moet worden uitgevoerd door een gas geregistreerde installateur. Installateurs moeten de voorzieningen van de praktijkcode van de relevante Britse normen, het gas veiligheidsreglement en de bouwnormen (Schotland) (Consolidatie) reglementeringen strikt naleven die werden uitgevaardigd door het Schotse Departement voor Ontwikkeling.
- Page 61 DEEL 3: INSTALLATIE EN VOORBEREIDINGEN VOOR GEBRUIK BELANGRIJK • 7 Het apparaat moet worden geïnstalleerd, gereguleerd en aangepast zodat het kan werken met andere types gas door een GEKWALIFICEERDE INSTALLATEUR. Het niet naleven van deze voorwaarde maakt deze garantie nietig. De kookplaat mag enkel worden geïnstalleerd door een Gasgeregistreerde installateur.
- Page 62 GASINSTALLATIE BELANGRIJKE NOTA Dit apparaat wordt uitsluitend geleverd voor gebruik met AARDGAS en het mag niet worden gebruikt met ander gas zonder wijzigingen. Dit apparaat wordt gefabriceerd voor conversie naar LPG. Om een LPG conversiekit aan te kopen, kunt u contact opnemen op het nummer 0870 6052020.
- Page 63 Gebruik geen naakte vlammen om te controleren op gaslekken. Alle metalen onderdelen die worden gebruikt voor de gasverbinding moeten vrij zijn van roest. Controleer ook de vervaldata van de gebruikte componenten. De punten die moeten worden gecontroleerd tijdens de montage van de vaste gasverbinding Om een vaste gasverbinding te monteren (gasverbinding met draden, bijv.
- Page 64 3. Deel: INSTALLATIE EN VOORBEREIDING VOOR GEBRUIK 3.4. Elektrische aansluiting en veiligheid Volg de instructies vermeld in de handleiding voor de elektrische verbinding. • De aardleiding moet verbonden worden met het aardingseinde. • U moet er voor zorgen dat het netsnoer met geschikte isolatie wordt aangesloten op de voeding tijdens de aansluiting van de kabel.
- Page 65 3. Deel: INSTALLATIE EN VOORBEREIDING VOOR GEBRUIK 3.5. Elektrische aansluiting (ENKEL VK) Lees de volgende informatie voor uw veiligheid: WAARSCHUWING: Dit toestel moet worden geaard. • Het apparaat moet worden aangesloten op een 240 Volt 50 Hz AC voeding via een stekker met drie polen, correct geaard en beveiligd met een 3 amp zekering in de stekkering.
- Page 66 GASCONVERSIE DE GASVERBINDING WIJZIGEN De installatie van het gasapparaat op aardgas of LPG-gas moet worden uitgev oerd door ee n g as gere gistreerde installateur. Ingenieurs m oeten d e voorz ieningen v an de praktijkcode v an d e rel evante Britse nor men, het gas veiligheidsreglement en d e bouwnormen (Schotland) (Consolidatie) reglementeringen strikt nal even die werden...
- Page 67 • Maak de overbruggingsschroef 90° losser of vaster behulp van een kleine schroevendraaier, dit laat de vlam van de brander tot een minimum komen. Wanneer de vlam een omvang heeft van 4 mm, dan is het gas goed verdeeld. Zorg ervoor dat de vlam niet uitdooft tijdens de overgang van de maximum op minimum stand.
- Page 68 4. Deel: GEBRUIK VAN UW KOOKPLAAT 4.1 Gebruik van gasbranders Ontsteking van de branders Om de knop te bepalen waarmee iedere brander wordt bediend, kunt u het symbool controleren boven de knop. • Handmatige ontsteking Als uw apparaat niet is uitgerust met een ontstekingsmiddel, of indien er een fout is in het elektrisch netwerk, kunt u de onderstaande procedures volgen: Om een van de branders te ontsteken, drukt u deze knop in en u draait hem tegen de...
- Page 69 4. Deel: GEBRUIK VAN UW KOOKPLAAT Bediening van de branders De knop heeft 3 standen: Uit (0), max (grote vlamsymbool) en min (kleine vlamsymbool). Na het o ntsteken van de br ander i n de ma x. pos itie: U k unt de vl amgrootte aa npassen tussen max.
- Page 70 4. Deel: GEBRUIK VAN UW KOOKPLAAT WAARSCHUWING: • Gebruik enkel vlakke pannen met een voldoende dikke basis. • Zorg ervoor dat de basis van de pan droog is voor u ze op de branders plaatst. • De temperatuur van toegankelijke onderdelen kan hoog zijn wanneer het apparaat in gebruik is.
- Page 71 5. Deel: SCHOONMAKEN EN ONDERHOUD 5.1 Schoonmaken Maak dat alle bedieningsknoppen uitgeschakeld zijn en dat uw toestel afgekoeld is alvorens uw oven te reinigen. Schakel het apparaat uit. Kijk na of de schoonmaakproducten die u gaat gebruiken aanbevolen zijn door de fabrikant alvorens de schoonmaakproducten te gebruiken.
- Page 72 5. Deel: SCHOONMAKEN EN ONDERHOUD Roestvrij staal: Roestvrij stal en o nderdelen moeten reg elmatig worden schoongemaakt met ee n l auw zeepsopje en een zac hte sp ons. Droo g da arna met e en zachte do ek. Gebruik ge en schurende p oeders of sc hoonmaakmiddelen.
- Page 73 6. Deel: DIENST EN TRANSPORT 6.1 Basis probleemoplossen voor u contact opneemt met de onderhoudsdienst Indien de elektrische ontsteking niet werkt: • De kookplaat kan uitgeschakeld zijn, er was een black-out. De kookplaat branders werken niet correct: • Controleer of de branderonderdelen correct werden gemonteerd (in het bijzonder na de schoonmaak).
- Page 75 Als er iets niet werkt Als er iets met uw toes tel is wat u niet begrijpt en u woont in het VK, kunt u met ons contact opnemen tijdens de n ormale werkuren op: 0844 8009595. Als u onderhoud vereist , kunt u het nu mmer bellen op uw ontvangstbewijs.
- Page 76 INSTRUCCIONES DE INSTALACIÓN Y MANEJO ENCIMERA A GAS EMPOTRABLE PGH461SS-B PGH461W-B PGH461SS-F PGH461W-F PGH461SS-N PGH461W-N PGH461SS-S PGH461W-S PGH461SS-U PGH461W-U...
- Page 77 Estimado Cliente, Este manual se proporciona para ayudarle a utilizar el aparato, fabricado con la última tecnología, y con el fin de brindar la máxima eficiencia. Antes de utilizar este aparato, léase detenidamente esta guía, en la que encontrará la información básica para una instalación, mantenimiento y uso seguros.
- Page 78 ÍNDICE: 1. Sección : PRESENTACIÓN Y DIMENSIONES DEL APARATO 2. Sección : INSTRUCCIONES DE SEGURIDAD IMPORTANTES 3. Sección : INSTALACIÓN Y PREPARATIVOS PARA EL USO 3.1 Localización de la encimera empotrable 3.2 Evacuación de los Gases Quemados del Medio Ambiente 3.3 Conexión del gas 3.4 Conexión eléctrica y seguridad 3.5 Conexión eléctrica (SOLO PARA EL REINO UNIDO)
- Page 79 1. Sección : PRESENTACIÓN Y DIMENSIONES DEL APARATO PRESENTACIÓN: Lista De Componentes: Hornillo Mediano Botón de Encendido Para Hornillo Mediano Hornillos a Gas Quemador Rápido Mandos de control Hornillo Auxiliar * La apariencia de su encimera puede ser diferente de la imagen que se muestra más arriba debido a su configuración.
- Page 80 2. Sección : INSTRUCCIONES DE SEGURIDAD IMPORTANTES Después de desembalar el aparato, asegúrese de que no esté dañado. Si tiene alguna duda, no lo use y consulte a su proveedor o a un técnico cualificado profesional. Los elementos del embalaje (por ejemplo, bolsas de plástico, espuma de poliestireno, clavos, correas de embalaje, etc.) no se deben dejar al alcance de los niños, ya que estos elementos pueden causar lesiones serias.
- Page 81 2. Sección : INSTRUCCIONES DE SEGURIDAD IMPORTANTES PRECAUCIONES Y RECOMENDACIONES IMPORTANTES SOBRE EL USO DE APARATOS ELÉCTRICOS El uso de cualquier aparato eléctrico implica la necesidad de seguir una serie de normas fundamentales. No tocar el aparato nunca con las manos o los pies mojados;...
- Page 82 3. Sección : INSTALACIÓN Y PREPARATIVOS PARA EL USO DEL APARATO 3.1. Localización de la encimera empotrable Cree un espacio para instalar su encimara de acuerdo con las dimensiones indicadas en la ilustración • 150 mm desde el borde de la placa hasta los materiales combustibles, tales como papel tapiz o cortinas 750 mm de distancia entre los armarios colgados, las estanterías y las campanas •...
- Page 83 3. Sección : INSTALACIÓN Y PREPARATIVOS PARA EL USO DEL APARATO Fijación de los soportes de instalación • Cada en cimera in cluye u n ki t instalación, incluidos los soportes y los tornillos para sujetar la parte superior de la t >...
- Page 84 3. Sección:INSTALACIÓN Y PREPARATIVOS PARA EL USO DEL APARATO 3.2. Evacuación de los Gases Quemados del Medio Ambiente Los aparatos de cocina que funcionan a gas, emiten gases quemados residuales directamente al exterior o a través de las campanas de extracción conectadas a la chimenea que se abre directamente al exterior.
- Page 85 3. Sección : INSTALACIÓN Y PREPARATIVOS PARA EL USO DEL APARATO CONEXIÓN DEL GAS La instalación de la manguera hacia el suministro de gas natural o gas licuado debe ser realizada por un instalador de gas certificado. Los instaladores deberán tener debidamente en cuenta las disposiciones pertinentes del Código Británico de Prácticas de Normas, la normativa en materia de Seguridad en Gas, así...
- Page 86 SECCIÓN 3: INSTALACIÓN Y PREPARATIVOS PARA EL USO DEL APARATO IMPORTANTE • El aparato debe ser instalado, regulado y adaptado para funcionar con otros tipos de gas por un TÉCNICO INSTALADOR AUTORIZADO. El incumplimiento de esta condición anulará la garantía. La encimera sólo debe ser instalada por un instalador de gas autorizado ycertificado.
- Page 87 NOTA IMPORTANTE SOBRE INSTALACIONES DE GAS Este aparato se suministra para utilizarlo con GAS NATURAL y no se puede utilizar ningún otro gas sin modificaciones. Este aparato está fabricado para la conversión a GLP. Para comprar un kit de conversión de GLP llame directamente al teléfono 0870 6052020.
- Page 88 No utilice llamas para comprobar si hay fugas de gas. Todos los componentes metálicos empleados durante la conexión de gas deben estar libres de óxido. Verifique también las fechas de caducidad de los componentes utilizados. Puntos de comprobación durante el montaje de la conexión fija de gas Para montar una conexión de gas fija (conexión de gas hechas por tuercas, por ejemplo), existen d iferentes métodos ut ilizados e n di ferentes ár eas.
- Page 89 3. Sección:INSTALACIÓN Y PREPARATIVOS PARA EL USO DEL APARATO 3.4. Conexión eléctrica y seguridad Durante la conexión eléctrica, siga las instrucciones indicadas en el manual de usuario. • Debe conectar el cable de toma de tierra al terminal de tierra. •...
- Page 90 3. Sección:INSTALACIÓN Y PREPARATIVOS PARA EL USO DEL APARATO 3.5. Conexión eléctrica (SOLO PARA EL REINO UNIDO) Para su seguridad, por favor lea la siguiente información. ADVERTENCIA: Esta encimera debe estar conectada a tierra. • El aparato debe conectarse a una corriente de 240 voltios AC a 50 Hz a través de un enchufe de tre s patillas, d ebidamente con ectado a tierra y de be pr otegerse por u n fusible de 3 amperios en el enchufe.
- Page 91 CONVERSIÓN DE GAS CAMBIO DE LA CONEXIÓN DE GAS La instal ación de la manguera desde el aparato haci a e l suministro de gas natural o gas licuado debe ser realizada por un instalador de gas c ertificado. Los instaladores deberán ten er de bidamente en cu enta las disposiciones pertinentes del Código Británico de Pr ácticas de N ormas, la normativ a e n materia de Segur idad en Gas, así...
- Page 92 • Con la ayuda de un pequeño destornillador, apriete o afloje la tuerca de paso 90°, lo que hace que la llama del quemador permanezca al mínimo. Cuando la llama tenga una longitud de al menos 4 mm, el gas estará bien distribuido. Asegúrese de que la llama no se extinga al pasar de la posición máxima a la posición mínima.
- Page 93 4. Sección : USO DE LA PLACA 4.1 Uso de los hornillos a gas Encendido de los quemadores Para determinar qué mando corresponde a cada hornillos, compruebe la posición del símbolo por encima de la perilla. • Encendido manual Si su aparato no está equipado con ayuda al encendido, o si hay un fallo en la red eléctrica, siga los procedimientos que se detallan a continuación: Para encender uno de los quemadores, apriete y gire el mando hacia la izquierda para que...
- Page 94 4. Sección : USO DE LA PLACA Control de los Quemadores de la Encimera: El mando tiene 3 p osiciones: Apag ado ( 0), ma x (l lama grande) and min (símbo lo de llama p equeña). Des pués d e e ncender el qu emador en má x. p osición, usted p uede ajustar la longitud de la llama entre el máx.
- Page 95 4. Sección : USO DE LA PLACA ADVERTENCIA: • Utilice sólo sartenes planas y con un base con un grosor adecuado. • Asegúrese d e que la base de la sarté n e sté seca ante s de situarl a encima de l os hornillos.
- Page 96 5. Sección : LIMPIEZA Y MANTENIMIENTO 5.1 Limpieza Antes de proceder a limpiar la cocina, asegúrese de que todos los mandos están en posición apagada y que el aparato se haya enfriado. Desenchúfelo de la corriente. Verifique que los productos de limpieza para el horno sean los recomendados por el fabricante antes de utilizarlos.
- Page 97 5. Sección : LIMPIEZA Y MANTENIMIENTO Acero inoxidable: Las piezas de acero in oxidable se deben limpiar a menudo, con agua tibia y jabón suave y una esponja suave y secar con un paño suave. No utilice polvos abrasivos ni materiales de limp ieza ab rasivos.
- Page 98 6. Sección : SERVICIO TÉCNICO Y TRANSPORTE 6.1 Solución de problemas básicos antes de contactar con nuestro servicio técnico Si el encendido eléctrico no funciona: • La placa puede estar desconectada debido a un apagón. Los hornillos quemadores no funcionan correctamente: •...
- Page 100 Si algo parece no funcionar Si pasa a lgo incompre nsible con su aparato y reside en el Reino Unido, puede llamar en horario de oficina al teléfono de nuestro centro de atención telefónica: 0844 8009595 Si necesita servicio técnico, llame al número que aparece en su recibo de compra.
Need help?
Do you have a question about the PGH461SS-B and is the answer not in the manual?
Questions and answers