
Subscribe to Our Youtube Channel
Related Manuals for Sumake EP-1800


Summary of Contents for Sumake EP-1800
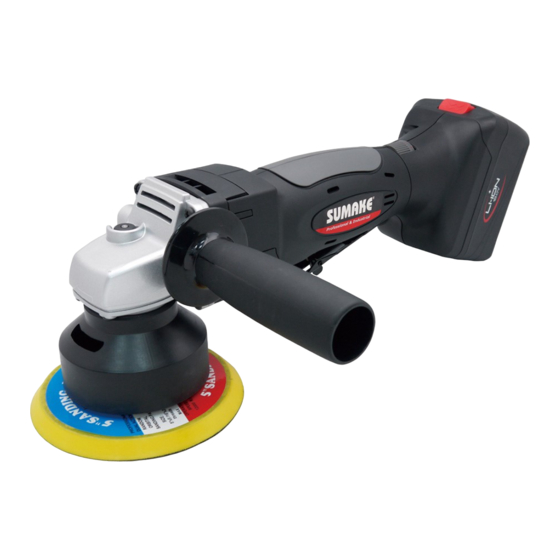
- Page 1 INSTRUCTION MANUAL EP-1800 ITEM NO.: 18V 7" CORDLESS POWER POLISHER EP-1800-I-1403A-TE...
- Page 2 Operational Precautions General Safety Instructions △ △ △ △ ! WARNING 1. Consider work area environment. Do not expose tools to rain. Do not use tools in damp or wet locations:keep work area clean and well lit. Do not use tools in the present of flammable liquids or gases. 2.
- Page 3 Important Safety Instructions for Charger & Battery Pack △ △ △ △ ! WARNING 1. Caution : To reduce risk of injury, charge only specific type rechargeable battery packs. Other types of battery packs may burst causing personal injury and damage. 2.
- Page 4 Additional Safety Rules for Charger & Battery Pack △ △ △ △ ! WARNING 1. Do not charge battery pack when temperature is below 10° C (50° F) or above 40° C (104° F). 2. Do not attempt to use a set-up transformer, an engine generator or DC power receptacle.
-
Page 5: Specific Safety Rules And/Or Symbols
Hz-------Hertz W--------Watts kg-------Kilograms mm------Millimeter d.c. -----Direct Current kg-cm--Kilograms Per Centimeter ft-lb------Foot-Pound /min-----Revolutions or Reciprocations Per Minute Specification Model No. EP-1800 Voltage 10.8V d.c. 14.4V d.c. 18V d.c. No Load Speed /min 1300~3800 r.p.m. Tool Weight 2.146kg 2.23 kg 2.35 kg With Battery) (Battery 0.446kg) -
Page 6: Operating Instructions
Accessories Lapin cloth Sponge bonnet Charger Wrench Operating Instructions Installing or Removing Battery Pack 1. To remove the battery pack push the battery knob on the battery pack and pull the battery pack to remove the battery pack from the unit. 2. - Page 7 Battery pack LED Indication Function The Battery Pack has a “SW” button and 4-step green LEDs for indicating remaining capacity status and over temperature condition. The remaining capacity (RC) and temperature protection status green LED indications ( 3 second ) when the “SW” button is momentarily pressed. Remaining Capacity LED Indication RC Status LED 1 (green)
-
Page 8: Charging The Battery Pack
Charging the Battery Pack 1. Plug the fast charger into the power source. 2. Slide the battery pack into the charger as the arrow direction shown on the charger. 3. Push the battery pack into place and make sure the red light on the charger is “ON”. -
Page 9: Tool Operation
△ △ △ △ ! WARNING 1. Charger is plugged into a 100-240V a.c outlet only. 2. If the battery pack is too hot or too cold, the charger will not fast charge the battery pack and the red Indicator light is “blinking”. When the battery pack temperature returns to between 0 C(32 F) and 50 C(122 F), The charger will automatically begin charging. - Page 10 Sponge Bonnet Exchange 1. Bonnet exchange:Hold the pad to separate the sponge bonnet then replace a new sponge bonnet. Sponge bonnet 2. Cover the lapin cloth:put the sponge bonnet on the pad then cover the lapin cloth and tie the cloth strings Lapin cloth Cloth strings 3.
- Page 11 Attaching Polisher Backing Pad 1. Use polisher wheel flange wrench to hold the hexagonal nut. 2. Align the polisher backing pad bolt thread with the thread hole on the eccentric wheel ass’y. Threads of eccentric wheel ass’y Bolt Threads 3. Use flange wrench to hold the hexagonal nut and stabilize the eccentric wheel ass’y counter weight disc, spin the polisher backing pad in clockwise direction until tightened.
-
Page 12: Operation Procedure
4. Use flange wrench to hold the hexagonal nut and stabilize the eccentric wheel ass’y and spin the polisher backing pad in counterclockwise direction to remove. Counterclockwise Use flange wrench to stabilize the eccentric wheel ass’y.. Operation Procedure 1. Prepare glaze wax polish. 2. - Page 13 DECLARATION OF CONFORMITY SUMAKE INDUSTRIAL CO., LTD. 4F, No. 351, Yangguang St., Neihu District, Taipei City, Taiwan declare in sole responsibility that the equipment Equipment:CORDLESS POWER POLISHER Model/ Serial No.:EP-1800 to which this declaration applies, complies with these normative documents: ...
- Page 14 EP-1800 18V 7" CORDLESS POWER POLISHER WITH 3.0AH Li-ion BATTERY SET PARTS LIST Parts No. Description Q'ty Parts No. Description Q'ty EP1800-01 Screw EP1800-16 Velcro EP1800-02 Front Cover & Gear Box Ass'y EP1800-17 Sponge EP1800-03 Bush EP1800-18 Lapin Cloth EP1800-04...
- Page 15 NOTE...
- Page 16 NOTE...
Need help?
Do you have a question about the EP-1800 and is the answer not in the manual?
Questions and answers