Schaerer siena 1 Operating Instructions Manual
Hide thumbs
Also See for siena 1:
- User manual (60 pages) ,
- User manual (35 pages) ,
- User manual (42 pages)
Table of Contents
Advertisement
Schaerer Siena 1 & 2
Betriebsanleitung
Operating instructions
Manuel d'utilisation
Gebruiksaanwijzing
Manual de instrucciones
Návod k provozu
Használati utasítás
V07 / 06.2010
. . . . . . . . . . . . . . . . . . . . . . . . . . . . . . . . . . . . . . . . . . . . .
. . . . . . . . . . . . . . . . . . . . . . . . . . . . . . .
. . . . . . . . . . . . . . . . . . . . . . . . . . . . . . . . . . . . . . .
. . . . . . . . . . . . . . . . . . . . . . . . . . . . . . . . . .
. . . . . . . . . . . . . . . . . . . . .
. . . . . . . . . . . . . . . . . . . . . . . . . . . . . . . . . . . . . . . . .
. . . . . . . . . . . . . . . . . . . . . . . . . . . . . . . . . . . . .
Seite 2
Page 35
Page 69
Pagina 103
Página 137
Strana 171
Oldalt 205
Advertisement
Table of Contents

Related Manuals for Schaerer siena 1


Summary of Contents for Schaerer siena 1
- Page 1 Schaerer Siena 1 & 2 Betriebsanleitung Seite 2 ..........
-
Page 2: Schaerer Siena
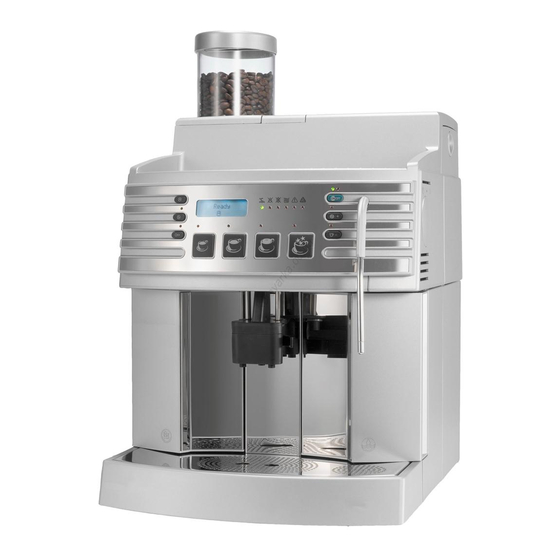
Your machine may vary from those shown in the pictures (options). The company Schaerer Ltd. reserves the right to make changes at any time without issuing further notification. - Page 3 Hot water outlet Siena 1: Beverage outlet Drip grid Water tank Drip tray Swivel The position differs between * Illustration: Siena 2 Siena 1 and Siena 2. Indicator symbols: Display Bean container empty Grounds container Water tank empty Malfunction/brew unit Temperature...
-
Page 4: Safety Symbols
Introduction www.schaerer.com Safety symbols Observe the safety instructions on page 40! Exercise extreme caution when these Caution! Caution! symbols appear! Risk of damage to User at risk! machine! Caution! Caution! Hot fluid! Hot steam! Caution! Caution! Hot surface! Risk of squeezing! -
Page 5: Table Of Contents
Preparing products ................47 Preparing coffee / espresso (whole-bean coffee) ......47 Preparing DECAF coffee (coffee powder) ........47 Preparing hot water (Siena 1) ............47 Preparing hot water (Siena 2) ............48 Preparing steam (Siena 1) ............... 48 Preparing cappuccino (Siena 2)............48 Preparing milk foam (Siena 1) ............ -
Page 6: Safety Notes
Safety notes General At Schaerer Ltd., the highest degree of safety is one of the most important product features. The effective- ness of the safety devices is guaranteed only if the following instructions are observed to prevent injuries and health hazards: •... -
Page 7: Hygiene
Safety notes Disposal! For safety reasons, machines that have reached the end of their product life cycles must be rendered unusable. To do so, disconnect the power cord and sever the connector cable. Afterward, dispose of the device in accordance with regulations. -
Page 8: Intended Use
Use of this equipment is subject to the „General Terms and Conditions“ of Schaerer Ltd. and these opera- ting instructions. In legal terms, any other use is not an intended use. The manufacturer accepts no liability for damage resulting from unintended use. -
Page 9: Product Description
Product description Product description Overview - machine (Refer to page 36) Overview - control panel (Refer to page 36) Detailed picture of the foamer head (Siena 2) 1. Foamer head 2. Corner piece 3. Foam nozzle If no milk foam is dispensed, insert the supplied instrument (air valve pin) into the foam nozzle [ 3 ]. -
Page 10: Power Supply
● Schaerer Ltd. advises against the use of extension cables! • If an extension cable must be used, nevertheless (minimum cross-section: 1.5 mm2), please observe the cable manufacturer’s data (instructions for use) and all local regulations. -
Page 11: Installation Plan For Siena 2
Product description Installation plan for Siena 2 Minimaldistanz zur Rückwand Minimal distance to back panel Distance minimale à la paraoi arrière min. 220 Distancia mínima hasta la pared Milchschlauch Milk tube Tuyau du lait Tubo de leche Milchpack Milk carton... -
Page 12: Commissioning
► Set the date using ► Confirm by pressing ► Fill the bean container (Siena 1: 300 g Siena 2: 600 g). Close the bean container with the lid to form a tight seal. Only pure whole coffee beans may be used – no coffee with caramelised or aromatised beans. -
Page 13: Operation
Fill only roasted coffee beans into the container. ► Remove the lid from the bean container. ► Fill beans (Siena 1: 300 g Siena 2: 600 g) into the bean container and fit the lid back on. A well-sealed bean container prevents the loss of aroma. -
Page 14: Operating Modes
Operation www.schaerer.com Operating modes The Siena 1 / 2 has two (2) operating modes: << Stand by >> The machine is switched off but still connected to the power supply. The following message appears on the display (shown left). Ready The machine is ready to operate. -
Page 15: Preparing Hot Water (Siena 2)
Preparing milk foam (Siena 1) Milk foam can be dispensed and/or added at any time. ► Unscrew the screw. -
Page 16: Preparing Milk Foam (Siena 2)
Operation www.schaerer.com Preparing milk foam (Siena 2) Milk foam can be dispensed and/or added at any time. ► Place a cup under the outlet. ► Press the button and keep it pressed. ► Press and hold the cappuccino/macchiato button to dispense milk foam. „Milk“ appears on the display. -
Page 17: Programming
Programming Programming Your coffee machine is pre-programmed at the factory. You also have the option, however, of adjusting the device to your individual tastes. You can program the following product-related elements (refer also to the programming overview): Water volume - coffee quantity - pre-brew function In addition, you can program various device functions individually. -
Page 18: Overview: Product Programming (Coffee, Cappuccino)
Ready ► Press to access the programming level. Product, 2x, C Siena 1 + 2: Press button [ 1 ] or [ 2 ] (see page 51) ► Set the water volume (ml) using + 0% ► Confirm by pressing ►... -
Page 19: Overview: Product Programming (Milk Foam, Hot Water)
Programming Overview: product programming (milk foam, hot water) Accessing the programming level: Ready ► Press to access the programming level. Product, 2x, C Siena 2: Product programming: milk foam ► Press button [ 4 ] ► Set the milk foam volume (sec.) using + 0% #.## s... -
Page 20: Overview: Programming Common Parameters
Programming www.schaerer.com Overview: programming common parameters Accessing the programming level: Bereit ► Press to access the programming level. Product, 2x, C Press the button ► Set the language using English ► Confirm by pressing bestätigen. ► Set the brewing temperature using Temp. -
Page 21: Overview: Programming Fixed Parameters
Programming Overview: programming fixed parameters Accessing the programming level: Ready ► Press to access the programming level.. Product, 2x, C Press the button ► Set each digit using Code #### ► Confirm by pressing ► Set counter level to 0 using (if desired). -
Page 22: Cleaning
Cleaning www.schaerer.com Cleaning his chapter describes the cleaning of the coffee machine. To achieve the best possible quality of the dis- pensed beverages, it is necessary to clean the machine properly and thoroughly on a daily and weekly basis. Please observe the safety notes on page 40! •... -
Page 23: Daily And Weekly Cleaning
Cleaning Daily and weekly cleaning Carefully read the information given in the Operating instructions as it contains important information regarding safety,hygiene, use and maintenance of the machine. Never reach into the machine or under the beverage outlets during the automatic cleaning! -
Page 24: Coffee System Cleaning
Cleaning www.schaerer.com Coffee system cleaning: Milk system rinsing: (Siena 1 / Siena 2) (Siena 2) ► Fill the water tank with fresh water. ► Insert the cleaning tablet into the funnel. ► Put the milk tube into a container with fresh ►... -
Page 25: Descaling
► Place a container under the outlet (Volu- by mode. me: ± 2.0 Litre). ► Remove the outlet. Siena 1: ► Remove the water tank. Only appears if the steam generator ► Turn the rotary knob (on the right side) to ►... -
Page 26: Installing/Detaching The Foam Head (Siena 2)
Cleaning www.schaerer.com When the descaling is finished, a prompt to carry out the daily cleaning appears automatically. ► Descaling process is finished. On the dis- play appears: << Stand by >> ► Reinstall the outlet. Installing/detaching the foam head (Siena 2) Press the front of the foam head [ 1 ]. -
Page 27: Troubleshooting
± 6 sec.) . (The indicator goes out when the next beverage is dispensed). Siena 1: ► Turn the rotary dial (on the right-hand side) to the [ Hot water ] position in order to bleed the device. ► The milk nozzle is clogged (in the milk container). Insert a brush... -
Page 28: Service And Maintenance Work
Troubleshooting www.schaerer.com Service and maintenance work Even if the coffee machine is cleaned and maintained in an ideal manner, it must be serviced (once a year). Having a qualified service technician inspect the coffee machine regularly extends its product life cycle. -
Page 29: Options
► Re-insert the coin container. ► Close the coin tester again. Bean container Various bean hoppers are available: ► Siena 1 = Maximum capacity 300 g. (also available for Siena 2) ► Siena 2 = Maximum capacity 600 g. 62 / 68... -
Page 30: Base With Supports (Art. No.: 062489)
Options www.schaerer.com Base with supports (Art. No.: 062489) A base is required for machines with a wastewater connection (supply and drainage pipes). This is only required if no holes are to be drilled into the counter! Fixed water supply FA fixed water supply is strongly recommended for coffee machines dispensing a large quantity of beverages.A fixed water supply is generally possible wherever supply pipes and drainage pipes are pre-... -
Page 31: Declaration Of Conformity
The stated manufacturer declares herewith that this machine complies with all relevant stipulations of the specified EU directives. In case of any modifications of the units that have not been approved by Schaerer, this declaration is rendered invalid. A quality management system certified by Bureau Veritas, in accord- ance with SN EN ISO 9001: 2008, has been used to ensure the proper adherence to the requirements. -
Page 32: Appendix
Appendix www.schaerer.com Appendix Cleaning products Cleaning tablet (Art.-No.: 062867) Before using the cleaning tablet, please read the information on the tablet‘s packaging as well as the safety data sheet („HEALTH & SAFETY DATA SHEET“). If you do not have this safety data sheet, please request it from your sales centre. -
Page 33: Emergency Information
508 mm Depth: 403 mm 460 mm with wastewater (option) Water tank (capacity): 2.4 litre Bean container: Siena 1: ± 300 g Siena 2: ± 600 g Empty weight: ± 15.7 kg Power cord (Length): 1.1 m Electrical socket: Do not use any multiple sockets, especially if devices... -
Page 34: Overview Of Accessories
Cleaning tablets 062867 Measuring spoon 067111 Multi-tool adjusting knob 062985 Brush 062951 Brush set (5 pcs.) 071174 Accessories for Siena 1: Foam nozzle 062945 Accessories for Siena 2: Milk foam nozzle Milkpure 250 ml 071531 Air valve pin 061454 1 set... - Page 35 Declaration of conformity 68 / 68 Operating instructions / V07 / 06.2010...
Need help?
Do you have a question about the siena 1 and is the answer not in the manual?
Questions and answers