Table of Contents
Advertisement
Quick Links
Advertisement
Chapters
Table of Contents

Subscribe to Our Youtube Channel
Related Manuals for Schaerer Junior


Summary of Contents for Schaerer Junior
- Page 1 Junior Operating instructions V03 / 10.2010...
- Page 2 Schaerer USA Corporation Original operating instructions 2900 Orange Avenue, Suite 102 BAJR_EN Signal Hill, CA 90755 info@schaererusa.com www.schaererusa.com N° 021231...
- Page 3 All information, illustrations, and specifications in this Operating instructions are based on the latest product information available at the time of publication approval. Schaerer Ltd. reserves the right to change the content at any time without any prior notice.
-
Page 4: Welcome
Introduction INTRODUCTION WELCOME Dear customer With this new coffee machine, you have purchased a Swiss quality product especially designed for the catering trade and office environment. The brewing unit allows for simultaneous filling of up to two cups. The Operating instructions will inform you in detail on programming, commissioning, use and cleaning of your new machine. -
Page 5: Symbols And Pictograms
Introduction Symbols and pictograms Note: This section provides you with important notes and information. Attention! This note indicates possible damage to property as well as possible financial and sta- tutory penalties (e.g. loss of rights to claim under guarantee, liability suits, etc.). Danger! This note indicates a risk of severe and/or fatal injury if specific procedural rules are violated. -
Page 6: Table Of Contents
Introduction CONTENTS Chapter Page Welcome ...............................1-2 Dear customer ............................1-2 Symbols and pictograms ........................1-3 SAFETY INSTRUCTIONS ........................2-2 General ..............................2-2 Safety symbols ............................2-2 Prevention of accidents .........................2-3 Hygiene ..............................2-5 Designated use ............................2-5 Liability ..............................2-5 Product description..........................3-2 Specifications ............................3-2 Operating data ............................3-8 Equipment and accessories ........................3-10 Special settings ...........................3-11 Commissioning ............................3-13 OPERATION ............................4-2... - Page 7 Safety Instructions Contents Chap. Text Page SAFETY INSTRUCTIONS ..............2-2 General ............................... 2-2 Safety symbols ..........................2-2 Prevention of accidents ........................2-3 Hygiene .............................. 2-5 Designated use ..........................2-5 Liability .............................. 2-5 Page 2-1 BAJR_USA_EN_V03...
-
Page 8: Safety Instructions
Safety Instructions SAFETY INSTRUCTIONS This chapter warns you about possible dangers when operating your new machine. The information contained herein on how to recognize hazardous situations enables a safe and proper operation. General The coffee machine will be handed over by a service technician authorized by the manufacturer. -
Page 9: Prevention Of Accidents
Safety Instructions Prevention of accidents In the event of incorrect operation or misuse, one or more of the following might occur: • Risk to life and limb of the operator, third persons or animals that are in close proximity to the machine, •... - Page 10 Safety Instructions Attention! Pressing the [ on/off ] will only switch off the machine, but not physically separate it from the mains. If your machine is equipped with a refrigerator, do not disconnect the power supply, as this will switch off the cooling system. When the coffee machine is not used for a prolonged period of time (e.g.
-
Page 11: Hygiene
M. Schaerer AG. The operating manual is an integral part of the above agreement of use. Any usage other than within the limits specified herein shall be regarded as not in accordance with the designated use. - Page 12 Safety Instructions Attention! The manufacturer's warranty exclusively covers machines that have been properly maintained at the intervals specified and where original spare parts are used that were directly supplied by the manufacturer or one of the manufacturer's authorized suppli- ers. Service of the machine has to be carried out either after 12 months or after 70,000 cof- fee products have been dispensed.
- Page 13 Product Description Contents Chap. Text Page Product description ................. 3-2 Specifications ............................ 3-2 3.1.1 Overview ............................. 3-2 3.1.2 Control panel ............................3-3 3.1.3 Coffee machine display ........................3-4 3.1.4 Grinder adjustment ..........................3-4 3.1.5 Installation layout ..........................3-5 3.1.6 Purpose of coffee machine ......................... 3-6 3.1.7 Serial plate ............................
-
Page 14: Product Description
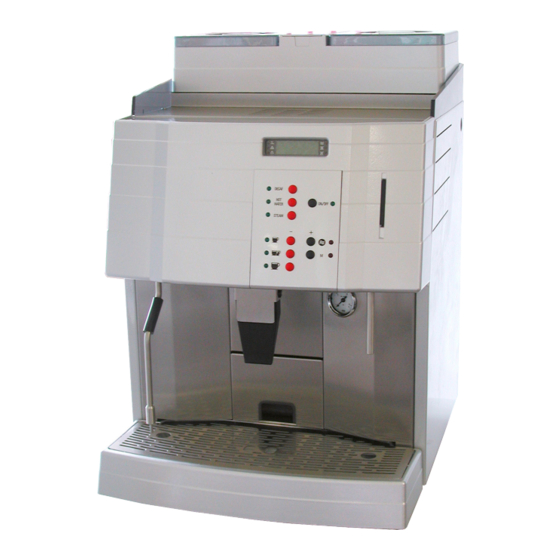
Product Description PRODUCT DESCRIPTION Specifications 3.1.1 Overview Pos. 3.1 A Legend: Coffee bean container (left-hand grinder) Opening for decaffeinated coffee powder and cleaning tablets Coffee bean container (right-hand grinder) 2-line LCD display, illuminated Control panel Beverage outlet (coffee) Hot water outlet Steam pipe Drip grid Drip tray with drain... - Page 15 Product Description 3.1.2 Control panel Display example Pos. 3.2 A Legend: [ on/off ] button with green LED: - Operating button from stand-by mode Switch on to stand-by mode Switch off Button [ ] with red LED: - Moves brewing unit downwards during cleaning program - one pre-set step back (lower) with each button push during programming phase.
-
Page 16: Coffee Machine Display
Product Description 3.1.3 Coffee machine display Pos. 3.3 A Legend: Control display for temperature with green LED Control display for descaling with red LED Control display "malfunction/brewing unit" with red LED Control display "grounds container" with red LED Control display "bean container" with red LED Control display "water tank"... -
Page 17: Installation Layout
Product Description 3.1.5 Installation layout Pos. 3.6 A Installationsplan 3.8.6203 b - UK The fol lo wi ng i nsta ll atio ns must be pres 1 Ma in swi tch (a ll -p ol e isol ated fro m th e p min . -
Page 18: Purpose Of Coffee Machine
(b) and the cover plate (c) (fig. 3.7 Pos. 3.7 A Serial plate Pos. 3.10 A Inst. No. 3.6.9150 Inst. No. 3.6.9150 Type JUNIOR 15 SOJR Type JUNIOR 15 SOJR Serial No. 000000 Serial No. 000000 Date of Production Feb.-XX... -
Page 19: Instruction Label - For Usa Only
B) should be Pos. 3.9 D kept clean at all times. If they are very dirty or il- legible, new adhesives must be requested from the manufacturer and the old ones replaced. Abb. 3.9 E schaerer CAUTION CAUTION CAUTION CAUTION Page 3-7... -
Page 20: Operating Data
Product Description Operating data 3.2.1 Performance Characteristics Max. beverage production per day: - 60 cups of coffee of 120 ml each - 60 cups of tea of 120 ml each, corresponding to approx. 7.2 liters of hot water 3.2.2 Dimensions and weight Height: 615 mm Width:... -
Page 21: Power Consumption
Product Description • Mains cable and/or extension cords must be placed so that they pose no safety or health hazard. Do not pinch the cords or pull them around sharp corners and over sharp edges; do not let them hang exposed in the room. Do not place the cords on warm surfaces and protect them from oil and harsh cleaning agents. -
Page 22: Equipment And Accessories
& right 0.75 kg coffee beans per container Equipment and accessories 3.3.1 Make of the coffee machine The Junior series is available in the following models: Model Ordering no. 15 SO Junior USA 040'659 15 SO Junior EU... -
Page 23: Special Settings
Product Description Special settings Note: All settings described in this section can only be programmed by an authorized service technician. 3.4.1 Service reminder After a certain number of products a reminder will be displayed that it is time to have the machine serviced. -
Page 24: Turn-Off Flushing
Product Description 3.4.2.2.2 Turn-off flushing The automatic turn-off flush cycle is activated just before the machine is switched to stand-by mode. The turn-off flushing lasts approx. 40 seconds. Danger! The machine will automatically start as soon as the turn-off flushing is activated. Keep hands away from the beverage outlet! 3.4.3 Miscellaneous... -
Page 25: Commissioning
Product Description Commissioning 3.5.1 First-time commissioning The coffee machine must be installed and commissioned by a service technician au- thorized by the manufacturer. 3.5.2 Set-up conditions 3.5.2.1 Location Danger! Prior to installing, ensure that the coffee machine will not be positioned on a hot surface or near an oven. - Page 26 Product Description Page 3-14 BAJR_USA_EN_V03...
- Page 27 Operation Contents Chap. Text Page OPERATION ..................4-2 Introduction ............................4-2 Operating modes ..........................4-2 Messages displayed when coffee machine is ready for operation ..........4-3 4.3.1 Display symbols with LEDs ......................... 4-3 4.3.2 Display messages - text ........................4-3 4.3.3 Display messages - symbols ......................
-
Page 28: Operation
Operation OPERATION Introduction This chapter describes the basic functions of the coffee machine. Read them carefully to ensure easy and problem-free routine operation. Note: Proper installation and programming of the coffee machine by an authorized service technician are crucial for a smooth operation and good product quality Danger! - During product release, never move cups or other objects positioned below the beverage outlet, the hot water outlet or the steam pipe! The beverages de-... -
Page 29: Messages Displayed When Coffee Machine Is Ready For Operation
Operation Messages displayed when coffee machine is ready for operation 4.3.1 Display symbols with LEDs Pos. 4.1 A Legend: Temperature control display with green LED - The machine is ready for operation. The green LED shows the optimum temperature has been reached Descaling control display with red LED - Please contact an after-sales service technician authorized by the manufacturer... -
Page 30: Display Messages - Symbols
Operation 4.3.3 Display messages - symbols Note: The following display symbols indicate an active machine-specific and/or product-specific setting.. The warning chime is disabled Automatic switch-off time has been activated Pre-brewing is disabled (for the respective product) The coin controller is enabled (does not apply for this model) Does not apply for this model Steam heating is disabled, steam discharge is not possible. -
Page 31: Routine Operation
Operation Routine operation 4.4.1 Refilling of coffee beans Both coffee bean containers (1) should only be filled with max. 0.75 kg of coffee beans each. Note: Never fill the coffee bean containers with a different product than roasted coffee beans! The coffee grinders are set for a specific coffee mixture. -
Page 32: Making The Coffee Machine Ready For Operation
Operation 4.4.3 Making the coffee machine ready for operation 4.4.3.1 Pre-checks Prior to switching on the machine, check the following: - Is the fresh water supply open? - Are the coffee bean containers filled? (see 4.4.1 "Refilling of coffee beans", page 4-5). -
Page 33: Preselecting Type Of Beverage
Operation 4.4.5 Preselecting type of beverage: If the service technician has enabled beverage preselection, you can select several beverages of the same type by repeatedly pressing the respective product button. Pre- selection of different beverage types is not possible Note: START/STOP operation is not possible, if the service technician has enabled "beve- rage type preselection". -
Page 34: Serving Coffee Beverages
Operation 4.4.7 Serving coffee beverages Note: - If two cups are to be filled simultaneously, ensure that the cups are positioned exactly underneath the outlets. - Refilling of coffee beans: see 4.4.1 "Refilling of coffee beans", page 4-5. - Special-size beverage containers: see 4.4.6 "Special-size beverage containers"... -
Page 35: Serving Of Coffee Made With Pre-Ground Coffee Powder - Decaffeinated Coffee (Decaf)
Operation 4.4.8 Serving of coffee made with pre-ground coffee powder - Decaffeinated coffee (Decaf) Note: - Manual coffee preparation is enabled by default with this coffee machine. - Beverages made from coffee powder cannot be preselected. - Only use ground coffee. - Do not use water-soluble freeze-dried instant coffee. -
Page 36: Dispensing Hot Water
Operation 4.4.9 Dispensing hot water Note: Press the [ HOT WATER ] button for delivery of hot water. Delivery is facilitated through the hot water pipe located to the right of the beverage outlet. (see Fig. 4.9 - Hot water cannot be pre-selected. - Coffee and hot water cannot be served simultaneously. -
Page 37: Generating Steam
Operation 4.4.10 Generating steam Note: For steam delivery press the [ STEAM ] button. The steam is delivered through the steam pipe located to the left of the beverage outlet (see fig. 4.10 The temperature of the beverage to be heated is constantly monitored by the tempera- ture sensor on the steam pipe. -
Page 38: Setting Of The Grinders
Operation Steam delivery ends as soon as a beverage temperature of approx. 70°C (in the container) is reached. Place the container on a stable surface. Danger! The steam pipe is hot. Touch the steam pipe only at the rubber handle. Clean the outside of the steam pipe with a wet and clean paper cloth. -
Page 39: Coffee - Tips And Hints
Operation 4.4.12 Coffee - tips and hints The final coffee quality not only depends on the actual coffee machine, but also on the water quality, type of coffee, coarseness of grind, temperature etc. Especially heed the following tips: - always use fresh coffee - fresh coffee is best stored in a cool place;... -
Page 40: Extended Idle Times
Operation Extended idle times If the coffee machine is not used for several weeks or months (e.g. outside the sea- son), it must be fully switched off. 4.5.1 Extended idle time of up to 4 weeks (e.g. holiday close-down): Do the weekly cleaning (see chapter 5 "Weekly cleaning". -
Page 41: Programming
Operation Programming The coffee machine is fully programmed when it leaves the factory. You can however customize the settings at any time to suit your personal preferences and tastes. You can program the following product items: see also 4.6.1 "Menu overview" page 4-16 Product settings Settings Gen. -
Page 42: Menu Overview
Operation 4.6.1 Menu overview For all the functions described in this chapter, it is assumed that the coffee machine is ready for routine operation in payment mode. Ready [ M ] Product,+,C Fig. 4.15 A Select product button Select program button [ + ] [ Decaf ] General settings... -
Page 43: Reading Product Counter For Totals And Per Button
Operation 4.6.2 Reading product counter for totals and per button f the coffee machine is in operation, switch to stand-by mode by pressing the [ on/off ] button. 2. * Press the desired product button(s). Display message: Display example: Number Displayed value is the total of the selected product button. - Page 44 Operation Change water quantity: Press the desired product button The display will show the current water quantity: Display example (= factory setting): Displayed value is the total of the selected product button. "+0%" = 100% Either press button [ ] or [ ] to increase or decrease the water quantity.
-
Page 45: Changing Hot Water Quantity
Operation Press the [ M ] key to confirm the setting or modification. Display message: Ready The coffee machine returns to normal operating mode. Note: Water quantity: The factory setting of 142 corresponds to a reference value of 140 ml. This value can vary slightly depending on the water pressure in the mains supply. -
Page 46: Changing Steaming Time
Operation Display message: Ready The coffee machine returns to normal operating mode. Note: The factory setting of 140 corresponds to a reference value of 140 ml. This value can vary slightly depending on the water pressure in the mains supply. 4.6.4.3 Changing steaming time The coffee machine is set to run in "Ready"... -
Page 47: Programming - General Settings
Operation 4.6.5 Programming - general settings 4.6.5.1 Choosing display language The language in the display can be set individually according to the languages programmed in the machine control. Note: Programming can be cancelled at any time by pressing the [ on/off ] button. All settings that have been confirmed so far by pressing the [ M ] button are still va- lid. -
Page 48: Setting Stand-By Switch-Off Time
Operation Press the [ M ] key to confirm the setting or modification. 6. * Select next menu: Press the [ M ] button. 7. * Return to normal operating mode: Press the [ M ] button, until "Ready" ap- pears in the display. -
Page 49: Service Support (Phone Number)
Operation Note: Programming can be cancelled at any time by pressing the [ on/off ] button. All settings that have been confirmed so far by pressing the [ M ] button are still va- lid. The current value shown in the display is discarded and the original setting is kept. -
Page 50: Programming - Protected Settings
Operation 4.6.6 Programming - protected settings 4.6.6.1 Entering PIN code All programming stages are protected against unauthorized changes with a four- digit PIN code. Each digit has a range from 0-9. The programming stages "product buttons" and "general settings" can be protected individually. The pro- gramming stage "protected setting"... -
Page 51: Clearing Counter
Operation 4.6.6.2 Clearing counter You can delete the total of all product servings from the counter. The coffee machine is set to run in "Ready" mode and uses the default settings for routine operation. Note: Programming can be cancelled at any time by pressing the [ on/off ] button. All settings that have been confirmed so far by pressing the [ M ] button are still va- lid. -
Page 52: Locking/Unlocking Descaling
Operation Note: Programming can be cancelled at any time by pressing the [ on/off ] button. All settings that have been confirmed so far by pressing the [ M ] button are still va- lid. The current value shown in the display is discarded and the original setting is kept. -
Page 53: Pin-Code For Programming Of "Product Buttons" On / Off
Operation Press the [ DECAF ] button: Code 0000 Display example (=factory setting) Enter the PIN code as described in section 4.6.6.1 "Entering PIN code" on page 4-24. Press the [ M ] button until the following menu appears: Descaling ON Display example (=factory setting) Either press button [ ] or [... -
Page 54: Pin-Code For Programming Stage "General Settings" On / Off
Operation Press the [ M ] button to confirm the setting or modification. 7. * Select next menu: Press the [ M ] button. 8. * Return to normal operating mode: Press the [ M ] button, until "Ready" ap- pears in the display. -
Page 55: Counter On / Off
Operation 4.6.6.7 Counter ON / OFF The display of products served can be switched on and off for each product but- (see 4.6.2 "Reading product counter for totals and per button" page 4-17.) The coffee machine is set to run in "Ready" mode and use the default settings for routine operation. - Page 56 Operation The coffee machine is set to run in "Ready" mode and use the default settings for routine operation. Note: Programming can be cancelled at any time by pressing the [ on/off ] button. All settings that have been confirmed so far by pressing the [ M ] button are still va- lid.
- Page 57 Cleaning Contents Chap. Text Page CLEANING ..................5-2 Important general notes on cleaning ....................5-2 Rinsing the coffee pipes ........................5-2 Daily cleaning ............................ 5-3 5.3.1 Interior Cleaning ..........................5-3 5.3.2 Exterior cleaning ..........................5-7 Page 5-1 BAJR_USA_EN_V03...
-
Page 58: Cleaning
Cleaning CLEANING Important general notes on cleaning Danger! Never reach into the machine while the automatic cleaning cycle is running and keep clear of the beverage outlets. Danger! Never clean the machine with a hose or a pressure cleaner. Do not use steam cleaning devices. -
Page 59: Daily Cleaning
Cleaning Daily Cleaning Daily cleaning The intervals in which the cleaning program is to be carried out are programmed by the service technician. When cleaning is required at pre-set time the display will show: Cleaning Display example Attention! A power outage will cause the automatic cleaning cycle to start again. 5.3.1 Interior Cleaning Note:... - Page 60 Cleaning Daily Cleaning Press the cleaning button [ ] for approx. 4 seconds until the display alternately shows: Remove cont. Cleaning Pull the coffee grounds container within 6 seconds out of the machine. The following message is displayed: Man. cleaning The LEDs of both buttons [ ] and [ will flash.
- Page 61 Cleaning Daily Cleaning Remove all ground coffee residue from the side panels, the base and the brewing unit with the supplied brush. Clean the inside with a moist and clean pa- per tissue..and dry the cleaned surface with a clean paper tissue.
- Page 62 Cleaning Daily Cleaning Danger! Always follow the dosing instructions, safe- ty notes and warnings included with the cleaning products. Read chapter 7 "Clean- agents". Drop a cleaning tablet recommended by the manufacturer or an after-sales service or- ganization authorized by the manufacturer into the filler funnel.
-
Page 63: Exterior Cleaning
Cleaning Daily Cleaning 5.3.2 Exterior cleaning Danger! Do not clean the outside of the machine un- til the rinsing cycle has finished. Attention! Never clean the outside while the cleaning cycle is still running! Never use scouring tools, pads or abrasive agents, chemicals or cleaning tools made of metal. - Page 64 Cleaning Daily Cleaning Dry the external surfaces with a clean paper tissue. Page 5-8 BAJR_USA_EN_V03...
-
Page 65: Error Messages And Malfunctions
Error Messages and Malfunctions Contents Chap. Text Page ERROR MESSAGES and malfunctions ........... 6-2 Error messages with display ......................6-2 6.1.1 Error messages - coffee machine ....................... 6-2 Malfunctions without display messages ..................6-4 Page 6-1 BAJR_USA_EN_V03... -
Page 66: Error Messages And Malfunctions
Error Messages and Malfunctions ERROR MESSAGES AND MALFUNCTIONS Error messages with display 6.1.1 Error messages - coffee machine Danger! Inform your authorized after-sales service immediately if you cannot rectify a malfunction! Do not attempt to repair the coffee machine yourself! Cause Cause Rectification... - Page 67 Error Messages and Malfunctions "Grinder block." - Using the [on/off] button, switch the ma- - An object (e.g. a stone) is stuck in the grinder. chine off and on and press the product button again. - If the message persists, disconnect the coffee machine from the power mains.
-
Page 68: Malfunctions Without Display Messages
Error Messages and Malfunctions "Timeout" - The final position of the brewing unit can- - Contact a customer service authorized by not be detected. the manufacturer. (sTxt-052) No products can be served. Cause Cause Rectification Cause Cause Rectification Malfunctions without display messages Note: The following problems may occur without causing the coffee machine to dis- play an error message. -
Page 69: Appendix
Appendix Contents Chap. Text Page Appendix ................... 7-2 Cleaning agent ..........................7-2 7.1.1 Cleaning tablet for the coffee machine ....................7-2 Serial plate of steam generator and instant heater ............... 7-3 Instant heater (Type - KKM - HW 062'300) ..................7-3 7.2.1 7.2.2 Instant heater (Type SO - HW 061'672) (EU) .................. -
Page 70: Cleaning Agent
Appendix APPENDIX Cleaning agent 7.1.1 Cleaning tablet for the coffee machine Attention! Before you use the cleaning tablets read the label on the cleaning tablet container and the "HEALTH AND SAFETY DATA SHEET." Should you not be in possession of this safety sheet, please order it from the distributing company. -
Page 71: Serial Plate Of Steam Generator And Instant Heater
Pos. 6.1 A The pressure container must be replaced after 36 months at the latest! 7.2.2 Instant heater (Type SO - HW 061'672) (EU) Pos. 6.2 A Schaerer AG, CH-4528 Zuchwil F-Nr. : HW..Baujahr : 20…. pmax 12 bar Tmax : 192ºC... -
Page 72: Environmental Aspects
Appendix 7.2.3 Steam generator (Type SE - DA 061'156)( EU & USA) Pos. 6.2 A Schaerer AG, CH-4528 Zuchwil F-Nr. : DA..Baujahr : 20…. pmax 12 bar Tmax : 192ºC Vol. 0.8 l : 230 VAC Tmin 10ºC : 3000 W : 50/60 Hz Ausführung und Prüfung nach SVTI und TÜV Vorschriften... - Page 73 Index Index A C D E F G H I L M O P R S T V W Text Chapter Page Index Adding coffee powder ......................4.4.2 ..... 4 -5 Appendix ..........................7 ....7 -2 Index Change PIN code ....................... 4.6.6.8 ..4 -29 Changing hot water quantity ....................
- Page 74 Index Text Chapter Page Error messages - coffee machine ..................6.1.1....6 -2 ERROR MESSAGES and malfunctions ................6 ....6 -2 Error messages with display....................6.1....6 -2 Extended idle time of more than 4 weeks (e.g. end of season): ........4.5.2....4 -14 Extended idle time of up to 4 weeks (e.g.
- Page 75 Index Text Chapter Page Index Operating data ........................3.2 ....3 -8 Operating modes ........................ 4.2 ....4 -2 OPERATION ........................4 ....4 -2 Overview ..........................3.1.1 ..... 3 -2 Index Performance Characteristics ....................3.2.1 ..... 3 -8 PIN-Code for programming of "product buttons" ON / OFF ..........4.6.6.5 ..4 -27 PIN-Code for programming stage "general settings"...
- Page 76 Index Text Chapter Page START/STOP operation ..................... 4.4.4....4 -6 Steam generator (Type SE - DA 061'156)( EU & USA) ............. 7.3.3....7 -5 Switching on the coffee machine ..................4.4.3.2 ..4 -6 Switching signal chime on/off ..................... 4.6.5.4 ..4 -22 Symbols and pictograms ....................
Need help?
Do you have a question about the Junior and is the answer not in the manual?
Questions and answers