Table of Contents
Advertisement
Quick Links
Advertisement
Table of Contents

Subscribe to Our Youtube Channel
Related Manuals for Coffee Queen BRILLIANCE 3.0


Summary of Contents for Coffee Queen BRILLIANCE 3.0
- Page 1 BRILLIANCE 3.0 TECHNICAL MANUAL TM_EN Part No.: 1764040_03...
-
Page 2: Table Of Contents
CONTENT BRILLIANCE 3.0 CONTENT .................................2 GENERAL ................................4 Facts & weight ................................4 Dimension ..................................5 OVERVIEW OF COMPONENTS ......................6 Front exterior ................................6 Front interior ................................7 Recipe and cleaning card ............................8 GRINDER SETTINGS ........................... 9 Coarsness adjustment .............................9 Doser adjustment ..............................10 CLEANING PROGRAM .......................... - Page 3 CONTENT BRILLIANCE 3.0 Recipe explanation ..............................33 Doses adjustment time scheme ......................... 36 ELECTRICAL DIAGRAM........................37 IO-Board outputs ..............................37 Wiring sketch ................................. 38 FLOW CHARTS ............................39 Water system vibration pump ........................... 39 Water system rotary pump ..........................40 EXPLODED VIEW ............................
-
Page 4: General
GENERAL BRILLIANCE 3.0 Facts & weight FACTS VIBRATION PUMP 2.0 ROTARY PUMP (RP) Built-in grinder Function for selecting jug None None Drink options Ingredient canister Bean hopper Brewing mechanism Cleaning function by smart card Electronic temperature control Adjustable coffee strength... -
Page 5: Dimension
GENERAL BRILLIANCE 3.0 Dimension Model D (Min~ Max) Brilliance 3.0 664mm 474mm 394mm 75mm ~ 133mm... -
Page 6: Overview Of Components
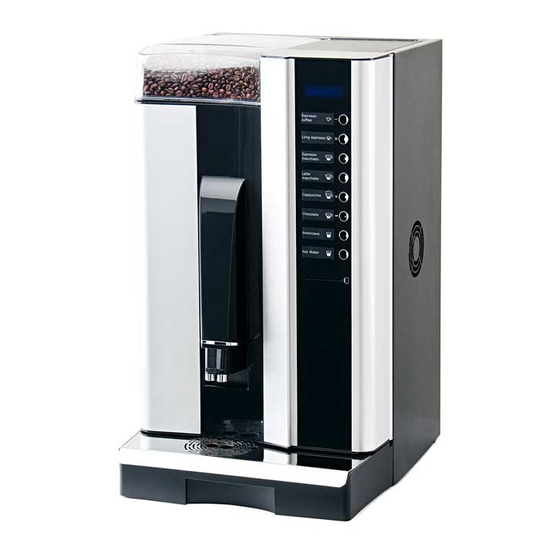
OVERVIEW OF COMPONENTS BRILLIANCE 3.0 Front exterior Eight buttons are available to select 8 different beverages. Some of these buttons have additional functions as below. Selection Button Bean hopper Display Canc Door Door lock Smart card reader Enter Height-adjustable spouts... -
Page 7: Front Interior
OVERVIEW OF COMPONENTS BRILLIANCE 3.0 Front interior Bean Hopper Ingredient Canisters Mixing Bowl Espresso Group Height-Adjustable Spouts Grounds Container Drip Tray Ingredient canisters CUPS/ DETAIL INGREDIENTS WIDTH DEPTH HEIGHT CAPACITY UNIT Bean Hopper Beans ---- ---- ---- ~2kg ~250 cups... -
Page 8: Recipe And Cleaning Card
OVERVIEW OF COMPONENTS BRILLIANCE 3.0 Recipe and cleaning card Cleaning card Recipe card Recipe card (Vibration Pump) (Rotary Pump) Cleaning card is used to access the cleaning functions of the machine. Recipe card is used to update or download recipe setting of the machine. There are two version, Rotary pump and Vibration pump. -
Page 9: Grinder Settings
GRINDER SETTINGS BRILLIANCE 3.0 Coarsness adjustment CCW for coarser grinding CW for finer grinding To adjust the coarseness, please rotate the adjuster counterclockwise for coarser grinding, or clockwise for finer. Take into consideration that after the adjuster is moved, the effect is not immediate;... -
Page 10: Doser Adjustment
GRINDER SETTINGS BRILLIANCE 3.0 Doser adjustment Dosers are devices that can control the amount of ground coffee that the espresso group is supplied with. Doser must be adjusted between position 3 to 9, if the piston of the Espresso group is adjusted to A, the doser adjustment should be from 6.5g to 8.5g . if the piston is adjusted to B the doser adjustment should be from 8.5g to 9.5g, never... -
Page 11: Cleaning Program
CLEANING PROGRAM BRILLIANCE 3.0 Rinsing Canc Enter This rinsing function allows for an easy cleaning of the outlets of the machine. Rinsing is recommended at least once a week, but preferable every day, Rinsing especially if used in high consumption environments. This software routine flushes the different outlets of the machine, Starting with the mixing system and finishing with the espresso group. -
Page 12: Cleaning With Tablets
CLEANING PROGRAM BRILLIANCE 3.0 Weekly Cleaning Cleaning with tablets Canc Canc Enter Enter Insert the cleaning card in the card reader with the chip downwards, toggle Cleaning with tablet through the menus using “-” or “+” until “Cleaning with tablet” is shown on the display, press “Enter”... -
Page 13: Launching The Rinsing Without Cleaning Card
CLEANING PROGRAM BRILLIANCE 3.0 Launching the rinsing without cleaning card Canc Enter Switch The execution of the rinsing can be launched without having to open the door of the machine. As to do that : Turn off power to the machine from its main switch. -
Page 14: Cleaning And Care
CLEANING AND CARE BRILLIANCE 3.0 Weekly Cleaning Disassemble mixing system Rotate the canister chutes so they point upwards and pull out the outlet hose. Turn the mounting plate lever anticlockwise. Loosen the mixing bowl by pulling it straight out. Loosen the whipper by pulling it straight out. -
Page 15: Wash These Parts
CLEANING AND CARE BRILLIANCE 3.0 Weekly Cleaning Wash these parts Clean with a moist Mixing bowl Condensation trap Mounting plate Whipper cloth and wipe dry. All parts must be dry before reassembly. Reassemble mixing system The flat side of the whipper shaft must correspond with the Check all seals (red) before marked arrow on the whipper. -
Page 16: Disassemble The Espresso Group
CLEANING AND CARE BRILLIANCE 3.0 Disassemble the espresso group To remove the espresso group follow the following steps: To remove the espresso group follow the following steps: Open the door and push down the Press down the safty ring on the connector simultaneously outlet beam. -
Page 17: Reassemble The Espresso Group
CLEANING AND CARE BRILLIANCE 3.0 Reassemble the espresso group To reassemble the espresso group follow the following steps: To reassemble the espresso group follow the following steps: “Click” Replace the brewer in front of the gearbox. Attach top part at the back of the brewer to the hooks on the gearbox. -
Page 18: Cleaning The Espresso Group
CLEANING AND CARE BRILLIANCE 3.0 Cleaning the espresso group First, remove the espresso group from the machine as explained earlier in this manual. Then proceed to clean it with neutral detergents (avoid solvents that could damage paint or plastics). Disinfectant products as Chlorine-detergents are preferred. -
Page 19: Applying Grease To Group
CLEANING AND CARE BRILLIANCE 3.0 Applying grease to group Apply grease on the cam of the gear wheel (this side facing down) Apply grease on the pin of piston rod and verify it moves freely Recover the nut opposite to the screw... - Page 20 CLEANING AND CARE BRILLIANCE 3.0 Applying grease to group align the signs Position 0 ° Insert the gear wheel, align the signs Position 0 °...
- Page 21 CLEANING AND CARE BRILLIANCE 3.0 Applying grease to group Insert the nut and tighten the screw Before closing the cover and refitting the appropriate screws, check again the Position 0 ° as in the previous sheet...
-
Page 22: Periodic Maintenance
CLEANING AND CARE BRILLIANCE 3.0 Grinder Adjustment Wheel Fixation Screw Periodic maintenance Each month: clean outlet, grinding house and grinding discs. Monthly cleaning of grinder using GRINDZ cleaning tablets (item no. E1001001). Safety Please read and observe the following service instructions carefully. Non- observance can result in damage to the grinder as well as in healththreatening risks for the user. -
Page 23: Every Month
CLEANING AND CARE BRILLIANCE 3.0 Grinder Every month Approximately every month the grinder housing and spout should be inspected for coffee residues and obvious damages. Proceed as follows: Fig.1 Fig.2 Remove bean container. Remove all coffee residues from the spout and the grinder housing by grinding through all coffee beans and using a vacuum cleaner to remove all residues. -
Page 24: Disassembly The Grinder
CLEANING AND CARE BRILLIANCE 3.0 Grinder Disassembly the grinder remove the holder clip (A) then loosen the adjuster wheel by pulling it straight out. Remove the four phillips screws on the top of grinder housing lid. Then pull the grinder housing straight up. -
Page 25: Message Shown On Display
MESSAGE SHOWN ON DISPLAY BRILLIANCE 3.0 Temporary warnings messages In this type of warnings, once the issue is solved, the message will disappear from There are two the display and the machine will operate as normal. levels of alarms, Insufficient credit warnings and fixed alarms. -
Page 26: Alarms
MESSAGE SHOWN ON DISPLAY BRILLIANCE 3.0 Alarms This type of alarms requires the user to turn off and on the machine, in order to remove the message on the display. If the problem persist, the next time the machine is powered the alarm will show again. -
Page 27: What To Do If
MESSAGE SHOWN ON DISPLAY BRILLIANCE 3.0 Coffee doser error If the control board detects a problem when opening the doser to empty the ground coffee into the espresso group chamber before the extraction starts, the Doser Error display will show “Doser Error”. This alarm can be caused by a bad connection in the wire of the doser to the control board, or by a defective doser unit. -
Page 28: Programming
PROGRAMMING BRILLIANCE 3.0 Active programming with recipe card Canc Insert the recipe card in the card reader(A). The display indicates: Enter Press Global Counter INFO Doses xx Key Total Key Total Key Total Key Total Press + button K5 to scroll between the... -
Page 29: Programming Buttons
PROGRAMMING BRILLIANCE 3.0 Programming buttons -(Minus) Decreases the value or changes to previous selection Canc Cancel selection and/or exit to previous menu -(Plus) Increases the value or changes to next selection Enter Confirms selection... -
Page 30: Doses Program
PROGRAMMING BRILLIANCE 3.0 Doses program Doses Program Change doses program setting. Press Doses Program Time 2 Water1 Soluble Time2 Doses Program Key 1 0.0s. Key 1 0.0s. Press K5 Press K5 Press K5 Press K5 Time1 Water2 Soluble Time3 Coffee Water Vol Key 1 xx cc Key 1 x.xs. -
Page 31: Machine Parameter
PROGRAMMING BRILLIANCE 3.0 Machine Parameter Machine Param. Change machine param. setting. Press K5 Press Language Extra Speed Dose prices 4 Machine Param. English DISABLED 0.00 Press K5 Press K5 Press K5 Press K5 Dose prices 5 Temperature Pump 0.00 Press K5... -
Page 32: Other Settings
PROGRAMMING BRILLIANCE 3.0 Other settings Info Change other settings. Press K5 Press Coin Box Coin Box Disabled Press K5 Press Rinsing Rinsing In progress Press K5 Press Press Enter K6 Open door Open the door Cleaning with to Proceed cleaning... -
Page 33: Recipe Explanation
PROGRAMMING BRILLIANCE 3.0 Recipe explanation This section will explain how to change specific settings for drink 1. Press K6 Same explanations will then apply to all buttons (1-8). To see the machines default settings for all buttons, please refer to page 58. - Page 34 PROGRAMMING BRILLIANCE 3.0 Recipe explanation The next three parameter set the hot water coming out from the hot water spout. This water will not be mixed with any instant powder. Here we can set the “Pause Water2” and the Press K6 “Time2Water2”...
- Page 35 PROGRAMMING BRILLIANCE 3.0 Recipe explanation Now it comes the adjusting of the instant powder. The quantity of instant powder that will be added to the actual recipe. Two canisters are available. Soluble time 3&4 are not used in this machine: keep them set to 0.
-
Page 36: Doses Adjustment Time Scheme
PROGRAMMING BRILLIANCE 3.0 Doses adjustment time scheme Each one of the 8 selections can be adjusted, modifying the following parameters: Coffee Coffee Brewing Coffee Brewing Coffee Water Vol Water Vol BEFORE AFTER Before Soluble After Soluble Water Time 1 Water 1... -
Page 37: Electrical Diagram
ELECTRICAL DIAGRAM BRILLIANCE 3.0 IO-Board outputs... -
Page 38: Wiring Sketch
ELECTRICAL DIAGRAM BRILLIANCE 3.0 Wiring sketch... -
Page 39: Flow Charts
FLOW CHARTS BRILLIANCE 3.0 Water system vibration pump... -
Page 40: Water System Rotary Pump
FLOW CHARTS BRILLIANCE 3.0 Water system rotary pump... -
Page 41: Exploded View
EXPLODED VIEW BRILLIANCE 3.0 Machine 1 Drawing 5 10 12 13... -
Page 42: Machine 1
EXPLODED VIEW BRILLIANCE 3.0 Machine 1 Spare parts list POS. Part No. Description 1604632 Motor gear 85RPM 1104537 Vibrations damper H15 D15 M4 160571 EMI Fliter with AC socket C60900043 Main switch 120316 Adjustable foot 1206706 Bulkhead adaptor black 1204969... -
Page 43: Machine 2
EXPLODED VIEW BRILLIANCE 3.0 Machine 2 Drawing... - Page 44 C18001040 Hopper lid Brilliance C10003125 Floating level indicator 1105511 Driptray Brilliance 1105515 Cover outlets Brilliance 1264178 Drip Tray Top Brilliance 3.0 120250 Door lock, clip and key 1301704 Spout's arm 710036 Drip tray level sensor set 23mm 1204871 Outlet cross...
-
Page 45: Door/Front
EXPLODED VIEW BRILLIANCE 3.0 Door/Front Drawing... - Page 46 EXPLODED VIEW BRILLIANCE 3.0 Door/Front Spare parts list POS. Part No. Description C60100302 Crem display board 2row C60105060 Coin validator C70000102 Drink labels Brilliance EN 1760049 Drink labels Brilliance ES 180115 Door centering pin 1031307 Right front cover Brilliance 1031308...
-
Page 47: Vibration Pump
EXPLODED VIEW BRILLIANCE 3.0 Vibration pump Drawing Spare parts list POS. Part. No. Description C60000040 Pump motor C30400055 Pump bypass C30400010 90º racor male G1/8 - D6 C30400060 Vibrating pump support C30400070 90º plastic connection office pump CESC00001 Vibration pump complete... -
Page 48: Rotary Pump
EXPLODED VIEW BRILLIANCE 3.0 Rotary pump Drawing Spare parts list POS. Part No. Description C30400055 Pump bypass C65000010 Retention valve 3/8-1/8 CASS00004 Rotary pump C60000030 Pump head C60000016 Crem 230V 50Hz C30000240 Pump adaptor 3/8-3/8 C70000009 Tubular group filter C30100100... -
Page 49: Boiler Assembly
EXPLODED VIEW BRILLIANCE 3.0 Boiler assembly Drawing... - Page 50 EXPLODED VIEW BRILLIANCE 3.0 Boiler assembly Spare parts list POS. Part No. Description 1660050 Solenoid valve G1/8 3-way 24V DC PPS C60100076 Temp probe +SUSP.steam pipe ICD 1860019 Connector straight male G I/4-tube 6 C15100006 Boiler 0.7L vending C10200110 Office thermostat 16A...
-
Page 51: Mixing System And Outlet
EXPLODED VIEW BRILLIANCE 3.0 Mixing system and outlet Drawing Spare parts list POS. Part No. Description 1604591 Motor whipper 24V DC 1206701 Motor whipper plate 1206706 Bulkhead adaptor black 1604804 Slinger disc 1206702 Mounting plate 120638 O-ring 120655-02 Whipper shaft gasket... -
Page 52: Canister
EXPLODED VIEW BRILLIANCE 3.0 Canister Drawing... - Page 53 EXPLODED VIEW BRILLIANCE 3.0 Canister Spare parts list POS. Part No. Description 1204953 Lid for canister W67 1204715 Auger 1204776 Auger holder 1204777 Auger nut 1204722 Canister base W67 120633 Outlet 1204775 Plastic nut for auger 1204962 Canister W67 H250mm complete...
-
Page 54: Espresso Group
EXPLODED VIEW BRILLIANCE 3.0 Espresso group Drawing... - Page 55 EXPLODED VIEW BRILLIANCE 3.0 Espresso group Spare parts list POS. Part No. Description 1201635 Group fixation pin 1201627 Shaft lock screw 1201626 Compression spring 1201628 Chamber o-ring 2025 1201625 Ring sealing 1201624 Chamber Filter 1201633 Piston o-ring 29.75X3.53 1201624 Piston Filter...
-
Page 56: Factory Settings
FACTORY SETTINGS BRILLIANCE 3.0 Default recipes Long Espresso Latte Coffee Espresso Cappuccino Chocolate Espresso Macchiato Macchiato Water Coffee water 60cc 35cc 65cc 35cc 35cc 35cc volume Brewing coffee Before After After After After After -------- -------- Time 1 Water 1... -
Page 57: Service Intervals
SERVICE INTERVALS BRILLIANCE 3.0 Months Main Components Parts Part No. Boiler Outlet valve coffee 1660050 Check Check Outlet valve mixer 1660050 Check Check Outlet valve hot water 1660050 Check Check Sensor C60100076 Check Check Brewing Unit Clean Espresso Brewer Brewer... - Page 58 For the warranty to be valid the conditions for maintenance must have been followed according to our instructions, proper precaution has been made and warranty claim been issued without delay. The affected equipment may not be used during awaiting service if there is any risk that the damage or defect would worsen.
Need help?
Do you have a question about the BRILLIANCE 3.0 and is the answer not in the manual?
Questions and answers