Chapters

Related Manuals for German pool EVA-166


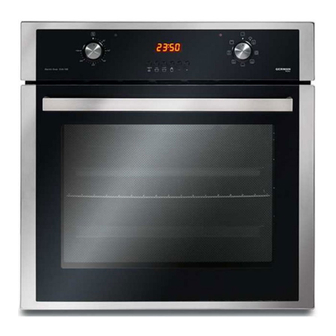
Summary of Contents for German pool EVA-166
- Page 1 EVA-166 嵌入式電 焗爐 Built-In Electric Oven 在 使 用 之 前 請 詳 細 閱 讀 「 使 用 說 明 書 」 及 「 保 用 條 款 」, 並 妥 為 保 存 。 P lea s e r ead th ese in s tr uctions and warra nty info rmat ion carefully b efore use a n d kee p them handy for fut ure reference.
- Page 2 請即進行保用登記﹗ 有關保用條款細則,請看本說明書最後一頁。 Please register your warranty information now ! For Warranty Terms & Conditions, please refer to the last page of this user manual.
-
Page 3: Table Of Contents
目錄 1.安全守則 - 注意事項 - 使用前注意事項 2.技術規格 3.產品結構 4.嵌入式焗爐的安裝 5.操作說明 6.清潔與保養 For English instructions, please refer to P.17. 英文版說明書請參閱 P.17。... -
Page 4: 安全守則
安 全守則 注意 本產品必需由合格技師負責安裝、初始操作及保養,以確保符合有關安全標準及安裝條例。本公司 對未遵照此規定而引致之損失或問題概不負責。 • 本產品尚未完全穩妥安裝或被確定一切操作正常之前,請勿使用。 • 焗爐工作時,應平穩放置於通風處。 • 出現故障或損壞時請不要使用。 • 焗爐僅供日常家庭使用,不作其他工業或專業用途。焗爐不能應用於其他目的,如升高周圍環 境溫度,或烘乾寵物毛髮或衣服等。 • 操作前應清理設備附近的窗簾,起絨織物,紙張或其他易燃物品。不要將易燃物品放置於焗爐 內,否則焗爐正常工作時容易起火。 • 注意!尤其對兒童,使用時灼傷的危險性較高。正常工作時,焗爐的門,內部零件及蒸汽排出 口溫度較高,容易導致灼傷或燙傷。因此兒童應避免接近焗爐。稍年長的兒童應在成人的指引 下使用本焗爐。 • 注意!灼傷危險:高溫零件,工作狀態下的焗爐及配件溫度很高。為了避免灼傷,取出廚具時 建議穿戴隔熱手套或其他保護物。 • 避免兒童於焗爐附近活動或進行操作。 • 首次使用時,可能因隔熱材料或加熱材料而產生異常氣味。用戶可以將焗爐門打開,調至 250℃,運行45分鐘則可解決。 • 烹調時加熱及焗爐控制按鈕須同時調節。 • 焗爐工作時請勿觸摸玻璃。兒童及寵物應避免在附近活動。 • 使用烤架時,可觸摸的部分溫度可能較高。兒童應避免在附近活動。請勿觸摸焗爐內部加熱原 件。 • 工作時,焗爐表面溫度上升,內部、加熱原件及排出的蒸汽溫度非常高。即使關閉後,這些部 分仍保持較高溫度。請勿觸摸高溫表面。 • 電源線應繞開高溫零件及表面。... -
Page 5: 使用前注意事項
使用前注意事項 • 使用設備前請先佈置好焗爐放置的位置及線路。隨後聯繫附近服務中心進行安裝工作。因非授 權人員安裝導致的安裝錯誤或故障,我司概不負責。首次使用前請徹底清除包裝物及保護物。 由於焗爐偏重,搬運時請注意。 • 額定電壓230V,頻率50-60Hz。 • 保險絲的設定電流值為16安培以下。須有專業電工更換適合的保險絲。 • 焗爐必須接地。 • 焗爐應放置在容易連接插座的地方。 • 電線應避免接觸高溫表面,或放置在焗爐門及機身處,以避免擠壓電線。 • 更換焗爐燈泡前請先切斷電源。 • 首次使用前或斷電後,計時器需要重新設置。 • 使用時,熱量或水分會出現在周圍,請保障廚房良好通風。通常長時間使用需要額外的通風。 您可以打開門窗或調大排氣扇。 • 焗爐工作時請勿觸摸焗爐內部或加熱元件 • 請勿將易燃物放置與焗爐內。不正確的操作會導致焗爐內部起火。 • 從焗爐中取出高溫托盤時需要佩戴隔熱手套。 • 由於焗爐內溫度較高,焗爐停止工作後玻璃上可能會出現小水珠。請用乾布擦拭乾淨。 • 使用後,確保所有的控制按鈕處於“關閉”位置。... -
Page 6: 技術規格
技術規格 型號 EVA-166 230V 電壓 2179W 功率 1000W 上加熱器功率 1100W 下加熱器功率 燈泡功率 渦輪摩打功率 50 - 300 恒溫器 排氣功率 計時器 電子式 66 L 容量 產品規格及設計如有變更,恕不另行通知。 中英文版本如有出入,一概以英文版為准。 本產品使用說明書以 www.germanpool.com 網上版為最新版本。... -
Page 7: 產品結構
產品結構 主機 1.控制按鈕 2.電源指示燈 3.電子計時器 4.恒溫器指示燈 5.溫度調節按鈕 6.機身外殼 7.頂部加熱組件 8.照明壁燈 9.焗爐門密封條 10.兩側金屬架 11.烤架 12.托盤 13.焗爐門外玻璃 14.把手 控制面板 溫度調節按鈕 控制按鈕 按鈕使用須知 使用者需要先按下彈出按鈕(如上圖 a),再進行調節(如上圖 b)。煮食完成後,請將按鈕調節 。 至“ ”位置,再按下按鈕。不使用焗爐時,需確保按鈕處於非工作位置。... - Page 8 產品結構 控制按鈕圖示 圖標 功能 描述 關 焗爐待機狀態 照明壁燈、解凍模式 解凍模式、渦輪風機、照明壁燈工作。 照明壁燈、渦輪風機、渦輪電熱器同時 照明壁燈、渦輪風機加熱器 工作。應用於快煮模式。 照明壁燈、烤架、下加熱器及渦輪風機 照明壁燈、下加熱器 、 同時工作。煮食時熱風從下方加熱器送 渦輪風機 出,並在爐腔內迴圈。 上下加熱器同時工作。煮食時熱量從上 照明壁燈、上下加熱器 下處送出,在焗爐內迴圈。 上下加熱器同時工作。在渦輪風機作用 上下加熱器、渦輪風機、 下,煮食時熱風在爐腔內迴圈,保證受 照明壁燈 熱均勻。 照明壁燈、上烤架加熱器及渦輪風機同 照明壁燈、上加熱器 、 時工作。煮食時熱風從上方加熱器送 渦輪風機 出,並在爐腔內迴圈。 照明壁燈與上烤架加熱器同時工作。煎 照明壁燈、上烤架加熱器 炸模式。恒溫器應調節至最大值。...
-
Page 9: 嵌入式焗爐的安裝
嵌入式焗爐的安裝 焗爐的安裝及電線連接需要由授權的技術人員進行。下述內容為符合相關法律及標準的安裝指引。 50mm 圖中尺寸為毫米 (mm) 如下圖所示,擰緊4顆螺栓以固定焗爐。 嵌入安裝 • 請確保廚柜尺寸適合嵌入式安裝並選擇耐高溫電纜。 • 為了確保安裝正確,電子零件及工作零件需要分開放置。 • 絕緣材料應嚴格安裝,保證利用任何工具亦不能將其拆下。 • 強烈建議嵌入式焗爐不要安裝在靠近冰箱或冷藏箱附近,避免因焗爐熱風迴圈影響其他設備工作。 • 在嵌入式焗爐上安裝嵌入式爐具時,兩者的電線需要分開,以確保焗爐或爐具可以輕易地從其位置 上撤下。 • 焗爐應放置在靠近牆壁插座的地方。 • 請勿將電纜放置在高溫表面附近。焗爐門應避免擠壓電線。... -
Page 10: 操作說明
操作說明 首次使用時,可能因隔熱材料或加熱材料而產生異常氣味。用戶可以將焗爐門打開,調至250℃, 運行45分鐘則可解決。 冷卻風機冷卻嵌入廚柜及設備前面部分。 煮食結束後,冷卻風機將啟動並運作約20-30分鐘。 電子計時器的應用及設定 電子計時器讓使用者只需設定烹調時間及完成時間就可以在想要的時間享受到美食。電子計時器 亦可作為鬧鐘使用,時間到後會發出蜂鳴聲。 將烤箱連接電源後,計時器螢幕上則顯示0.00。同時“AUTO”標誌閃爍。該狀態下計時器的觸點 是打開的,焗爐不工作。通過計時器觸點產生的電流頻率,接通加熱元件電路。按 鍵可設定手 動模式。 焗爐的計時器工作原理與時鐘一樣。斷電後需要重新設定定時器。 P.10... - Page 11 操作說明 時鐘設定 非烹調模式下方可更改時鐘設定。按 鍵 或同時按 及 鍵,5秒內按 或 鍵更改時鐘 設定,長按令數字快速改變。 1) 2) 或 1)按 鍵。 或 1)同時按 及 鍵。 2)按 或 鍵更改時間,數秒後顯示時鐘。 響鬧設定 可設定在需要的時候發出響鬧聲以示提醒。 1)進入響鬧模式。 2)輸入時間段。 3)數秒後螢幕返回時鐘模式,鬧鐘響時,需要按 停止。 注意:設定後,按 鍵可得知剩餘時間。 P.11...
- Page 12 操作說明 自動烹調程式 烹調時間設定 若使用者需要立刻烹調,設定烹調時間後即可。 例如:將食物放置焗爐內,所需烹調時間為2小時15分鐘。 1) 2) 3) 1)當前時間18:30。 2)按 進入烹調時間調節模式。 3)按 或 鍵進行烹調時間設定。 4)數秒後,螢幕將顯示烹調已經開始,並顯示當前時間。不要忘記設定烹調功能或溫度控制按鈕。 注意:按 鍵或同時按 及 鍵可隨時取消烹調時間模式。 完成時間設定 根據上述例子,煮食時間設定完成後烹調開始。按 鍵可隨時查看烹調完成時間。用戶可更改完成 時間。操作如下: 1) 2) 3) 1)按 顯示的為烹調完成時間 18:30 2:15 20:45。 2)按 或 鍵設定希望的完成時間。 3)數秒後螢幕變為時鐘模式。 P.12...
- Page 13 操作說明 如今我們設置的完成烹調時間為21:30。烹調所需時間為2小時15分鐘,因此焗爐在19:15開始工 作,21:30烹調完成。 開始烹調 結束烹調 烹調完成後,計時器會發出響鬧聲。若未按停,響鬧會響7分鐘。 注意 : 按 鍵或同時按 及 鍵可隨時取消完成時間設定。 關閉焗爐 1) 將控制按鈕調節至“。”位置。 2) 按 鍵或同時按 及 鍵重設為時鐘,重設前焗爐不能使用。 1)關閉焗爐 2)重設計時器 或 在上述例子中,先設定了烹調耗時間,程式會自動計算完成時間,完成時間是可以更改的。使用者 亦可先設定完成時間,隨後再調整烹調時間,上限為所設定的完成時間。 P.13...
- Page 14 操作說明 金屬架 一般架子 五層 四層 四層 三層 三層 二層 二層 一層 一層 • 烹調時請勿頻繁打開焗爐門。否則可導致焗爐內的熱風迴圈不均勻,影響烹調效果。另外烹調耗時 取決於分量,烤盤材料不一樣亦可能改變烹調耗時。 • 使用蛋糕烤盤可達到更好烹調效果。 • 若用不同的托盤代替原裝托盤,請選擇適當位置放置 (如上圖)。 • 製作小餡餅時,請勿使用玻璃或熱反射效果差的器皿。 • 原裝烤盤適用於所有烹調。 • 焗爐的照明壁燈及風機摩打與溫度調節器相連。即使紋條調節器停止了加熱元件工作,照明壁燈及 風扇仍然繼續工作。 恒溫控制燈 當溫度達到所設溫度時,恒溫器自動停止工作,控制燈熄滅。 使用焗爐烤肉 • 將焗爐控制按鈕旋至 。 • 強烈建議使用內部烤架。 • 使用金屬烤架時,請將烤盤放置在金屬架下方,防止油脂滴落。 • 關閉焗爐門並預熱5-10分鐘。 • 預熱完成後,烘焗時保持焗爐門半開。 •...
- Page 15 操作說明 烹調時間表 烹調溫度 ( 食物名稱 烤架位置 金屬架位置 烹調時間 (分鐘) 蛋糕 30 - 35 150 - 170 35 - 45 200 - 220 小餡餅 20 - 25 160 - 170 餅乾 曲奇 20 - 35 160 - 170 鬆餅 25 - 35 160 - 180 紙杯蛋糕...
-
Page 16: 清潔與保養
清潔與保養 焗爐內部清潔 • 清潔前請先拔掉烤箱電源,並讓其冷卻。取出烤盤與烤架。用肥皂水潤濕抹布後擦拭焗爐內部。後 用乾淨的濕布清潔,待焗爐風乾。 • 請勿使用乾燥或多塵的清潔材料。清潔玻璃表面時需要使用玻璃專用清潔劑。 • 清潔焗爐內部時請勿使用硬毛刷、百潔布、刀或類似尖銳物體。 • 焗爐的任何部分均不適用於洗碗機。 拆下烤箱玻璃,便於清洗 清潔焗爐的玻璃時需用熱水進行清潔,清潔玻璃前請務必先冷卻焗爐。 請勿使用尖銳物體。內部零件及搪瓷的零件只能用熱水進行清潔。 打開焗爐門,鬆開左右兩邊螺絲後便可清潔。 1. 打開焗爐門,鬆開左右兩邊螺絲。 2. 取出金屬殼 3. 拆卸玻璃時請將其向上拉出,玻璃通過其上方的彈簧 及下方零件固定位置。 P.16... - Page 17 Table of Contents 1. Safety Instructions - Caution - Notice before Use 2. Technical Specifications 3. Product Structure 4. Installation Instructions 5. Operating Instructions 6. Care & Maintenance P.17...
-
Page 18: Safety Instructions
Safety Instructions Caution Installation, initial operation and maintenance of this appliance must only be conducted by an authorised dealer or a certified technician, who will then be responsible for adherence to applicable standards and installation regulations. We assume no liability for any damages caused by failure to observe these instruc- tions. -
Page 19: Notice Before Use
Notice before Use • To get the appliance ready for operation, arrange a suitable location and proper electric network for installation. Before first use, uncover the packing and protection materials. Due to the weight of the ap- pliance, please pay attention when moving it. •... -
Page 20: Technical Specifications
Technical Specifications Model EVA-166 Voltage 230V Rated Power 2179W Upper Heating Element 1000W Lower Heating Element 1100W Lamp Power Turbo Motor Power Thermostat 50 - 300 Ventilation Motor Power Timer Digital Volume 66 L Specifications are subject to change without prior notice. -
Page 21: Product Structure
Product Structure Main Unit 1) Position Control Knob 2) Power Indicator Lamp 3) Digital Timer 4) Thermostat Lamp 5) Thermostat Adjustment Knob 6) Exterior Body 7) Upper Heating Element 8) Interior Oven Lamp 9) Door Sealing 10) Wire Side Shelf 11) Wire Grid 12) Tray 13) Exterior Door Glass... - Page 22 Product Structure ICON FUNCTION DESCRIPTION Oven in standby mode. Lamp, Defrost mode Defrost mode with lamp on. Lamp, Turbo Fan and Turbo resistance Lamp and Turbo Fan with Turbo running simultaneously for quick cooking. Resistance Lamp and lower heating element Lamp and Lower Heating working together, with heat travelling Element...
-
Page 23: Installation Instructions
Installation Instructions Installation and electric connection should be performed by an authorised dealer or a certified technician. Installation must comply with all statutory regulations, as well as those of the local electricity companies. 50mm Dimensions in mm Fix the oven with 4 screws as shown below. Built in Installation •... -
Page 24: Operating Instructions
Operating Instructions There may be odour coming from the insulation materials or heating elements during first use. When this occurs, adjust the thermostat to 250°C and let the oven run for 45 minutes with the door open. The cooling fan cools both the built-in cabinet and the front side of the appliance. - Page 25 Operating Instructions Timer Adjustment Adjustment can only be made when no cooking program is in progress. Press the button, or the button together. Make the adjustment within 5 seconds by pressing the + or - button. Long presses will result in fast changes. 1) Press the button.
- Page 26 Operating Instructions Automatic Cooking Program Set cooking duration If you want to begin cooking immediately, simply set the time on the timer; for example; we place the meal inside the oven and the cooking time is 2 hours 15 minutes. 1) The present time is 18:30.
- Page 27 Operating Instructions We now have programmed the oven to have the food ready at 21:30. Since the cooking time was pre- programmed to 2 hours 15 minutes, the oven will start cooking at 19:15, so that the food is ready at 21:30.
- Page 28 Operating Instructions Wire Shelf Regular Shelf 5 Shelf 4 Shelf 4 Shelf 3 Shelf 3 Shelf 2 Shelf 2 Shelf 1 Shelf 1 Shelf • During the cooking process, refrain from opening the oven door frequently to maintain even heat circulation inside the oven as to avoid affecting the cooking results.
- Page 29 Operating Instructions COOKING CHART THERMOSTAT SHELF WIRE SHELF COOKING TIME FOOD POSITION ( POSITION POSITION (mins) Cake 30 - 35 150 - 170 35 - 45 200 - 220 Pastries 20 - 25 160 - 170 Biscuit Cookie 20 - 35 160 - 170 Muffin 25 - 35...
-
Page 30: Care And Maintenance
Care and Maintenance Cleaning the Interior of the Oven Before cleaning, unplug from the power supply and let the oven cool down. Take out trays and grids. Clean the interior with a damp cloth soaked in soap water and then dry. •... - Page 31 - serial number is modified, damaged or removed from the product. - 機身編號被擅自塗改、破壞或刪除。 4. 總代理有權選擇維修或更換配件或其損壞部份。 4. German Pool will, in its discretion, repair or replace any defective part. 5. 產品一經被轉讓,其保用即被視作無效。 5. This warranty will be void if there is any transfer of ownership from the original purchaser.
- Page 32 傳真 Fax:+852 2765 8215 傳真 Fax:+86 757 2980 8318 傳真 Fax:+853 2875 2661 © 版權所有。未獲德國寶授權,不得翻印、複製或使用本說明書作任何商業用途,違者必究。 © All rights reserved. Copying, reproducing or using the contents of this manual is not allowed without prior authorization from German Pool, violators will be prosecuted. P.32 EVA-166-M-15(1)
Need help?
Do you have a question about the EVA-166 and is the answer not in the manual?
Questions and answers