Table of Contents
Advertisement
嵌 入 式 二 合 一 蒸 氣 焗 爐
2-in-1 Built-In Steam Oven
St ea m
Ov en
SG V- 52
21
在使用之前請詳細閱讀「使用說明書」及「保用條款」,並妥為保存。
Please read these instructions and warranty information carefully
before use and keep them handy for future reference.
使 用 說 明 書
Low
Tim er
Hum idity
/ Clo ck
Ligh t
Hig h
Ove rlap
Hum idity
Fun ct.
Up
On / Off
Sta rt /
Pau se
Mo de
Dow n
U S E R M A N U A L
SGV-5221
即 時 網 上 登 記保 用
Online Warranty Registration
Advertisement
Chapters
Table of Contents

Related Manuals for German pool SGV-5221


Summary of Contents for German pool SGV-5221
- Page 1 SGV-5221 嵌 入 式 二 合 一 蒸 氣 焗 爐 2-in-1 Built-In Steam Oven Tim er Hum idity / Clo ck Ligh t St ea m Ov en Hig h Ove rlap SG V- 52 Hum idity Fun ct.
- Page 2 請即進行保用登記﹗ 有關保用條款細則,請看本說明書最後一頁。 Please register your warranty information now! For Warranty Terms & Conditions, please refer to the last page of this user manual.
-
Page 3: Table Of Contents
目錄 使用前注意事項 安裝 安全注意事項 產品結構 控制面板 自動菜單 操作方法 開機 調節時鐘 烹調功能設置 預約功能設置及查詢 疊加功能設置及查詢 使用須知 清潔與保養 故障排除 技術規格 電路原理圖 保用條款... -
Page 4: 使用前注意事項
使用前注意事項 安 裝 前 • 檢查出廠標牌上 指 明的 輸 入 電 壓 是 否 與 所 要 用的電源 插座電 壓相符。 • 打開蒸氣焗爐爐 門 ,拿 出 所 有 配 件 並 除 去 包 裝材料。 注意:蒸氣焗爐正面可能有保護膜覆蓋。在第一次使用蒸氣焗爐前,請從內部小心除去保護膜。 • 請檢查蒸氣焗爐 是 否出 現 任 何 損 壞 。 檢 查 蒸 氣焗爐爐 門是否 可以正常關 閉,以及 爐門內部 和蒸氣焗爐開口... - Page 5 使用前注意事項 注 意:在使用過程中 , 此 蒸 氣 焗 爐 可 能 會 變 得 很熱。 切勿用手 或其他物件 ,如取物夾 、隔手 套 等觸摸蒸氣焗爐內 部 發 熱 元 件 或 其 他 高 溫 部 件。有 燙傷危險 或造成損壞 ! 注 意:在使用過程中 , 可 接 觸 到 的 零 件 可 能 會 變得很 熱。請勿 讓小孩靠近 或觸摸蒸氣 焗爐! 注...
- Page 6 安裝 蒸氣 焗 爐 的 產品 尺 寸及安裝廚櫃尺寸 單位:m m (毫米) 蒸氣 焗 爐 固 定在 廚 櫃中 1. 將 本機嵌入廚櫃凹進處 ; 2. 打 開蒸氣焗爐門; 3. 用 4 個螺絲將蒸氣焗爐主體 固 定...
-
Page 7: 安全注意事項
安全注意事項 安裝 注 意 事 項 安 裝工作須符合當前標準和 現行 條例 。 僅可 由 專門 的 持 證 人員 操作 完 成 。 廚 櫃要求對於要裝入蒸氣焗 爐的 廚櫃 , 其元 件 (塑 膠 材 料 和裝 飾木 ) 須 由 耐熱 粘 合 劑 來組 裝 (... - Page 8 安全注意事項 • 從蒸氣焗爐內提取 食 物 和 器 皿 時 , 應 當 使 用 器皿叉或戴上隔熱 手套,以免 高溫燙傷 。 • 不要用蒸氣焗爐儲 存 任 何 物 品 。 • 加熱過後的奶瓶和 嬰 兒 食 品 罐 應 經 過 攪 拌 或 搖動,餵食前應檢 查瓶內食物 的溫度, 避免 燙傷。...
-
Page 9: 產品結構
產品結構 編號 部件名稱 功能簡介 詳見控制面板說明 控制面板 爐門打開,蒸氣焗爐暫停工作;爐 爐門安全開關 門關上,按開關鍵,蒸氣焗爐繼續 工作。 打開可以放入或拔出水箱;打開方 水箱面架蓋 法:輕按後鬆手會自動彈開。 層架 安放托盤用的托架 排氣口 用於排出腔體多餘水蒸氣 接水盤 盛接水箱和門沾附的水 排水口開關 用於排出蒸氣發生器內的積水及水垢 食物盤 盛放要烹調的食物 燒烤架 盛放要燒烤的食物 集油盤 用於接烹調產生的油汁等 吸水器 吸收腔內或接水盤內的積水 隔熱手套 用於取放加熱的食物烤盤及架 介紹蒸氣焗爐的使用方法、注意事項 說明書 及清潔保養等... -
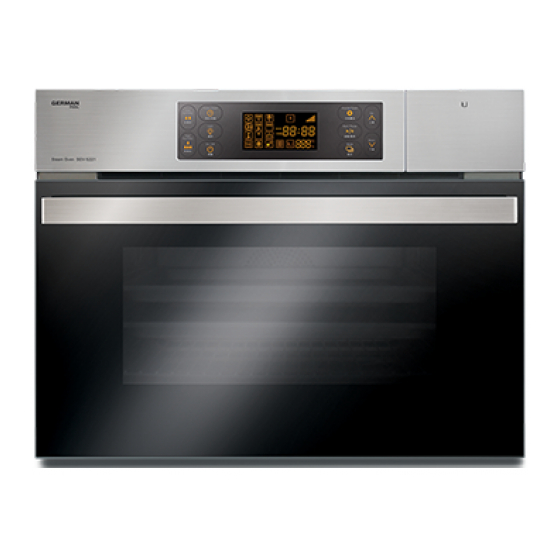
Page 10: 控制面板
控制面板 圖示 功能說明 圖示 功能說明 蒸煮 菜單 表示時鐘 頂部蒸烤組合 烹調工作狀態指示 後部熱風蒸組合 時間顯示 後部熱風 溫度顯示 頂部熱風 無水提示 頂部烤焗 預約功能指示 表示預約烹調啟動 頂部單管熱風 時間 表示預約烹調結束 頂部單管烤焗 時間 發酵 保溫 解凍 殺菌 P.10... - Page 11 控制面板 圖示 按鍵名稱 功能介紹 低濕度選擇鍵 在蒸烤組合功能時點按此為低濕度方式。 高濕度選擇鍵 在蒸烤組合功能時點按此為高濕度方式。 1. 選擇預約功能; 預約/時鐘 2. 調節當前時間。 爐燈 控制爐燈的開與關。 1. 開啟和關閉操作面板; 開關鍵 2. 取消當前設置或烹調。 啟動工作後點按此鍵進行不同的烹調模式、溫度、 功能疊加鍵 時間疊加設置,最多可疊加3種模式。 1. 啟動烹調程式; 啟動/暫停 2. 暫停正在進行的烹調程式。 程式鍵 開機狀態下,按此鍵返回功能選擇介面。 1. 選擇不同工作模式; 上調節鍵 2. 增加時間或者溫度的數值。 1. 選擇不同的工作模式; 下調節鍵 2. 減少時間或者溫度的數值。 各程式預設参數及 調校範圍 : 程式 預設時間 預設溫度 時間選擇範圍 溫度選擇範圍 蒸煮 20分鐘 100℃...
-
Page 12: 自動菜單
自動菜單 菜單 烹調菜單 程式 時間 H01 蒸蝦 蒸95℃ 15分鐘 H02 雞胸/雞肉 蒸110℃ 20分鐘 H03 蒸魚 蒸100℃ 15分鐘 H04 蒸蛋 蒸100℃ 12分鐘 H05 蒸蔬菜 蒸80℃ 15分鐘 H06 薄餅 熱風200℃ 20分鐘 H07 烤雞翼 熱風200℃ 18分鐘 H08 烤排骨 熱風200℃ 25分鐘 H09 烤全雞 熱風200℃ 40分鐘 H10 芝士薯仔 熱風200℃ 10分鐘 H11 烤魚 蒸烤200℃ 15分鐘 H12 烤青椒及牛肉 蒸烤200℃ 12分鐘... -
Page 13: 操作方法
操作方法 觀看操作視頻 注意:使 用前 請 安裝好 水 箱 , 並 確 保 水 箱 內 裝 有 水 。 水箱安裝 注意 事 項: 1. 按 下 水 箱面 蓋, 蓋會 自動 打 開 , 然 後 抽 出 水 箱 2. -
Page 14: 調節時鐘
操作方法 3.調 節時鐘 觀看操作視頻 在待 機模式下,長按 時 鐘 鍵 3秒 進 入 時 鐘 設 置 介面,時鐘 小時位閃爍 ,按 或 鍵 設置小時,然後 按 時 鐘 鍵 確 認 並 切 換 到分鐘 設置,按 或 鍵設置所需 數值,最後按 時鐘 鍵 時鐘 設 置 完 成 , 時 鐘 以 新設置的時 間顯示。( 注:時鐘一 經調整即生效,若想... -
Page 15: 烹調功能設置
操作方法 4 .烹調 功 能設 置 操作 觀看 操 作視 頻 操作步驟:設置烹調功能 設置烹調溫度 設置烹調時間 確認啟動 例:設 19 0 ℃ 蒸烤 組 合30分 鐘 步驟1 : 在 待機 介 面下 點按 程式 鍵, 進入功 能圖示 選 擇介 面 : 按 程 式 鍵 或 或... -
Page 16: 預約功能設置及查詢
操作方法 5. 預 約 功能 設置 操 作及查 詢 觀看操 作視頻 5. 1 設 置 操作 步驟 : 設 置 烹 調功 能 設置 烹 調 溫 度 設 置 烹 調 時 間 按 預 約 鍵 設 置 烹 調結 束時 間 確... - Page 17 操作方法 步驟3: 然後 按 或 設置烹調時 間為 30分鐘 ; 步驟4: 按 時 鐘 鍵,進入 預約 設置介 面: 然後按 或 設 置 預約結束時 間— —小時 設置 ,設 定 15時: 然後按 時 鐘 鍵進 入設置預約 結束 時間 ——分 鐘 設置 , 設定 30分: 步驟5:...
-
Page 18: 疊加功能設置及查詢
操作方法 5.2查 詢 預約 : 預約功 能 啟動 後 ,按 時鐘 鍵顯 示預約 啟動 工作 時間 , 再 時 鐘 鍵 顯示 預 約烹 調 結 束時 間 , 再按 時鐘 鍵 顯示 預約程序 的設定 : 按 一 下 再 按 一下 再... - Page 19 操作方法 步驟3: 設置 蒸氣 功能:按 功能 疊 加鍵 或 或 選 擇 蒸 氣 模 式 ,按 啟動 / 暫停 鍵 或 功能疊加鍵進入烹調溫度 設置 介 面: 然 後 按 啟動/ 暫停鍵或 功 能疊 加 鍵進 入烹 調 時 間設 置 介面 , 並 設置 烹 調 時 間為 30分 鐘。 步驟4 :然後...
-
Page 20: 使用須知
使用須知 下 列 現象均 屬正 常: 現 象 原 因 烹 調 時 爐 腔 內 多 餘 蒸 氣 通 過 排 氣 口快 速 冷 卻 排 出 , 但 少 部 分 蒸 氣 會 凝 蒸氣凝... -
Page 21: 清潔與保養
清潔與保養 蒸 氣發生器的清潔 1 . 如果 長時間不使用 機器,請把 蒸氣 發生 器 內 的殘 留 水 及 水垢 排 除 。 具 體操作:把腔體內右下角 排出 膠 塞拔 掉即 可 (注 意 : 水排 乾後 切 記 把 膠塞 裝 上 ). 膠塞 提 手 按... - Page 22 清潔與保養 爐 門組件安裝 1. 兩手拿起門組件 ,使兩個 鉸 鏈對 準前 板 的鉸鏈 插 口 , 左右 兩 端 平 行地 往 裡 扣 ,並 確 保 鉸 鏈 的 卡槽能卡住前板的鉸鏈 支撐 。 2. 門組件完全扣於 前板後, 開 門狀 態。 3. 將門組件的安全 扣往下扣 合 。 4. 門組件完成安裝 上後,關 門 狀態 。 門...
- Page 23 清潔與保養 注 意: 切 勿使用強洗滌劑、香蕉水 、汽 油、 研 磨粉 和 金屬 刷 來 清 洗爐 子的 任 何 部 位。 蒸 氣 焗 爐在 長 時 間使用後,腔體內有異味 ,可 以在 腔 體內 放 置5- 6片 檸 檬 ,使 用 普通 蒸 氣 功 能, 設 置 110 ℃...
-
Page 24: 故障排除
故障排除 故 障現象 可能 原 因 排除辦法 1. 蒸 氣 焗爐 沒有 連上 電 源 1.蒸氣焗爐接上電源(配有保險絲) 顯 示 屏不亮 2. 電 源 線不 能正 常工 作 2.聯繫客戶服務及維修中心或更換 1. 顯示 屏損 壞 顯 示 屏顯示異常 聯繫客戶服務及維修中心或更換 2. 電路 板電 子 元件 損 壞 烹調期間水或水蒸氣洩露... -
Page 25: 技術規格
技術規格 SGV-5221 型號 220- 24 0V / 50Hz 電壓 / 頻率 2,100W 額定輸入功率 455m m ×59 5m m×5 50 mm 產品尺寸(高×寬 ×深) 2 25m m × 470mm× 410mm 內腔尺寸(高×寬 ×深) 約 約 約 1. 3L 水箱容積 32 K g 淨重 產 品 規 格及 設 計如有變更,恕不另行通 知。... -
Page 26: 電路原理圖
電路原理圖 爐燈 風扇 頂部 後部 蒸氣發 頂部烤 底部煮 烤焗 烤焗 生器 焗內 水盤 外管 管 管 DC風機 底部NTC 蒸發盤NTC 水箱開關 電源開關 腔體 門開關 顯示屏 P.26... - Page 27 Table of Contents Notice Before Use Installation Safety Notes Product Structure Control Panel Auto Menu Operating Instruction Start-up Time setting Function setting Preset Timer setting and inquiry Overlap function setting and inquiry Tips for Using the Oven Care and Maintenance Troubleshooting Technical Specifications Circuit Diagram...
-
Page 28: Notice Before Use
Notice Before Use Before installation • Check the input voltage specified on rating label is consistent with the use of an electrical outlet voltage • Open steam oven door, take out all the accessories and remove the packing materials carefully. Note: Steam oven may have a protective film covering the front. - Page 29 Notice Before Use • Do not let children play with this appliance. Note: Never touch the heating element or any hot parts with your hands or anything else, like cooking tweezer and protective glove, as it could be dangerous, or cause damages, concerning the steam oven will become very hot.
-
Page 30: Installation
Installation Dimension of the product and furniture finishing Fix the steam oven on cabinet 1. Put the appliance in furniture recess; 2. Open the oven door; 3. Fix the appliance with 4 screws. P.30... -
Page 31: Safety Notes
Safety Notes Notice for installation: The installation must comply with the prevailing standards and regulations and conducted by qualified technicians. Demand for cabinet: For cabinet with oven installed, its components (plastic material and molding wood) should be assembled by heat-resistant bonding agent (up to 100 ): improper material and bonding agent ℃... - Page 32 Safety Notes For safety purpose, you should read the instructions carefully before using the appliance for the first time. Save the instructions for future reference • This appliance is for household use only, and it does not apply to other industrial or commercial use. Warning: •...
-
Page 33: Product Structure
Product Structure Component Description For details see instruction of control panel. Control Panel When oven door is open, the appliance stops working; Oven Door Safety When oven door is closed, press ON/OFF button to restart the appliance. Open the cap to pull out the tank; unlock method: press the Water tank cover cover, and it will pop open automatically. -
Page 34: Control Panel
Control Panel Icon Description Icon Description Steam Menu Clock Top steam grill Working status Rear hot wind and steam Time Back hot wind Temperature Top hot wind Water tank indicator Top grill Pre-set timer indicator Pre-set start time Top single-tube hot wind Pre-set finish time Top single-tube grill Ferment... - Page 35 Control Panel Icon Button Description Low humidity Low humidity in steam grill mode. High humidity High humidity in steam grill mode. 1.Preset timer; Preset/Clock 2.Current time adjustment. Oven light Oven light ON or OFF. 1. Turn ON or OFF the control panel ON/OFF 2.
-
Page 36: Auto Menu
Auto Menu M enu Cooking Menu Mode Time H01 Steam Shrimp Steam95℃ 15min H02 Chicken Breast/Meat Steam110℃ 20min H03 Steam Fish Steam100℃ 15min H04 Steam Egg Steam100℃ 12min H05 Steam vegetables Steam80℃ 15min H06 Pizza Hot Wind200℃ 20min H07 Grill Chicken Wings Hot Wind200℃... -
Page 37: Operating Instruction
Operating Instruction Video Tutorial Note: Please install the water tank correctly and make sure it filled with water before use. Notice for tank installation 1. Press water tank cover to open, and pull out the tank. 2. Fill the tank with distilled water (or filtered drinking water), water should not over brim the tank. 3. -
Page 38: Time Setting
Operating Instruction 3. Time Setting Video Tutorial Under standby mode, press lock button for 3s, then turn to time setting interface, press to set hour, then press clock button to confirm switching to minute setting, press to set minute, press clock button again to confirm setting. -
Page 39: Function Setting
Operating Instruction 4. Function Setting Video Tutorial Procedure: Function setting Temperature setting Time setting Confirm E.g. Set steam grill mode at 190°C for 30 minutes Step1: Press Mode button under standby mode, and turn to icon selecting interface. Press Mode button or button, choose top steam grill mode, the chosen icon flashes, press... -
Page 40: Preset Timer Setting And Inquiry
Operating Instruction 5. Preset Timer setting and inquiry Video Tutorial 5.1 Preset Timer setting procedure: Cooking mode setting Temperature setting Time setting Press Preset Timer button Set finish time Confirm E.g. The current time is 13:30, set back hot wind mode at 30 minutes, 190℃, finish at 15:30. Step 1: Press mode button under standby mode, then turn to function interface. - Page 41 Operating Instruction Step 3: Then press to set cooking time at 30 minutes; Step 4: Press clock button to pre-set time. Press to set finish time--hour setting, set 15 o’clock. Press clock button to set finish time--minute setting, set 30 minutes: Step 5: Press start/pause button to confirm, the setting is done.
-
Page 42: Overlap Function Setting And Inquiry
Operating Instruction 5.2 Preset Timer inquiry: After preset timer started, press clock button to show start time, press clock button again to show finish time, and press clock button one more time to show the preset setting: Press Press again Press again If the appliance is left idle for 10s during setting operation, the system will turn back to initial interface. - Page 43 Operating Instruction Step3: Set steam function: Press overlap function button or or overlap function button to choose steam mode, press start/pause button or overlap function button, then turn to temperature setting interface: Press start/pause button or overlap button, then turn to time setting interface, and adjust the time to 30 minutes.
-
Page 44: Tips For Using The Oven
Tips for Using the Oven The phenomenon below is normal: Phenomenon Cause Redundant steam will be cooled down and discharged through air outlet during Steam cluster in air outlet cooking, but small part of it will cluster in air outlet. Voltage fluctuation will When fluctuation range of voltage is from -10% to +5%, the appliance can still influence flavor and... -
Page 45: Care And Maintenance
Care & Maintenance Clean steam generator 1. Please drain the residual water and water scald in steam generator if the unit will not be used for a long time. Operation: Pull out drain cock on lower right corner of chamber (Note: Do not forget to block the drain cock after water in drained). - Page 46 Care & Maintenance Door installation Procedure: 1. Take the door with both hands, and align the two hinges with hinge sockets on front plate. Insert the door horizontally. Ensure slot on the hinges can lock the hinge holds on front plate. 2.
- Page 47 Care & Maintenance Note: Do not clean any parts of the oven with strong detergent, banana oil, gasoline, abrasive powder or metal brush. If there is an odor from the oven after a long time usage, put 5-6 slices of lemon in the cham- ber and select steam mode at 110°C for 15-20 minutes to remove the odor.
-
Page 48: Troubleshooting
Troubleshooting Phenomenon Cause Solution 1.Steam oven is not connected to 1. Plug in power of steam oven (with power supply; fuse) Display does not light up 2. Power cord is damaged. 2. Contact customer service & re-pair centre or replace the component. 1.Screen is damaged;... -
Page 49: Technical Specifications
Contact customer service & repair centre. evaporator chamber or sensor) Malfunction of sensor (short circuit of chamber Contact customer service & repair centre. evaporator sensor) Specification Model No. SGV-5221 Voltage/Frequency 220-240V/50Hz Rated Power 2,100W Product Dimension 455mm×595mm×550mm (H×W×D) Cavity Size Approx. 225mm×470mm×410mm (H×W×D) -
Page 50: Circuit Diagram
Circuit Diagram P.50... -
Page 51: 保用條款
- the serial number is modified, damaged or removed from the product. - 機身編號被擅自塗改、破壞或刪除。 4. German Pool will, at its discretion, repair or replace any 4. 總代理有權選擇維修或更換配件或其損壞部份。 defective part. 5. This warranty will be void if there is any transfer of 5. - Page 52 傳真 傳真 傳真 HONG KONG TOP BRAND TEN YEAR ACHIEVEMENT AWARD © 版權所有。未獲德國寶授權,不得翻印、複製或使用本說明書作任何商業用途,違者必究。 © All rights reserved. Copying, reproducing or using the contents of this manual is not allowed without prior authorization from German Pool, violators will be prosecuted. SGV-5221-M-17(3)
Need help?
Do you have a question about the SGV-5221 and is the answer not in the manual?
Questions and answers