
Subscribe to Our Youtube Channel
Related Manuals for Sunny SF-RW1410


Summary of Contents for Sunny SF-RW1410
- Page 1 Rowing Machine with Full Motion Arms USER MANUAL SF-RW1410 IMPORTANT: Read all instructions carefully before using this product. Retain owner’s manual future reference. customer service, please contact: support@sunnyhealthfitness.com...
-
Page 2: Important Safety Information
IMPORTANT SAFETY INFORMATION We thank you for choosing our product. To ensure your safety and health, please use this equipment correctly. It is important to read this entire manual before assembling and using the equipment. Safe and effective use can only be assured if the equipment is assembled, maintained and used properly. -
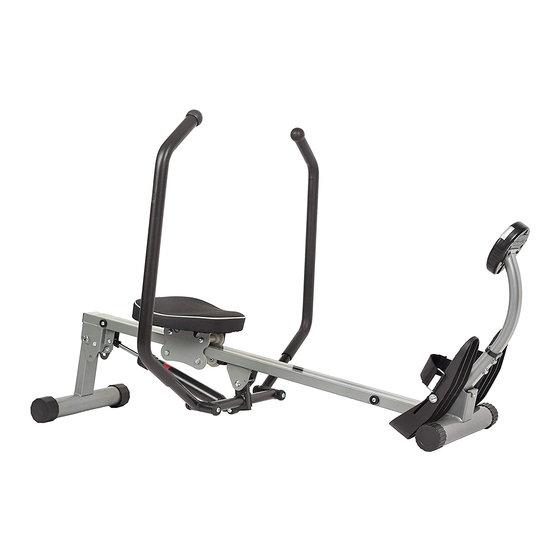
Page 3: Parts List
PARTS LIST PACKAGE CONTENTS ● Main Frame (1pc) ● Pedals (2pcs) ● Pedal Straps (2pcs) ● Meter (1pc) ● Washers (2pcs) ● Rowing arms (2pcs) ● Pedal tube (1pc) ● Support tube (1pc) ● Screws (2pcs) ● Seat cushion (1pc) ●... -
Page 4: Assembly Instructions
ASSEMBLY INSTRUCTIONS Remove the Pin (17) to unfold the Rear Support Tube (12-1). Reinsert the Pin (17) to secure the rear tube in place. 12-1 12-1 2. Remove the Bolts (5), Washers (4) and Dividers (6) attached to the Tube (7). Insert the Tube (7) through the Front Support Tube (12-2). - Page 5 4. Insert the Support Tube (2) into Front Support Tube (12-2). Align the holes and secure the tubes together using 2 Washers (4) and 2 Screws (5). Tighten with Allen Key (#B). 12-2 5. Assemble the Left Rowing Bar (9) onto the Main frame (12) using a Washer (13), Cap (14) and Screw (15).
-
Page 6: Exercise Instructions
EXERCISE INSTRUCTIONS NOTE: To adjust the tension level, simply turn the Adjustment Knob on the cylinder to the desired level. The tension levels range from Level 1 to Level 12, with Level 1 being the lowest resistance. Level 1 WARNING! Do not adjust the tension levels while operating the machine. -
Page 7: Monitor Instructions
MONITOR INSTRUCTIONS SPECIFICATIONS: TIME-----------------------------------------------------------------00:00-99:59 MIN: SEC COUNT--------------------------------------------------------------0-9999 CALORIE------------------------------------------------------------0.0-999.9 KCAL TOTAL-COUNT-----------------------------------------------------0-9999 MODE BUTTON: Press and release the MODE button to select the desired specification display. Press and hold the MODE button for 3 seconds to reset TIME, COUNT, and CALORIES back to zero. The TOTAL COUNT cannot be reset unless you remove the batteries.
Need help?
Do you have a question about the SF-RW1410 and is the answer not in the manual?
Questions and answers