Table of Contents
Advertisement
Quick Links
Advertisement
Table of Contents

Related Manuals for Bischoff & Bischoff Pyro start plus+


Summary of Contents for Bischoff & Bischoff Pyro start plus+
- Page 1 Bischoff & Bischoff Operating manual Pyro start plus+ Enjoy mobility.
-
Page 2: Table Of Contents
Contents 1| Preliminary note 1.1. Important safety instructions 2| Indications / Contraindications 3| Purpose 4| Declaration of conformity 5| Scope of supply and checking the delivery 6| Overview of the wheelchair 7| Assembly/adjustments 7.1. Folding and unfolding 7.2. Legrests 7.3. Side parts 7.4. - Page 3 Pyro start plus+ 9| Use 9.1. Getting in and out from the side 9.2. Getting in and out from the front 9.2. Negotiating stairs and high steps 10| Driving 11| Technical data 12| Transport 12.1. Transporting the wheelchair 12.2. Seat in a vehicle for transporting disabled people 13| Storage / shipping 14| Reuse...
-
Page 4: Preliminary Note
1. 1. Preliminary note Dear User By purchasing your Bischoff & Bischoff Pyro start plus+ folding wheelchair, you are getting a top German product that sets new standards in term of its flexibility. The wheelchair was designed to offer you a lot of benefits and to meet your needs. -
Page 5: Important Safety Instructions
Pyro start plus+ 1.1 Important safety instructions In order to avoid toppling and dangerous situations, you should practice handling your new wheelchair in a flat, easily manageable area. We recommend that someone accompanies you in this situation. • The person accompanying you should be physically and mentally capable of operating a wheelchair •... - Page 6 • Avoid running into obstacles without braking (steps, kerbs) or "jumping down" from one level to another. • Avoid using on uneven, loose surfaces. • Someone should be asked to accompany you when negotiating obstacles (steps, etc.). Use the tip assist (see overview of the wheelchair) to tip the wheelchair in an appropriate way.
-
Page 7: Indications / Contraindications
Pyro start plus+ - the foot plates are folded upwards (for getting in / out), are swung inwards/outwards, or if necessary removed. 2. Indication / Contraindication Inability to walk or severe walking disability as a result of: • paralysis • loss of limbs •... -
Page 8: Purpose
3. Purpose The wheelchair is made solely to increase mobility and to transport people with impaired mobility in accordance with the above-mentioned indications. To be noted: We are only able to provide a warranty if the product is used in accordance with the specified conditions and for the intended purposes 4. -
Page 9: Scope Of Supply And Checking The Delivery
Pyro start plus+ 5. Scope of supply and checking the delivery The scope of supply in the special box includes: • 1 wheelchair, folded • 1 air pump (only for pneumatic tyres) • 1 operating manual • 1 set of tools (3 Allen keys, SW3, SW4 and SW6, 1 cros- shead screwdriver, 2 ring spanners, SW10 and SW13) All B+B wheelchairs are subjected to a proper final in- house inspection and provided with the CE mark. - Page 10 In the event of transport damage... 1. Leave the goods and packaging unaltered in any case and do not use the goods yet. 2. Report the damage in writing to the transport company as shown below. 3. Then contact our customer service department (+49 (0)700/6000 7070) 4.
-
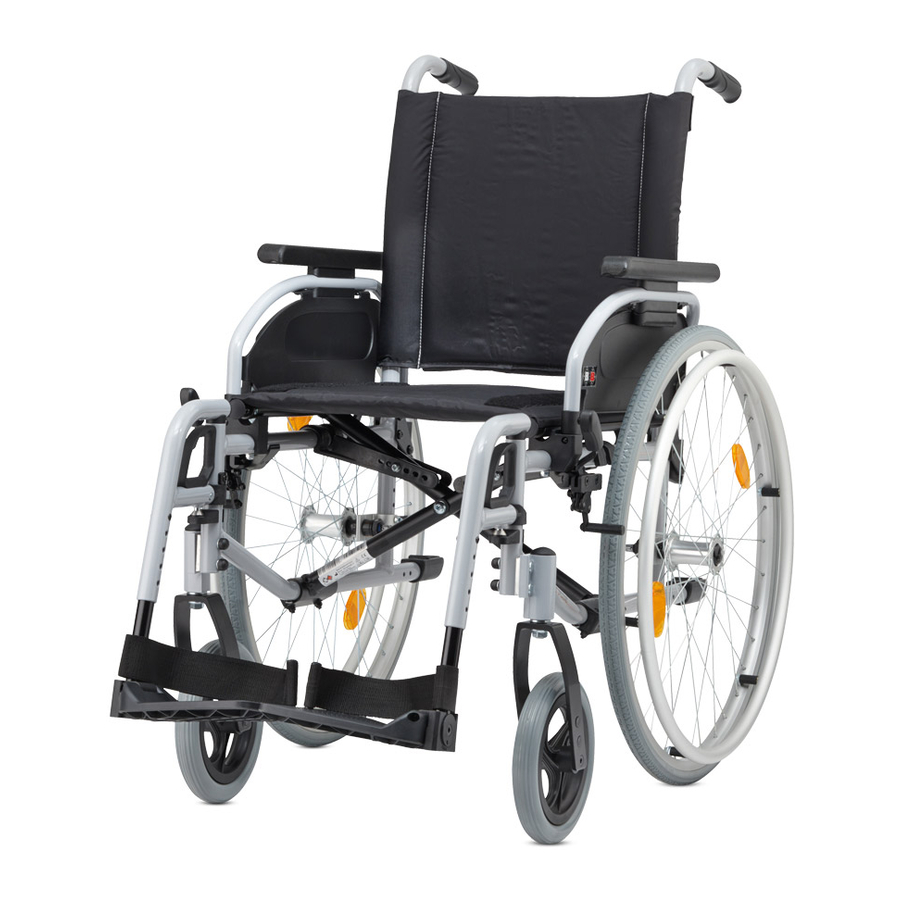
Page 11: Overview Of The Wheelchair
Pyro start plus+ 6. Overview of the wheelchair To make the use of your B+B wheelchair as simple as pos- sible, we have provided detailed illustrations in addition to the written instructions. The following illustrations should help you to identify the individual assemblies and how they interact. - Page 12 Push handles B+B logo Drive wheel Push rim Lifting point 2 Tip assist Fig. 1b...
-
Page 13: Assembly/Adjustments
Pyro start plus+ 7. Assembly / adjustments 7.1. Folding and unfolding Delivery Your new B+B wheelchair is delivered fully assembled and folded in an original B+B box. To avoid damage during transport, plug-in attachable parts are delivered under separate packaging (Fig. 2). Unfolding Fig. -
Page 14: Legrests
Folding Place your B+B wheelchair next to you. Tip it by pulling the backrest towards you, until the load is taken off the opposite drive wheel. At the same time, pull the seat cushion upwards until the chair is completely folded (Fig. 6). Fig. - Page 15 Pyro start plus+ 7.2.3 Fitting the legrests • Hold the upper part of the legrest so that it points out- wards. Activate the handle and now push the legrest with the guide profile into the hole in the frame (Fig. 9). •...
-
Page 16: Side Parts
To return to the original position, simply swing the legrest forwards until it locks into place. When standing up from the wheelchair, you must not stand on the foot plates under any circumstances! 7.2.6 Adjusting the legrest length The standard adjustment which can be made to the legrest length is a total of 80 mm in 5 x 20 mm steps. - Page 17 Pyro start plus+ • The arm supports for the side parts (desk/long) are fit- ted as desk (short) on delivery. • You can change the arm supports to the long setting in just a few steps. First, remove the fixing screws on the underside.
-
Page 18: Seat
7.4. Seat 7.4.1 Seat height You can adapt the seat height to your individual needs in just a few steps. 1. Height of the driving wheel There are 4 positions to allow the seat height to be adap- ted to the user's requirements. For the lowest one, the castor bushing must be turned and fitted on the other side. - Page 19 Pyro start plus+ 2. Height of the front wheel • First, remove the masking on the optional drill holes. • Loosen the axle (Allen key, SW 4) and take it out com- pletely. • Place the steering wheel in the right position for the required seat height.
-
Page 20: Wheelbase
7.5. Wheelbase Caution, risk of tipping! If you move the driving wheel forwards or the backrest backwards, this significantly increases the risk of tipping. Anti-tip rollers or an extended wheelbase are then neces- sary. Check the settings first with a helper. Only use settings that you feel safe with. -
Page 21: Brake
Pyro start plus+ 7.6. Brake Operating the knee lever locking brake (compact brake) To lock the brake, simply push the brake lever forwards until it clicks into place (Fig. 21). To release the locking brake again, simply pull the brake lever backwards (Fig. 22). -
Page 22: Wheels And Tyres
• Then tighten both Allen screws up again. • Make sure that the brake fully locks into place when the lever is operated and does not snap back. The compact brakes only operate on one driving wheel each! With pneumatic tyres, always ensure that both driving wheels have the same tyre pressure to achieve good direc- tional stability! After completion of the setting process, retighten the loo-... - Page 23 Pyro start plus+ Driving wheels PU tyres (puncture-proof, no valve) size 24"x13/8" are fit- ted as standard on your Pyro start plus+. Pneumatic tyres are available as an option. If they become worn or defec- tive, the authorised specialist retailer should be asked to carry out the repair.
-
Page 24: Quick-Release Axles
7.8. Quick-release axles To make the transport of your wheelchair considerably easier, the wheels are equipped with quick-release axles as standard: • Press the locking button of the quick-release axle with your finger and pull the wheel off (Fig. 26). •... -
Page 25: Accessories
Pyro start plus+ 8. Accessories 8.1. Anti-tip protection / anti-tip rollers Always use the anti-tip protection as a pair. To fit the anti-tip protection, please proceed as follows: • Pull the rubber profiles off the tip assist. • Push the round profile for the anti-tip protection onto the side frame tube at the bottom. -
Page 26: Drum Brake
8.3. Drum brake As an option, the Pyro start plus+ can be equipped with a drum brake, which should only be operated by an accom- panying person via the brake lever on the push handles. The drum brake should be used as both a locking brake and also as a service brake. -
Page 27: Use
Pyro start plus+ 9. Use 9.1. Getting in and out from the side • Move the wheelchair and the current or future seat as close beside one another as possible. • If you want to move from another wheelchair or indoor frame, secure this by activating the locking brakes. -
Page 28: Getting In And Out From The Front
9.2. Getting in and out from the front • First swing the foot plates up or remove the legrests. • Move the Pyro start plus+ and the current or future sea- ting as close as possible facing one another. • If you want to move from another wheelchair or indoor frame, secure this by activating the locking brakes. -
Page 29: Driving
Pyro start plus+ • When going down stairs, the helper who is below brakes by pushing the wheelchair right against the steps. The helper who is above holds the wheelchair by the push handles, secures it and holds it in the right position. The wheelchair should roll down step by step. - Page 30 To get over obstacles more easily, the assisting person must position the wheelchair at the correct angle to the obstacle by pressing on the tip assist (Fig. 27). Before getting in or out, the locking brake must be put on. Use outside of the home should only be undertaken with sufficient experience.
-
Page 31: Technical Data
Pyro start plus+ 11. Technical data Dimensions and weights Max. load (kg): Seat width (cm): 37 / 40 / 43 / 46 / 49 / 52 Seat depth (cm): 40 / 42 / 44 Seat height (cm): 42.5 / 45 / 47.5 / 50 Seat angle (°): 2 -3.5 Overall width:... -
Page 32: Transport
12. Transport 12.1 Transporting the wheelchair To make the wheelchair as convenient as possible to trans- port, all detachable parts (footrests, wheels, slot-in acces- sories) must be removed and the wheelchair folded. 12.2 Seat in disabled vehicle You can check whether your wheelchair is licensed as a seat in a disabled vehicle by the symbols on the frame (Fig. - Page 33 Pyro start plus+ •Detachable parts and accessories on the wheelchair, such as trays and bags, should, where possible, be removed and safely stowed in the boot. If attachments are not detachable they must be folded away and secured by the user or adequately padded. •When used as a seat in a disability vehicle, a 3-point safety belt must always be worn.
- Page 34 Positioning of wheelchair • Position the wheelchair facing forwards (Fig. C). Check whether the straps conform to the angles in Fig. D. Rear attachment point Side view Position of static or Rear view retracting belts Front attachment point Front view Side view Position of static or retracting belts...
- Page 35 Pyro start plus+ Fig. E Fig. F Fig. G Fig. H Bischoff & Bischoff GmbH • 27.08.2012...
- Page 36 Tensioning and loosening the straps •Tension using handle (Fig. I) •Loosening using lever or alternatively by releasing the belt tongue from the belt buckle (Fig. J). Safety belt Fig. I: open The safety belt must run at an angle of between 30° and 75°...
- Page 37 Pyro start plus+ Belts must not run across wheelchair attachments such as armrests or wheels! (Fig. L & Fig. M) Fig. L Fig. M In order to be able to remove the belt quickly in the event of an accident, a seat belt cutter like this (Fig. N) should Fig.
-
Page 38: People 13| Storage / Shipping
13. Storage / shipping If the wheelchair is to be stored or shipped, all attachable and unsecured parts, apart from the driving wheels, must be removed and packed individually in appropriate car- tons. The individually packed parts can then be packaged together in a larger carton. -
Page 39: Repair
Pyro start plus+ 15. Repair Repairs and maintenance may only be carried out by aut- horised partners (medical suppliers or specialist retailer). You can find a partner near you by telephoning our custo- mer service: Tel: + 49 (0)700/6000 7070. 16. -
Page 40: Appendices
17. Appendices Useful life If used as intended, in accordance with the safety, care and maintenance instructions, the anticipated useful life of the wheelchair is up to 5 years. Beyond this period, if the wheelchair is in a safe condition, it can continue to be used. - Page 41 Pyro start plus+ a) Care instructions Cleaning of the seat and back covers can be undertaken with warm water and a sponge or soft brush. For stubborn stains, standard detergent can be added to the water. Please note: Never use aggressive cleaning agents such as solvents, abrasive agents or hard brush.
- Page 42 Hygiene plan and risk eva- luation of B+B medical pro- ducts before preparation In accordance with: the second amendment to the medical products act (2. MPG-ÄndG) of 13 December 2001 here: Article 11 Section 4 Para.2, amendment to the medical devices operator ordinance Date: 29.04.2005 1.
- Page 43 Pyro start plus+ 6. Disinfection 1. Put on protective gloves before preparing the product 2. Spray the areas to be treated with disinfection agent 3. Wipe dry treated areas with paper towel. Repeat if necessary 4. Dispose of protective gloves and paper towels 7.
- Page 44 Maintenance table When What Before each journey Functional check of the brakes Operate the brake to the full extent of its travel. The bra- ked wheels must not be able to move any more in normal use. Check for wear in the pressure brake Move the brake lever sideways.
- Page 45 Pyro start plus+ Please note Check to be carried out by the user or an assistant. If brakes are defective, have them repaired by an authori- sed specialist workshop. Check to be carried out by the user or an assistant. If the brake play is too great, have it corrected by an authori- sed specialist workshop.
- Page 46 Maintenance table When What Every 6 months (depending Checks on frequency of use) • Cleanliness • General condition...
- Page 47 Pyro start plus+ Please note Take note of the care and hygiene information. In the event of any defects, have the necessary repair work car- ried out only by authorised specialist workshops, as only these are trained in the necessary work and generally have sufficient trained personnel.
-
Page 48: Warranty
18. Warranty This warranty covers all defects in the wheelchair that are shown to be caused by material or production defects. In the case of any complaint, please return the product together with the warranty certificate completely filled in. We provide a guarantee of 5 years on the frame and fol- ding mechanism of our Pyro light Optima folding wheelchair, whereas we assume a warranty of 2 years on all other mounted parts. - Page 49 Pyro start plus+ Notes Bischoff & Bischoff GmbH • 27.08.2012...
- Page 51 Pyro start plus+ Warranty certificate (Please note our general business terms and conditions) Model: Pyro start plus+ Model Nor: Serial Number:* (to be filled in by the specialist retailer) Specialist retailer: Date and stamp *Information plates can be found on the side frame Bischoff &...
- Page 52 Bischoff & Bischoff GmbH Becker-Göring-Straße 13 • D-76307 Karlsbad Tel.: 0700/6000 7070 • Fax: 0700/6000 8080 www.bischoff-bischoff.com info@bischoff-bischoff.de...
Need help?
Do you have a question about the Pyro start plus+ and is the answer not in the manual?
Questions and answers