Table of Contents
Advertisement
Quick Links
Advertisement
Table of Contents

Subscribe to Our Youtube Channel
Related Manuals for Bischoff & Bischoff S-Eco 2


Summary of Contents for Bischoff & Bischoff S-Eco 2
- Page 1 Bischoff & Bischoff Instruction manual S-Eco 2 Enjoy mobility.
-
Page 2: Table Of Contents
Dear User, With the purchase of your Bischoff & Bischoff Folding Wheelchair S-Eco 2 you have received a German high quality product which sets new standards through its various adjustment features. These operating instructions intend to help you to familiarise yourself better with the operating and the handling of your wheelchair. - Page 3 S-Eco 2 9| Accessories 9.1 Tip protection/ tip rolls 9.2. Therapy table 9.3. Safety belt 10| Driving with the S-Eco 2 11| Technical data 12| Transport 12.1 Transporting the wheelchair 12.2 Seat in disabled vehicle 13| Storage/ Dispatch 14| Repair...
-
Page 4: Important Safety Instructions
1. Important safety instructions In order to avoid any accidents and dangerous situations practice using your wheelchair on a flat and clearly visible area. The presence of an accompanying person is recom- mended for this. • Before you start using your wheelchair make sure that all fitted parts are properly secured •... - Page 5 S-Eco 2 • When getting on or off the wheelchair both handbrakes must be pulled. • Take care of adequate depth of tread on your tyres. • When using roads, the Highway Code must be observed. • The wheelchair’s lightning must always be visible to other road users.
-
Page 6: Indications
2. Indications Walking disability or distinct walking impairment due to: • paralysis • Loss of limb • extremity defect/deformation • joint stiffness/damage (not affecting both arms) • Other diseases. It is appropriate to supply strengthened wheelchairs when the body weight of the handicapped person is more than 90 kg and an ordinary wheelchair doesn’t secure the necessary safety any longer. -
Page 7: Proper Purpose
S-Eco 2 3. Purpose The wheelchair was exclusively designed to increase mobility and transport of people who have a walking disability according to the mentioned indications. We can only offer a guarantee if the product is used under the given conditions and for the designed purposes. -
Page 8: Conformity Declaration
4. Declaration of conformity As manufacturer of the product, B+B declare that the “S-Eco 2” wheelchair complies fully with the requirements of the European Directive 93/42/EWG (EEC) for medical products. -
Page 9: Overview Of Product And Parts Supplied
S-Eco 2 5. Overview of product and parts supplired The wheelchair is delivered in a special cardboard packaging and the full contents are: • 1 folded wheelchair • 1 air pump • a booklet of operating instructions • 1 set of tools (3 hexagon socket screws SW4, SW5,... - Page 10 In the event of damage in transit: 1. In all circumstances, leave the product and packaging as it is and do not yet use the product. 2. Notify the damage to the carrier in writing, as indicated below. 3. Then contact our Customer Service number: + 49 (0)700/6000 7070.
-
Page 11: Overview Of The Wheelchair
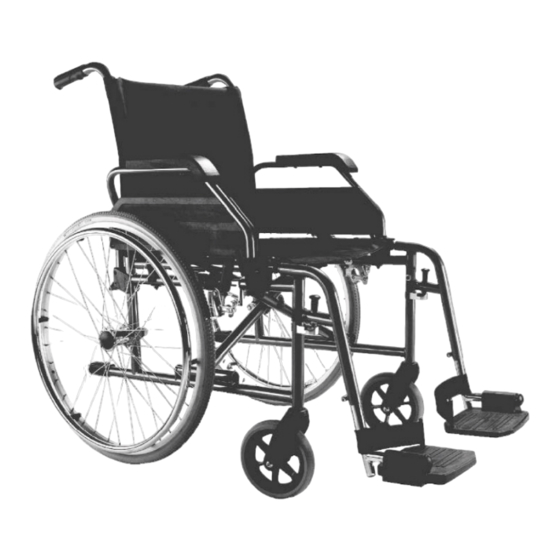
S-Eco 2 6. Overview of the wheelchair (description of “S-Eco-2”) In order to make the use of Bischoff & Bischoff wheel- chairs as easy as possible, we have elaborated the written description with detailed pictures. The following picture will help you understand the expres- sions and how the single parts act in combination. - Page 12 push handles B + B Logo Side parts/armrest hinge Drive wheel Side lighting/reflector Lifting point Stabilisers Gripping wheel Fig. 2...
-
Page 13: Assembly/Adjustments
S-Eco 2 7. Assembly/adjustments 7.1. Folding and unfolding Delivery Your new B+B wheelchair is delivered assembled and folded in a original carton by B+B. To avoid damages during the transportation, parts which have to be stuck on are separately delivered. -
Page 14: Leg Support
7.2. Leg supports Leg support with foot plate Both leg supports arrive assembled with the foot plates. You can lift up the foot plates on both leg supports in sitting position. Assembling the leg supports Fig. 6 Hold the leg supports on the upper part and put them into the leg support holder pointing outwardly. - Page 15 S-Eco 2 • Pull the button, in this way the lock is opened. • Now you can wing/pivot the leg supports outwardly or inwardly • If necessary you can lift the foot plates before that. To get back to the original state just swing the leg supports frontally until they snap in.
-
Page 16: Side Parts
7.3. Side parts/sections Swinging the side parts To make it easier to get on and off the wheelchair both side parts with the armrests can be swung backwards. Use the lock device lever (picture 9) pressing it gently with your finger and at the same time swing the side part Fig. -
Page 17: Brakes
S-Eco 2 7.4. Brakes Using the elbow lever parking brake (Compact brake) To use the brake just push the brake lever forward until it snaps. (Picture 12) To loosen the brake, pull the lever backwards (picture 13) Fig. 12 Adjustment of the elbow lever... - Page 18 In order to ensure optimal brake functioning pneumatic wheels should have a pressure of 300- 400 k Pa (3-4 bars). If the air pressure in the tyres is not according to the regulations then there is a danger of brake function loss. The compact brakes affect only one driving wheel at a time.
- Page 19 The spoked wheels are tightened with a power socket wrench (M12) on the chassis suspension. Drive wheels Your „S-Eco 2“ has puncture-proof PU tyres with tubes size 24x1 /4“ as standard equipment. The tyres must be repla- Fig. 15 ced by your authorised dealer when they are worn or faul-...
-
Page 20: Options
8. Options 8.1. Full floating axle In order to make the transport of your wheelchair easier there is an option to equip the wheels with full floating axles. The model with the full floating axles makes it possible that the wheels can be removed without any tools. The Fig. - Page 21 S-Eco 2 8.2. Horizontally adjustable leg supports Assembling, disassembling, deviating and adjustment of the leg supports and the leg support extension are described in chapter 7.2. The horizontal adjustment functions as follows (look at picture 19, 20): Fig. 19 • Press lever forward •...
-
Page 22: Drum Brake
8.3. Drum Brakes Using the drum brakes by the accompanying person To stand still, just pull down the brake lever and the locking device. (Picture 21) To stop the hand brake, just pull the brake levers shortly. The locking device loosens automatically. (Picture 21) Fig. - Page 23 S-Eco 2 In order to ensure optimal brake function the pneumatic wheels should have a pressure of 3-4 bars. If the air pressure in the tyres is not according to the regulations then there is a danger of brake function loss!
- Page 24 8.4. Height adjustable side parts It is possible to equip your S-Eco wheelchair with height adjustable side parts. (only long version). The height adjustable side parts can be pivoted and are secured by a hexagon socket screw (6 mm) secured to avoid slipping out.
-
Page 25: Accessories
S-Eco 2 9. Asseccories 9.1. Tip protection/ tip protection rolls Always use the anti-tilt mechanism in pairs. Fig. 26 To assemble the tip protection proceed as follows: • First detach the rubber profiles of the tilt aid from the frame. -
Page 26: Safety Belt
9.3. Safety belt If needed, you can get a safety belt as an accessory. It is mounted on the temporarily removed or swung over side part on the side frame of your wheelchair. (Picture 28) Put the open end of the belt around the side frame pipe and fix it with the belt buckle. - Page 27 S-Eco 2 10. Driving Position yourself in the seat of your B+B wheelchair. Ensure that you are sitting as far back in the seat as possible. You can move using the gripping wheels on the drive wheel. Be careful when taking your first rides until you get used to your new wheelchair and how it functions.
- Page 28 ! The static stability of the basic model is 5° (ca. 8 %) The critical obstacle height at the basic model in unfavou- rable situations is 23 mm (maximum centre of gravity shift) The critical obstacle height is the height in which the centre of gravity (with the user) is right vertical over the obstacle rim.
-
Page 29: Technical Data
S-Eco 2 11. Technical data Seat width: 37, 40, 43, 46, 49, 52 cm Seat height: 50 cm Seat depth: 42 cm Back height: 40 cm Chassis frame: steel Components: steel Folding device: simple cross braces Drive wheels (standard): break safe PU- tyres 24“... -
Page 30: Transport
12. Transport 12.1 Transporting the wheelchair To make the wheelchair as convenient as possible to trans- port, all detachable parts (footrests, wheels, slot-in acces- sories) must be removed and the wheelchair folded. 12.2 Seat in disabled vehi- You can check whether your wheelchair is licensed as a seat in a disabled vehicle by the symbols on the frame (Fig. - Page 31 S-Eco 2 •Detachable parts and accessories on the wheelchair, such as trays and bags, should, where possible, be removed and safely stowed in the boot. If attachments are not detachable they must be folded away and secured by the user or adequately padded.
- Page 32 Positioning of wheelchair • Position the wheelchair facing forwards (Fig. C). Check whether the straps conform to the angles in Fig. D. Rear attachment point Side view Position of static or Rear view retracting belts Front attachment point Front view Side view Position of static or retracting belts...
- Page 33 S-Eco 2 Attachment to vehicle floor Rails (Fig. E) Insert fitting into rail at an angle and then pull in side- ways. Detach the fittings by pulling on the snap ring. Mono System (Fig. F) Place mono-fitting flat on the base plate and pull over the base plate.
- Page 34 Tensioning and loosening the straps •Tension using handle (Fig. I) •Loosening using lever or alternatively by releasing the belt tongue from the belt buckle (Fig. J). Safety belt Fig. I: open The safety belt must run at an angle of between 30° and 75°...
- Page 35 S-Eco 2 Belts must not run across wheelchair attachments such as armrests or wheels! (Fig. L & Fig. M) Fig. L Fig. M In order to be able to remove the belt quickly in the event of an accident, a seat belt cutter like this (Fig. N) should Fig.
-
Page 36: Storage/Dispatch
13. Storage/dispatch If the wheelchair is going to be stored or transported all removable and not tightened parts except of the drive wheels have to be removed and packed in separate cartons. The separately packed parts can be packed together in a bigger carton. -
Page 37: Disposal
S-Eco 2 15. Disposal Even wheelchairs which are not useable any longer are a valuable material source which can be returned to the industrial cycle. Do not throw the wheelchair you want to dispose into household garbage. Let it be disposed by a disposal company. -
Page 38: Enclosures
16. Enclosures Care, hygiene instructions, mainten- ance instructions as enclosure to the Bischoff+Bischoff operation instructions As well as all technical products should be submitted for inspection regularly by authorised experts, the same applies for vehicles for ill people, driveable walking aids and hospital beds. - Page 39 S-Eco 2 Thanks to the quality surface coat optimal corrosion prevention is provided. If the varnishing is scratched you can mend the defective/faulty spots with a lacquer pen. Parts made of chrome have to be dryly rubbed off first. Dull spots as well as heavily clung dirt can be best removed with the usual cleaning products.
- Page 40 Directive (2.MPG-ÄndG) dated 13th December 2001 Here: Article 11 §4 paragraph 2, Change of Medical Device Operator Ordinance 29.04.2005 1. Product Wheelchair S-Eco 2* 2. Risk assessment Uncritical medical product Medical product which comes in touch with healthy skin 3. Hygiene frequency If not sooner, then after the user of the wheelchair changes.
- Page 41 S-Eco 2 6. Disinfection 1. Before preparation of the wheelchair put on protective gloves 2. Spray disinfectants on the places which have to be cleaned. 3. Wipe dry with paper tissues. 4. Throw away protective gloves and used tissues. 7. Special marking not necessary 8.
-
Page 42: Maintenance Schedule
Maintenance schedule When What Every time before you use it Checking the brake mechanism Push the brake right down. Now the wheels must not turn any more at normal usage. Wear test of the air brake move the brake lever on the side Check the air pressure of the tyres Standard front tyres: 200-250 k Pa(2-2,5 bar) Standard back tyres: 300-400 k Pa (3-4 bar) - Page 43 S-Eco 2 Pay attention to The check can be carried out by the user or a helper. Faulty brakes have to be overhauled and repaired by authorised speciality retailers. The check can be carried out by the user or a helper. Use...
- Page 44 Maintenance schedule When What Every 6 months (depending Inspection on the frequency of use) • cleanliness • general condition...
- Page 45 S-Eco 2 Pay attention to Pay attention to the care and hygiene instructions. If there are any malfunctions or defects then the wheel- chair should be taken to an authorised specialty retailer, because only they have people with the required special technical knowledge and know what has to be done.
-
Page 46: Guarantee-Certificate
If there are complaints you have to provide a completed certificate of guarantee. For our folded wheelchair “S-Eco 2” we offer a guarantee of 5 years for frame parts and die shears. - Page 47 S-Eco 2 Warranty certificate (Please note our general business terms and conditions) Model: S-Eco 2 Model number: Serial number * (must be inscribed by the specialist dealer) Dealer: Date and seal * Information sign can be found on the side frame...
- Page 48 Bischoff & Bischoff GmbH Becker-Goering-Strasse 13 • D-76307 Karlsbad Tel.: +49 700/6000 7070 • Fax: +49 700/6000 8080 www.bischoff-bischoff.com info@bischoff-bischoff.de...
Need help?
Do you have a question about the S-Eco 2 and is the answer not in the manual?
Questions and answers