
Related Manuals for Bischoff & Bischoff Pyro Light


Summary of Contents for Bischoff & Bischoff Pyro Light
- Page 1 Bischoff & Bischoff Instructions for Use Pyro Light / Pyro Light XL Enjoy mobility.
-
Page 2: Table Of Contents
Table of contents 1| Preliminary remark 1.1. Important safety information 2| Indications 3| Purpose 4| Declaration of conformity 5| Scope of delivery and checking the delivery 6| Overview of the wheelchair 7| Assembly/Adjustments 7.1. Folding and unfolding 7.2. Legrests 7.3. Side parts 7.4. - Page 3 Pyro Light / Pyro Light XL 10| Driving 11| Technical data 12| Transport 12.1 Transporting the wheelchair 12.2 Seat in disabled vehicle 13| Storage/Shipment 14| Repair 15| Disposal 16| Appendices: Care, hygiene and maintenance guidelines Hygiene + risk evaluation Maintenance plan 17| Guarantee certificate Bischoff &...
-
Page 4: Preliminary Remark
1. Preliminary remark Dear user, By purchasing your Bischoff & Bischoff folding wheelchair from the Pyro Light Series, you are getting a top German product that sets new standards with its variability. These operating instructions are to help you become more... -
Page 5: Important Safety Information
Pyro Light / Pyro Light XL 1.1 Important safety infor- mation In order to avoid toppling and dangerous situations, you should practice safe handling of your new wheelchair on a flat and familiar surface. In such a case, an assisting per- son is recommended. - Page 6 • Avoid running against obstacles (steps, kerbs) without braking or moving down steps. • Avoid using on uneven, loose surfaces. • An assisting person should be used if going over obstacles (steps etc.). Use the tip assist (see overview of wheelchair) to tip the wheelchair appropriately.
- Page 7 Pyro Light / Pyro Light XL • When transferring between wheelchair and bed, always ensure that: - both locking brakes are applied - the side part on the side for getting in/out is swung backwards. - the foot plates (for getting in/out) are folded upwards, swing inwards/outwards or are removed.
-
Page 8: Indications
2. Indications Inability to walk or severe walking disability as a result of: • paralysis • loss of limbs • meromelia/limb deformation • joint contractures/joint damage • other ailments The supply with strengthened wheelchairs is indicated if the body weight of the disabled person is 90 kg and more and a standard wheelchair no longer offers the required safety. -
Page 9: Purpose
Pyro Light / Pyro Light XL 3. Purpose The wheelchair is produced solely for increasing mobility and for the transport of people with impaired mobility in accordance with the above-mentioned indications. To note: We are only able to issue a guarantee if the product is used in accordance with the specified conditions and for the specified purpose. -
Page 10: Declaration Of Conformity
4. Declaration of conformi- B+B declares as manufacturer of the product that the "Pyro Light" and "Pyro Light XL" wheelchairs fully comply with the requirements of directive 93/42/EEC. -
Page 11: Scope Of Delivery And Checking The Delivery
Pyro Light / Pyro Light XL 5. Scope of delivery and checking the delivery The scope of delivery in the special carton includes: • 1 wheelchair, folded • 1 air pump (only for pneumatic tyres) • 1 operating instructions • 1 set of tools (3 Allen keys wrench size 3, 4, 6, 1 cros-... - Page 12 In the case of transport damage... 1. Leave the goods and packaging unchanged and do not use the goods. 2. Register the damage in writing with the transport com- pany as shown below. 3. Then contact our customer service (+49 (0)700/6000 7070) 4.
-
Page 13: Overview Of The Wheelchair
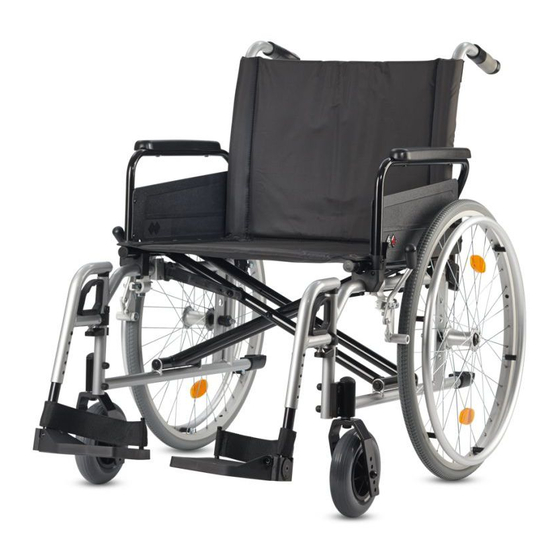
Pyro Light / Pyro Light XL 6. Overview of the wheelchair To make the use of your B+B wheelchair as simple as pos- sible, we have provided detailed illustrations for the writ- ten instructions. The following illustrations should help to identify the names and interaction of the individual elements. - Page 14 Hand push handles B+B logo Side part Drive wheel External reflectors Lifting point 2 Tip assist Push rim Fig. 1b...
-
Page 15: Assembly/Adjustments
Pyro Light / Pyro Light XL 7. Assembly/Adjustments 7.1. Folding and unfolding Delivery Your new B+B wheelchair is delivered fully assembled and folded in an original B+B carton. To prevent damage during transport, attachable mounting parts are delivered separately. (Fig. 2) Fig. -
Page 16: Legrests
7.2. Legrests Legrests with foot plate Both legrests are supplied with the foot plates attached. The foot plates on both legrests can be folded upwards. Attaching legrests • Hold the legrests on the upper part such that this part Fig. 6 points outwards. - Page 17 Pyro Light / Pyro Light XL Swinging away the legrests To make it as easy as possible to get into and out of your B+B folding wheelchair, you can easily swing the legrests outwards or inwards if needed without having to remove them (Fig.
-
Page 18: Side Parts
7.4. Seat Seat depth adjustment You can adjust the seat depth of your wheelchair from 42 cm to 44 cm (Pyro Light) and from 44 cm to 46 cm (Pyro Fig. 13 Light XL) . -
Page 19: Seat/Seat Height Adjustment
Pyro Light / Pyro Light XL • If you remove the screws for the seat cover with a scr- ewdriver, you can move the seat tubes 2 cm forwards (Fig. 16). • After you have set the required seat depth, retighten the screws (Fig.17). - Page 20 • Now check the adjustment of the brake. This must be set such that the gap between the tyre tread and the braking bolt with the brake open is 15 mm (Fig.19). The braking bolt must be horizontal, i.e. parallel to the gro- und surface.
-
Page 21: Wheels And Tyres
Steering wheels Rubber tyres with an inner tube or puncture proof tyres (without valve) with a diameter of 6" (7" on the Pyro Light XL) are mounted on your Pyro Light as standard. If they become worn or defective, the authorised specialist retai- Fig. -
Page 22: Quick-Release Axles
7.7. Quick-release axles To achieve significantly easier transport of your wheelchair, the wheels are equipped with quick-release axles as standard: • Press on the locking button of the quick-release axle with a finger and remove the wheel (Fig. 24). Fig. 24 •... -
Page 23: Options
Pyro Light / Pyro Light XL 8. Options 8.1. Horizontally adjustable legrests To attach, remove, swing away and adjust the legrests and the legrest length, please refer to Section 7.2 Horizontal adjustment functions as follows (see Fig. 25): Fig. 25 •... -
Page 24: Height-Adjustable Side Parts
8.3. Height-adjustable side parts (Pyro Light XL) Your Pyro Light XL can optionally be equipped with height-adjustable/removable side parts (only full version). Height adjustment: • Operate the locking lever to move the armrest to the Fig. 27 required position (75 mm, 3 steps of 25 mm, Fig. 28). -
Page 25: Accessories
Pyro Light / Pyro Light XL 9. Accessories 9.1. Tilt protection/anti-tilt rollers Always use the anti-tilt mechanism in pairs. Fig. 29 To mount tilt protection, proceed as follows. • Remove the rubber profiles of the tip assist • Push the round profile for the tilt protection onto the lower side frame tube. -
Page 26: Safety Belt
9.3. Safety belt If required, a safety belt is available as an accessory. This is mounted on the side frame of the wheelchair with the side part either temporarily removed or swung away (Fig. 31). Take the open end of the belt once around the side frame tube and fix it with the belt buckle. - Page 27 Pyro Light / Pyro Light XL sufficient experience. Where possible, somebody should accompany you. The static stability of the base model is 5° (approx. 8%). The critical obstacle height for the base model in the most Fig. 32 adverse situation (max. weight shift backwards) is 23 mm.
-
Page 28: Technical Data
24" x 13/8" on aluminium wheels (other sizes available) Steering wheels: pneumatic, solid or soft rubber (standard) tyres 7" x 13/4" (6" soft rubber for Pyro Light) (other sizes available) Side parts: combined side parts (desk/full/height-adjustable) * desk or full, only swing-away... - Page 29 Colours: metallic silver metallic blue Weight: "Pyro Light" 16.2 kg: "Pyro Light XL": 18.5 kg Max. load: "Pyro Light" 125 kg: "Pyro Light XL": 170 kg Standard equipment for: *"Pyro Light" **"Pyro Light XL" Bischoff & Bischoff GmbH • 03.01.2012...
-
Page 30: Transport
12. Transport 12.1 Transporting the wheelchair To make the wheelchair as convenient as possible to trans- port, all detachable parts (footrests, wheels, slot-in acces- sories) must be removed and the wheelchair folded. 12.2 Seat in disabled vehicle You can check whether your wheelchair is licensed as a seat in a disabled vehicle by the symbols on the frame (Fig. - Page 31 Pyro Light / Pyro Light XL •Detachable parts and accessories on the wheelchair, such as trays and bags, should, where possible, be removed and safely stowed in the boot. If attachments are not detachable they must be folded away and secured by the user or adequately padded.
- Page 32 Positioning of wheelchair • Position the wheelchair facing forwards (Fig. C). Check whether the straps conform to the angles in Fig. D. Rear attachment point Side view Position of static or Rear view retracting belts Front attachment point Front view Side view Position of static or retracting belts...
- Page 33 Pyro Light / Pyro Light XL Attachment to vehicle floor Rails (Fig. E) Insert fitting into rail at an angle and then pull in side- ways. Detach the fittings by pulling on the snap ring. Mono System (Fig. F) Place mono-fitting flat on the base plate and pull over the base plate.
- Page 34 Tensioning and loosening the straps •Tension using handle (Fig. I) •Loosening using lever or alternatively by releasing the belt tongue from the belt buckle (Fig. J). Safety belt Fig. I: open The safety belt must run at an angle of between 30° and 75°...
- Page 35 Pyro Light / Pyro Light XL Belts must not run across wheelchair attachments such as armrests or wheels! (Fig. L & Fig. M) Fig. L Fig. M In order to be able to remove the belt quickly in the event of an accident, a seat belt cutter like this (Fig.
-
Page 36: Storage/Shipment
13. Storage/shipment If the wheelchair is stored or shipped, all removable or non-attached parts, except drive wheels, must be removed and packed individually in suitable containers. The indivi- dually packed parts can then be packed together in a lar- ger container. It is recommended to retain the original packaging and to store it fo r this purpose so that it is available if required. -
Page 37: Disposal
Pyro Light / Pyro Light XL 15. Disposal Even a wheelchair that can no longer be used represents valuable material that can be recycled into the industrial process. Therefore, never throw away your wheelchair for disposal in the household ld waste, but have it disposed of professionally in an official waste-disposal centre. -
Page 38: Appendices
16. Appendices Care, hygiene and maintenance information for the Bischoff & Bischoff operating instructions Like all technical products, patient vehicles, mobile wal- king aids and patient beds, should be subject to a regular check and maintenance by authorised professionals. These checks should primarily ensure the safety of the user. - Page 39 Pyro Light / Pyro Light XL Due to the high-quality surface coating, optimum corrosi- on protection has been achieved. Should the coating be damaged by scratches or similar, you can make good the defective area with a paint pen. Chrome parts are initially wiped with a dry cloth.
- Page 40 (2. MPG-ÄndG) of 13 December 2001 here: Article 11 Section 4 Para.2, amendment to the medical devices operator ordinance Date: 29.04.2005 1. Product Pyro Light/Pyro Light XL wheelchair 2. Risk level Non-critical medical product Medical product that only comes into contact with unbroken skin 3.
- Page 41 Pyro Light / Pyro Light XL 6. Disinfection 1. Put on protective gloves before preparing the product 2. Spray the areas to be treated with disinfection agent 3. Wipe dry treated areas with paper towel. Repeat if necessary 4. Dispose of protective gloves and paper towels 7.
- Page 42 Maintenance table When What Before each journey Functional check of the brakes Operate the brake to the full extent of its travel. The bra- ked wheels must not be able to move any more in normal use. Check for wear in the pressure brake Move the brake lever sideways.
- Page 43 Pyro Light / Pyro Light XL Please note Check to be carried out by the user or an assistant. If brakes are defective, have them repaired by an authori- sed specialist workshop. Check to be carried out by the user or an assistant. If the brake play is too great, have it corrected by an authori- sed specialist workshop.
- Page 44 Maintenance table When What Every 6 months (depending Checks on frequency of use) • Cleanliness • General condition...
- Page 45 Pyro Light / Pyro Light XL Please note Take note of the care and hygiene information. In the event of any defects, have the necessary repair work car- ried out only by authorised specialist workshops, as only these are trained in the necessary work and generally have sufficient trained personnel.
-
Page 46: Guarantee Certificate
We provide a guarantee of 5 years on the frame and fol- ding back for our folding wheelchairs in the Pyro Light series, whereas we assume a warranty of 2 years on all other mounting parts. - Page 47 Pyro Light / Pyro Light XL Warranty certificate (Please note our general business terms and conditions) Model: Pyro Light/ Pyro Light XL Model No: Serial number:* (to be filled in by the specialist retailer) Specialist retailer: Date and stamp *Information plates can be found on the side frame...
- Page 48 Bischoff & Bischoff GmbH Becker-Goering-Strasse 13 • D-76307 Karlsbad Tel.: +49 700/6000 7070 • Fax: +49 700/6000 8080 www.bischoff-bischoff.com info@bischoff-bischoff.de...
Need help?
Do you have a question about the Pyro Light and is the answer not in the manual?
Questions and answers