
Related Manuals for Currys Essentials CFSG10WH


Summary of Contents for Currys Essentials CFSG10WH
- Page 1 F R EE STAND IN G G A S COO KER I N S T R UC T I O N / INST AL L AT ION MANUAL C FSG 10WH CF SG 10SV...
-
Page 3: Table Of Contents
Contents Unpacking ............................. 5 Product Overview ......................... 6 Front View ...................................6 Top View ..................................6 Control Panel ................................7 Gas Burners .................................7 Before Using your Cooker ......................7 Lighting the Burners ........................8 Flame Failure Safety Feature ....................... 8 If the Burner does not Light ......................8 If the Flame is Irregular ........................ - Page 4 Moving the Cooker ........................20 Stability Bracket ......................... 20 Ventilation Requirements ......................21 Gas Installation ........................... 21 Installation and Service Regulations ..................21 Gas Connection ........................... 22 Installation Relevant to Natural Gas ....................... 22 Installation Relevant to Liquid Petroleum Gas (LPG) ................22 To Connect the Gas Supply: ..........................
-
Page 5: Unpacking
Thank you for purchasing your new Currys Essentials Free Standing Gas Cooker. You must read this manual in order to fully understand how to operate it correctly. This unit MUST be installed by a competent and Registered Engineer (Gas Safe in the UK). -
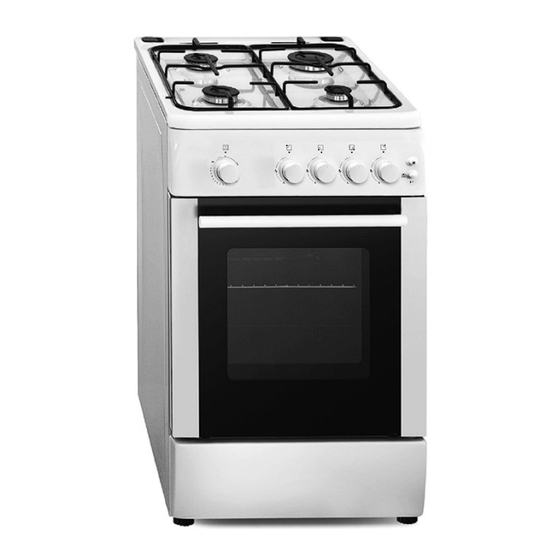
Page 6: Product Overview
Product Overview Front View Gas Hob Oven Door Handle Control Panel Oven Door Top View Standard Burners Large Burner (Fast) Small Burner (Simmer) -
Page 7: Control Panel
Control Panel Oven/Grill Control Rear Right Burner (Simmer) Control Rear Left Burner (Standard) Control Oven Light Switch Front Left Burner (Standard) Control Ignition Switch Front Right Burner (Fast) Control Gas Burners The relevant controls adjust the flow of gas through each of the burners. •... -
Page 8: Lighting The Burners
Lighting the Burners Choose the control for the burner you want to use. Press the Ignition switch and at the same time gently press and hold the burner control in and then turn it anti-clockwise to the position. Release the Ignition switch once the burner is lit. -
Page 9: General Guidelines
General Guidelines To get the best out of your hob, follow these simple suggestions: • Use saucepans with thick flat bottoms. Food in a saucepan with an uneven bottom will take longer to cook. • Do not let large saucepans or frying pans overlap the edges of your hob as this can deflect heat onto your worktop and damage the surface. -
Page 10: Lighting The Oven
Lighting the Oven Press and hold the Oven/Grill control in gently and turn it anti-clockwise to position 9. At the same time press Ignition switch. Once the oven burner is lit you may release the ignition switch. Keep holding the Oven/Grill control in for approximately 10 seconds after the oven burner has lit. (You will see blue flames through the bottom burner grid). -
Page 11: Cooking Table
The thermostat settings detailed below are a guide only and refer to the temperature in the centre of the oven. Gas Mark Centre Oven Max 280 Temperature in °C • If accurate temperatures are required then this should be checked using an oven thermometer available at most cookware shops. -
Page 12: Using The Grill
Using the Grill When using the Grill, the Grill Deflector must be used. The Grill Deflector is designed to protect the control panel controls and buttons when using the oven in Grill mode and to keep the door open the specified distance. • Please use this Grill Deflector in order to avoid heat damaging the control panel and the buttons when the oven is in Grill mode. -
Page 13: General Advice
General Advice Before you start cleaning your cooker, please: • Read the cleaning instructions and the ‘Safety Warnings’ sections. • Turn the cooker off at the wall and disconnect the plug from the socket. • Allow the cooker to cool fully before cleaning. • Do not use a steam cleaner. -
Page 14: Cleaning The Inside Of Your Oven
Cleaning the Inside of Your Oven • Do not use abrasive cleaners, cloths or pads to clean the enamel. • Clean the enamel on the inside of the oven when it has cooled down, using household detergents or an ammonia-based cleaner. You may use ‘off the shelf’ oven cleaners, if you carefully follow the manufacturers’ instructions. -
Page 15: Replacing The Burners
Replacing the Burners Check that: • The ignitor is always clean to ensure trouble-free sparking. • The probe is always clean to ensure correct operation of the safety valves. Both the ignitor and probe must be very carefully cleaned using a toothbrush. When replacing the burner parts, ensure you do not damage the ignitor or temperature probes. -
Page 16: Removing The Oven Door
Removing the Oven Door The oven door can easily be removed as follows: • Open the door completely. • The swivel retainers of the right hand and left hand hinges are hooked onto the metal bar above them. Lift the retainers as shown. • Lift the oven door slightly. -
Page 17: Hints And Tips
Hints and Tips Problem Possible Solutions My hob burner does • Check the cooker is switched on. not light • Check the gas supply valve is turned on and the supply to the house is working. You should hear the gas when you turn a burner on. • The ignitors may be dirty. -
Page 18: Specification
Specification Model CFSG10WH / CFSG10SV Rated Voltage 230 V Rated Frequency 50 Hz Overall Dimension (W x D X H) 495(W) x 640 D) x 910(H) (in mm) Usable Volume 41.7 Litres Oven Lamp Features and specifications are subject to change without prior notice. -
Page 19: Installation
Installation • The cooker must be installed by a competent and Gas Safe Registered Engineer (in the UK) and in compliance with local safety and building regulation safety standards. This cooker can be installed next to a cabinet. • If the cooker is installed adjacent to furniture which is higher than the gas hob, a gap of at least 150 mm must be left between the side of the cooker and the furniture unless non-combustible materials are used which then allows this distance to be reduced to 20 mm. -
Page 20: Adjusting The Feet
Adjusting the Feet Using the fitted adjustable feet is MANDATORY. For safety reasons and to ensure adequate ventilation, the cooker chassis MUST NOT sit directly on the floor, a plinth, or other support surface. Level the cooker by screwing the bottom of the feet in or out, as shown. Moving the Cooker • Two people must always raise the cooker, as shown, to prevent damaging the adjustable feet. -
Page 21: Ventilation Requirements
Ventilation Requirements • The appliance should be installed in a room or space with an air supply in accordance with the latest edition of BS5440-2. • For rooms with a volume of less than 5m — permanent ventilation of 100cm free area will be required. -
Page 22: Gas Connection
Gas Connection The installation of the cooker to Natural Gas or LP Gas must be carried out by a Gas Safe registered engineer. Installers must take account of the provisions of the relevant British Standards Code of Practice, the Gas Safety Regulations and the Building Regulations. -
Page 23: To Connect The Gas Supply
To Connect the Gas Supply: Connect the gas supply to the right or left gas inlet at the rear of the cooker. The gas hose must hang in a "U" behind the cooker. Close the unused end inlet pipe with a plug. Undertake a full gas tightness test. -
Page 24: Replacement Of Burner Injectors
Replacement of Burner Injectors Select the injectors to be replaced according to the “Table for the choice of the injectors”. To Replace the Hob Injectors Remove the pan supports and burners from the cooktop. Using a wrench substitute the nozzle injectors with those most suitable for the kind of gas which is being used. -
Page 25: Removal Of The Grill Burner Injector
Remove the oven burner screw as shown. The oven burner shall be removed in the direction of the arrow carefully as shown. During disassembly of the oven burner, the thermocouple and spark igniter connection sheet assembly must not be changed since it will cause the oven not to work correctly. -
Page 26: Lubrication Of The Gas Taps
Table for the Choice of the Injectors Natural Gas Burner Injector Values G 30-30 G 20-20 According to the Gas Type mBar mBar Injector 0.850 1.150 m3/h Large Burner (Fast) Gas Flow 0.083 0.253 gr/h Power 3.000 2.770 Injector 0.650 0.970 m3/h Standard Burner... -
Page 27: Safety Warnings
Safety Warnings Installation Operation and Maintenance • This appliance should be installed in accordance • This appliance is NOT intended for use by persons with the regulations in force and only used in a (including children) with reduced physical, sensory well ventilated space. - Page 28 If you require a replacement for any of the items listed below, please quote their corresponding part numbers: Replacement Part Part Number Grill Deflector Y10-05-40-0008 Oven Shelf 20-25-11-001 Grill Rack 20-25-11-004 Grill Tray Y10-05-40-0009 Grill Pan Handle 20-25-90-006 Pan Supports (Left/Right) 20-25-22-003 Stability Bracket Y10-01-40-0018...
Need help?
Do you have a question about the CFSG10WH and is the answer not in the manual?
Questions and answers