
Related Manuals for Currys Essentials CFSE10WH


Summary of Contents for Currys Essentials CFSE10WH
- Page 1 FREE ST AND IN G E LECTR IC COO KER I N S T RUC T I O N / I N ST A L L AT I O N M ANUAL C F SE 1 0WH C F SE 10SV CFSE10WH_SV_final110426_flo.indd 1 26/04/2011 7:35 PM...
- Page 2 CFSE10WH_SV_final110426_flo.indd 2 26/04/2011 7:35 PM...
-
Page 3: Table Of Contents
Contents Unpacking ............................. 4 Product Overview ......................... 5 Front View ...................................5 Top View ..................................5 Control Panel ................................5 Before Using Your Cooker ......................5 First Time Use of the Hotplates ....................6 Choosing the Right Cookware ..................... 6 Using Your Hotplates ........................6 First Time Use of the Oven ...................... -
Page 4: Unpacking
Thank you for purchasing your new Currys Essentials Freestanding Electric Cooker. You must read this manual in order to fully understand how to operate it correctly. This cooker must be installed by a competent engineer. Please allow the installer to view the installation section of this manual. -
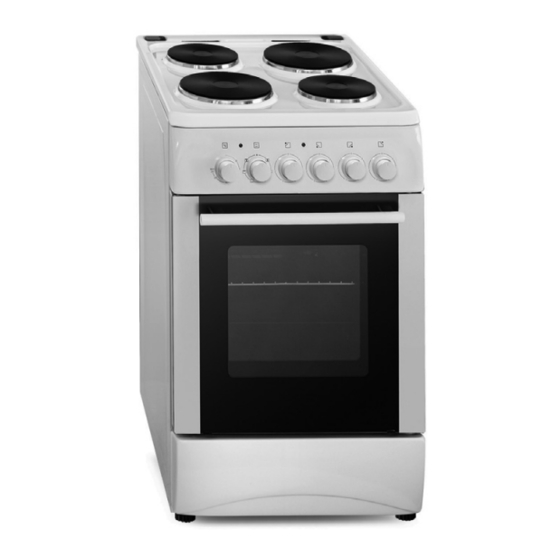
Page 5: Product Overview
Product Overview Front View Top View ˚C Control Panel Top Panel Large Hotplate 1500W Oven Handle Side Panel Small Hotplate 1000W Oven Door Control Panel ˚C Thermostat Control Oven Indicator Lamp Oven Function Selector Control Hotplate Warning Lamp Hotplate Controls Before Using Your Cooker Before using your new cooker, please: • Make sure all the controls are turned off. -
Page 6: First Time Use Of The Hotplates
First Time Use of the Hotplates Operate your electric hotplates at level 6 for 5 minutes. This will remove any manufacturing residues. The chrome rings may discolour, this is normal and not a fault with the cooker. Choosing the Right Cookware Do not use cookware with jagged edges or a curved base. -
Page 7: Using The Oven
Using the Oven To get the best results, the smallest distance allowed between the food and the upper heating element is 30 mm. Guide 1 On the wall of the inner cavity there are 4 Guide 2 different shelf guide slots. You can place the shelf at different heights to achieve the best Guide 3 cooking performance depending on the heat... -
Page 8: Thermostat Control
Thermostat Control The temperature can be set from 50°C - 240°C. Select the desired temperature, as follows: ˚C To keep food warm 50 - 100°C position For traditional oven cooking 50 - 240°C position For all types of grilling 240°C position Bread may catch fire if the toasting time is too long. -
Page 9: Using The Grill
Using the Grill When using the Grill, the Grill Deflector must be used. The Grill Deflector is designed to protect the control panel controls and buttons when using the oven in Grill mode and to keep the door open the specified distance. • Please use this Grill Deflector in order to avoid heat damaging the control panel when the oven is in Grill mode. -
Page 10: General Advice
General Advice Before you start cleaning your cooker, please: • Read the cleaning instructions and the ‘Safety Warnings’ sections. • Turn the cooker off at the wall. • Allow the cooker to cool fully before cleaning. • Do not use a steam cleaner. • Do not keep flammable substances in, on or near the cooker. -
Page 11: Removing The Oven Door
Removing the Oven Door The oven door can easily be removed as follows: Open the door completely. The swivel retainers of the right hand and left hand hinges are hooked onto the metal bar above them. Lift the retainers as shown. Lift the oven door slightly. -
Page 12: Hints And Tips
Hints and Tips Problem Possible causes What to do The cooker cannot be No power. Make sure the cooker is turned on. connected to the power and that the mains socket is switched on. Check whether there is a power outage in your home or area. -
Page 13: Specification
Specification Model CFSE10WH / CFSE10SV Overall Dimension (WxDxH) 495(W) x 640(D) x 900(H) mm Usable Volume 45 Litre Oven Lamp 15 W Thermostat 50 - 250°C Bottom Heating Element 1000 W Top Heating Element 800 W Grill Heating Element 1500 W... -
Page 14: Installation
Installation • The cooker must be installed by a competent person, if in doubt consult a qualified technician, and in compliance with local electrical, safety and building regulation standards. This cooker can be installed next to a cabinet. • If the cooker is installed adjacent to furniture which is higher than the hob, a gap of at least 150 mm must be left between the side of the cooker and the furniture unless non-combustible materials are used which then allows this distance to be reduced to 20 mm. -
Page 15: Adjusting The Feet
Adjusting the Feet Using the fitted adjustable feet is MANDATORY. For safety reasons and to ensure adequate ventilation, the cooker chassis MUST NOT sit directly on the floor, a plinth, or other support surface. Level the cooker by screwing the bottom of the feet in or out, as shown. Moving the Cooker • Two people must always raise the cooker, as shown, to prevent damaging the adjustable feet. -
Page 16: Electrical Connection
Electrical Connection Electric cookers come without a power supply cable. The cooker is designed to operate on an electricity supply which conforms to the electrical data shown on the Rating Plate. The cooker can be connected to the mains only after you complete the connection at the junction box. -
Page 17: Safety Warnings
Safety Warnings Installation • If your supply cable gets damaged, it should be replaced by an authorized service agent or qualified • This appliance must be earthed. electrician in order to avoid danger or electric shock. • It is recommended that this appliance is installed by • The oven must be used in a well ventilated location a qualified electrical engineer. - Page 18 CFSE10WH_SV_final110426_flo.indd 18 26/04/2011 7:35 PM...
- Page 19 CFSE10WH_SV_final110426_flo.indd 19 26/04/2011 7:35 PM...
- Page 20 If you require a replacement for any of the items listed below, please quote their corresponding part numbers: Replacement Part Part Number Grill Deflector Y10-05-40-0008 Oven Shelf 20-25-11-001 Grill Rack 20-25-11-004 Grill Tray Y10-05-40-0009 Grill Pan Handle 20-25-90-006 Stability Bracket Y10-01-40-0018 Visit Partmaster.co.uk today for the easiest way to buy electrical spares and accessories.
Need help?
Do you have a question about the CFSE10WH and is the answer not in the manual?
Questions and answers