Webasto Thermo Top C Installation Instructions Manual
Peugeot 307; peugeot 307 cc; peugeot 307 sw / break
Hide thumbs
Also See for Thermo Top C:
- Installation instructions manual (47 pages) ,
- Operating instructions manual (40 pages) ,
- Operating and installation instructions (39 pages)
Table of Contents
Advertisement
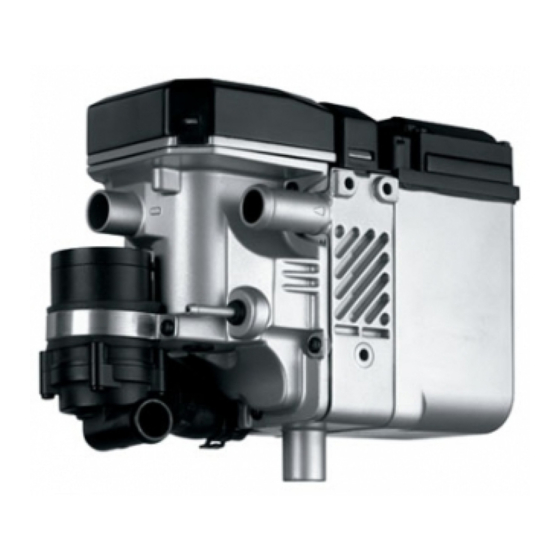
Water heater unit
Thermo Top C Additional heating
Thermo Top E Additional Heating
4
1
5
2
3
Legend for figure 1:
1 Thermo Top C, E – B/D Heater Unit
2 Blade-Type Fuse Holder and Blower Relay
3 Time switch
4 Exhaust silencer
WARNING!
Hazard warning:
Incorrect installation or repair of Webasto heating and cooling systems may cause a fire or result
in the emission of carbon monoxide, which can be fatal. Serious or fatal injuries can be caused
as a result.
Specialist company training, technical documentation, specialized tools and equipment are
required to install and repair Webasto heating and cooling systems.
NEVER attempt to install or repair Webasto heating or cooling systems if you have not
successfully completed the company training and thereby acquired the required technical skills
or if you do not have access to the required technical documentation, tools and equipment
needed to carry out correct installation and repairs.
ALWAYS follow all Webasto installation and repair instructions and observe all warning
instructions.
Webasto does not accept any liability for defects and damage that are attributable to an
installation by untrained staff.
Ident. no. 13 006 80EEN
e1
00 0002
e1
00 0003
Installation instructions
Peugeot 307
Peugeot 307 CC
Peugeot 307 SW / Break
6
Gasoline and diesel
For left-hand drive vehicles only
For validity, see page 2
1
€10 fee
© Webasto AG
Advertisement
Table of Contents

Subscribe to Our Youtube Channel
Related Manuals for Webasto Thermo Top C


Summary of Contents for Webasto Thermo Top C
-
Page 1: Installation Instructions
6 Metering pump WARNING! Hazard warning: Incorrect installation or repair of Webasto heating and cooling systems may cause a fire or result in the emission of carbon monoxide, which can be fatal. Serious or fatal injuries can be caused as a result. - Page 2 Thermo Top C, E Peugeot 307 Table of Contents Peugeot 307 Fuel connection Peugeot 307 SW / Break Exhaust System Validity Combustion air intake pipe Heater Unit / Installation Kit Final work Foreword Operating instructions for the end customer Special Tools...
- Page 3 Peugeot 307 Thermo Top C, E Manufacturer Model Type EG-BE no. Peugeot 3*RHY e2*98/14*0245*.. Engine type Engine model Power in kW Engine capacity in cm Diesel 1997 Manufacturer Model Type EG-BE no. Peugeot 3*8HZ e2*98/14*0251*.. Engine type Engine model Power in kW...
-
Page 4: Special Tools
However, where this is the case the stipulations in the "installation instructions" and "operating and maintenance instructions" for the Thermo Top C should be observed. The corresponding rules of technology and any information from the vehicle manufacturer should be observed during the installation work. - Page 5 Peugeot 307 Thermo Top C, E Preliminary work - Remove years that do not apply from the duplicate label. - Attach the duplicate label (type label) in the appropriate location. Engine Compartment WARNING: Disconnect the battery. - Remove the batters and the bracket.
- Page 6 Thermo Top C, E Peugeot 307 Cable harness assembly Pre-assembly for automatic air conditioning - Cut two a 300 mm section and two 100 mm sections each from the enclosed brown 2.5 mm wire - Uncrimp the brown wire (3) from the K3 blower relay (4) terminal 85.
- Page 7 Peugeot 307 Thermo Top C, E Blower control For vehicles with automatic air conditioning Webasto Peugeot 307 Pin 4 rt/ws ST 01 ST 04 ST 03 K3.1 ST 02 Gebläsemotor ST 01 Steckverbindung 6-polig Gebläseregler ST 04 Stecker 16VGR im...
- Page 8 Thermo Top C, E Peugeot 307 Installation with automatic air conditioning The installation location is the fuse and relay box to the left of the air filter. NOTE: Pay attention to the free movement of the housing cover. Remove any reinforcements in the relay box near the fastening points for the blower relay and the fuse holder.
- Page 9 Peugeot 307 Thermo Top C, E Preassembly and installation with manual air conditioning NOTE: Pay attention to the free movement of the housing cover. Remove any reinforcements in the relay box near the fastening points for the blower relay and the fuse holder.
- Page 10 Thermo Top C, E Peugeot 307 Installing the Cable Harnesses For all vehicles - Run the heater unit cable harness along the original vehicle cable harness / battery positive terminal from the fuse and relay box to the right and then behind the original vehicle cooler to the heater unit installation location.
- Page 11 Peugeot 307 Thermo Top C, E Blower control Automatic air conditioning NOTE: The positive triggering of the blower engine is between the six-pin plug connection (2) pin 3 and the two pin connector (1) pin 2 on the blower motor.
- Page 12 Thermo Top C, E Peugeot 307 Manual air conditioning Re-connect the connections with the enclosed round connectors in accordance with circuit diagram Figure 15 The air conditioning control is triggered at pin 4 on the 5 pin connector in the air conditioning control.
- Page 13 Peugeot 307 Thermo Top C, E Time Switch and Summer / winter switch option CAUTION When installing the time switch, do not press on the LCD display. NOTE The installation location shown for the time switch (1) and the summer / winter switch (2) is a recommendation.
- Page 14 Thermo Top C, E Peugeot 307 Remote start option NOTE: Please observe the general installation instructions for the Telestart remote start option. - Fasten the bracket (2) with bolt M5x12, washer and flanged nut in previously drilled hole. - Slide the receiver (1) on the bracket (2)
- Page 15 Peugeot 307 Thermo Top C, E Thermo Call TC1.1 option NOTE: Please observe the general installation instructions for the TC1.1 option. - Position the receiver (1) on the fuse holder. - Position the receiver (1) with the cable clip (2) on the fuse holder.
- Page 16 Thermo Top C, E Peugeot 307 Installing the Heater Unit Preparing the Installation Location For vehicles with wind deflector - Remove wind deflector (1) and dispose. For all vehicles - Transfer the hole image (1) to the cross strut as shown in the figure.
- Page 17 Peugeot 307 Thermo Top C, E Pre-assemble the Heater Unit Section (Will be used again) Cut the supplied water hose into a section, as shown in the figure: 1 x 80 mm + 90° bend (1) (from the heater unit water outlet to the 1,200mm long water hose).
- Page 18 Thermo Top C, E Peugeot 307 Installing the heater unit - Assemble the bracket with heater unit on the preassembled M6x20 bolt and the original vehicle bolt (31/2) as shown in figure 30 and figure 31. NOTE: Insert a 10mm spacer washer between the bracket and the crossarm at position (31/2;...
- Page 19 Peugeot 307 Thermo Top C, E Connection to the water circuit. NOTE: Tighten all hose clamps to 2.0 + 0.5 Nm. Any fuel running off should be collected using an appropriate container! Install hoses so that they are kink-free! The following sections describe the installation of the heater unit “inline”...
- Page 20 Thermo Top C, E Peugeot 307 NFU 1.6 l gasolinewith automatic drive Section - Cut the supplied water hose into three sections, as shown: 1 x 80 mm + 90° bend (1) (preassembled on the heater unit) 1 x 660 mm straight (2)
- Page 21 Peugeot 307 Thermo Top C, E RFN 2.0 l gasoline Section - Cut the supplied water hose into two sections, as shown: 1 x 80 mm + 90° bend (1) (preassembled on the heater unit) 1 x 700 mm straight (2)
- Page 22 Thermo Top C, E Peugeot 307 8 Hz 1.4 l diesel and 9 Hz 1.6 l diesel Section - Cut the supplied water hose into two sections, as shown: 1 x 80 mm + 90° bend (1) (preassembled on the heater unit) 1 x 1,200 mm + 90°...
- Page 23 Peugeot 307 Thermo Top C, E RHY 2.0 l diesel and RHS 2.0 FAP diesel Section - Cut the supplied water hose into two sections, as shown: 1 x 80 mm + 90° bend (1) (preassembled on the heater unit) 1 x 1,200 mm + 90°...
- Page 24 Thermo Top C, E Peugeot 307 RHR 2.0 l HDI Section - Cut the supplied water hose into three sections, as shown: 1 x 80 mm + 90° bend (1) (preassembled on the heater unit) 1 x 1,200 mm + 90° bend (3) (from the 80mm long water hose (1) to the 440mm long water hose (2)).
- Page 25 Peugeot 307 Thermo Top C, E RFK 2.0 l gasoline Section - Cut the supplied water hose into three sections, as shown: 1 x 80 mm + 90° bend (1) (preassembled on the heater unit) 1 x 880 mm + 90° bend (3) (from the heater unit water inlet to the 920mm long water hose (47/1)).
-
Page 26: Water Connection
Thermo Top C, E Peugeot 307 Water connection All vehicles, except RFK 2.0l gasoline. Running the hose from the heater unit in the engine compartment NOTE: Position hose clamps so that no other hose can be damaged! - Loosely pre-assemble the rubberized 34mm tube... - Page 27 Peugeot 307 Thermo Top C, E - Insert the M6x20 screw (4) according to the figure with the body washer in the oblong hole on the bend fastening strap (5). - Loosely pre-assemble the rubberized 34mm tube clamps (1,3) according to the figure with the M6x20 bolt and M6 flanged nut.
- Page 28 Thermo Top C, E Peugeot 307 - Run the 1,150mm long water hose (56/1,3; 53/2 or 54/3 and 55/3) on the traverse to the right. - Run the 1,150mm long water hose (1,3) through the lower rubberized tube clamp to position (2) as shown in the figure.
- Page 29 Peugeot 307 Thermo Top C, E KFW 1.4 l gasoline and NFU 1.6 l gasoline with shift gears NOTE: Position hose clamps so that no other hose can be damaged! - Drill enclosed angle bracket (1) open to Ø 8.5mm on the short leg.
- Page 30 Thermo Top C, E Peugeot 307 - Run the 400mm long water hoses (2) through the left rubberized tube clamp (1) as shown in the figure. - Fasten the 400mm long water hose (2) on the connecting pipe in the 1150 mm long water hose (3)
- Page 31 Peugeot 307 Thermo Top C, E NFU 1.6 l gasoline with automatic drive NOTE: Insert two washers between the original vehicle hose mounting and the bracket (1) to compensate for the beads. - Secure the enclosed bracket (1) to the engine block with the original vehicle bolt (2), insert two washers between the hose bracket and the bracket.
- Page 32 Thermo Top C, E Peugeot 307 - Fasten the 660mm long water hose (1) on the connecting pipe (68/1) to the original vehicle hose section (2) and secure with hose clamps. - Slide the black rubber profile (3) onto the water hose (4) and position according to the figure.
- Page 33 Peugeot 307 Thermo Top C, E - Insert the enclosed spacer bracket (1) according to the figure. - Insert the enclosed spacer bracket (1) according to the figure. - Insert the enclosed spacer bracket (1) according to the figure. - Position and align all rubberised profiles as shown in the figures 69, 75 and 76.
- Page 34 Thermo Top C, E Peugeot 307 RFN 2.0 l gasoline NOTE: Position hose clamps so that no other hose can be damaged! - Fasten the enclosed bracket (2) to the existing stay bolts (1) on the gear according toe figure.
- Page 35 Peugeot 307 Thermo Top C, E - Run the 580mm long water hoses (83/2) as shown in figure 83. - Run the 580mm long water hoses (3) through the left rubberized tube clamp (2) as shown in the figure. - Fasten the 580mm long water hose (3) on the...
- Page 36 Thermo Top C, E Peugeot 307 8 Hz 1.4 l diesel and 9 Hz 1.6 l diesel NOTE: Position hose clamps so that no other hose can be damaged! - Fasten the enclosed bracket (2) to the existing stay bolts (1) on the gear according toe figure.
- Page 37 Peugeot 307 Thermo Top C, E - Slide the black rubber profile (1) on the original vehicle hose section (2). - Slide the 350mm long water hose (3) onto the connecting pipe in the original vehicle hose section (2) from the heat exchanger water inlet, align according to the figure and fasten with hose clamp.
- Page 38 Thermo Top C, E Peugeot 307 RHY 2.0 l diesel and RHS 2.0 FAP diesel NOTE: Position hose clamps so that no other hose can be damaged! - Fasten the enclosed bracket (2) to the existing stay bolts (1) on the gear according toe figure.
- Page 39 Peugeot 307 Thermo Top C, E - Run the 480mm long water hoses (3) through the right rubberized tube clamp (2) as shown in the figure. - Fasten the 480mm long water hose (3) on the connecting pipe in the 1,200mm long water hose (1)
- Page 40 Thermo Top C, E Peugeot 307 RHR 2.0 l HDI NOTE: Position hose clamps so that no other hose can be damaged! - Fasten the enclosed bracket (2) to the existing bolt (1) on the gear according toe figure. - Loosely pre-assemble the two rubberized 29mm tube clamps (3,4) onto the bracket according to the figure with the M6x20 bolt and M6 flanged nut.
- Page 41 Peugeot 307 Thermo Top C, E - Slide the preassembled water hose (2) on the engine water outlet and place as shown in the figure. - Position the black rubber profile (4) as shown in the figure and fasten with cable clips.
- Page 42 Thermo Top C, E Peugeot 307 RFK 2.0 l gasoline NOTE: Position hose clamps so that no other hose can be damaged! - Loosely pre-assemble the rubberized 29mm tube clamps (4.5) with the 15 mm spacer sleeve (2), M6x30 bolt, body washer and flanged nut on the hole to the left of the cooler as shown in the figure.
- Page 43 Peugeot 307 Thermo Top C, E - Drill a Ø 6.5mm bore hole at position (1) in the cross- piece according to the figure. - Insert the preassembled fastening strap (2) into the 150mm hole with the bolt (109/4) according to the figure and fasten to the cross-piece with the body washer and the flanged nut.
- Page 44 Thermo Top C, E Peugeot 307 - Clamp the vehicle's own water hose (1,2,3) from the engine water outlet to the heat exchanger water inlet with hose clamps. - Separate the original vehicle water hose at the mark according to the figure.
- Page 45 Peugeot 307 Thermo Top C, E - Run the 1,000mm water hose (1) and 920 mm long water hose (2) in the engine compartment as shown in the figure. - Connect the 920mm long water hose (4) and 880 mm long water hose (5) with the 20/20 connecting pipe and hose clamps.
-
Page 46: Fuel Connection
Thermo Top C, E Peugeot 307 Fuel connection WARNING: Open the vehicle's tank-cap lock, ventilate the tank and then re-close the tank-cap lock. Catch any fuel running off with an appropriate container. Install the fuel line so that it is protected from impact by rocks! Fit the fuel line and cable harness with edge protectors around sharp edges. - Page 47 Peugeot 307 Thermo Top C, E Fuel take-off for gasoline engine The fuel is extracted with the fuel extractor from the tank mounting. - Remove tank mounting according to manufacturer's instructions - Transfer the hole image (1) with the enclosed body washer (2) to the tank mounting according to the figure.
- Page 48 Thermo Top C, E Peugeot 307 Fuel take-off for diesel engine The fuel is extracted with the fuel extractor from the tank mounting. - Remove tank mounting according to manufacturer's instructions - Transfer the hole image (1) with the enclosed body washer (2) to the tank mounting according to the figure.
- Page 49 Peugeot 307 Thermo Top C, E - Run the Mecanyl fuel pipe (131/1; 132/1) to the metering pump (3) and cut into sections. - Fasten the Mecanyl fuel line (1) to the suction side of the metering pump (3) with a hose section (2) and hose clamps.
-
Page 50: Final Work
(Tectyl ML, Order No. 111329). - Start engine, bleed water circuit according to the repair instructions, fill up with coolant. - Switch on the Webasto heating, see "Operating and Maintenance Instructions" NOTE: Fill out the installation confirmation on the back side of... - Page 51 Peugeot 307 Thermo Top C, E Operating instructions for the end customer NOTE: Please separate and add to the vehicle operating instructions! For vehicles with automatic air conditioning Before parking the vehicle, please make the following settings: - Set the temperature (2,3) to max/warm.
- Page 52 Thermo Top C, E Peugeot 307 Webasto AG Post box 80 - D-82132 Stockdorf - Hotline 0 18 05 / 93 22 78 Hotfax (0395) 55 92-353 - http://www.webasto.de Printed in Germany Printed by: Steffen...
Need help?
Do you have a question about the Thermo Top C and is the answer not in the manual?
Questions and answers