Table of Contents
Advertisement
Quick Links
Download this manual
See also:
Instruction Manual
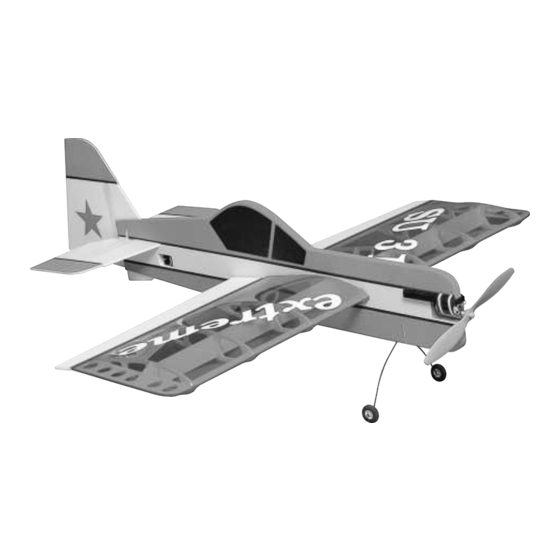
Wingspan: 39-3/8 in [1000mm]
Wing Area: 555 sq in [35.8 dm
Weight: 24-30 oz [680-850 g]
Wing Loading: 6.22-7.78 oz/sq ft [19-23.7 g/dm
Length: 46-3/4 in [1188mm]
Radio: 4-channel with four micro servos
Recommended Motor: Kontronik Fun 400-36 with 4.2:1 gear box
Recommended Prop: APC 11x4.7SF
Great Planes
®
Model Manufacturing Co. guarantees this kit to be free from defects in both material and workmanship at the date of purchase. This warranty does not cover
any component parts damaged by use or modification. In no case shall Great Planes' liability exceed the original cost of the purchased kit. Further, Great Planes
reserves the right to change or modify this warranty without notice.
In that Great Planes has no control over the final assembly or material used for final assembly, no liability shall be assumed nor accepted for any damage resulting from the
use by the user of the final user-assembled product. By the act of using the user-assembled product, the user accepts all resulting liability.
If the buyer is not prepared to accept the liability associated with the use of this product, the buyer is advised to return this kit immediately in new and unused condition to
the place of purchase.
To make a warranty claim send the defective part or item to Hobby Services at the address below:
Include a letter stating your name, return shipping address, as much contact information as possible (daytime telephone number, fax number, e-mail address), a
detailed description of the problem and a photocopy of the purchase receipt. Upon receipt of the package the problem will be evaluated as quickly as possible.
READ THROUGH THIS MANUAL BEFORE STARTING
CONSTRUCTION.
WARNINGS AND INSTRUCTIONS CONCERNING
THE ASSEMBLY AND USE OF THIS MODEL.
© Copyright 2004
INSTRUCTION MANUAL
2
]
2
]
IT
CONTAINS
IMPORTANT
WARRANTY
Hobby Services
3002 N. Apollo Dr. Suite 1
Champaign IL 61822
USA
Champaign, Illinois
(217) 398-8970, Ext 5
airsupport@greatplanes.com
GPMZ0206 for GPMA1185 V1.0
Advertisement
Table of Contents

Related Manuals for GREAT PLANES Sukhoi SU-31


Summary of Contents for GREAT PLANES Sukhoi SU-31
-
Page 1: Instruction Manual
In that Great Planes has no control over the final assembly or material used for final assembly, no liability shall be assumed nor accepted for any damage resulting from the use by the user of the final user-assembled product. -
Page 2: Table Of Contents
Great Planes Sukhoi SU-31 3D ARF visit the Great Planes web site at www.greatplanes.com. Open the “Airplanes” link, INTRODUCTION ..............2 then select the Sukhoi SU-31 3D Park Flyer ARF. If there is SAFETY PRECAUTIONS ..........2 new technical information or changes to this model, a “tech DECISIONS YOU MUST MAKE ........3... -
Page 3: Decisions You Must Make
Order numbers (in The Sukhoi SU-31 ARF will fly well on a variety of motors, parentheses) are provided for your convenience. -
Page 4: Battery Recommendations
An 8-cell (9.6 volt) 2000 mAh NiMH battery pack is Here is a list of optional tools mentioned in the manual that recommended (GPMP0352). This battery gives great will help you build the Sukhoi SU-31 ARF. performance and fits well in the battery compartment. Great Planes CG Machine ™... -
Page 5: Kit Contents
If any parts are missing or are not of acceptable quality, or if you need assistance with assembly, contact Great Planes Product Support. When reporting defective or missing parts, use the part names exactly as they are written in the Kit Contents list on this page. -
Page 6: Building Instructions
Install the Fuselage Servos BUILDING INSTRUCTIONS Install the Landing Gear 1. Install the rudder and elevator servos into the fuselage mount using the grommets, eyelets and screws provided with your servos. Enlarge the mounting area as needed to fit 1. Mount the wheels to the landing gear wire, holding your servos. -
Page 7: Install The Receiver And Battery
Install the Receiver and Battery 2. Drill a 3rd hold to for a zip tie. 1. Plug the elevator and rudder servos into the receiver.You will also probably need a 6" [152mm] servo extension wire for the speed control. Install the receiver in the receiver compartment with a short piece of the supplied hook and loop mounting tape. -
Page 8: Install The Tail Surfaces
hardwood strip at the front of the fuselage. The motor shown Install the Tail Surfaces is a MEGA Can 16/15/3 brushless. Note: The tie-wraps may not hold the motor tightly enough to prevent it from twisting slightly at full power with the prop installed. If this happens, put a small drop of CA on the rear of the motor where it touches the fuselage. - Page 9 5. Glue the stab into place with 6-minute epoxy, using as little epoxy as possible. Caution: Do not use alcohol to clean up any excess epoxy as it could remove and/or streak the paint on the fuselage. Wipe up any excess epoxy only with paper towels. 3.
-
Page 10: Connect The Control Linkages
Caution: In the following steps you will be using screw- lock connectors to connect the pushrods from the control horns to the servo arms. Before installing the Push-On Retainer Ring on the screw-lock connector, you should first turn on your radio system and check which hole the screw-lock connector should be installed in to get the desired control throw. -
Page 11: Install The Wing
3. Remove the servo arm from the servo. Insert the elevator pushrod into the elevator control horn. Re-install the servo arm and screw-lock connector on the servo. Do not install a push-on retainer ring on the screw-lock connector. Use your radio system and determine which hole 2. -
Page 12: Get The Model Ready To Fly
the epoxy, slide the wing about 1/2" [12.7mm] so that it is slightly off center. Spread some epoxy on the wood of the exposed wing rib, on the top and bottom of the rib. Then, slide the wing so that it is 1/2" [12.7mm] off center in the other direction and spread some epoxy on the other exposed rib. -
Page 13: Set The Control Throws
3" [76mm] left IMPORTANT: The Sukhoi SU-31 3D Park Flyer ARF has 2. Place the model on a Great Planes CG Machine, or lift been extensively flown and tested to arrive at the throws it at the balance point you marked. -
Page 14: Balance The Model Laterally
We use a Top Flite Precision Magnetic Prop Balancer ™ sleeves, ties, scarfs, long hair or loose objects such as (TOPQ5700) in the workshop and keep a Great Planes pencils or screwdrivers that may fall out of shirt or jacket Fingertip Prop Balancer (GPMQ5000) in our flight box. -
Page 15: Motor Safety Precautions
The motor gets hot! Do not touch it during or right CHECK LIST after operation. The electric motor and battery used in your Sukhoi SU-31 During the last few moments of preparation your mind ARF are very powerful and the spinning propeller has a may be elsewhere anticipating the excitement of the first lot of momentum;... -
Page 16: Takeoff
While full throttle is usually desirable for takeoff, most models fly more smoothly at reduced speeds. Take it easy with the Sukhoi SU-31 ARF for the first flight, gradually getting acquainted with it as you gain confidence. Adjust the trims to maintain straight and level flight. After...
Need help?
Do you have a question about the Sukhoi SU-31 and is the answer not in the manual?
Questions and answers