Table of Contents
Advertisement
Quick Links
ORDERING REPLACEMENT PARTS
To order replacement parts, contact the ICON Health & Fitness Ltd. office, or write:
ICON Health & Fitness Ltd.
Greenwich House
223 North Street
Sheepscar
Leeds LS7 2AA
West Yorkshire
Tel: Country Code:
0345-089009
Fax: 0113-2411120
To help us assist you, please be prepared to give the following information:
¥ The NAME of the product (WEEMBE73500)
¥ The MODEL NUMBER of the product (WEIDER
¥ The PART NUMBER of the part (see the PART LIST and EXPLODED DRAWING on pages 18 and 19)
¥ The DESCRIPTION of the part (see the PART LIST and EXPLODED DRAWING on pages 18 and 19).
WEIDER is a registered trademark of ICON Health & Fitness, Inc.
Part No. 156991 R0800A
¨
PRO 355 weight bench)
Printed in China © 2000 ICON Health & Fitness, Inc.
Model No. WEEMBE73500
Serial No.
Write the serial number in the space
above for reference.
Serial Number Decal
QUESTIONS?
As a manufacturer, we are
committed to providing complete
customer satisfaction. If you
have questions, or if there are
missing parts, we will guarantee
complete satis-faction through
our Customer Service
Department.
Please CALL:
0345-089009
Or WRITE:
ICON Fitness Lifestyle Ltd.
Greenwich House
223 North Street
Sheepscar
Leeds LS7 2AA
West Yorkshire
CAUTION
Read all precautions and instruc-
tions in this manual before using
this equipment. Save this manual
for future reference.
USER'S MANUAL
Visit our website at
www.weiderfitness.com
new products, prizes,
fitness tips, and much more!
Advertisement
Table of Contents

Related Manuals for WeiderPro 355


Summary of Contents for WeiderPro 355
-
Page 1: Ordering Replacement Parts
Serial Number Decal ¥ The MODEL NUMBER of the product (WEIDER ¨ PRO 355 weight bench) ¥ The PART NUMBER of the part (see the PART LIST and EXPLODED DRAWING on pages 18 and 19) QUESTIONS? ¥ The DESCRIPTION of the part (see the PART LIST and EXPLODED DRAWING on pages 18 and 19). -
Page 2: Table Of Contents
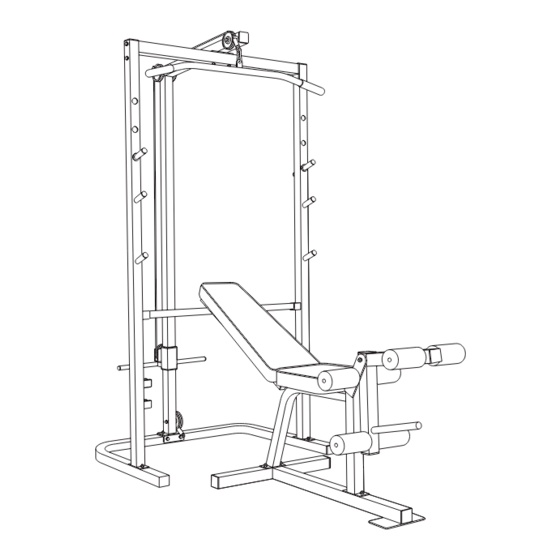
TABLE OF CONTENTS EXPLODED DRAWINGÑModel No. WEEMBE73500 R0800A WARNING DECAL PLACEMENT ............2 IMPORTANT PRECAUTIONS . -
Page 3: Important Precautions
PART LISTÑModel No. WEEMBE73500 R0800A IMPORTANT PRECAUTIONS Key No. Qty. Description Key No. Qty. Description WARNING: To reduce the risk of serious injury, read the following important precautions M10 x 72mm Bolt ÒUÓ Bracket before using the weight bench. M10 Nylon Locknut Adjustment Tube M8 x 60mm Carriage Bolt Leg Lever... -
Page 4: Before You Begin
WEEMBE73500. The serial number can be found on a muscle size and strength, or a healthier cardiovascular decal attached to the weight bench (see the front system, the PRO 355 weight bench will help you to cover of this manual). achieve the specific results you want. -
Page 5: Part Identification Chart
MUSCLE CHART PART IDENTIFICATION CHART This chart is provided to help you identify the small parts used in assembly. The number in parenthesis below each part refers to the key number of the part. The second number refers to the quantity needed for assembly. Important: Some parts may have been pre-assembled for shipping purposes. -
Page 6: Assembly
doing a toning workout, and 30 seconds after each set STAYING MOTIVATED ASSEMBLY if you are doing a weight loss workout. Plan to spend the first couple of weeks familiarising yourself with the For motivation, keep a record of each workout. The equipment and learning the proper form for each exer- chart on page 17 of this manual can be photocopied ¥... -
Page 7: Exercise Guidelines
2. Press a 2Ó Square Inner Cap (46) into the Left EXERCISE GUIDELINES Upright (18). Press four 1Ó Round Inner Caps (39) into the Left Upright. THE FOUR BASIC TYPES OF WORKOUTS PERSONALISING YOUR EXERCISE PROGRAM Slide the Left Upright (18) onto the indicated M8 x We have not specified an exact length of time for each ¥... - Page 8 5. Slide the Weight Carriage (52) onto the Main ATTACHING THE LAT BAR OR NYLON STRAP TO Upright (42). The bracket must be on the side THE HIGH PULLEY STATION shown. Attach the Lat Bar (36) to the Cable (51) with a Cable Press a 2Ó...
- Page 9 9. Route the Cable (51) around the indicated Pulley ADJUSTING THE WEIGHT BENCH (24). Tighten the M10 Nylon Locknut (2) and the M10 x 120mm Bolt (not shown). Do not overtighten the Nylon Locknut. Be sure that both Cable The weight bench is designed to be used with your own weight set (not included). The steps below explain how Traps (23) are turned as shown and that the the weight bench can be adjusted.
-
Page 10: Shown. 8
13. Press three 2Ó Square Inner Caps (46) into the Leg 17. Insert the M6 x 60mm Carriage Bolt (14) into the Lever (32). Press a 1Ó Round Inner Cap (39) into centre hole in the Seat Bracket (50). Attach the the Leg Lever.
Need help?
Do you have a question about the 355 and is the answer not in the manual?
Questions and answers