
Related Manuals for AGA APRO48AGSS


Summary of Contents for AGA APRO48AGSS
- Page 1 APRO48AGSS 48” All Gas User Guide Installation and Service Instructions U110588 - 01...
- Page 2 WARNING! If the information in this manual is not followed exactly, a fire or explosion may result causing property damage, personal injury or death. Do not store or use gasoline or other flammable vapors and liquids in the vicinity of this or any other appliance. WHAT TO DO IF YOU SMELL GAS Do not try to light any appliance.
-
Page 3: Table Of Contents
Contents 1. Before You Start... Troubleshooting In Case of Fire Installation To Prevent Fire or Smoke Damage Regulations Wear Suitable Clothing For Your Safety Use Only Dry Potholders or Oven Gloves Installation Safety Instructions Important Safety Notice and Warning Converting to Propane Gas Proper Installation Location of the Range Common Odors... -
Page 5: Before You Start
1. Before You Start... Read all instructions before using this appliance. Save NEVER leave any items on the range cooktop. The these instructions for future reference. hot air from an oven vent may ignite flammable items and may increase pressure in closed The installation must conform with local or, in the containers, which may cause them to burst. -
Page 6: Wear Suitable Clothing
Flammable materials should not be stored in an oven, or near This appliance contains or produces a chemical or chemicals the cooktop burners. This includes paper, plastic and cloth which can cause death or serious illness and which are known items, such as cookbooks, plasticware and towels, as well as to the state of California to cause cancer, birth defects or flammable liquids. -
Page 7: User Servicing
User Servicing Ovens Take care when opening the door. Do not repair or replace any part of the appliance unless specifically recommended in the manual. All other servicing Let hot air and steam escape before removing or should be referred to a qualified technician. replacing food. - Page 8 This appliance should not be installed with any When cooking foods with high water content (e.g. oven fries) ventilation system that blows air downward toward there may be some steam visible at the rear grille. the gas cooking appliance. This type of ventilation Take care when opening the oven door, as there may be a system may cause ignition and combustion momentary puff of steam when the oven door is opened.
-
Page 9: Range Overview
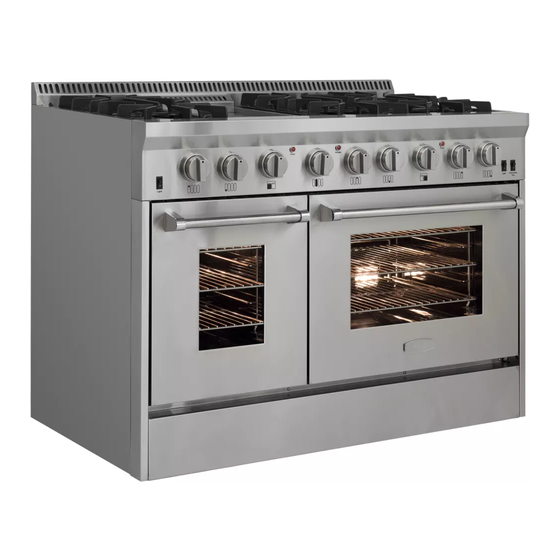
2. Range Overview DocUS.025-0008 - Overview DF_Hyxion48 Fig. 2.1 ArtNo.270-0029 - Prof+ 90SC annotated The 48” gas range (Fig. 2.1) has the following features: Fig. 2.2 6 sealed gas burners Griddle and Lid Continuous cast iron grates Control panel 30” convection oven 18”... -
Page 10: Griddle
Adjust the flame height to suit by turning the knob counter- Fig. 2.3 clockwise (Fig. 2.3). On this range the low position is beyond high, NOT between high and off. The ‘LO’ marks the low position. This setting is ideal for simmering. If a burner flame goes out, the burner will detect this, and automatically relight. -
Page 11: The Ovens
The Ovens Fig. 2.10 Both ovens are gas ovens. References to ‘conventional’ and ‘convection’ ovens apply as viewed from the front of the appliance. Before using the ovens for the first time, to dispel manufacturing odors, heat them to their highest temperature and run for 30 minutes. - Page 12 The Gas Ovens Fig. 2.13 Do not drop or rest objects on the door glass. Although the glass is very strong, a sharp blow or a sharp falling object might cause the glass surface to crack or break. Use all oven modes with the oven door closed. ...
-
Page 13: Oven Light
Accessories Fig. 2.15 The range is supplied with the following: 1 griddle pan lid (Fig. 2.15) 3 18” flat racks (Fig. 2.16) 3 30” flat racks (Fig. 2.17) 2 sets of ladder rack supports (Fig. 2.18) 1 broiler pan with grid (Fig. 2.19) Fig. -
Page 14: Cooking Tips
3. Cooking Tips When the oven is on, don’t leave the door open for longer The wire shelves should always be pushed firmly to the back than necessary, otherwise the knobs may get very hot. of the oven. Do not block the vents at the rear of the range when •... -
Page 15: Cooking Table
4. Cooking Table The oven control settings and cooking times given in the table below are intended to be used AS A GUIDE ONLY. Individual tastes may require the temperature to be altered to provide a preferred result. Food is cooked at lower temperature in a convection oven than in a conventional oven. When using ArtNo.050-0019 - Albertine SC - Shelf position recipes, reduce the convection oven temperature by 25°F (10 °C) and the cooking time by 5-10 minutes. -
Page 16: Cleaning Your Range
5. Cleaning Your Range Essential Information Fig. 5.1 Before thorough cleaning, turn off the circuit breaker. Allow Burner Cap Burner Cap the range to cool. After cleaning, remember to switch on the circuit breaker before re-using the range. Inner Outer Burner Base Burner Head Never use paint solvents, caustic cleaners, biological... -
Page 17: Griddle
Stainless Steel Main Top Fig. 5.3 Lift away pots or pans from main top. Remove grates from spillage area and carefully place in a sink of warm soapy water. Wipe loose debris from main top. Avoid using any abrasive cleaners including cream cleaners on brushed stainless steel surfaces. -
Page 18: Troubleshooting
6. Troubleshooting Cooktop ignition or hotplate burners faulty Food is cooking too slowly, too quickly, or burning Is the power on? If not, there maybe something wrong Cooking times may differ from your previous oven. with the power supply. Check that you are using the recommended Are the sparker (ignition electrode) or burner slots temperatures and shelf positions –... - Page 19 An oven light is not working Fig. 6.1 The bulb has probably burnt out. You can buy a replacement bulb (which is not covered under the warranty) from a good electrical shop. Turn off the power at the circuit breaker. Before removing the existing bulb, turn off the power supply and make sure that the oven is cool.
-
Page 20: Installation
INSTALLATION Check the appliance is electrically safe and gas sound when you have finished. 7. Installation Regulations can withstand 80 °C (180 °F) without shrinking, warping or discoloring. Do not install the range over carpeting Installation of this range must conform with local codes, or in unless a sheet of ¼’’... -
Page 21: Positioning The Range
INSTALLATION Check the appliance is electrically safe when you have finished. Positioning the Range Fig. 7-1 Fig. 7-1 shows the minimum recommended distances and clearances from the range to nearby surfaces. You MUST provide adequate clearances between the range Min 30” (76.2 cm) / Max 36” (91.4 cm) between the cooktop and adjacent combustible surfaces. -
Page 22: Gas Connection
INSTALLATION Check the appliance is electrically safe and gas sound when you have finished. Gas Connection Because hard piping restricts movement of the range, the use of a CSA International-certified flexible metal appliance Installation of this range must conform with local codes or, in connector is recommended unless local codes require a hard- the absence of local codes, with the National Fuel Gas Code, piped connection. -
Page 23: Electrical Connection
INSTALLATION Check the appliance is electrically safe when you have finished. Electrical Connection Fig. 8-1 When installed the range must be electrically grounded in accordance with local codes or; in the absence of local codes with the National Electrical Code ANSI/NFPA 70, latest edition. In Canada the range must be installed in accordance with the current CSA Standard C22.1 –... -
Page 24: Range Operational Checks
INSTALLATION Check the appliance is electrically safe and gas sound when you have finished. Range operational checks Oven Light Press the oven light switches and check that the lights are working. Note: The oven light bulbs are not included in the warranty. Check Ignition of Cooktop Burners Operation of all cooktop burners should be checked after the range and gas supply lines have been carefully checked for... -
Page 25: To Fit And Remove The Oven Shelf
INSTALLATION Check the appliance is electrically safe and gas sound when you have finished. DocAUS.020-0004 - Overview - 110DF - Elan To Fit and Remove the Oven Shelf To fit the oven shelf To remove the oven shelf... -
Page 26: Conversion To Another Gas
CONVERSION Check the appliance is electrically safe and gas sound when you have finished. 8. Conversion to Another Gas Important! Fig. 8.1 • Observe all governing codes and ordinances. Burner Cap Burner Cap • The range must be properly grounded. •... -
Page 27: Valve Adjustment
CONVERSION Check the appliance is electrically safe and gas sound when you have finished. Valve Adjustment Fig. 8.3 Disconnect from the electricity supply. Pull off all the control knobs. And remove the bezels. Oven Griddle Oven Open the oven doors and remove the 4 fixing screws underneath the control panel (Fig. -
Page 28: Pressure Testing
CONVERSION Check the appliance is electrically safe and gas sound when you have finished. Pressure Testing Fig. 8.8 Connect the appliance to the gas supply. Check the appliance is gas sound. The gas pressure can be measured at the pressure test point on the appliance at the right hand, front, cooktop burner. -
Page 29: Circuit Diagram
9. Circuit Diagram 18” bake safety valve... - Page 30 Notes...
- Page 31 Notes...
- Page 32 AGA Marvel 1260 E. VanDeinse St. Greenville, MI 48838 Business (616) 754-5601 Fax (616) 754-9690 Toll Free Telephone 800-223-3900 www.aga-ranges.com...
Need help?
Do you have a question about the APRO48AGSS and is the answer not in the manual?
Questions and answers